6 Best Accounting Practice Management Software in 2026!
Managing an accounting or bookkeeping firm requires a lot of effort.
You must manage projects, tasks, clients, teams, and payments. At times, clients would even want to book meetings with you.
But while you do all this, the business must keep moving forward because the competition is tough.
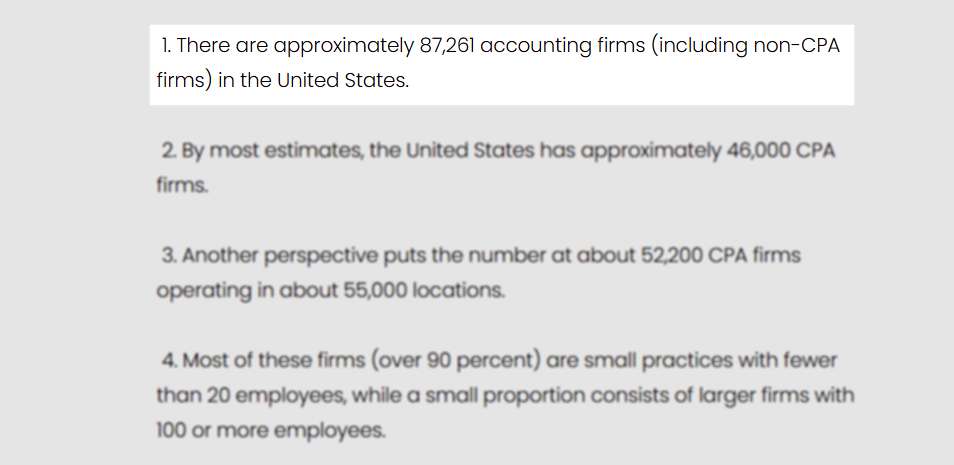
A recent study found that there are about 87,261 accounting firms in the US.
If you want to keep up with your competitors, you must use good accounting practice management software. This will save you time and help you move faster.
I spent the last 12 days testing over 11 tools, and today I am ready to share my six best accounting practice management software picks.
I will discuss their most interesting features, show what I love about each tool, and what I struggle with.
Keep reading!
Side-to-side comparison: Best accounting practice management software
| Accounting Software | Features | Ease of use | Personal rating | Starting price | Best for |
|---|---|---|---|---|---|
| Zencal |
|
Very easy | 4.5/5 stars | From $4/monthly, billed annually | Zencal is best for individual accountants, bookkeepers, and small businesses seeking to manage their daily accounting tasks, like scheduling and client projects easily. |
| Jetpack Workflow |
|
Easy | 4/5 stars | $30/user/month, billed annually | Small and medium bookkeeping firms seeking software to create accounting workflows and manage projects. |
| Ignition |
|
Easy | 4/5 stars | $39/month | Mid-sized agencies and accountants seeking software to centralize billing, invoicing and manage payments. |
| Financial Cents |
|
Easy | 4/5 stars | $19/user/month, billed annually | Small to mid-sized accounting firms seeking to manage tasks and track client work. |
| Xero |
|
Moderate | 4/5 stars | $29/month | Sole traders and small businesses seeking a system to manage finances, invoicing and bank reconciliations. |
| Teamwork |
|
Easy | 4/5 stars | $19.99/user/month, billed annually | Large firms seeking to manage huge resources and complex projects using automation. |
1. Zencal
| Personal rating: 4.5/5 stars | With Zencal, it is so easy to set up booking pages. It's also simple to manage clients and receive payments. |
The first accounting practice management software on this list is Zencal.
I strongly recommend Zencal to individual accountants and small businesses who want to manage their daily accounting tasks and client projects easily.
Now let's see how you can use Zencal.
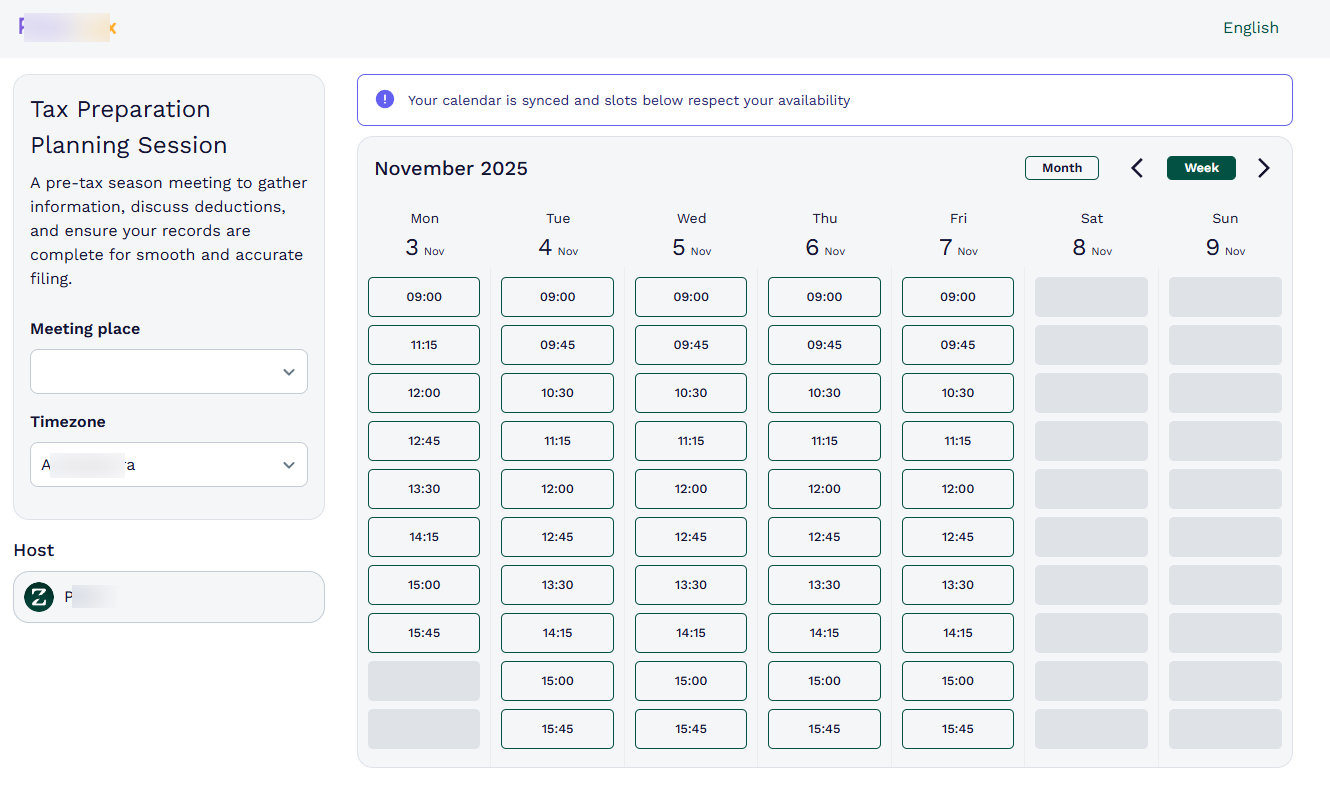
In just a few minutes, you can have a professional booking page. This is an easy way for consultants or coaches to let their clients book meetings.
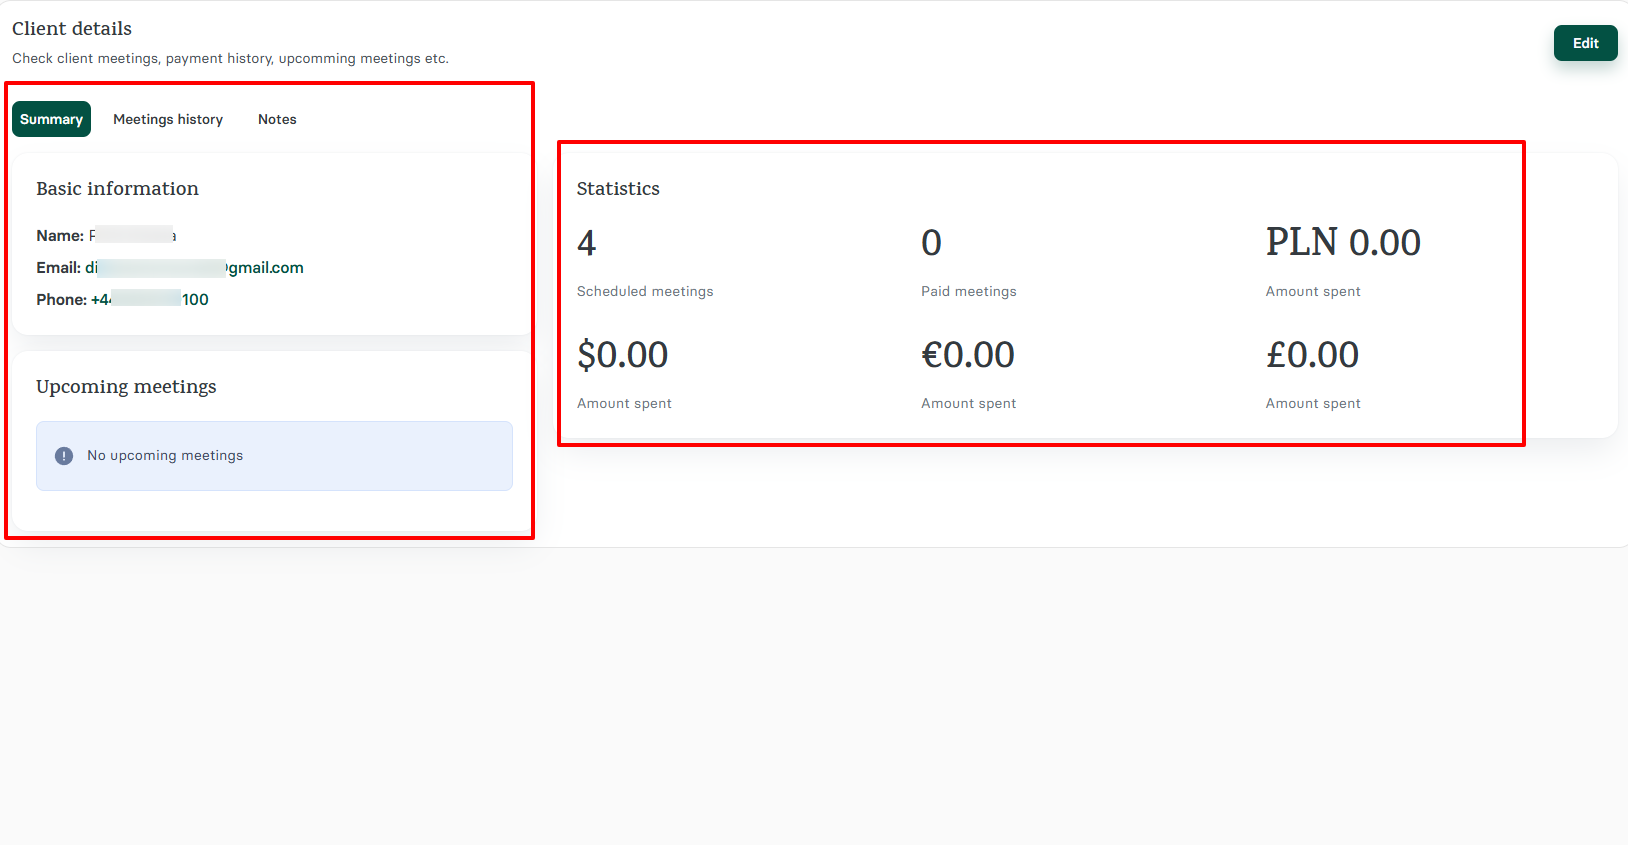
Aside from that, you can access your client's data. This includes their meeting history and upcoming meetings.
And don't worry. If you offer paid meetings, you will see the amount your clients spend.
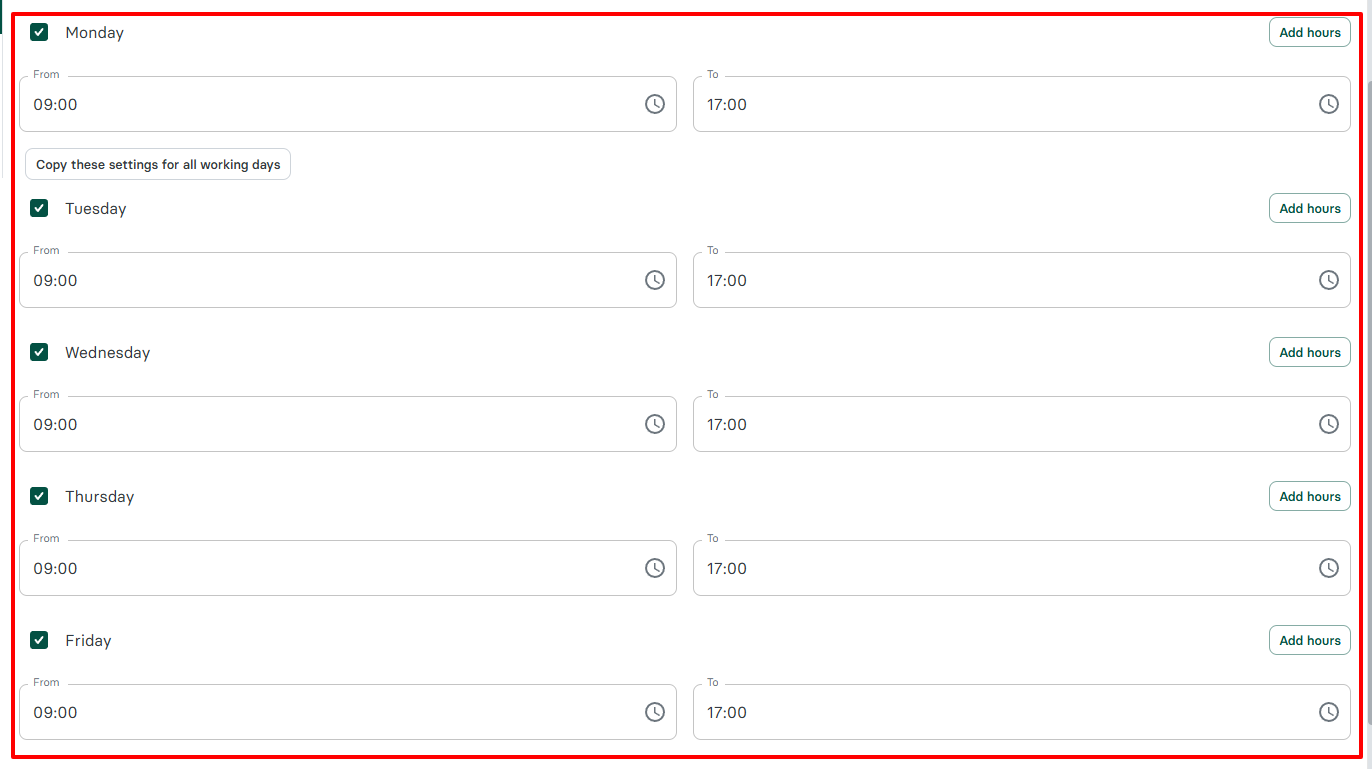
You may not be available all the time. That's why you must customize your availability by simply setting your working days and hours.
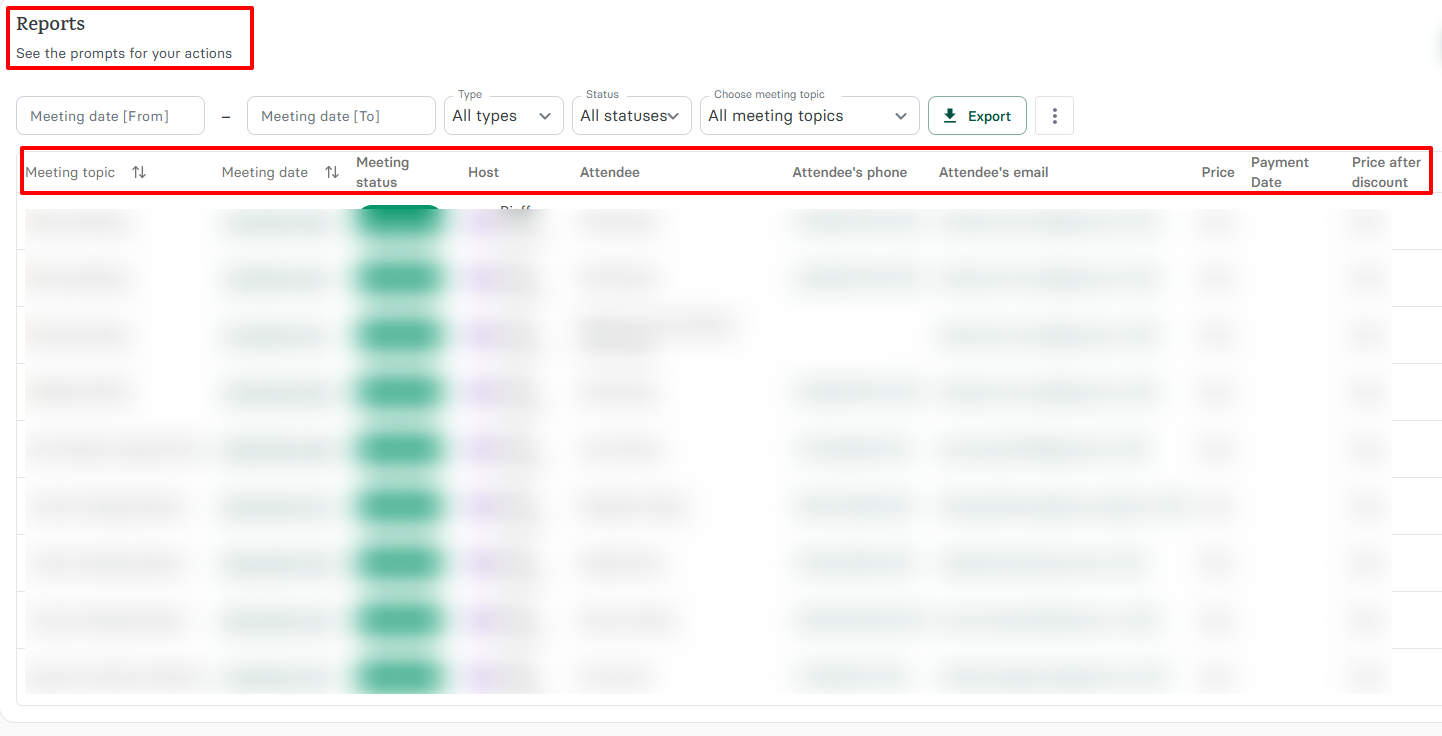
But I won't forget the Reports feature. It gives you a summary of all your meetings with details like the meeting name, date, status, host, and attendees.
What I like most is how detailed the information it displays is. You have each attendee's phone number, email, and payment details with the exact payment date.
For business owners and teams running paid sessions, this feature helps you track your revenue and do follow-ups.
What I loved about Zencal
1. Booking pages
As an accountant or bookkeeper, you may want clients to schedule consultations or meetings with you based on your real-time availability.
With Zencal, you can create an amazing booking page, then share the link with them, saving hours of back-and-forth communication.
Let me walk you through how to create one.
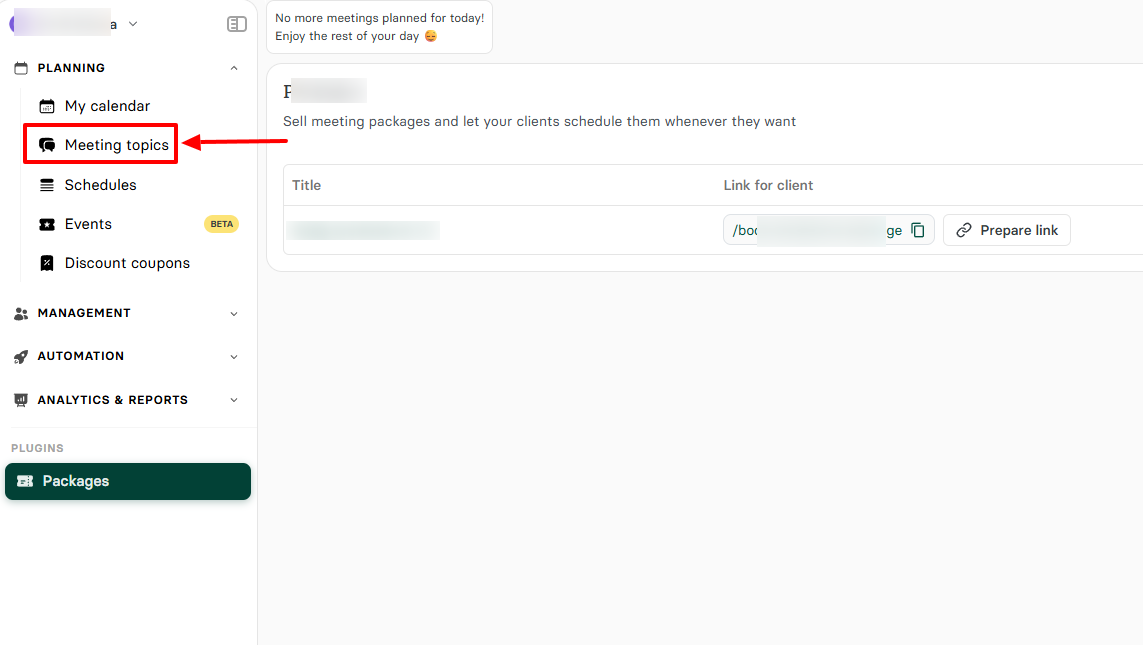
After you sign up, head to Meeting topics.
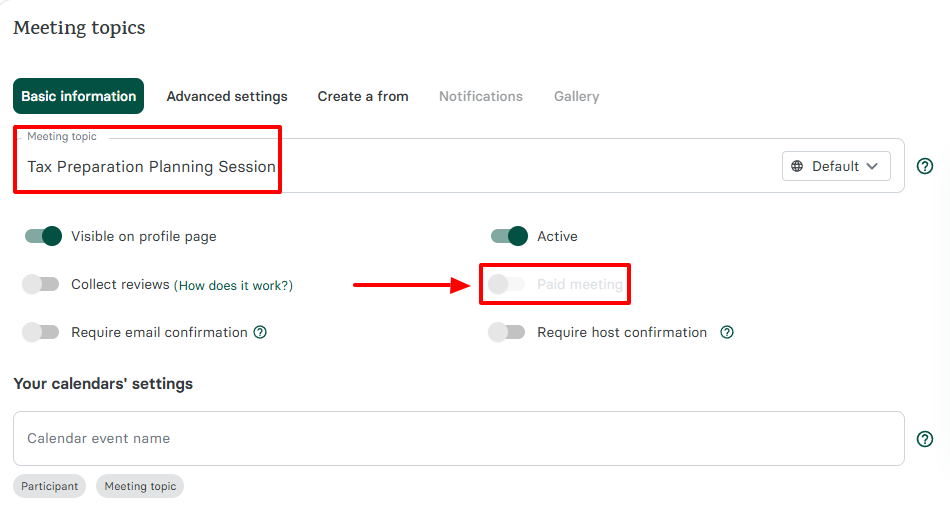
Enter your meeting topic, bearing in mind this is what clients will see on the booking page.
And if the meeting isn't free, you can turn on the paid meeting option. This way, you will collect payment during the booking process.
You may have a physical location, or perhaps prefer meeting online.
Whatever the case may be, specify it: if online, choose a video conferencing app like Google Meet or Zoom. If it is in-person, then enter a meeting place.

Let's move on with a few settings.
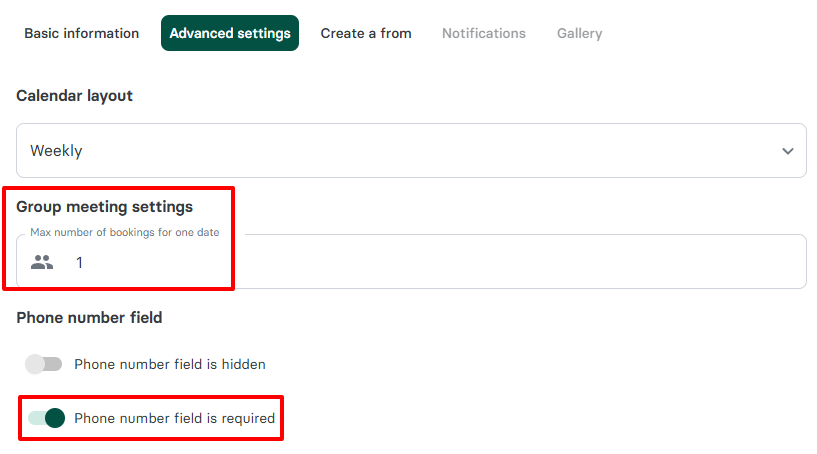
Zencal lets you specify the maximum number of bookings for one date.
That's not all! You can turn on the "Phone number field" if you want bookers to add it when booking.
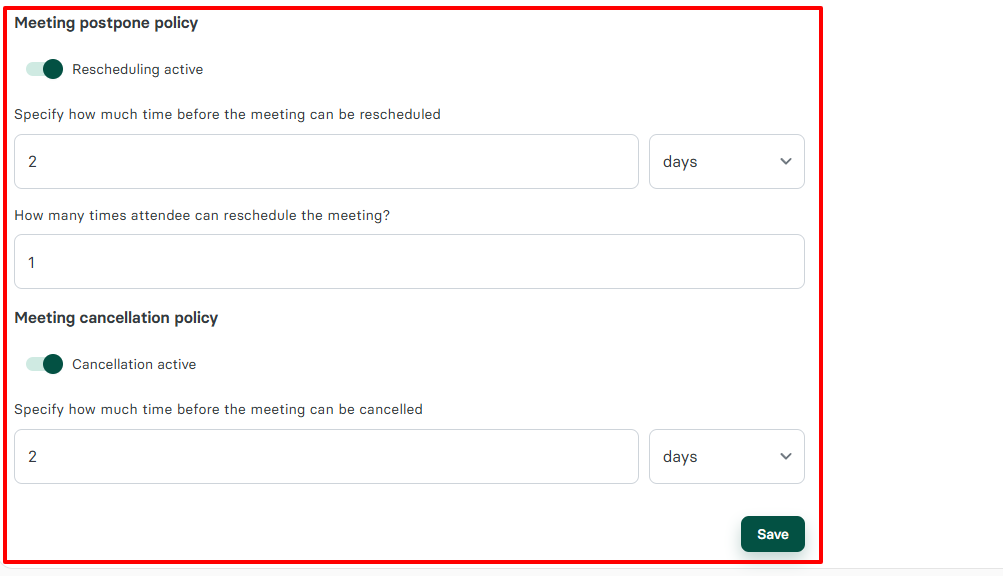
There is another setting I want to share with you: the meeting postponement and cancellation policy.
This is very important because clients may schedule meetings but then never show up. To avoid that, you need to allow them to reschedule or cancel.
This is what this feature lets you do. You can specify how much before the meeting can be rescheduled or cancelled.
Not just that! You can also specify how many times attendees can reschedule a meeting. It's all in your hands!
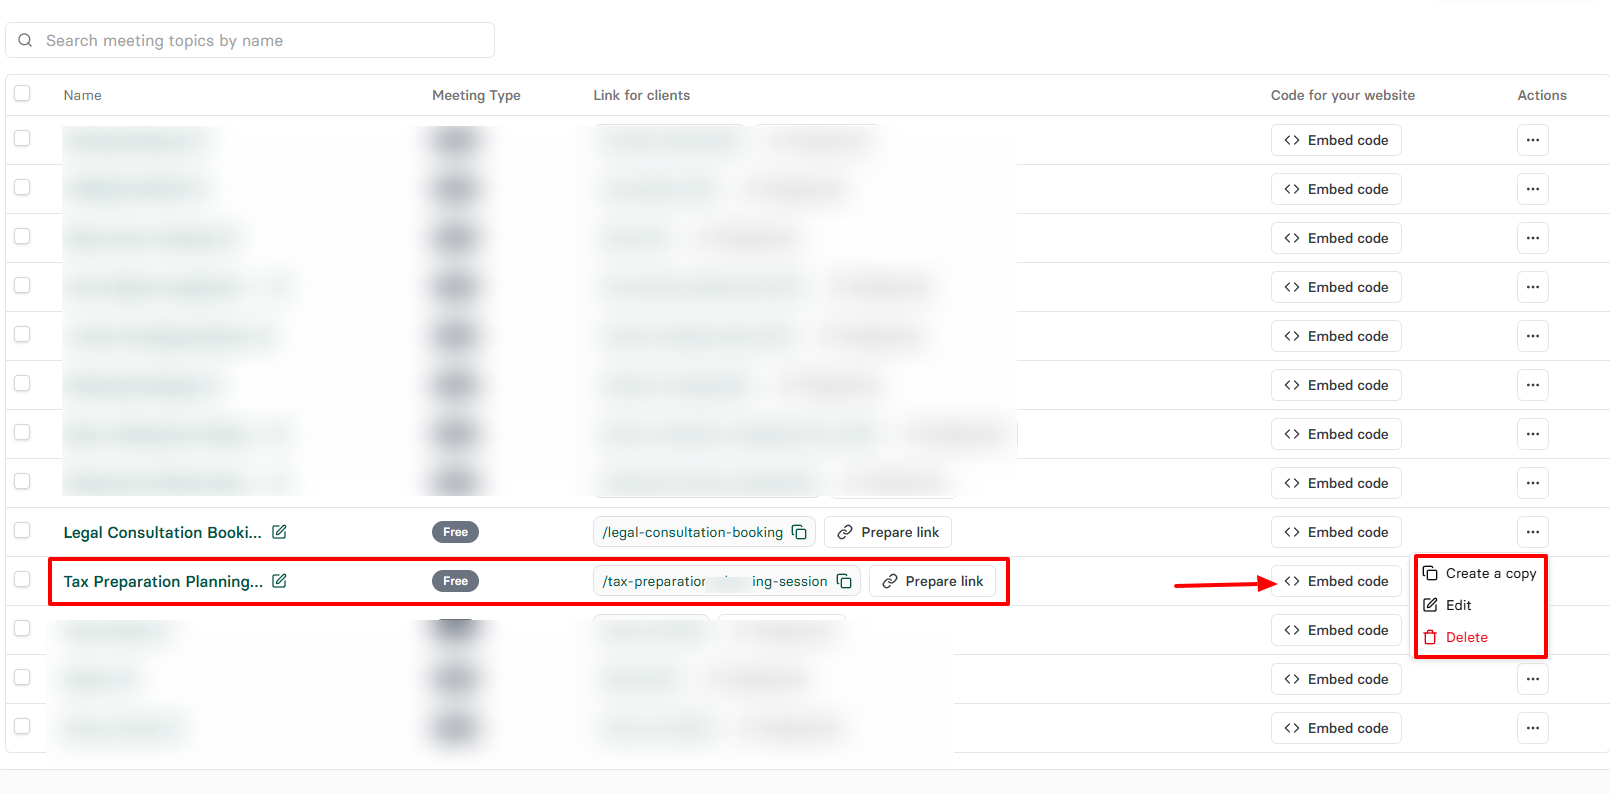
The booking link is ready. You can copy or embed the link or share it with your clients. You can also create a copy of the booking link, edit it, or delete it.
This is an example of what the booking page will look like.
Zencal really stands out as one of the best tools for scheduling meetings with your clients or team members.
2. Client management
It's important that an accounting practice management software can organize client information, track their payments, and know their past & upcoming meetings. Zencal lets you do all that and even more.
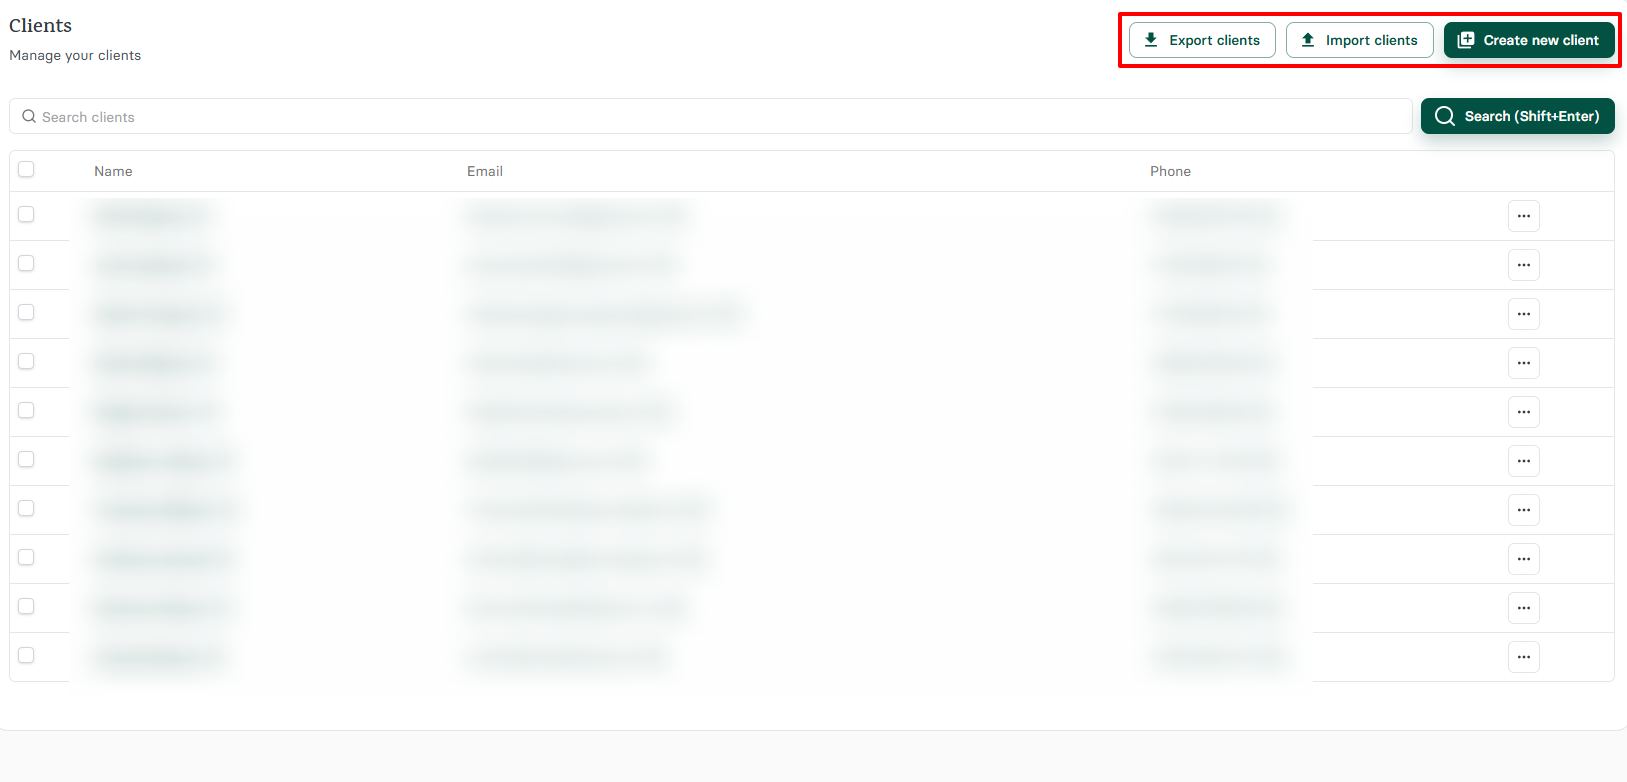
You can easily locate the "Clients" feature under the Management section in the sidebar menu.

The platform gives you three options: you can export clients, import or add them.
If, for example, you want to add a client, you don't have much to do. Simply enter their first & last name, email address, and phone number. Then you choose a timezone and language.
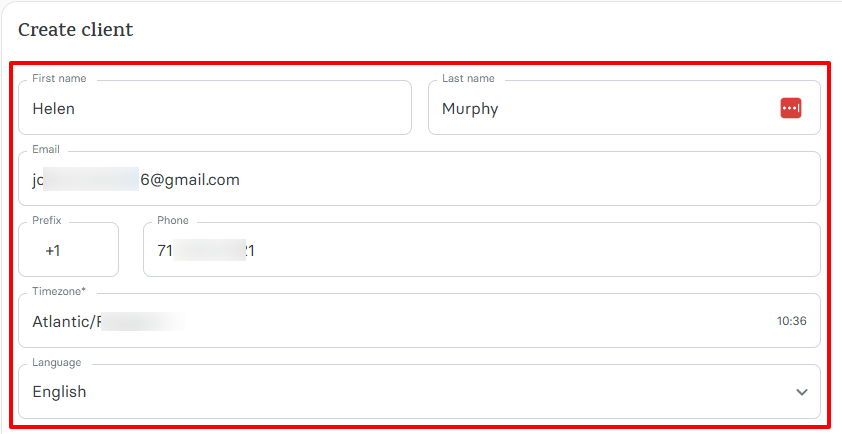
In case you want to update clients' information or delete them, you can do that by clicking the three-dot menu.

And you can go further. By clicking on a client's name, you can access more information, such as their meeting history and upcoming meetings.
And if you offer paid meetings, you can see the amount they spend.
What I Loved and What I Struggled With
|
What I Loved ✔ Has a simple interface where you can find all the features on the left. ✔ Its low-priced plans include premium features like payments, client management, and calendar integrations that other tools charge extra for. ✔ Allows you to send alerts using Webhooks so clients never forget their meetings. ✔ Integrates with popular tools like Stripe, PayPal, Google Calendar, Outlook, Zoom, Teams, Google Meet, and Xero. |
What I Struggled With ✘ Doesn't offer a built-in payment system, but you can connect to Xero, Stripe, or PayPal for payments. |
Best for
- Zencal is best for individual accountants, bookkeepers, and small businesses seeking to manage their daily accounting tasks, like scheduling and client projects easily.
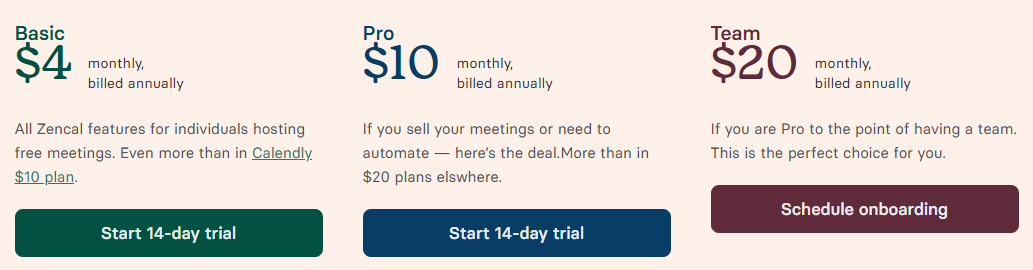
Pricing
- Basic: $4/monthly, billed annually
- Pro: $10/monthly, billed annually
- Team: $20/monthly, billed annually
2. Jetpack Workflow
| Personal rating: 4/5 stars | It's interesting how I can create templates that can be used over and over. Jetpack Workflow also lets you create and monitor projects with ease. |
We continue this list with the next best accounting practice management software, Jetpack Workflow.
I recommend it to small and medium-sized bookkeeping firms that want to create accounting workflows and monitor projects.
It's so simple to create a template with this feature.
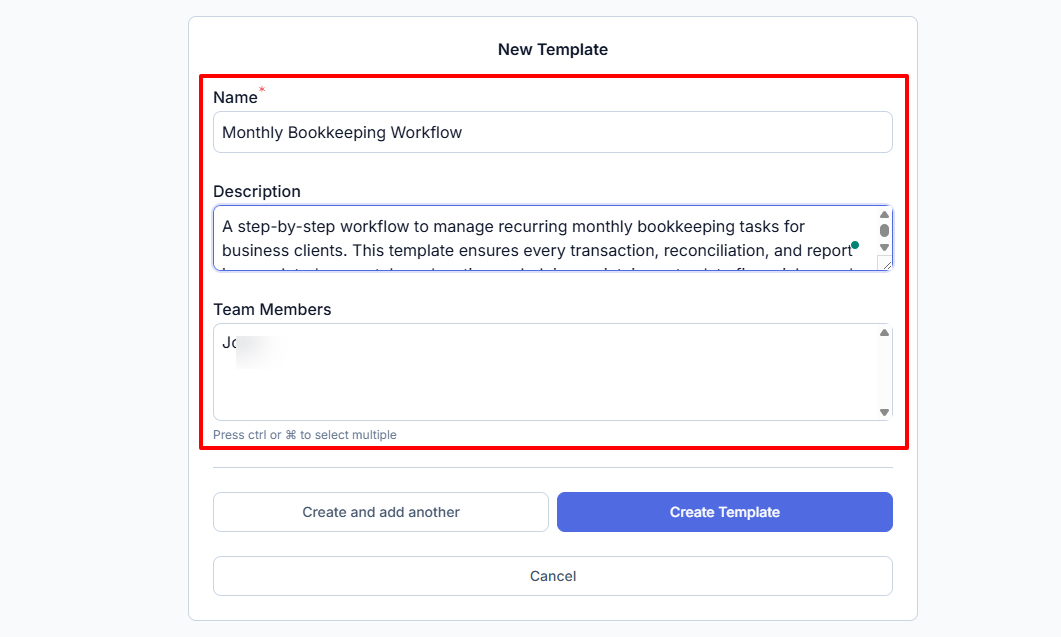
The process is simple: I name the template, add a description, choose a team member, and add my preferred tasks in that template.
My favorite part is that once it's set up, you can reuse it anytime. You won't need to rebuild the template all over again. Marketing teams can use this to create multiple campaign templates, while project managers can reuse task lists for client onboarding.
Now, for projects, the process is not really different from that of templates. I also name it first, add a description, and a team member.
Now here's where it changes: I can set a due date and select the project status.
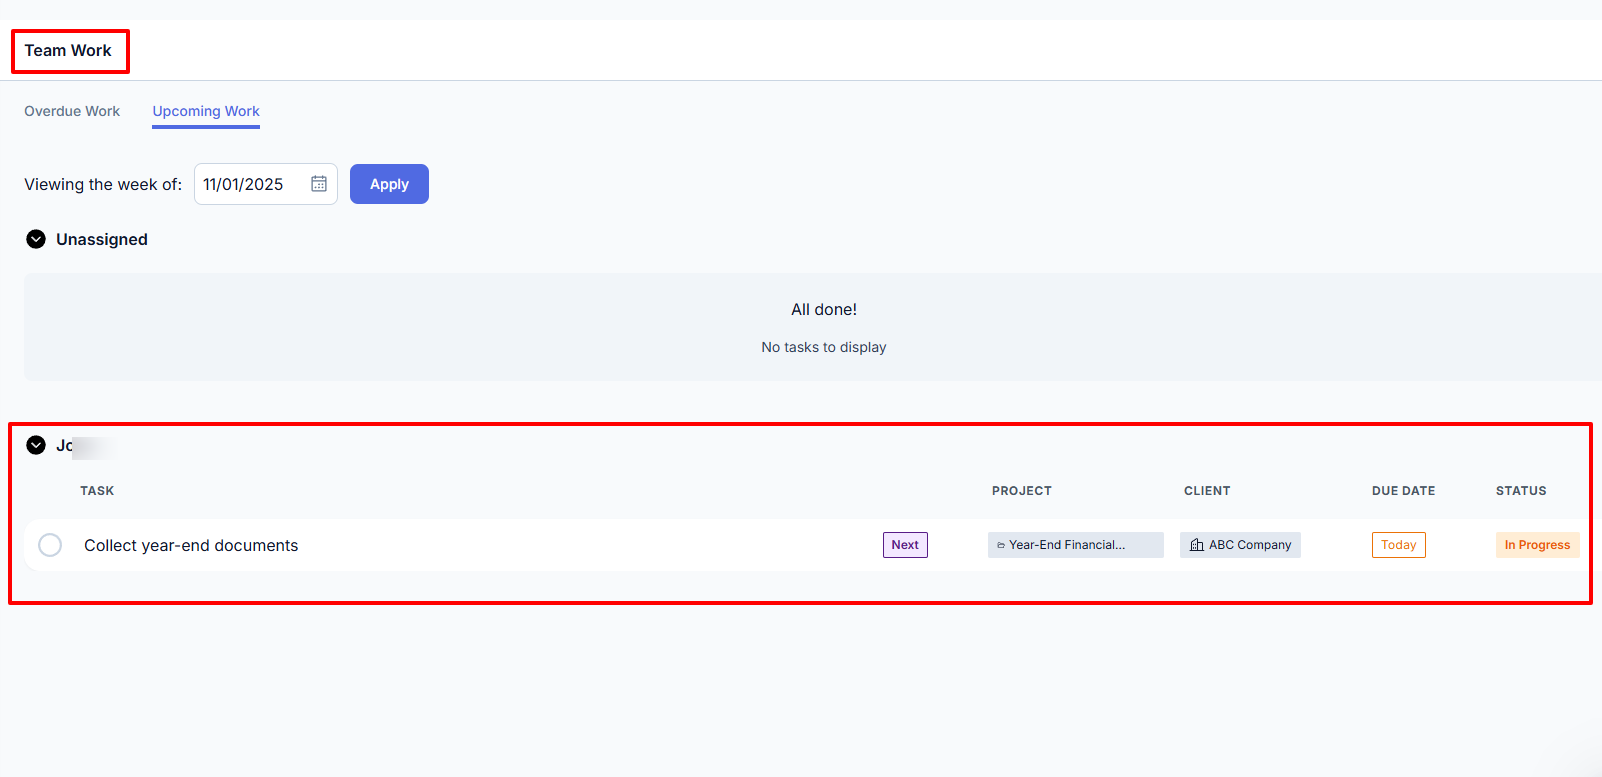
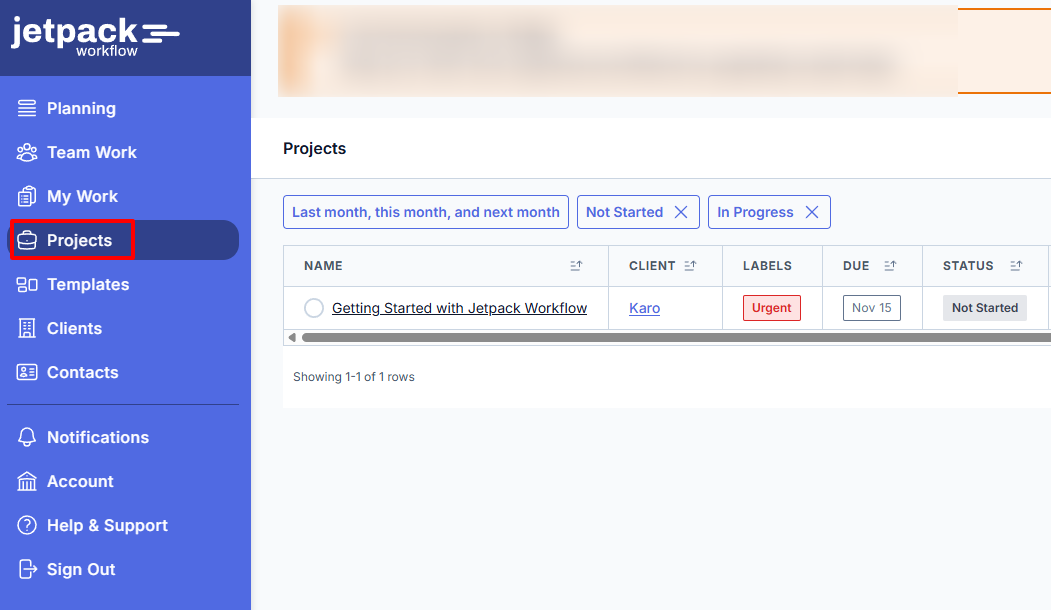
Jetpack Workflow has a teamwork interface where you can see each task, the project it belongs to, the client's name, due date, and current status. I like how it highlights both overdue and upcoming work.
An accounting team managing monthly reports can use this to track who's handling which client and the next task due.
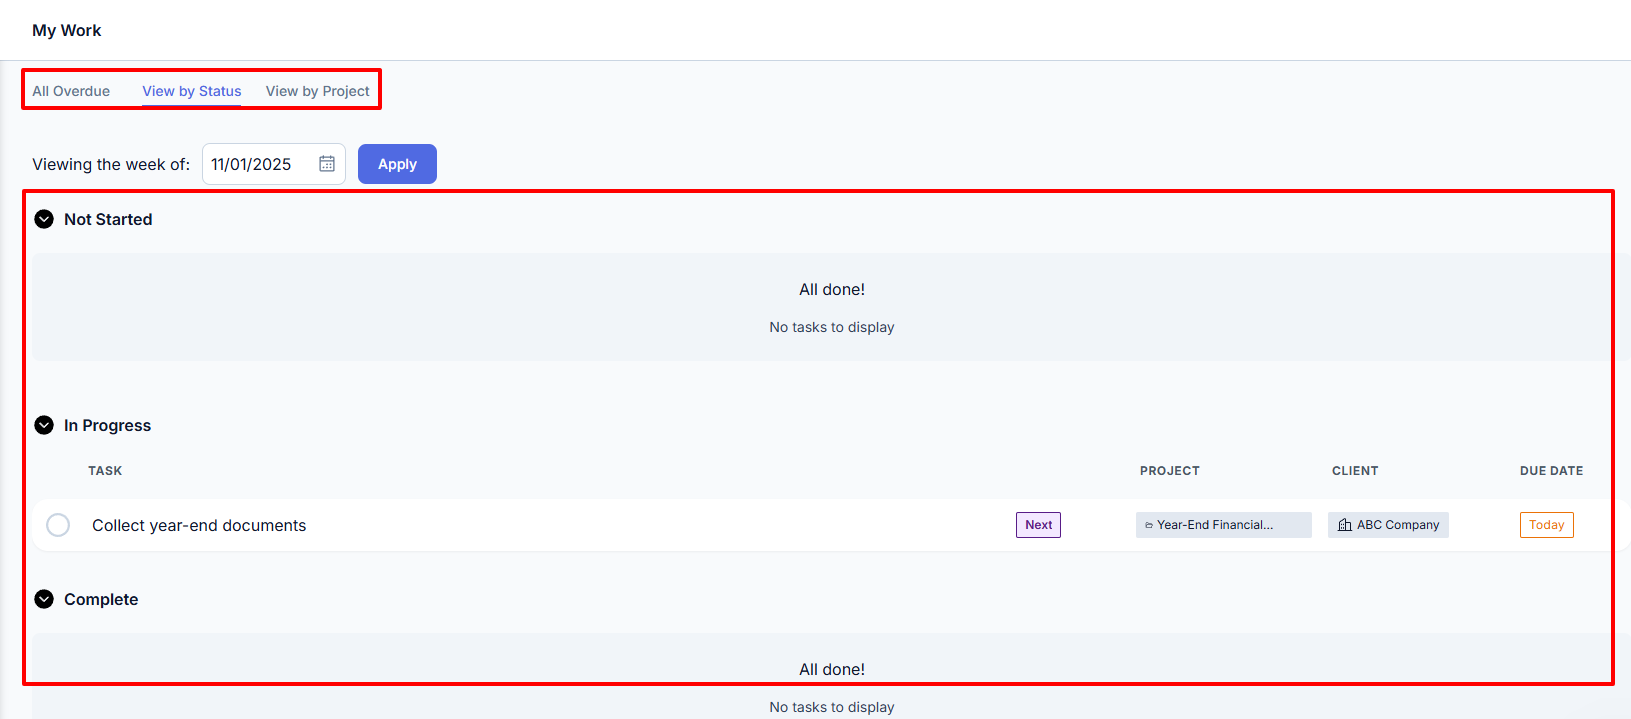
But the platform doesn't just have the "Team Work" interface. It also displays my work with all my overdue tasks. I can view the ones that I started, those in progress, and the ones that are complete.
What I loved about Jetpack Workflow
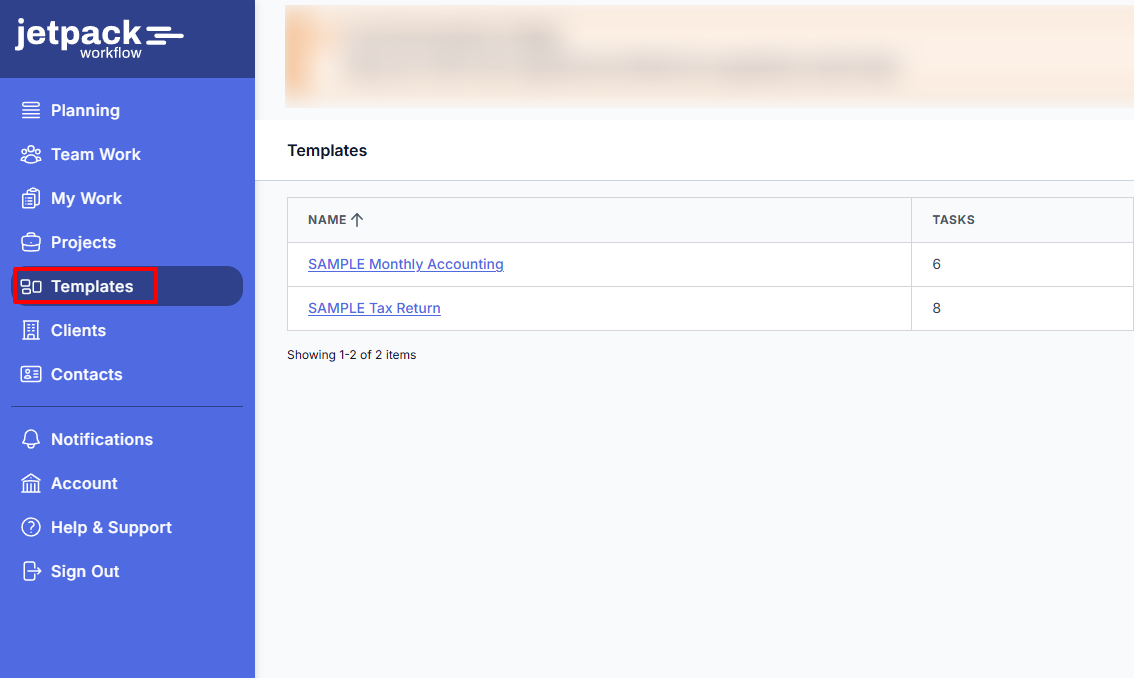
1. Templates
If you are familiar with accounting practice management software, then you know how exhausting it can be to always create projects for clients.
One project for a client would mean hundreds of projects for hundreds of clients.
That's why Jetpack came up with the Templates feature. You create one and can reuse it later without creating a new project.
Let's try that out.
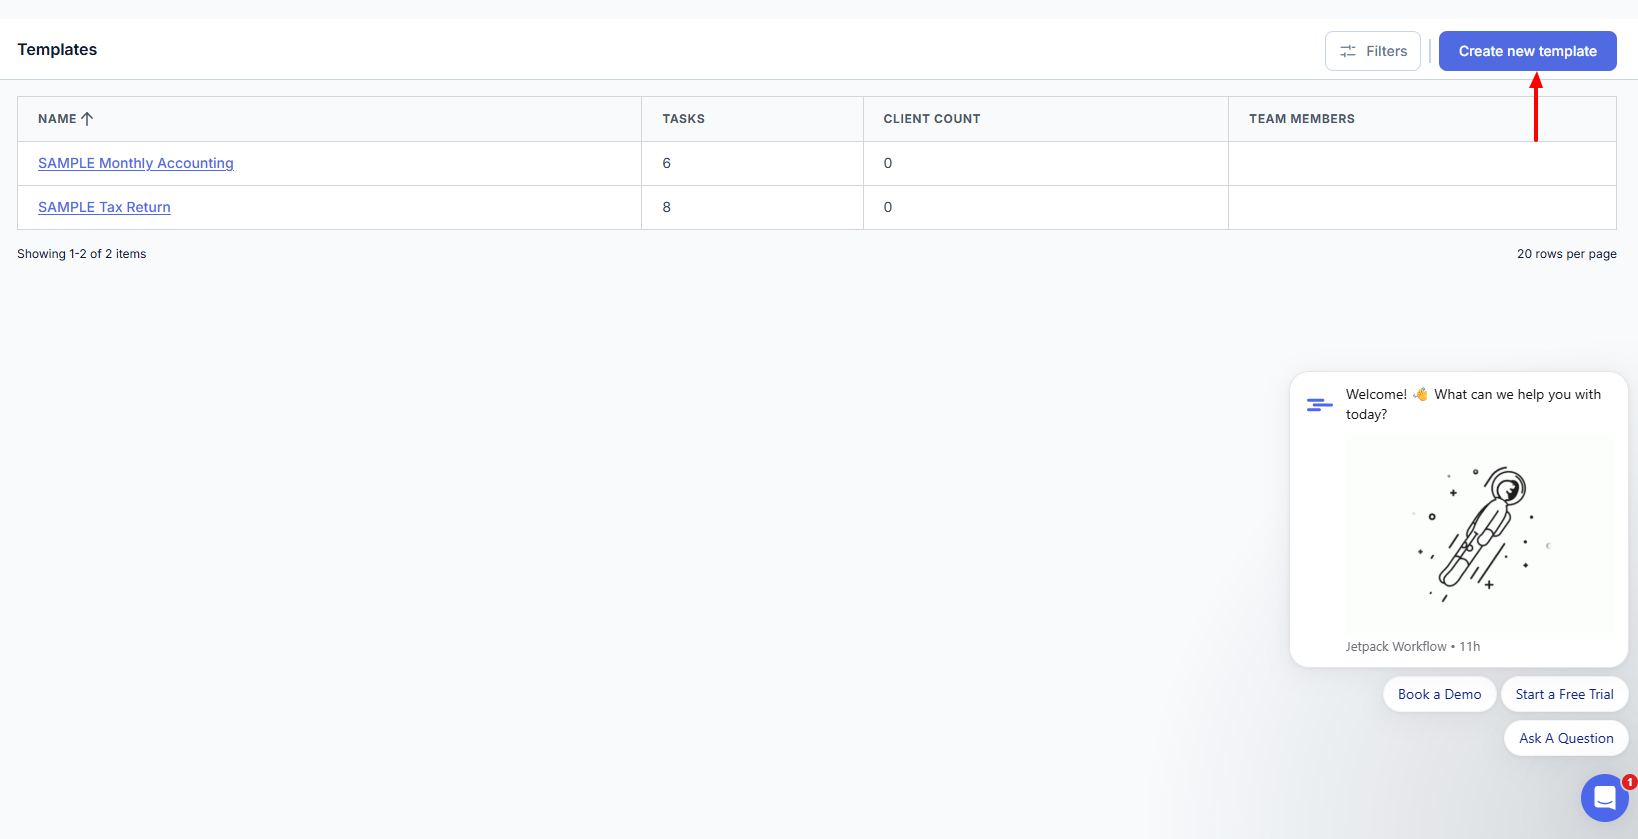
On the far right, click "Create new template".
I will give my template a clear name, add a description, and choose team members.
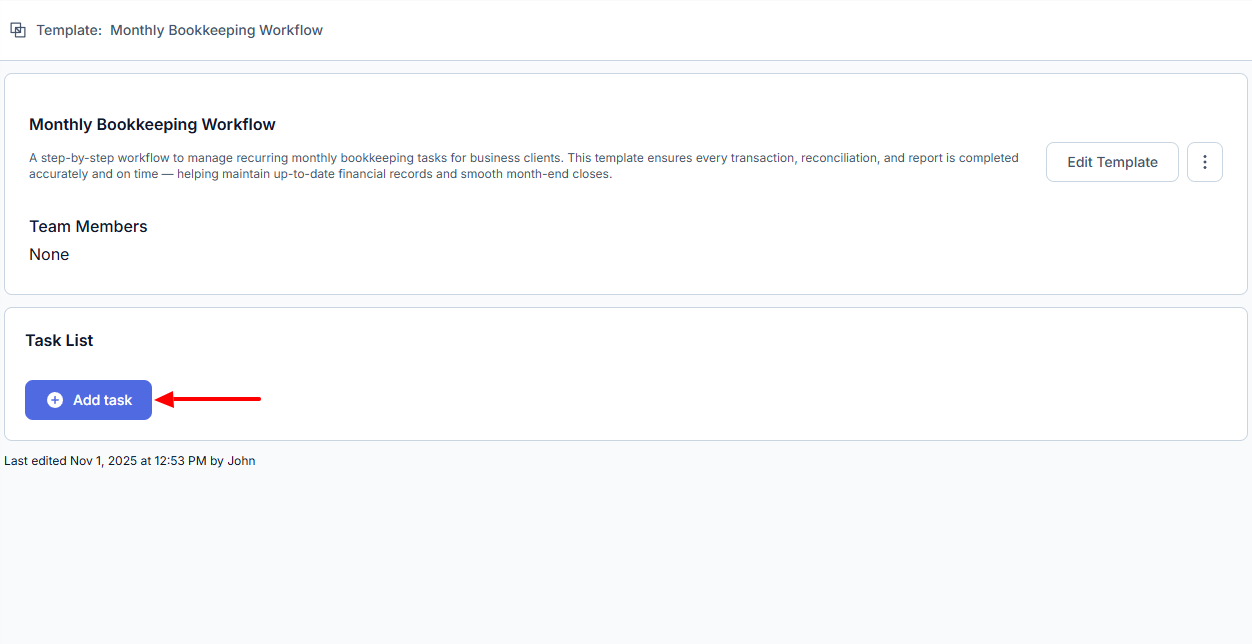
Now that the template is created, I can add tasks to it.
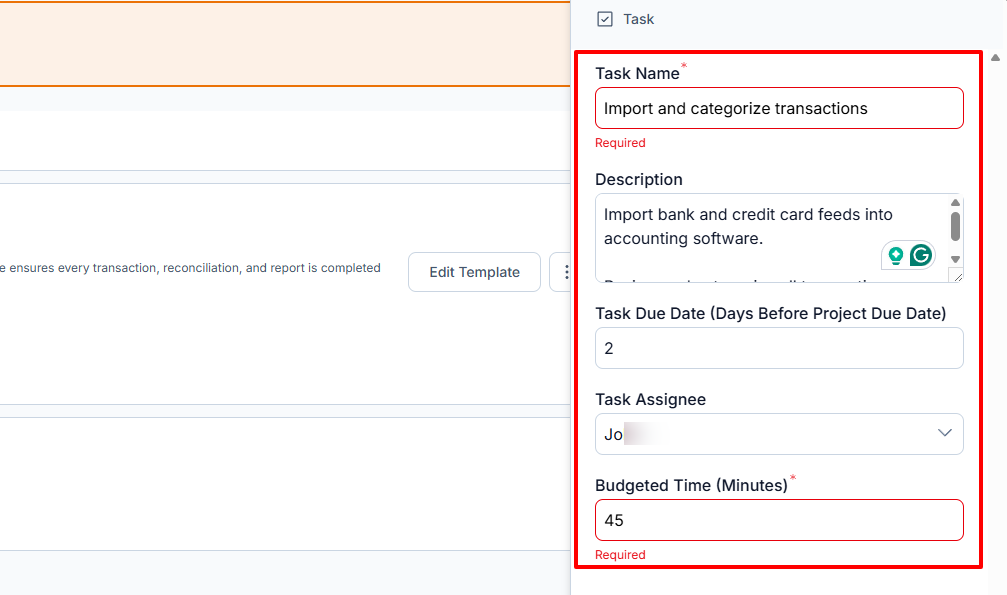
I will name the task, add my descriptions, and specify the due date. I can then select my task assignee and specify the budgeted time in minutes.
That's it! My Template is ready.
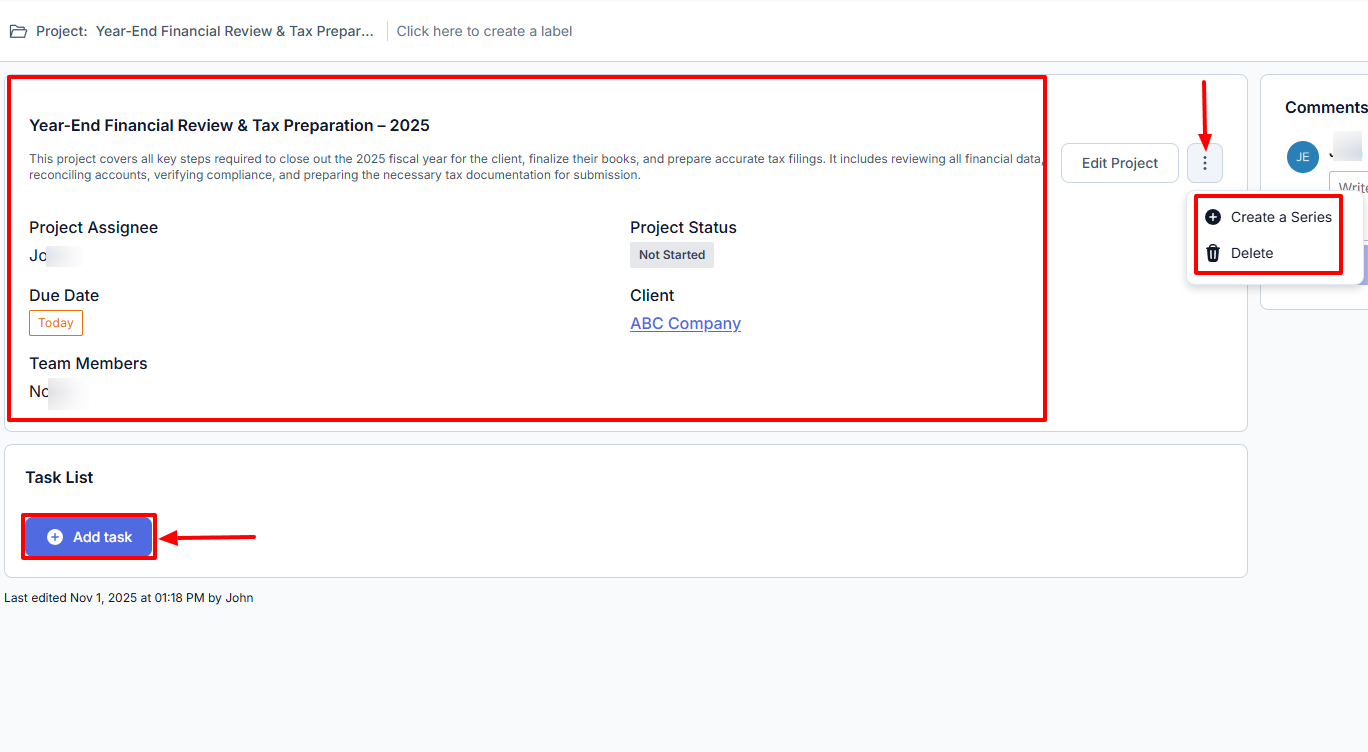
2. Projects
One thing about the Projects feature is that it helps accountants organize client work into clear tasks. You will be able to set deadlines and monitor progress.
Now, let's use Jetpack to create a project.
This is what I will do: I'll name the project, add a description, choose a client, and a project assignee. Then I will select a team member and a due date.
I loved that I could specify if the project was a repeating one or a one-off.
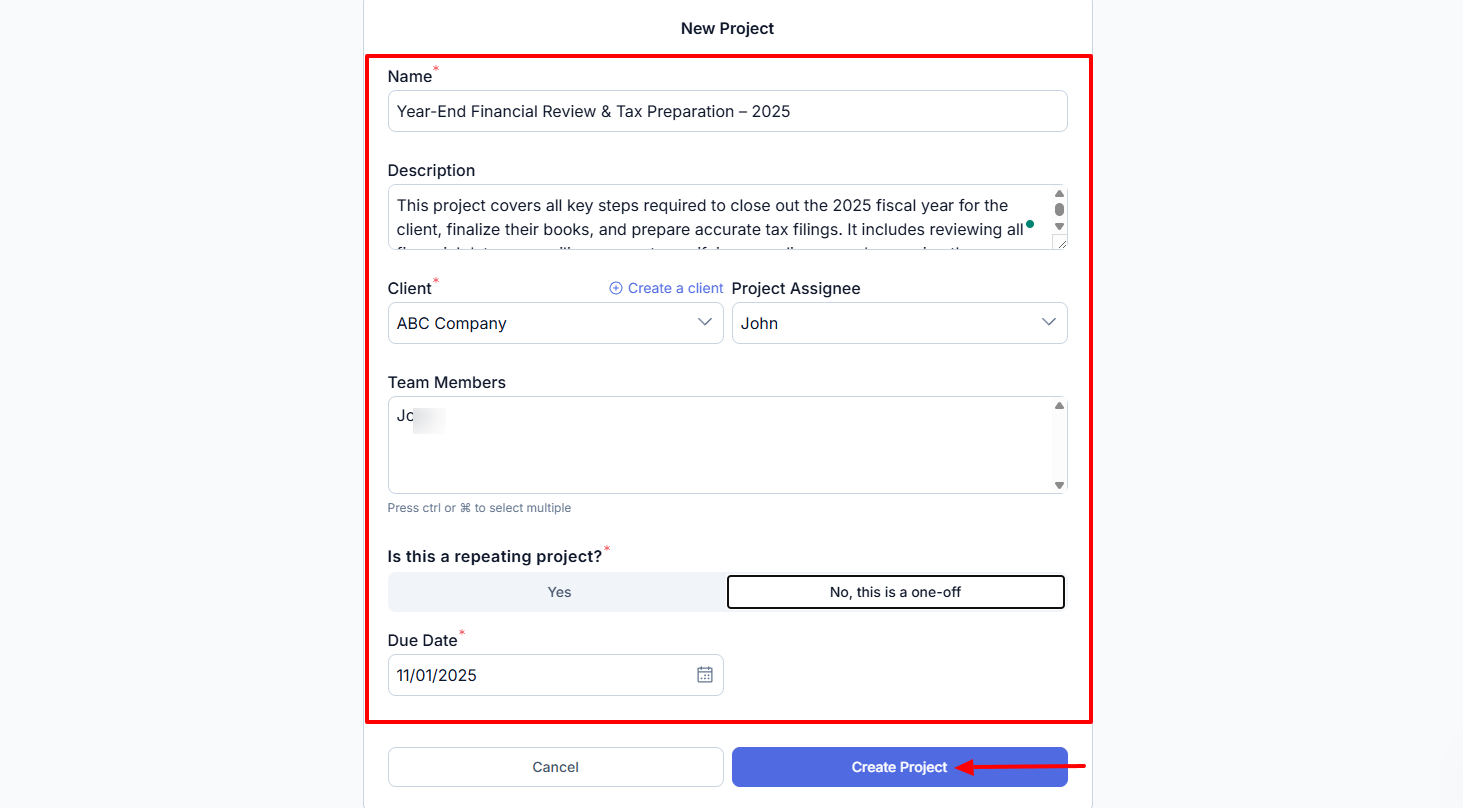
There you go, the project is ready. The three-dot menu on the right lets you create a series or simply delete the project.
But we will add tasks below.
We will start with the task name, description, due date, assignee, and budgeted time.

Upon creating the task, I could quickly set its status to "Not started", "In Progress", or "Complete".
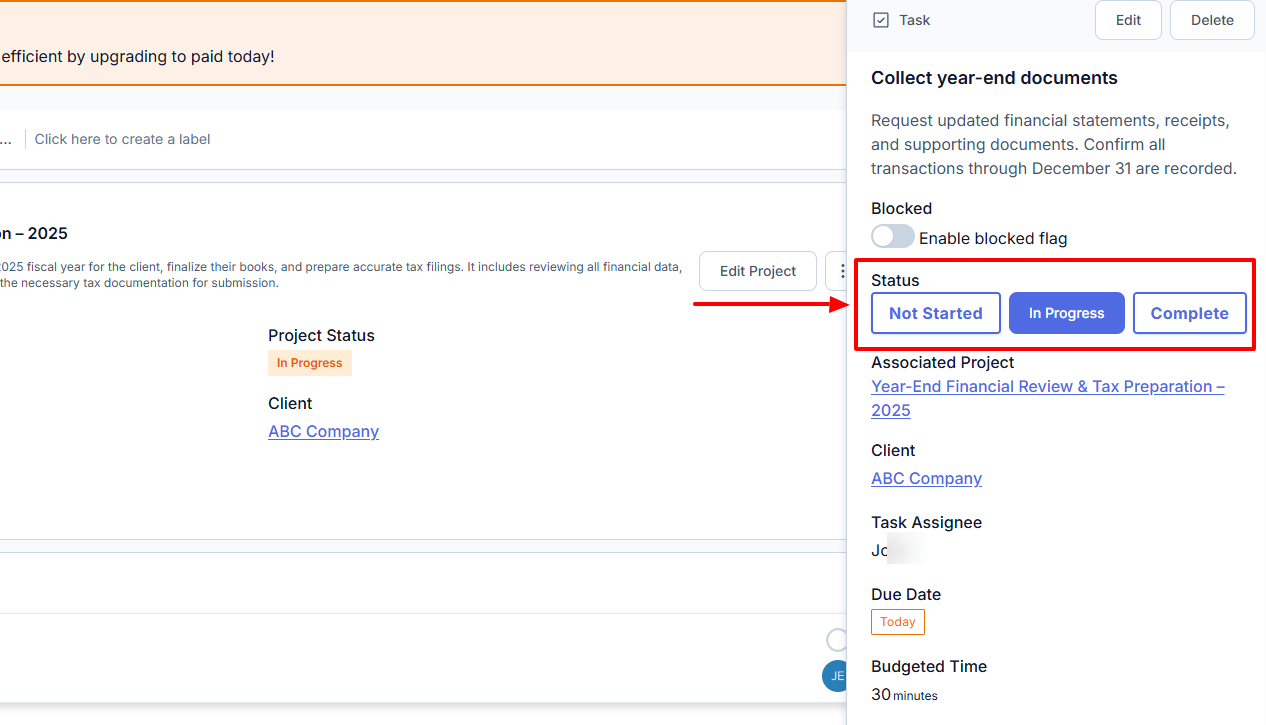
If you check the Team Work feature, you will see all the task details: project, client, due date, and status.
What I Loved and What I Struggled With
|
What I Loved ✔ Loved that I could write comments after creating tasks. ✔ All the features are well-positioned in the sidebar menu. ✔ Can add more columns, like task assignee or team member, to the project interface. ✔ Lets you apply multiple filters, such as client or flag, in your project. |
What I Struggled With ✘ Doesn't show my task progress in real-time. ✘ The Planning interface isn't easy to understand at first. It shows minutes and different numbers. |
Best for
- Small and medium bookkeeping firms seeking software to create accounting workflows and manage projects.
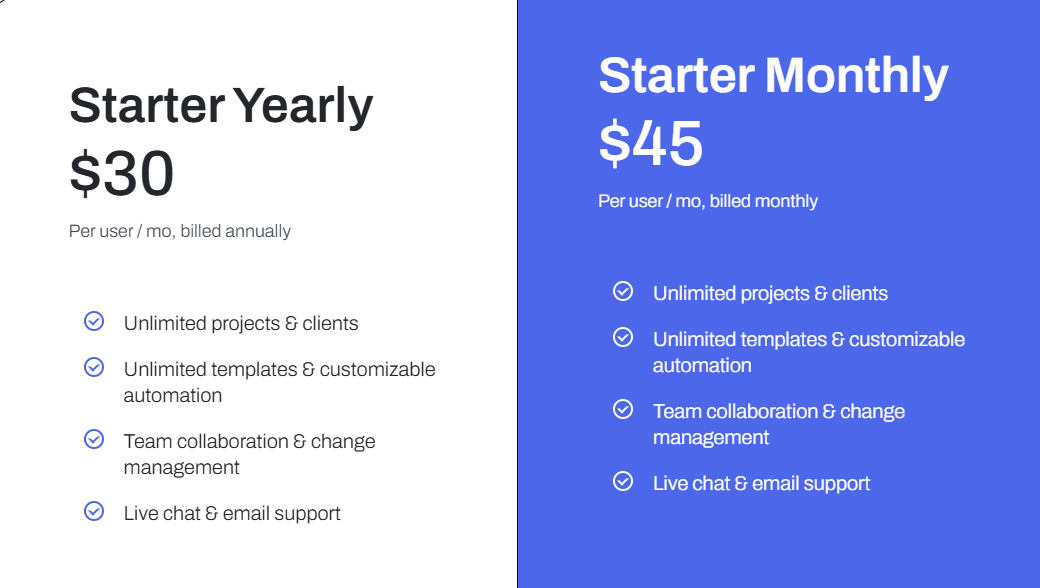
Pricing
- Starter Yearly: $30/user/month, billed annually
- Starter Monthly: $45/user/month, billed monthly
Start your 14-day free trial and automate your scheduling today.
3. Ignition
| Personal rating: 4/5 stars | I particularly love how the platform focuses more on billing and paying. It's really about payments. |
Moving on with Ignition, another accounting practice management software.
I recommend this platform to mid-sized agencies, accountants, and bookkeepers with the focus of managing payments and centralizing billing.
I will discuss more below.
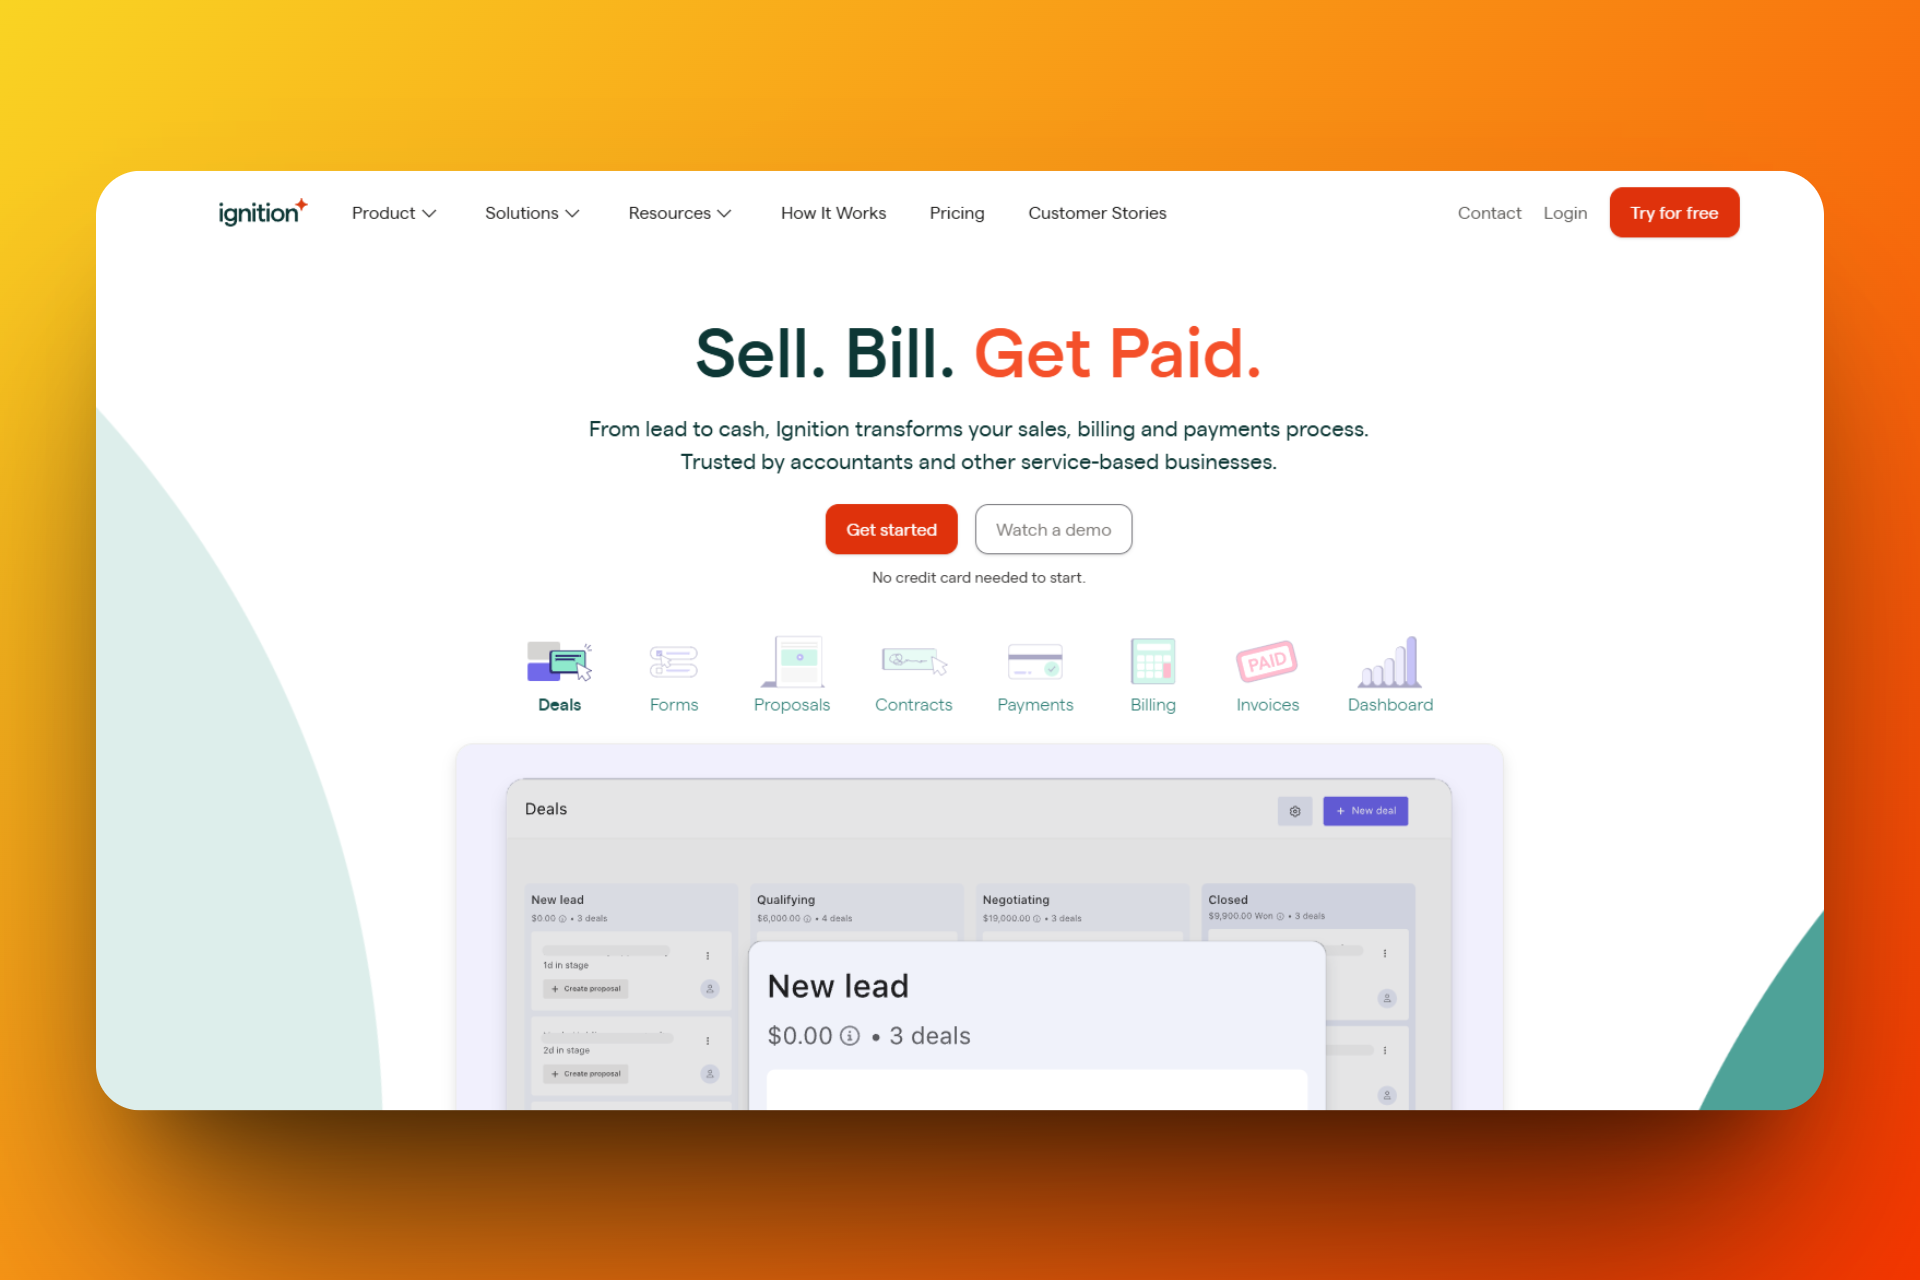
Ignition focuses more on payments, and creating an instant bill is easy. I add my service name, service description, price, tax rate, and quantity. It's quick to use.
Any accountant or consultant who bills clients frequently can use this to generate invoices in the blink of an eye.
I find it interesting that I can track my payments using the Collections feature. The first thing that caught my attention is that the interface first displays my next payout.
But that's not all. It also shows the amount to be paid soon and the one being processed.
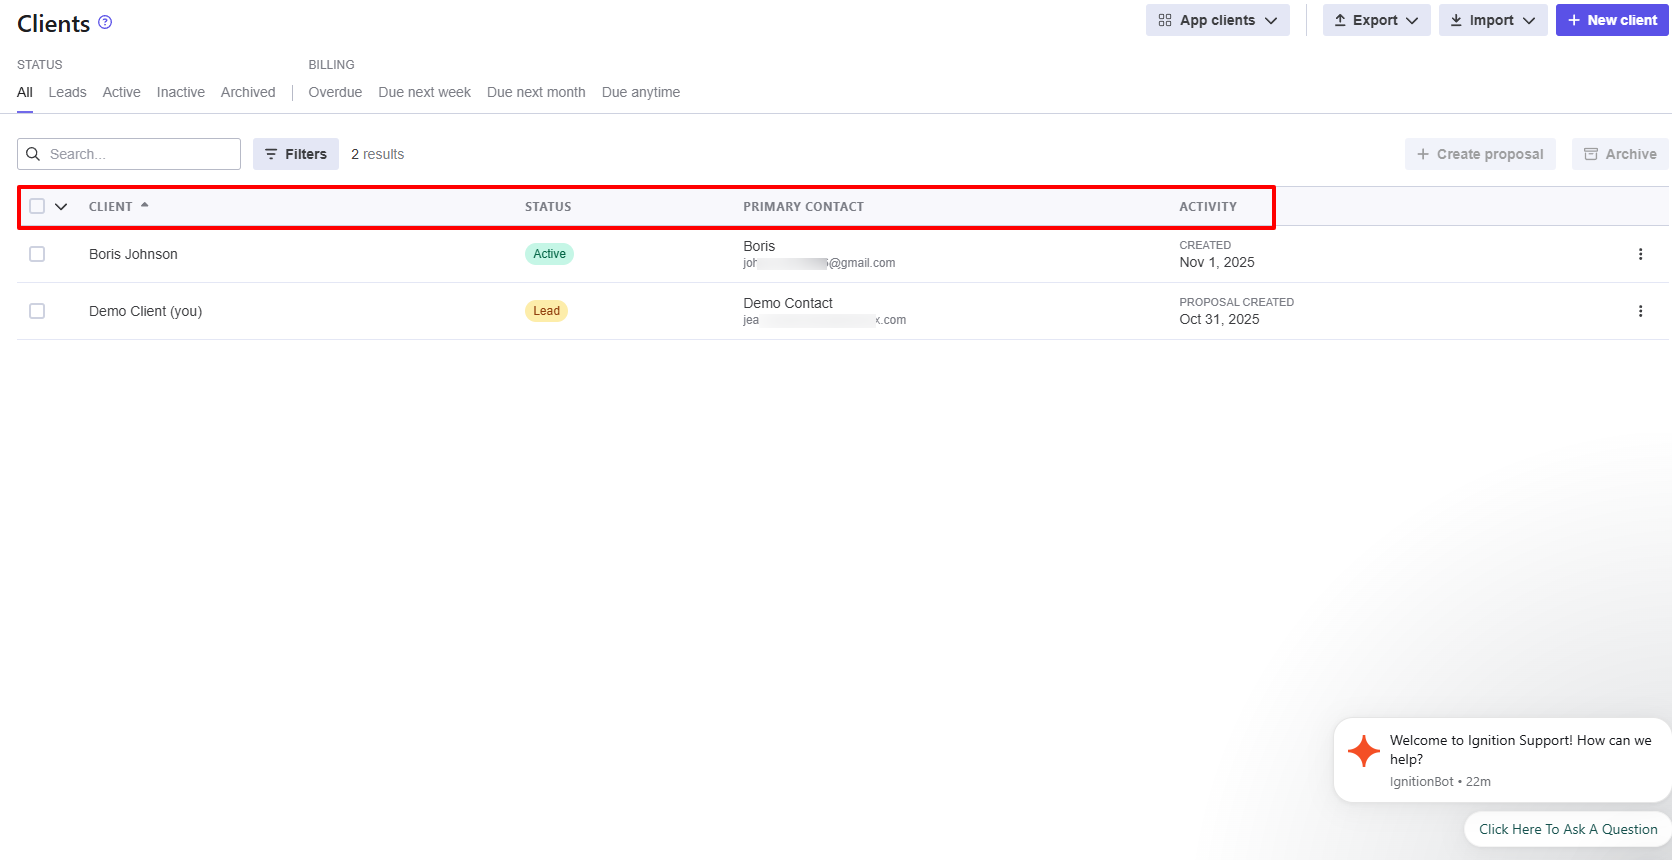
When you add a client to the platform, you can adjust their status. They can simply be active, inactive, archived, or lead.
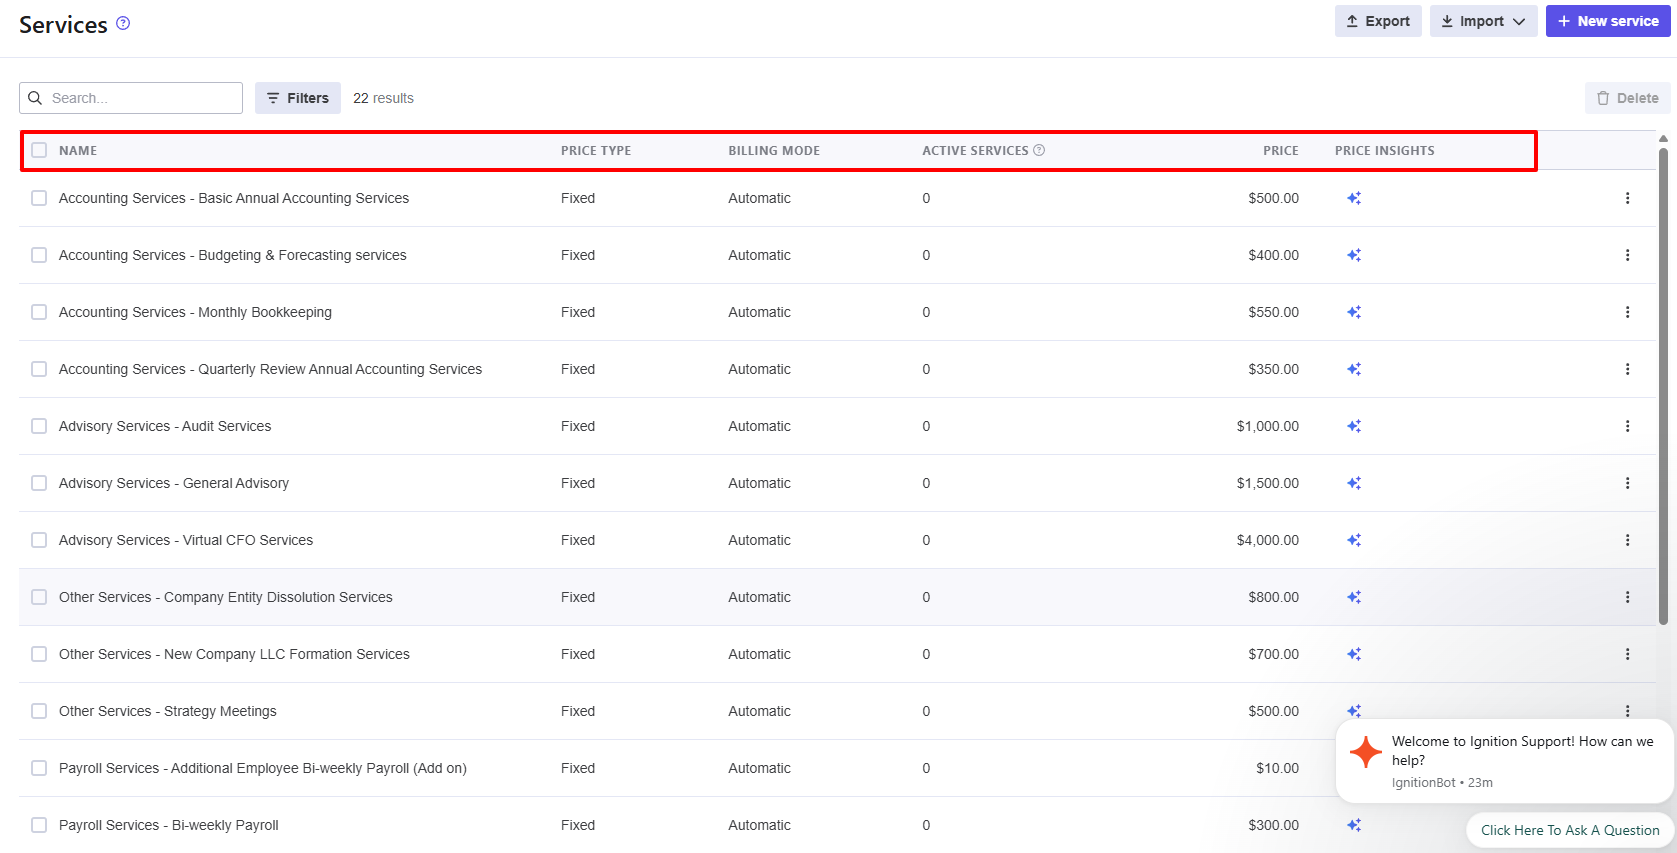
Aside from the above actions, I also like that you can add your services to the platform. Just enter the service name, choose the price type, billing mode, and price. Ignition will organize all your pricing details for you.
An accountant offering services such as bookkeeping, payroll processing, or financial reporting can then list each service with its exact fee.
What I loved about Ignition
1. Billing
The reason we all offer services is that we expect to be paid. With the Billing feature, you can create and send invoices so that you receive payments accurately and on time.
To use this feature, you must first locate it in the sidebar menu.
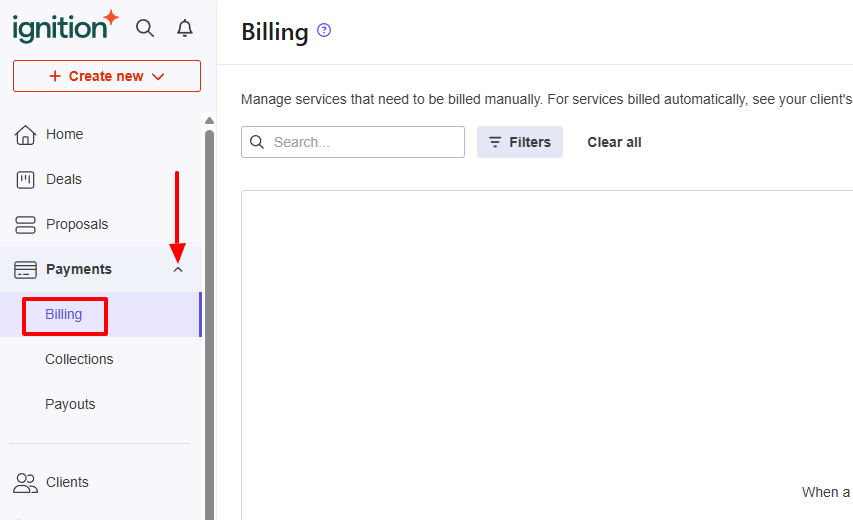
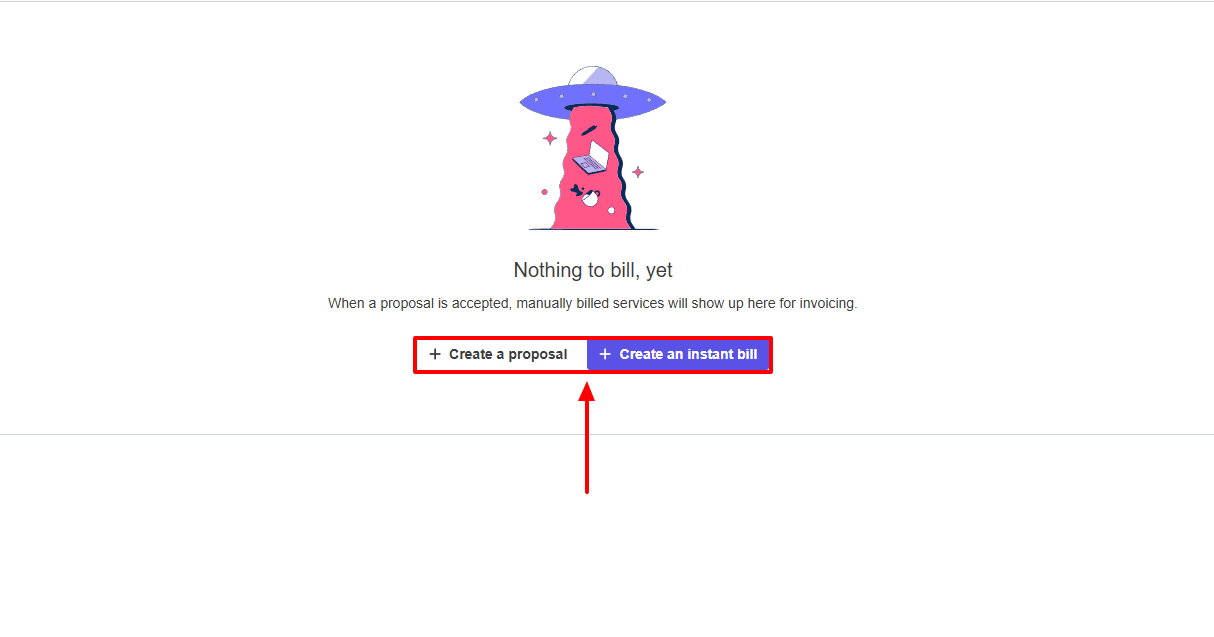
There are two options Ignition offers: Create a proposal or create an instant bill (which is what we are going to do).
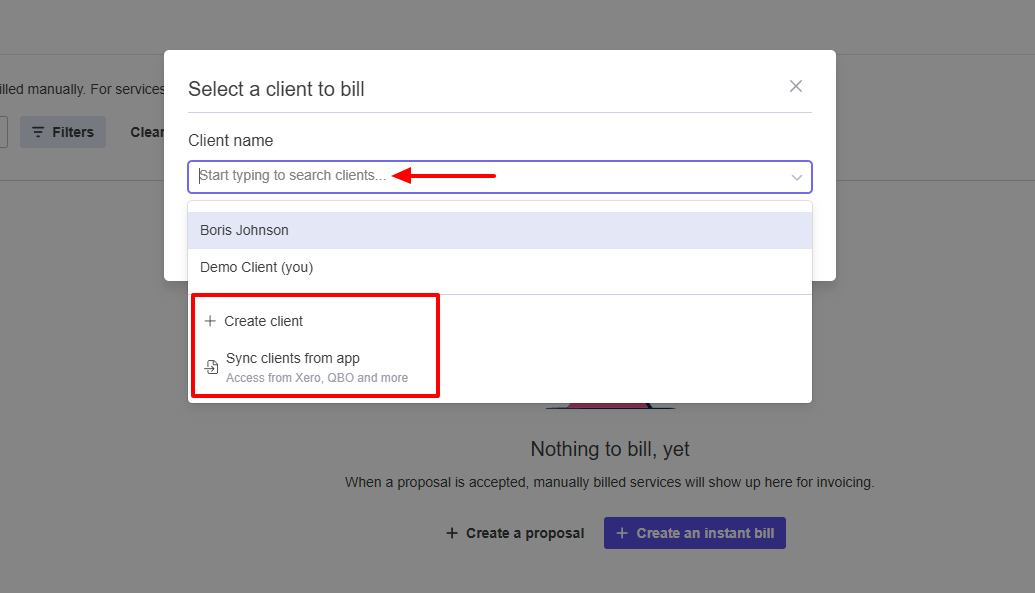
First, enter the client name. But in case the client is not saved on the platform, you can quickly create them or sync them from other apps you use.
Now, add your service name, service description, price, tax rate, and quantity. You can also choose a price type and billing mode.
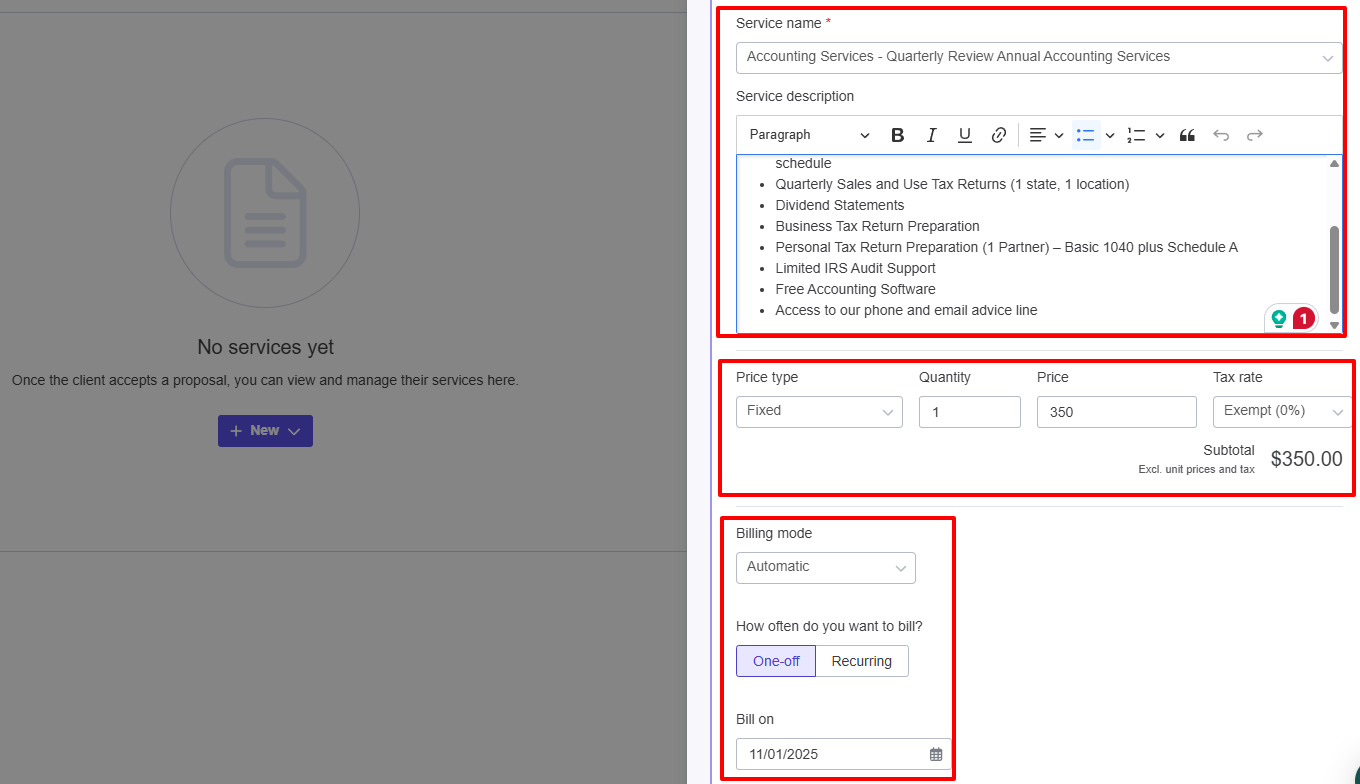
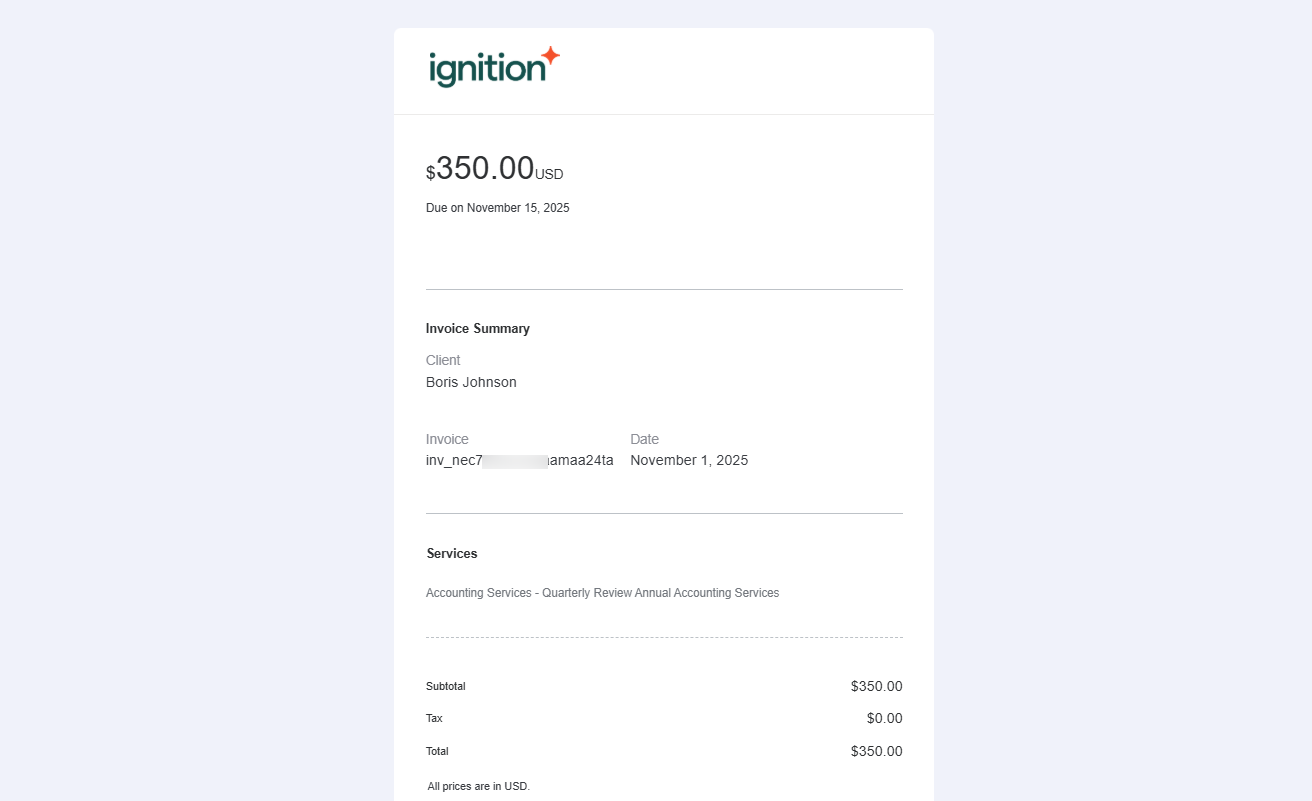
That's it. I can still double-check everything and even email the client. If I decide to do so, I simply enter their email address, subject, and message.
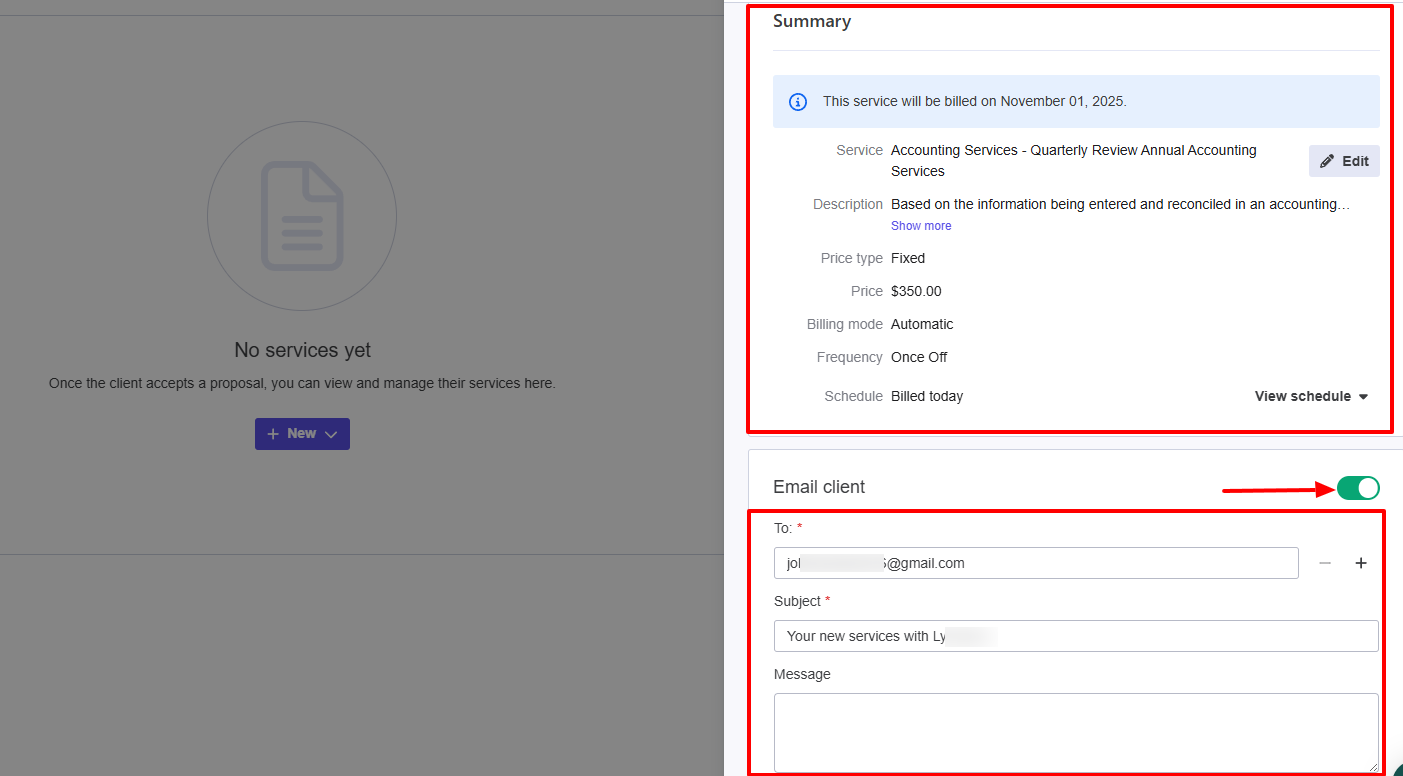
This is what my instant bill looks like.
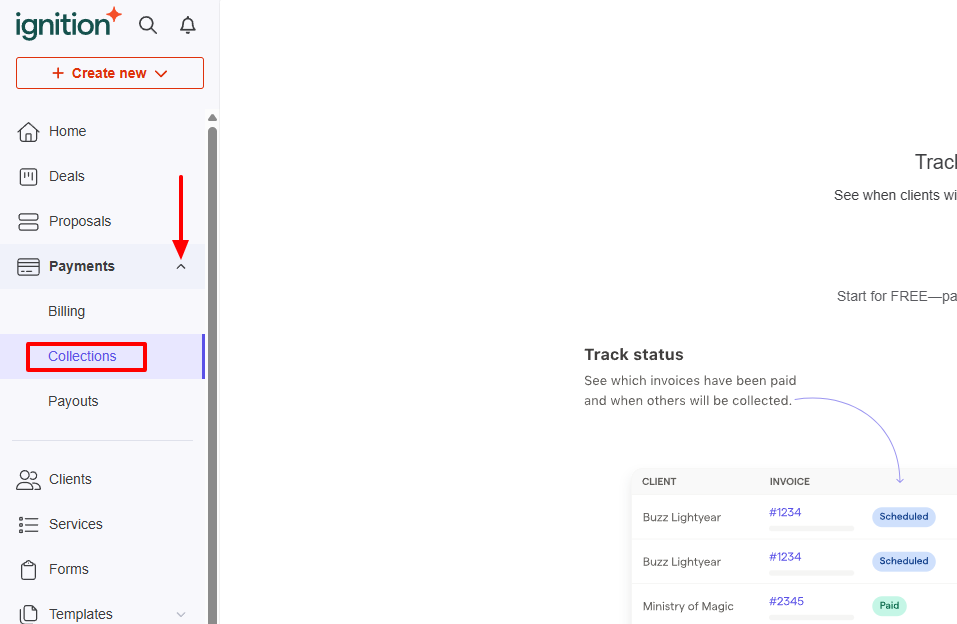
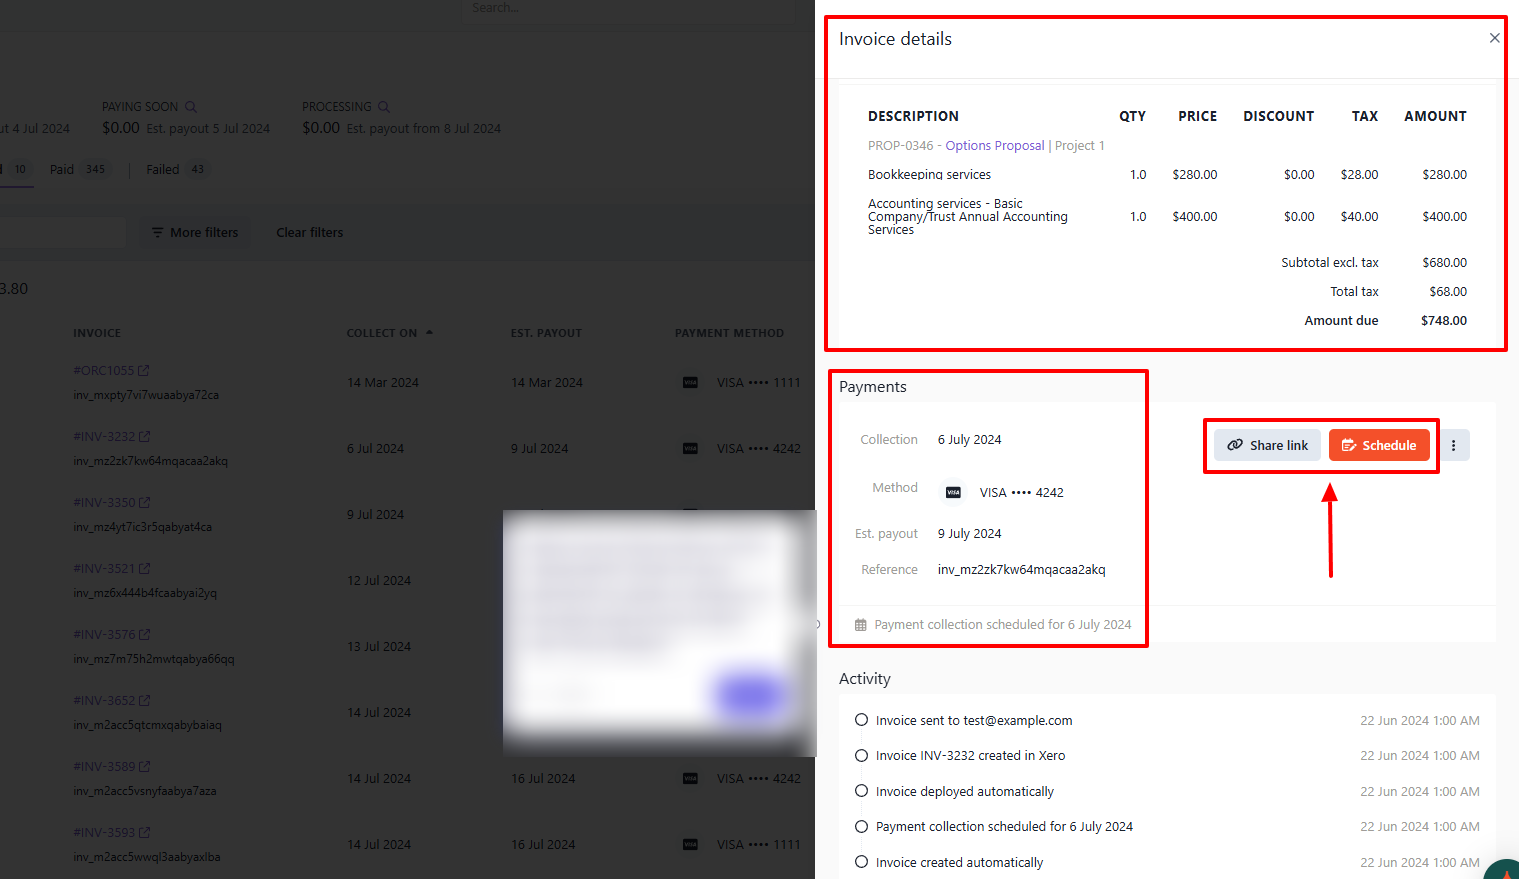
2. Collections
This is the next feature of Ignition we will look at. It lets you view when clients will be charged and when you'll get the money. You are really tracking and monitoring client payments.
I will give you a practical example.
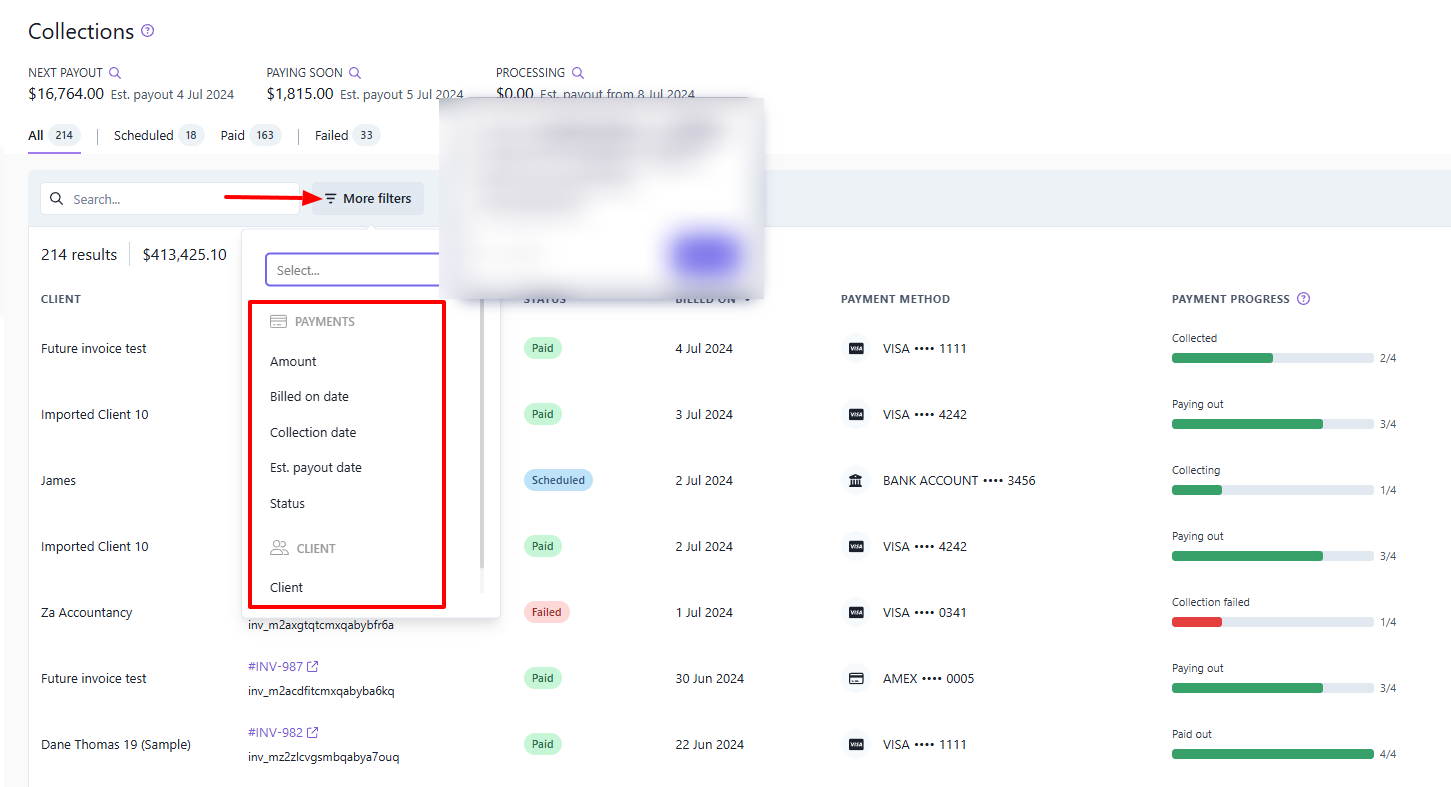
After clicking collections, the first thing I immediately see is the next payout, the amount to be paid soon, and the one being processed.
The interface below displays key data, including client, invoices, payment status, billing date, and payment method.
I could also see the payment progress in real time and the exact amount.
When I click the three-dot menu, I can reschedule a payment, share a payment link, send an invoice, or delete it.
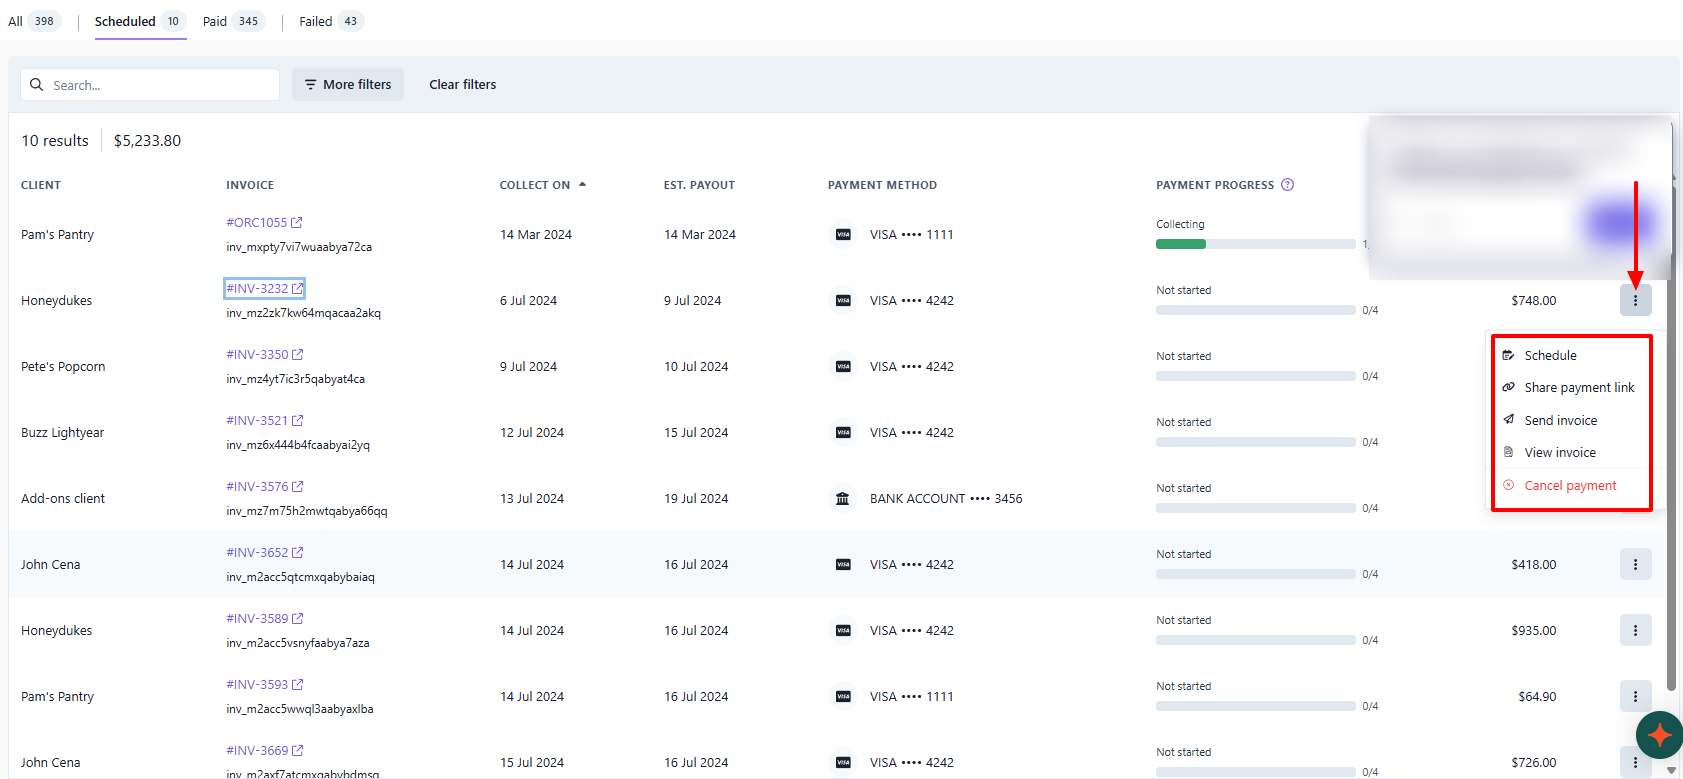
If you have a lot of client payments to track, but you just want to track specific ones, you can use their filters. You filter them by amount, collection date, or even status.
To see more details on a payment, click it. It will show the invoice details, payments, and activity. You can still share the payment link or schedule it.
What I Loved and What I Struggled With
|
What I Loved ✔ Has an Awaiting Verification tab that shows all bank accounts awaiting client verification. ✔ Can view payment progress in real time. ✔ Offers many filters, such as collection date, status, or client name, to help locate a payment. |
What I Struggled With ✘ Can be a bit difficult to understand at first. The interface of some features, like collections, is so crowded with information. |
Best for
- Mid-sized agencies and accountants seeking software to centralize billing, invoicing and manage payments.
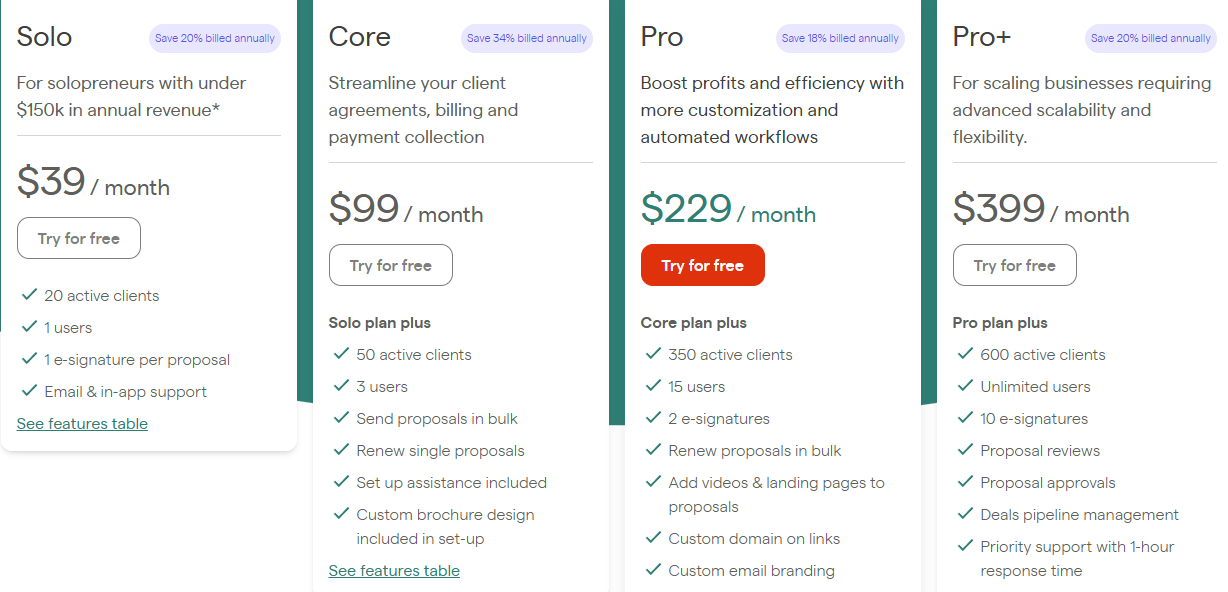
Pricing
- Solo: $39/month
- Core: $99/month
- Pro: $229/month
- Pro+: $399/month
4. Financial Cents
| Personal rating: 4/5 stars | I love how Financial Cents doesn't just focus on teams. They focus on both teams and clients and let you track each one easily. |
Financial Cents is our next best accounting practice management software.
I recommend it to small and mid-sized accounting firms that want to manage and track team and client tasks.
To create a task in Financial Cents, select a project, the client, a start and due date, and specify whether the project is recurring or not.
Every task is clearly linked to the client and project, making it great for accountants managing multiple monthly reports for multiple clients.

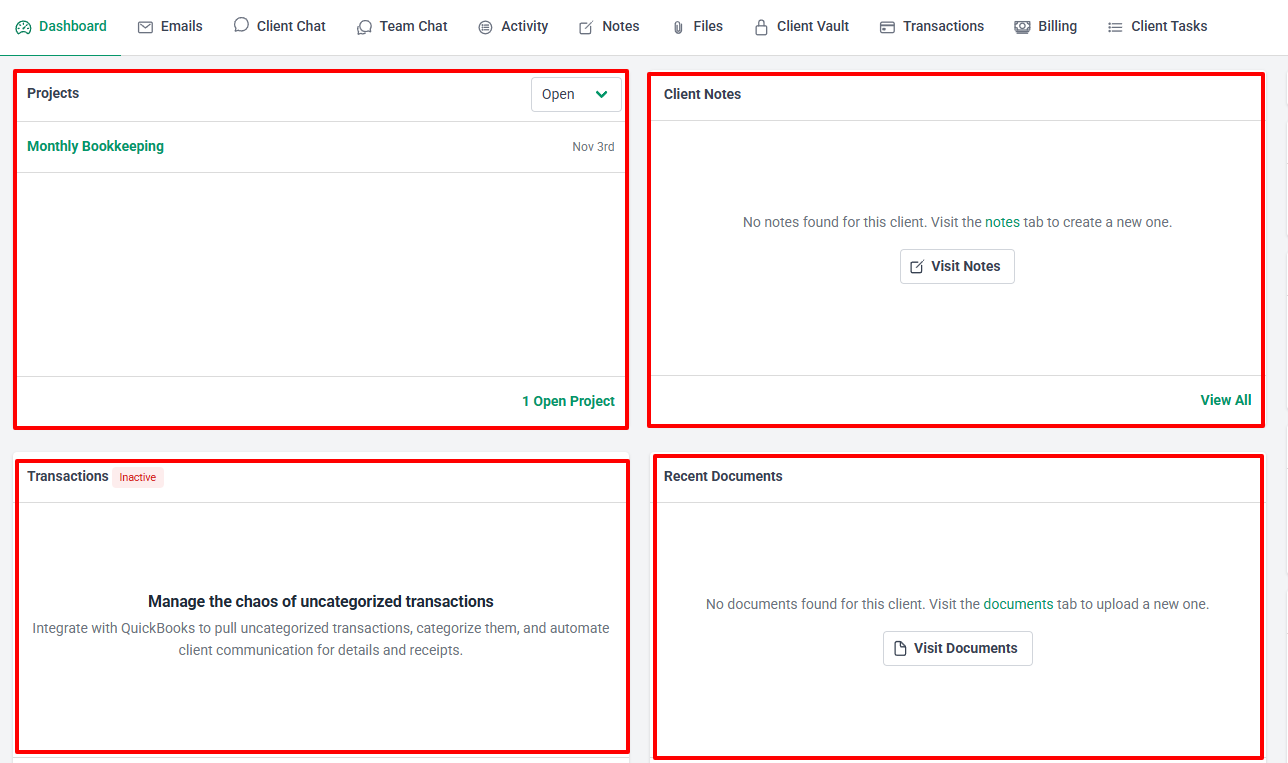
You can learn a lot from the client dashboard. It shows all open projects, client notes, transactions, and recent documents, in case you uploaded any.
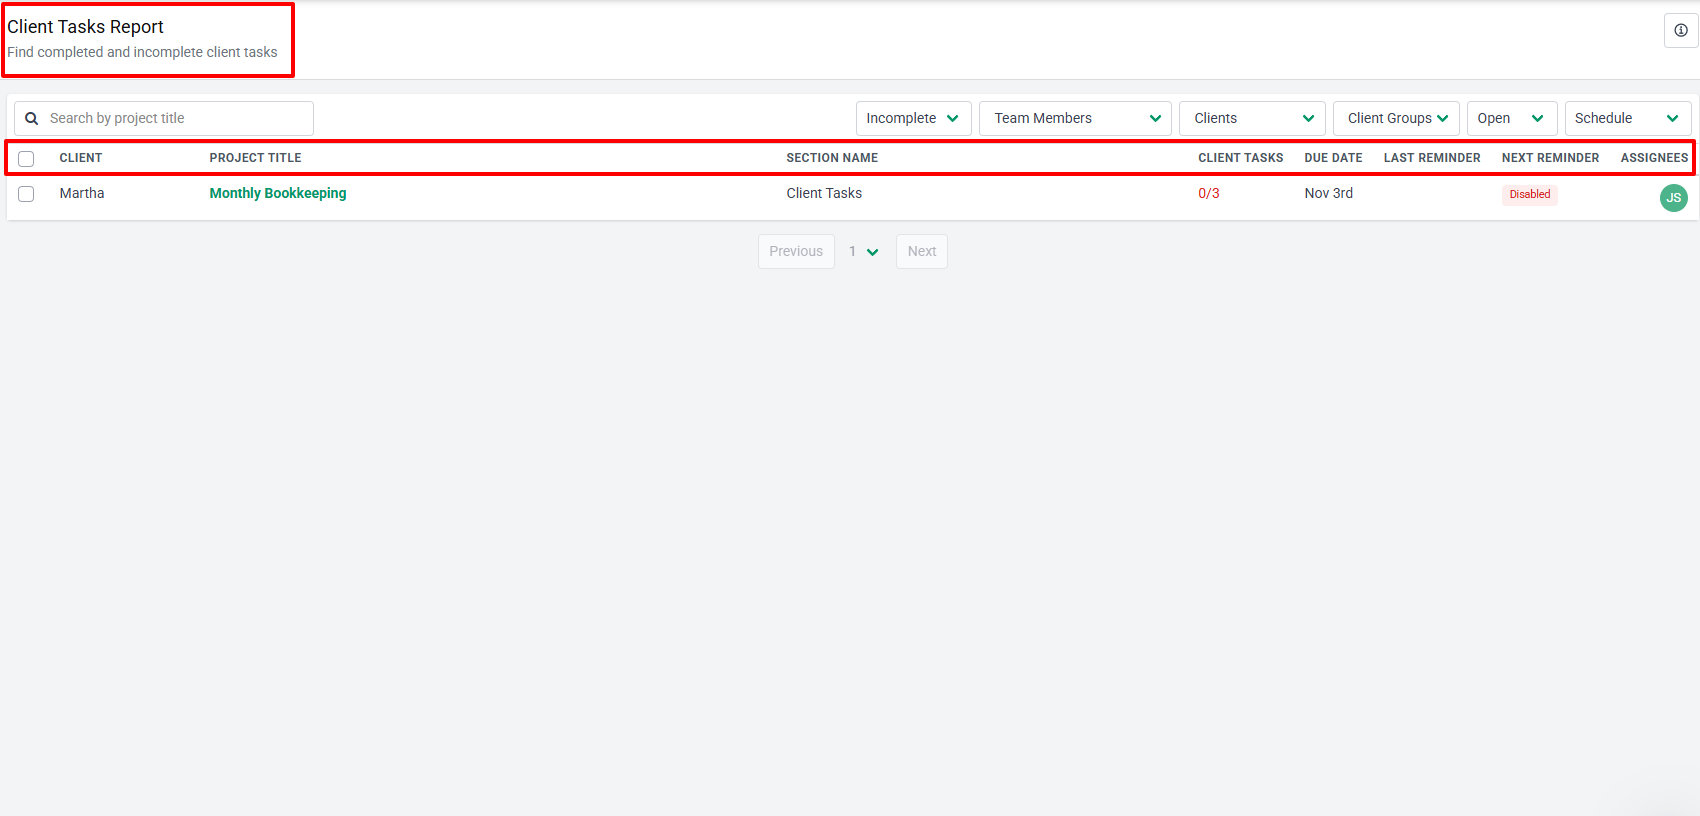
Financial Cents also has a client tasks report where I can find all completed and incomplete client tasks. I will see their name, project title, section name, and due date. But it also shows their last and next reminder.
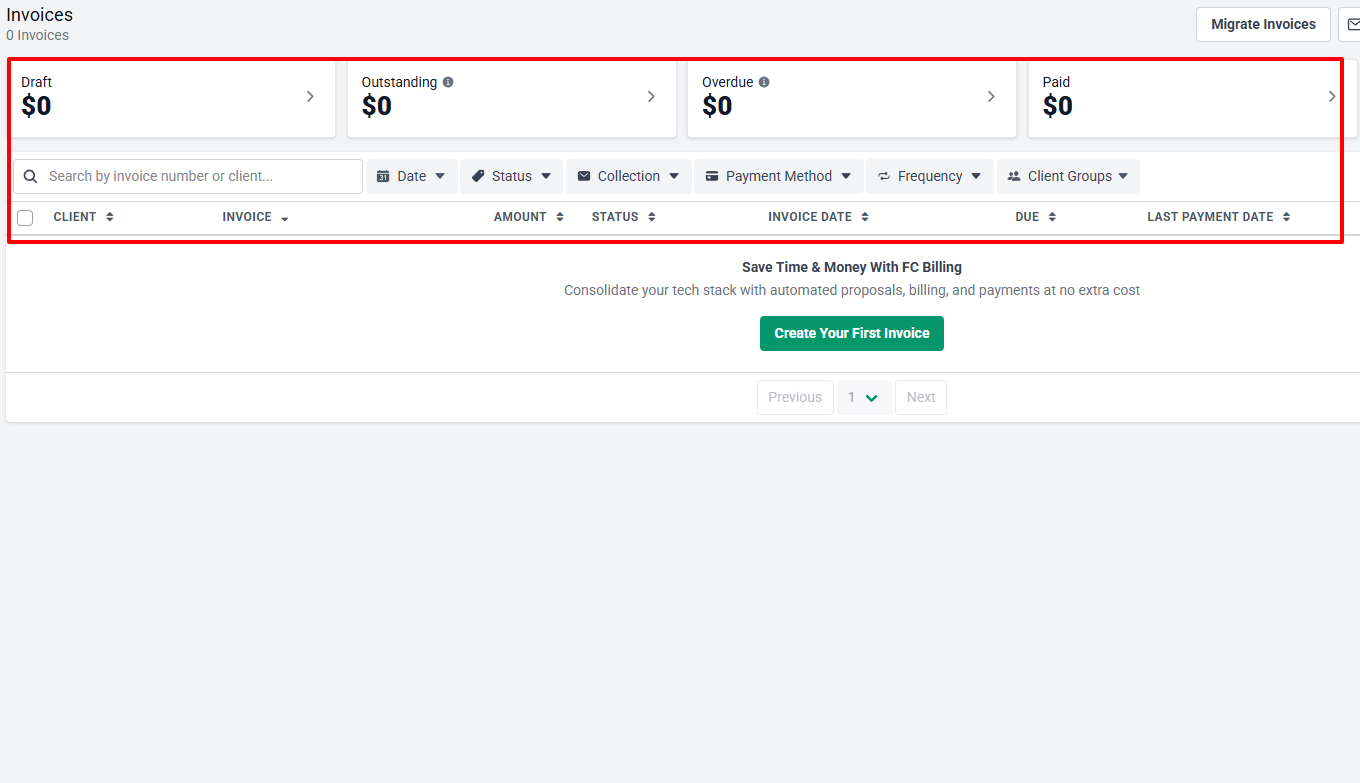
It is also worth mentioning that you can create invoices on the platform. You will add the client's name, amount, status, invoice date, and when it is due.
With this, you don't need to get separate invoicing software. Again, accountants will love using this feature to manage multiple clients.
What I loved about Financial Cents
1. Tasks
One of the reasons I added Financial Cents to this list is how well it handles task management. But before you create a task in there, you first need to create a project.
We will go step by step.
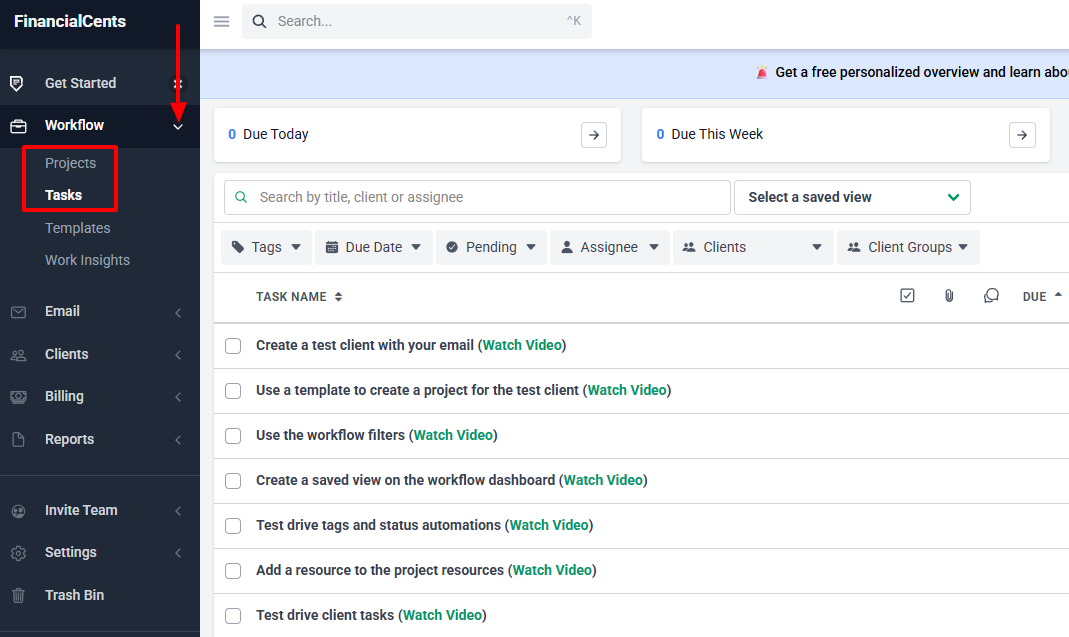
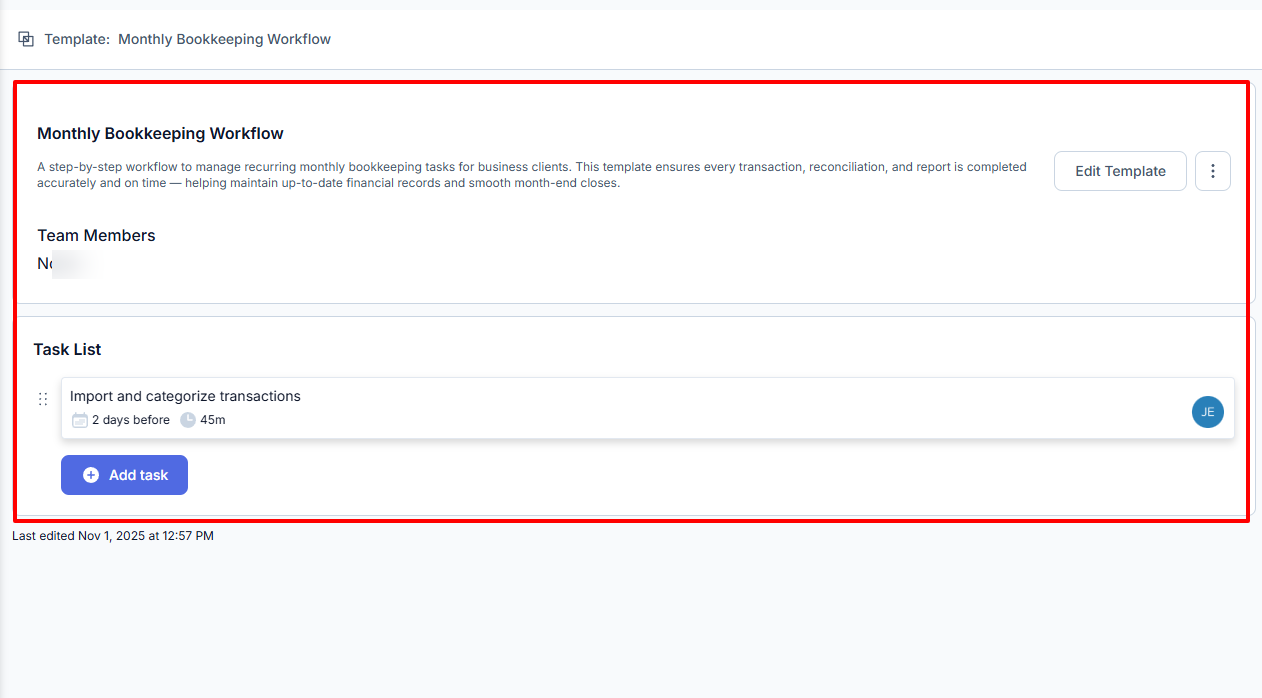
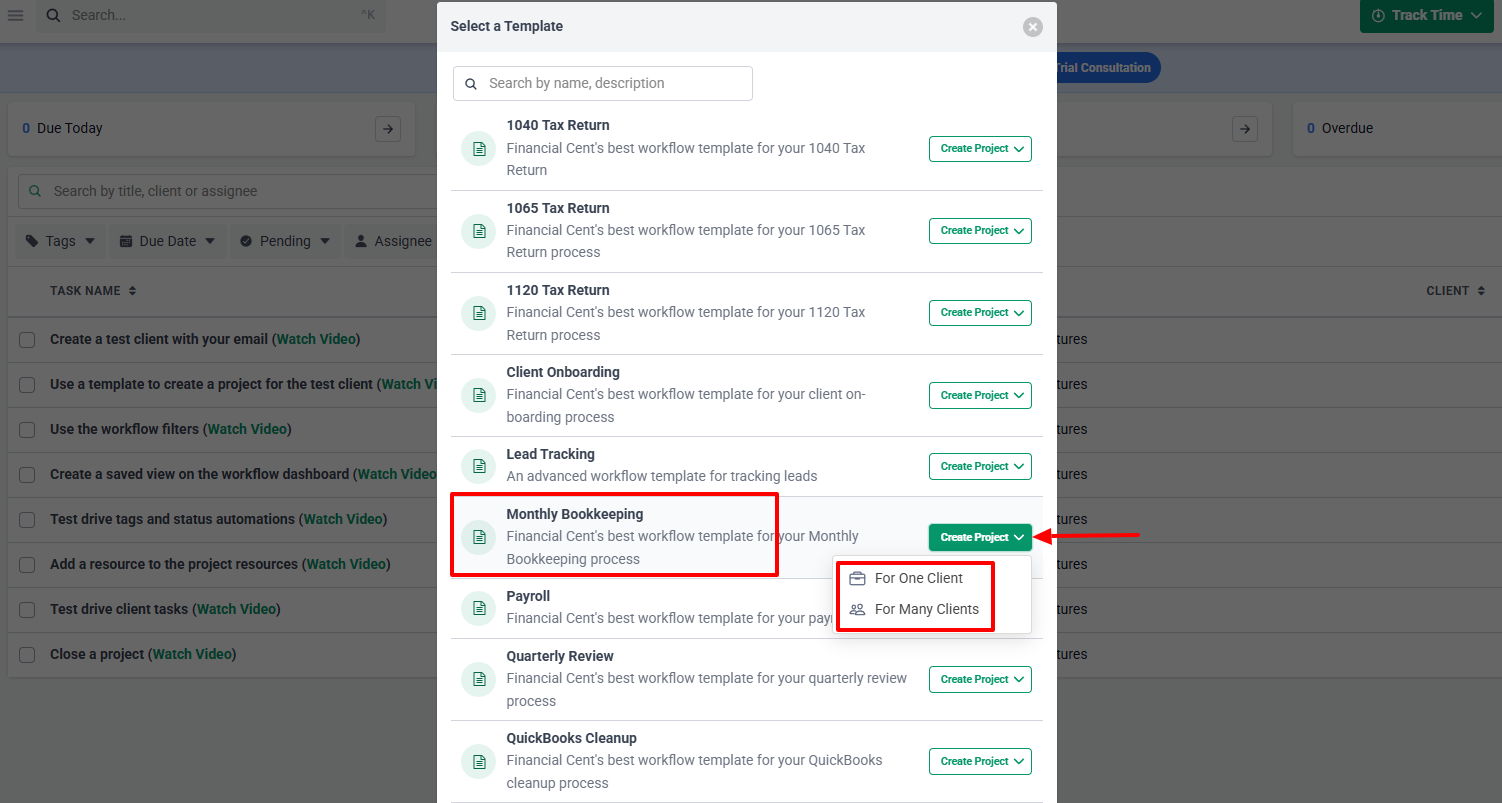
The first step is to select a starting point for your project. It could be starting from scratch, from a template, or creating a new template.
Let's use an existing template.
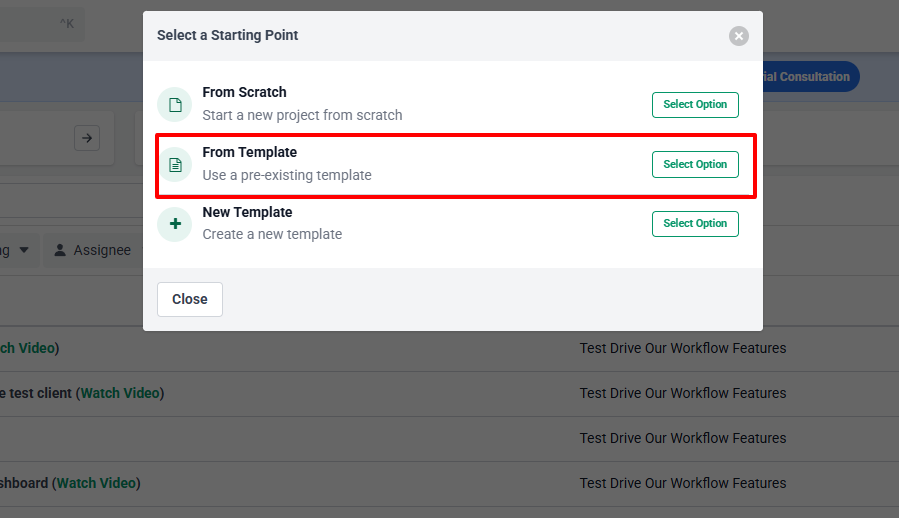
The template I will choose is "Monthly Bookkeeping". When I click Create project, I can choose whether it is for a single client or multiple clients.
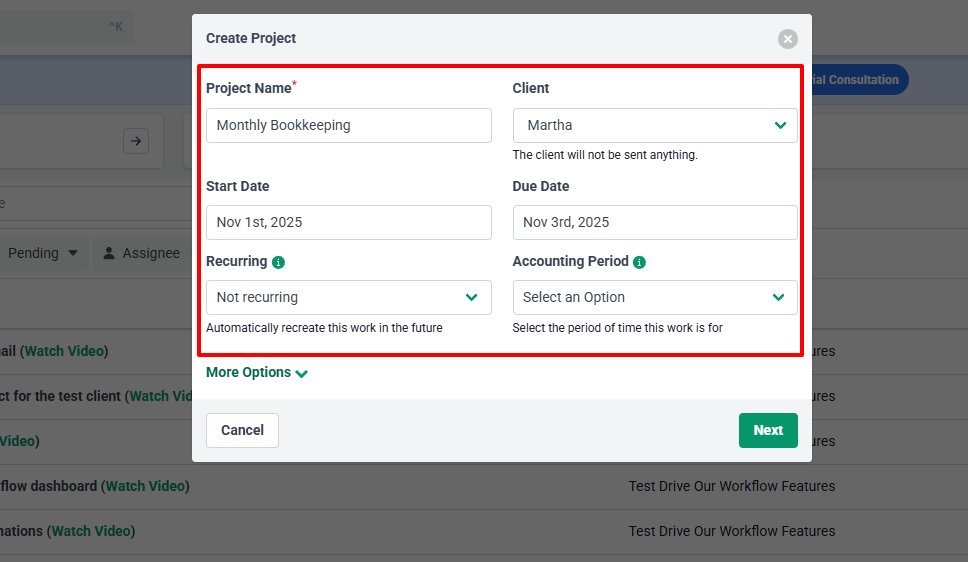
The project is there. I can select the client, a start and due date, and specify whether the project is recurring or not.
I can also add the accounting period, which is basically the period of time this work is for.
Interestingly, I can select a team member for each role: admin, bookkeeper, and reviewer.
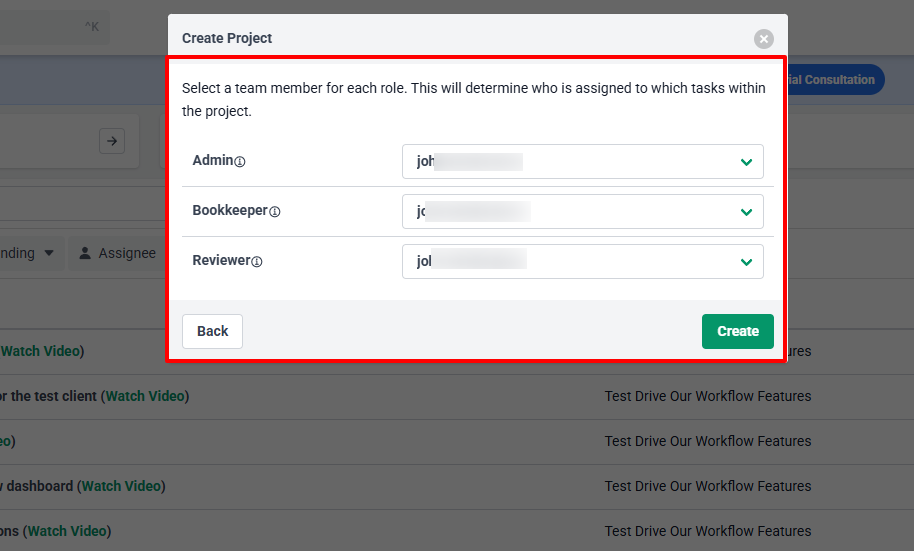
Now, because we chose a template, there were already tasks in there. You have the client tasks and the team tasks.
I could still edit or add other tasks. And on the right side, I could schedule or send, use auto-reminders, or automations.
2. Client Dashboard
Being able to view clients' information will always be an advantage for every business. These details help you understand where you are and how you can improve your client deliverables.
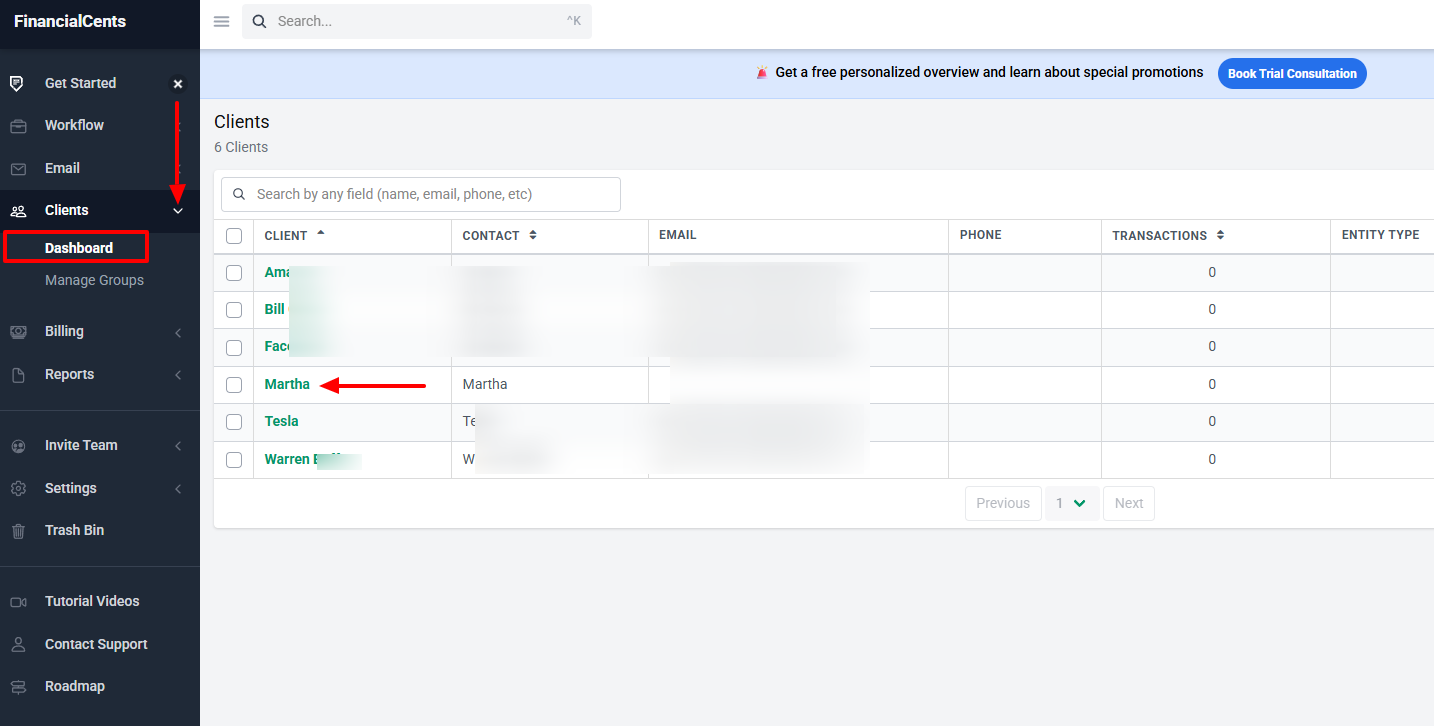
On the sidebar menu, go to Dashboard, then click your preferred client.
The dashboard shows lots of insights, such as the open projects, client notes, transactions, and recent documents uploaded for the client.
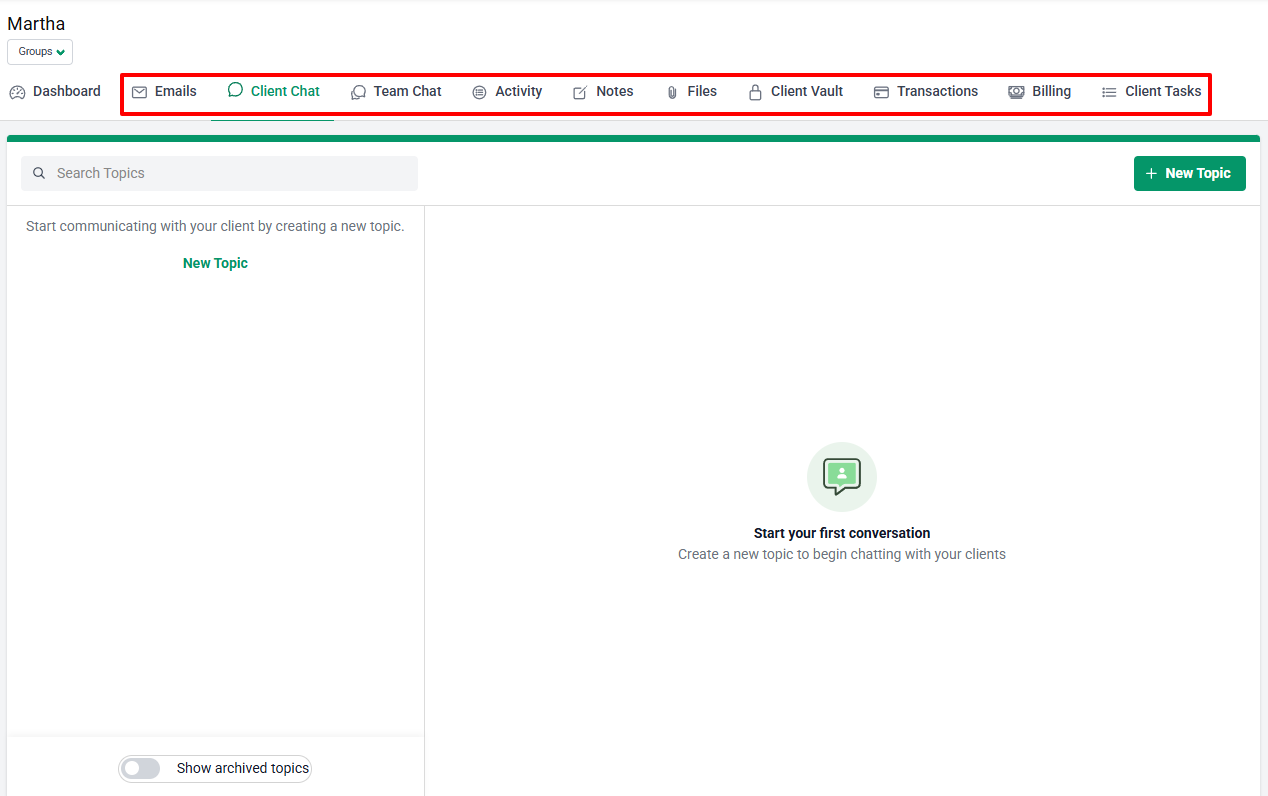
Aside from the dashboard, you can view emails, client chat, files, client vault, tasks, and billing, just to name a few.
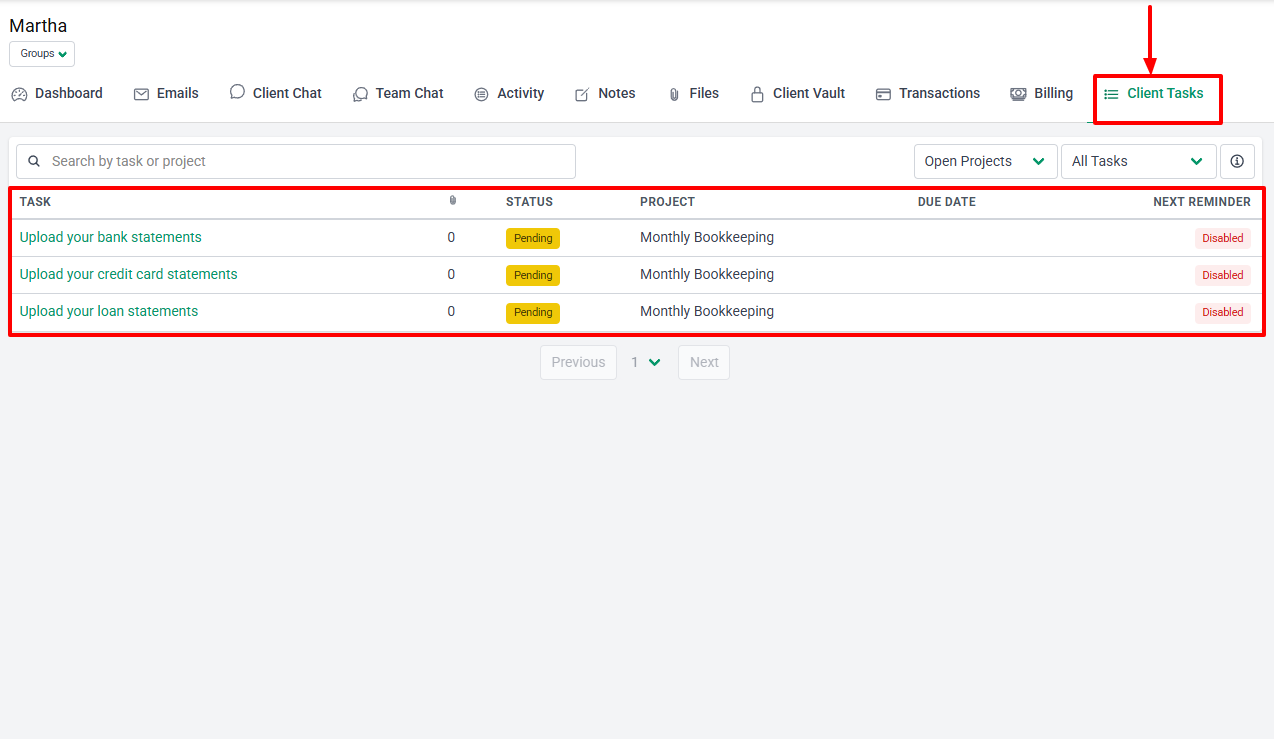
Take the client tasks, for instance. It not only shows all the client tasks but also their status, project, due date, and next reminder.
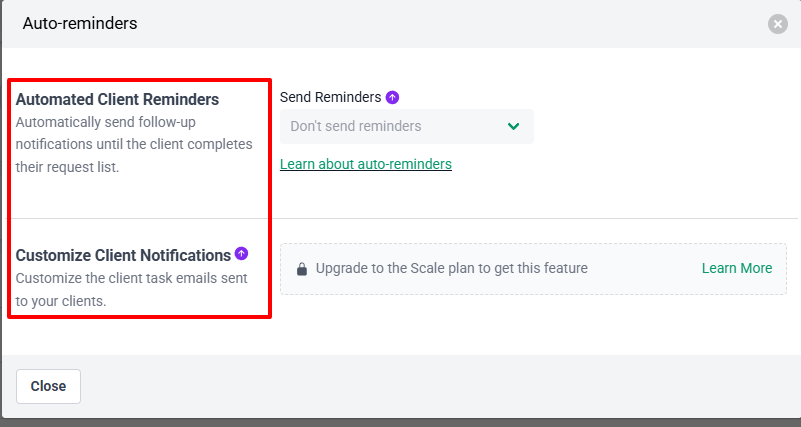
And you can turn on the automated client reminders so that clients can complete their request list without forgetting that you can also customize the client task emails.
What I Loved and What I Struggled With
|
What I Loved ✔ Allows you to add an internal due date when creating a project. ✔ Loved that the Client report shows the last reminder as well as the next one. ✔ Has a team chat feature where you can organize conversations with your team. You can tag members, upload files, and insert images, among others. |
What I Struggled With ✘ Access to auto-reminders only starts from the third tier. ✘ Can't create tasks directly. You need to create projects first. |
Best for
- Small to mid-sized accounting firms seeking to manage tasks and track client work.
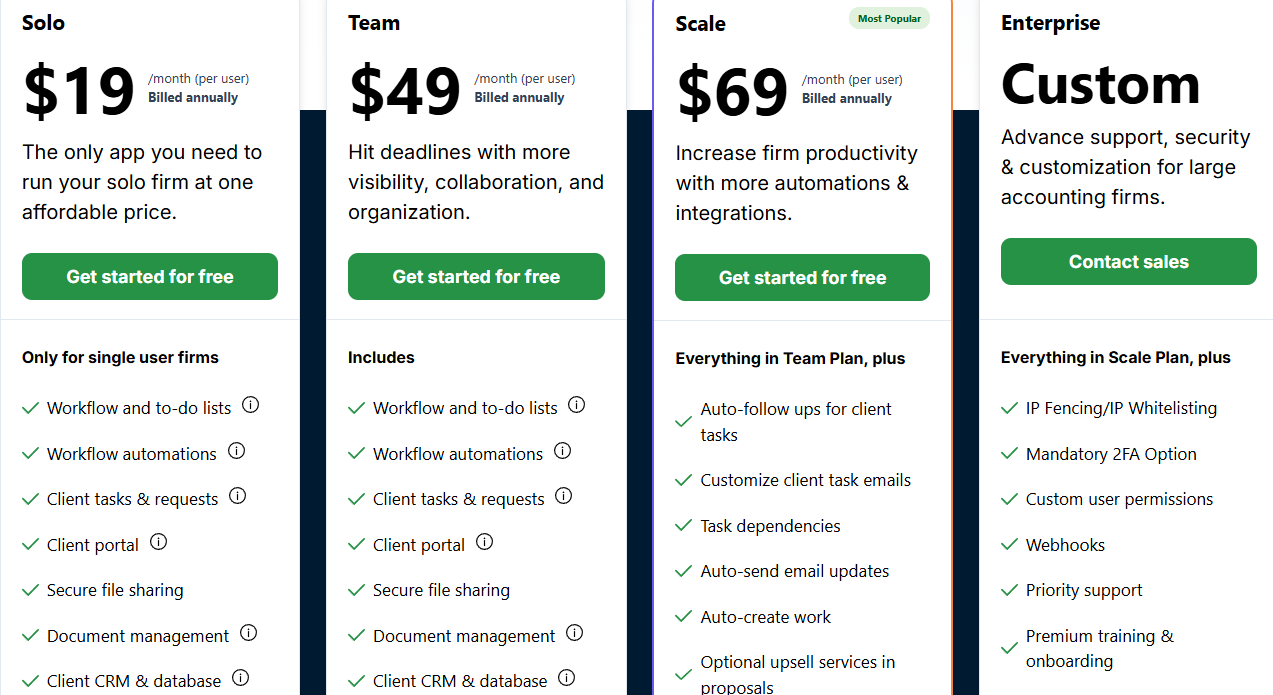
Pricing
- Solo: $19/month/user, billed annually
- Teams: $49/month/user, billed annually
- Scale: $69/month/user, billed annually
- Enterprise: Custom pricing
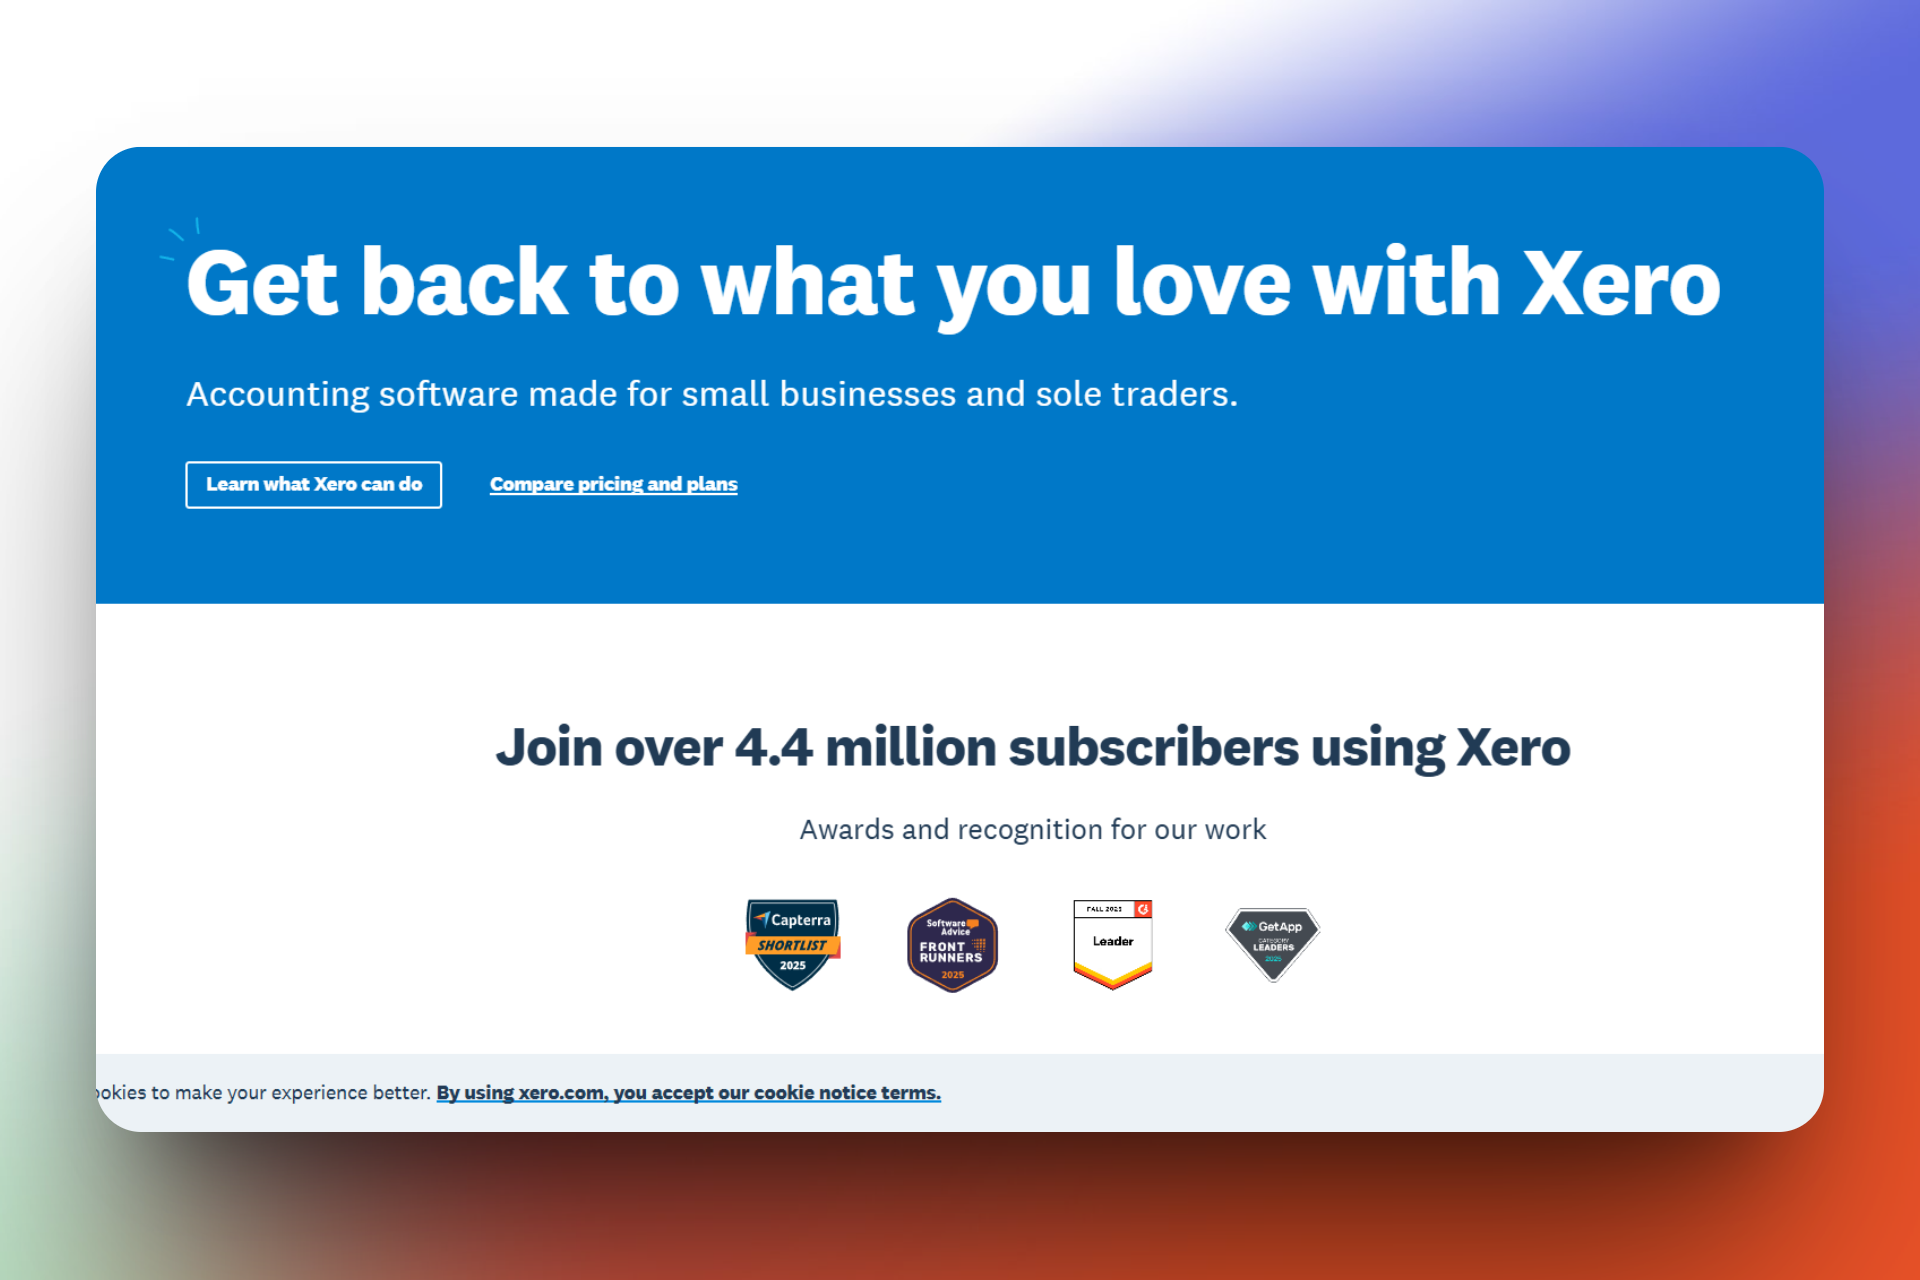
5. Xero
| Personal rating: 4/5 stars | One thing I like about Xero is how easy it can be to create and send invoices. |
Our next best accounting practice management software is Xero.
I recommend this platform to sole traders and small businesses who are mostly interested in managing their finances.
Let's see what Xero actually does.
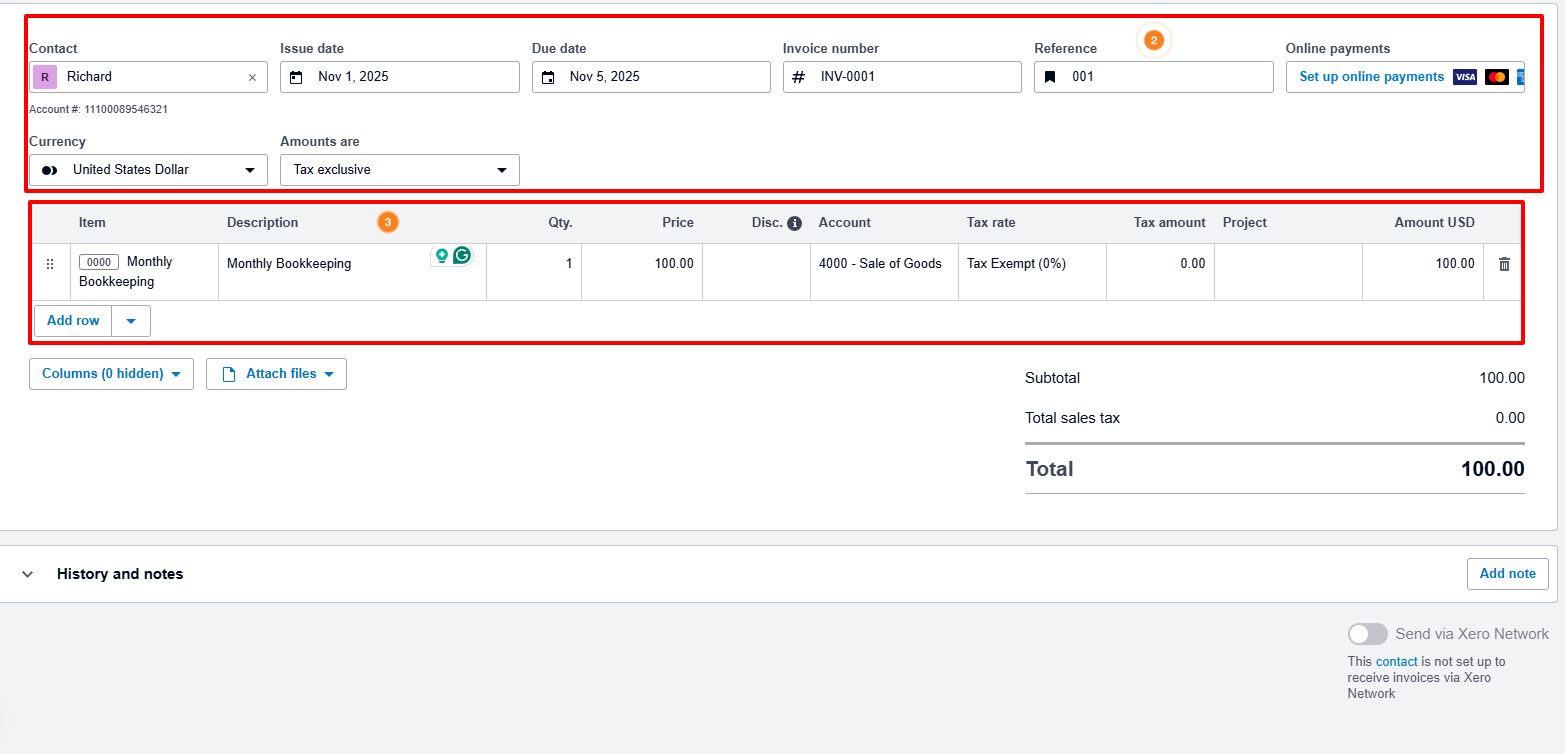
Although the process is not difficult, there are a couple of details to provide when creating your invoice. For instance, you will enter a contact, issue date, due date, and choose an online payment type.
You will also select service, price, quantity, account, and tax rate. With all these details in one place, accountants can keep track of all invoices and review them later if necessary.
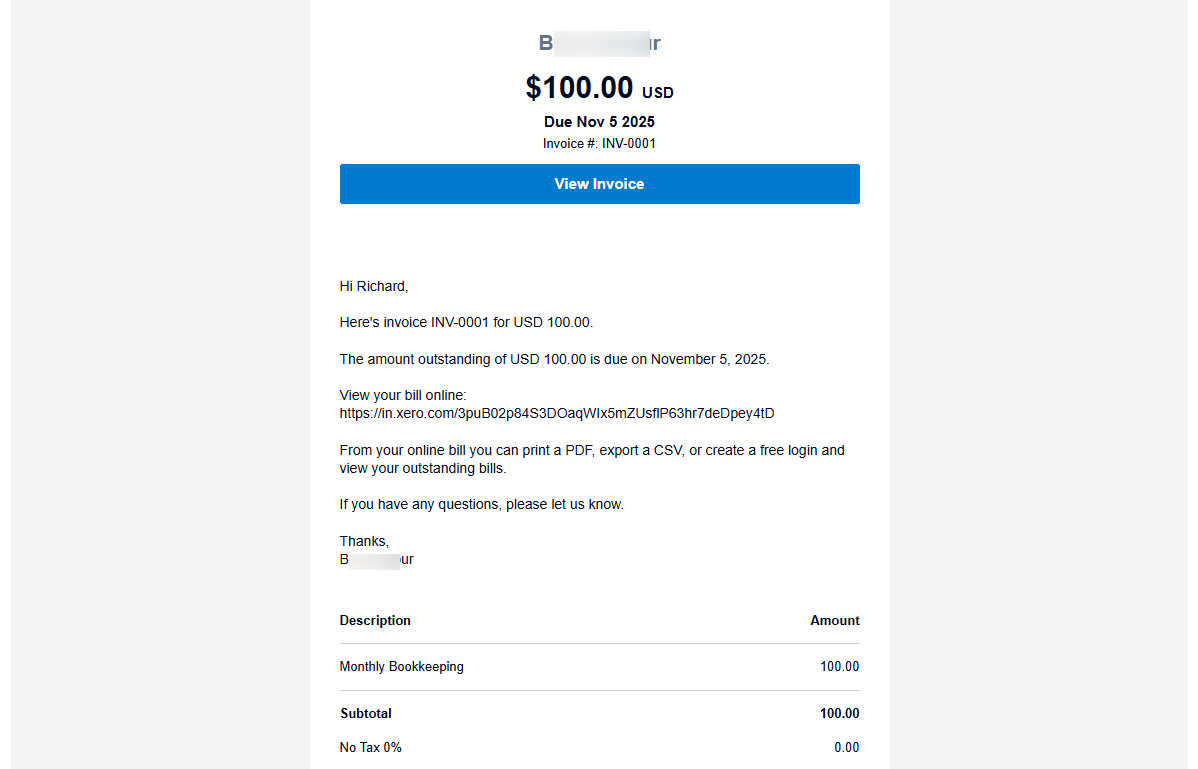
One thing I love about Xero is that I can claim my expenses. And to do so, I simply add the amount I spent, a description, and explain where and when I spent it.
And the most interesting part is that I can even upload an image as proof.
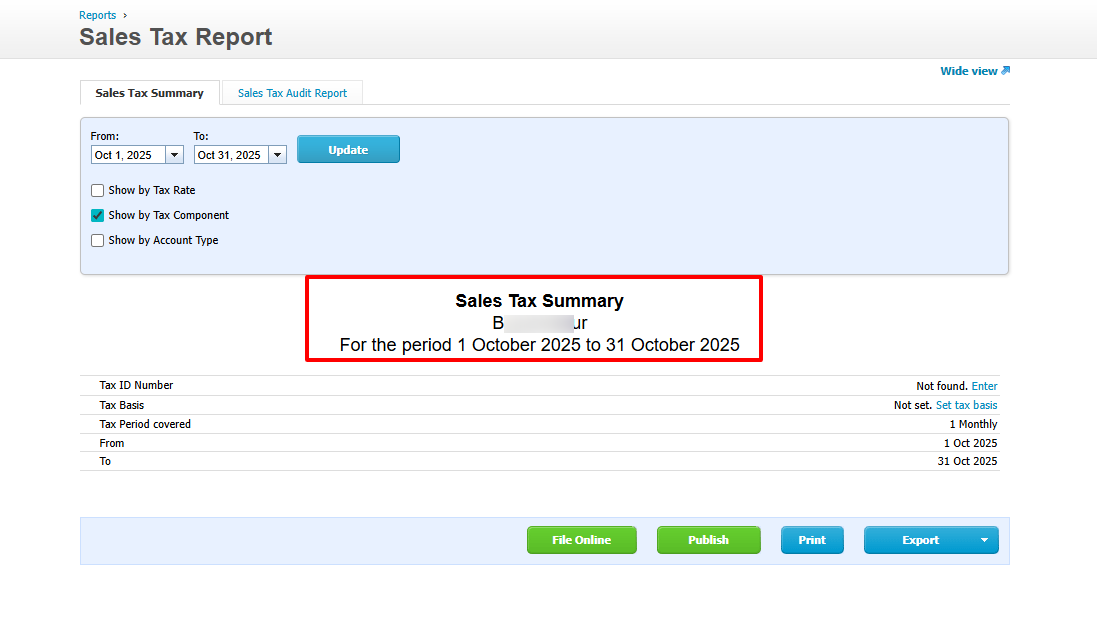
There are other actions I can take when using Xero. For example, I can view my sales tax report for a particular period of time. I only need to specify that period.
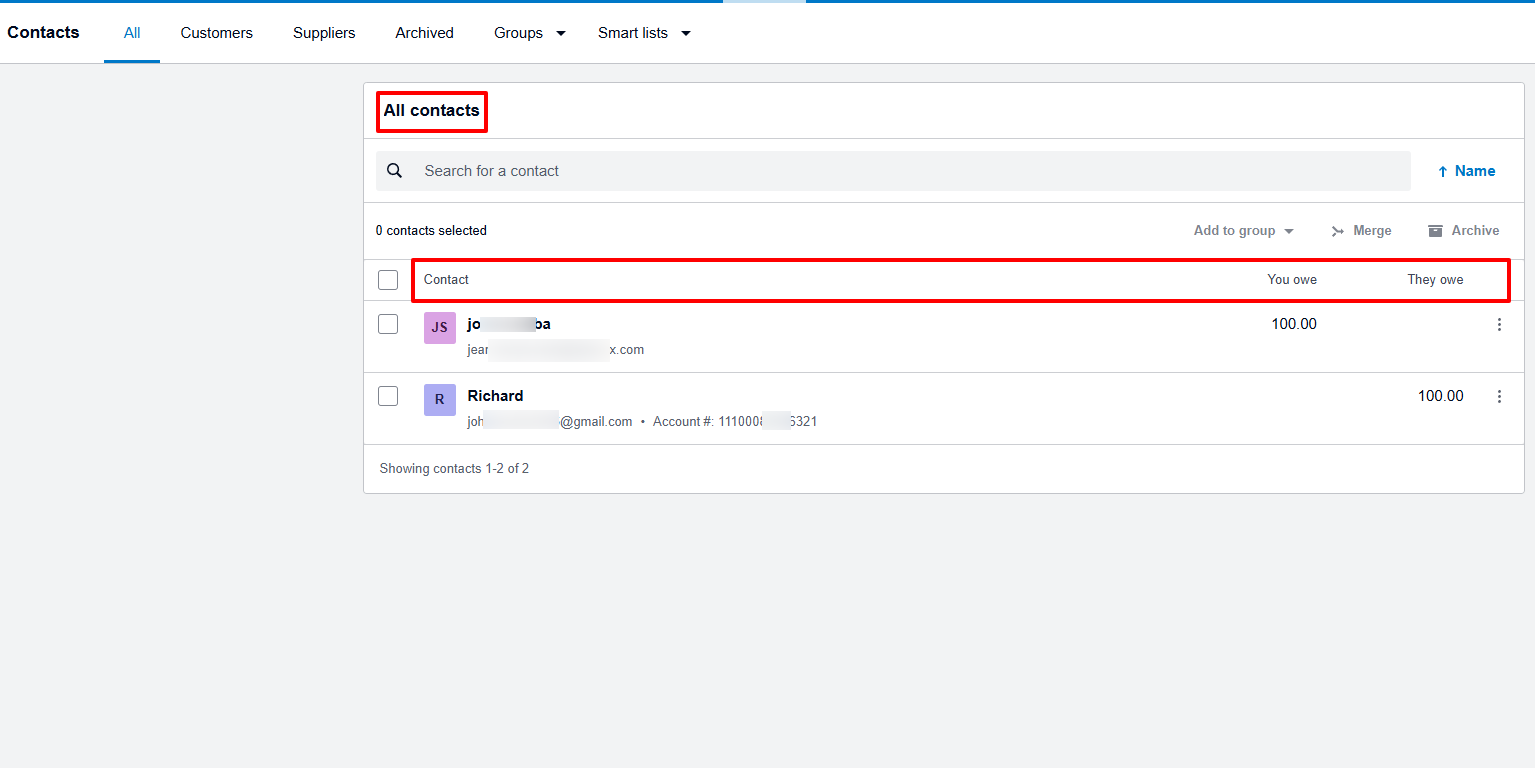
But their Contact feature is a bit different from other platforms. On Xero, it displays what I owe my contact and what they owe me. Impressive!
What I loved about Xero
1. Invoices
Xero made it easier for sole traders and small businesses to easily create and send invoices and maintain accurate financial records.
I will show you how you can create one.
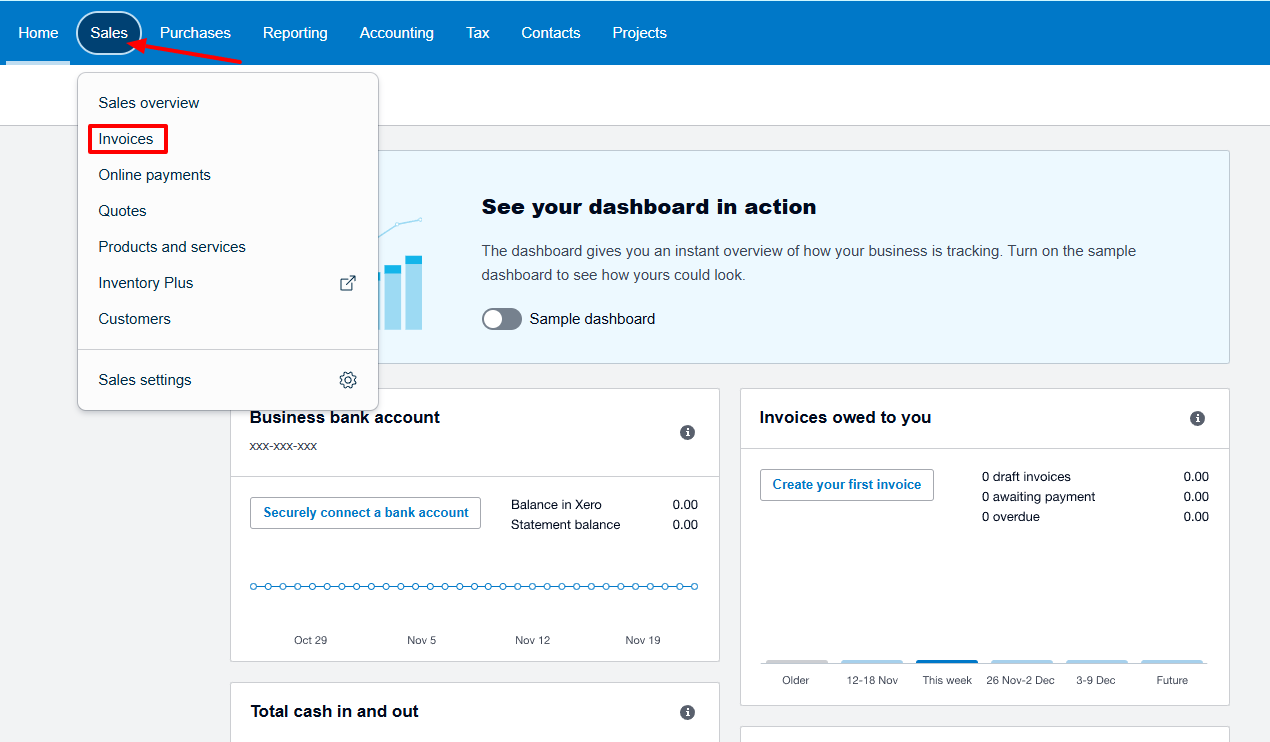
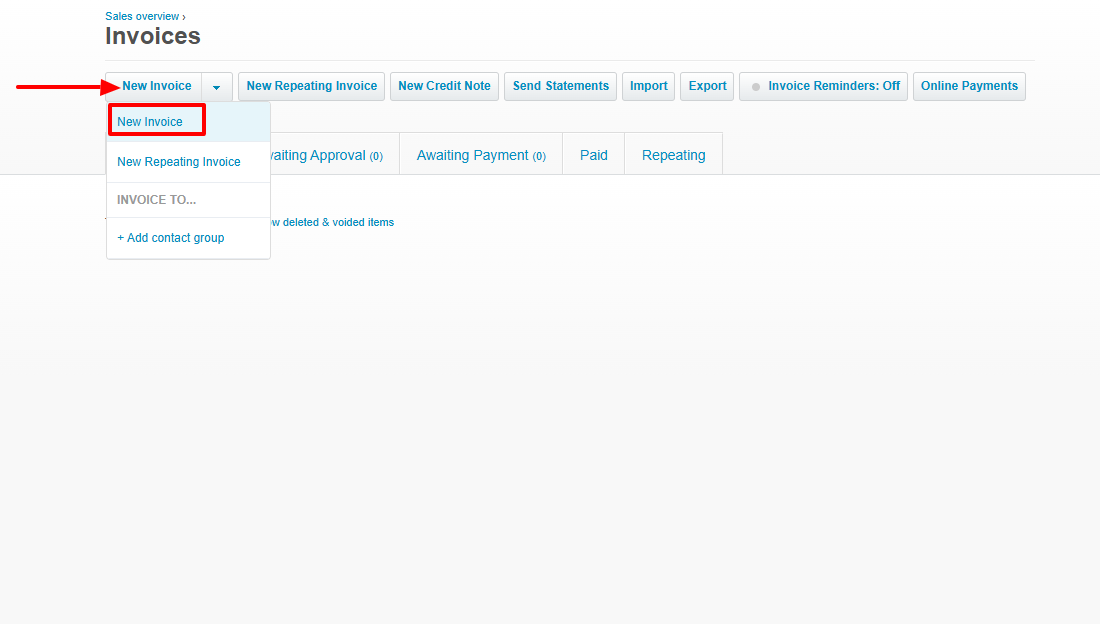
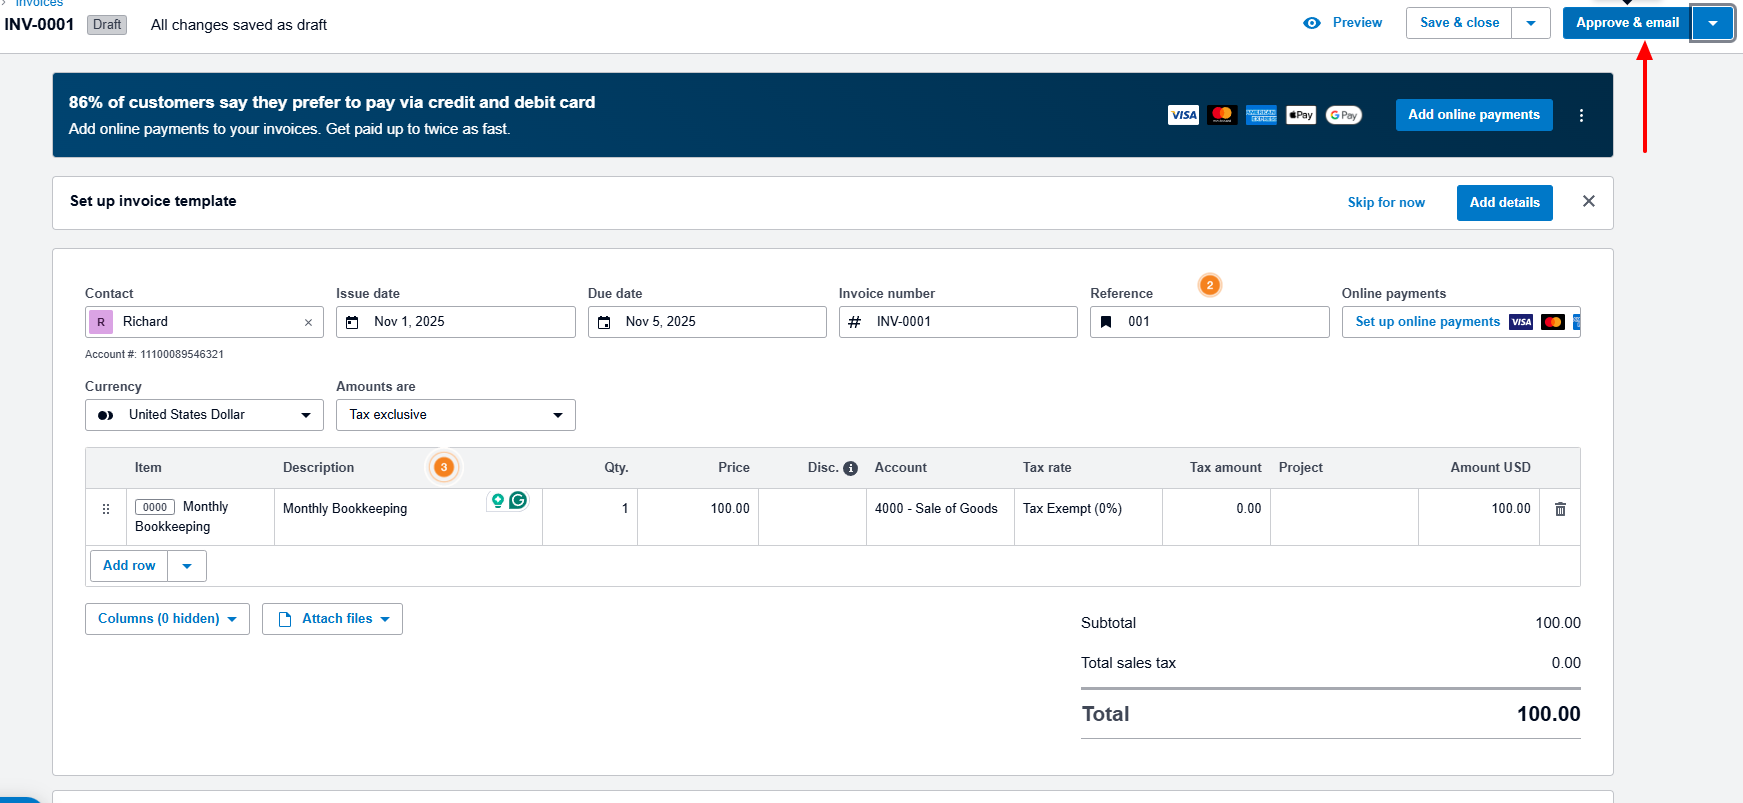
Click "New Invoice".
To create your invoice, you will add a contact, issue date, due date, invoice number, and choose an online payment type.
You will also select service, price, quantity, account, and tax rate.
We are almost there! On the far right, click "Approve & email."
Now, I will add my client's email address, subject, and choose an email template. Below, I can adjust the message, attach a PDF to email, and send myself a copy.
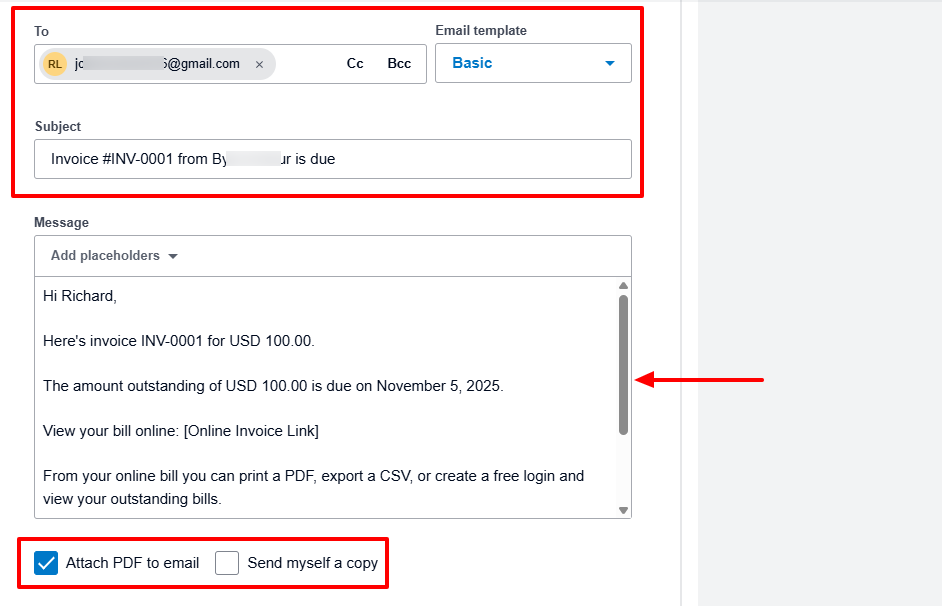
Your invoice is ready.
2. Expenses
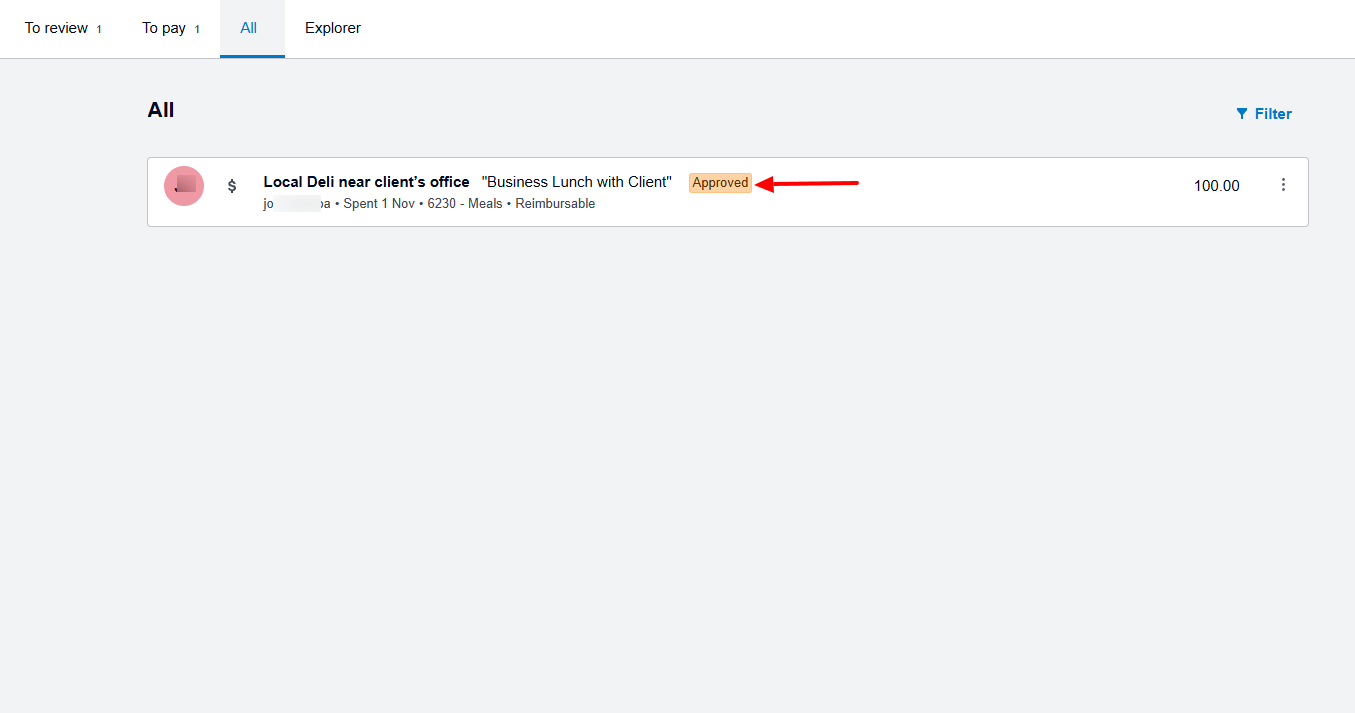
Sometimes, a team member can make an expense on behalf of the company and use their own money to cover it. Later, they can claim it so the company reimburses them, provided they can prove that's really the case.
On Xero, it's called Expense claim.
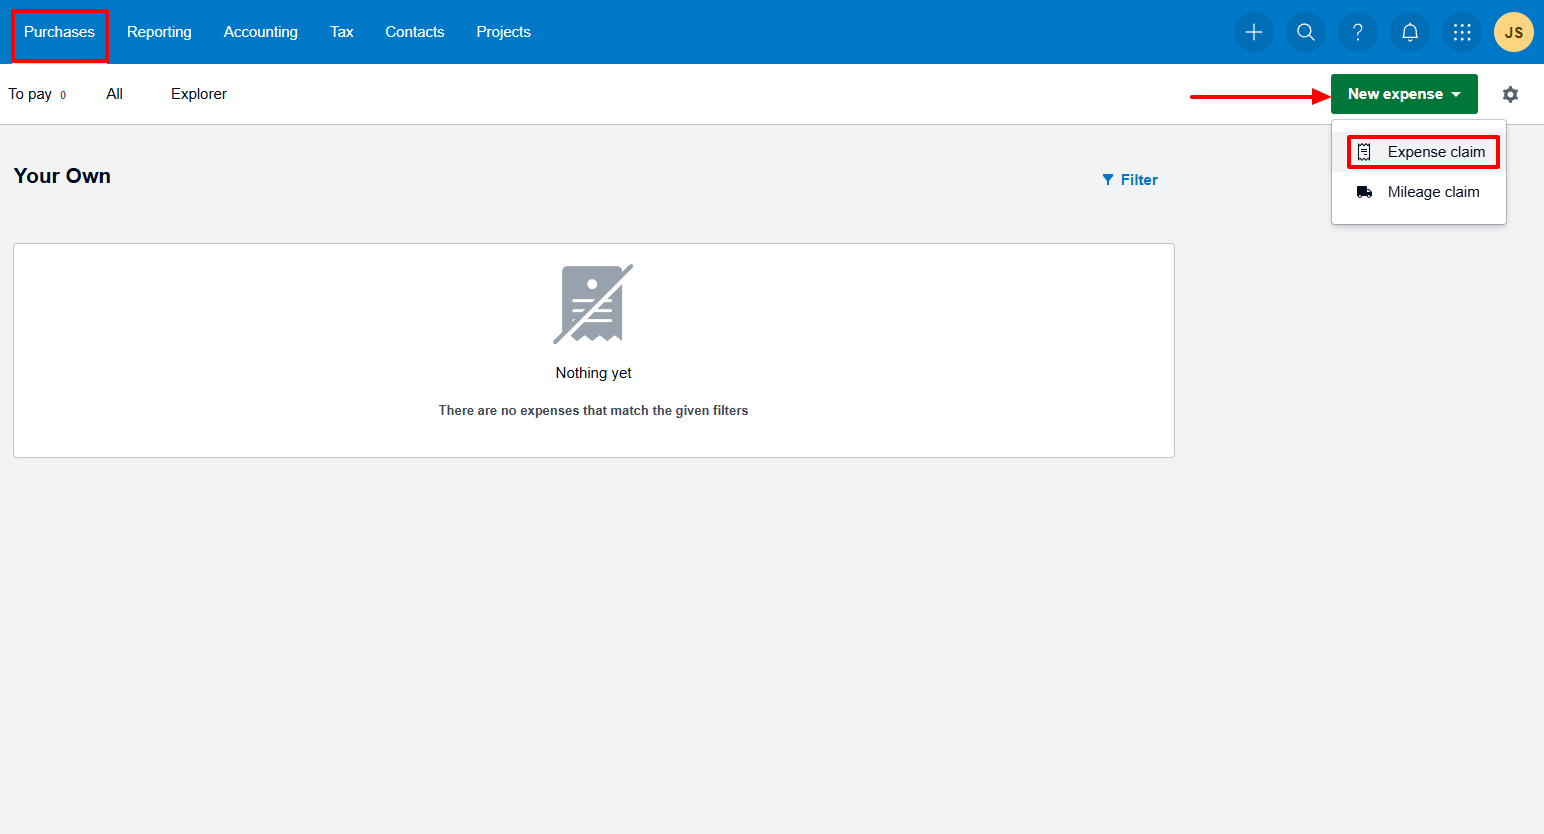
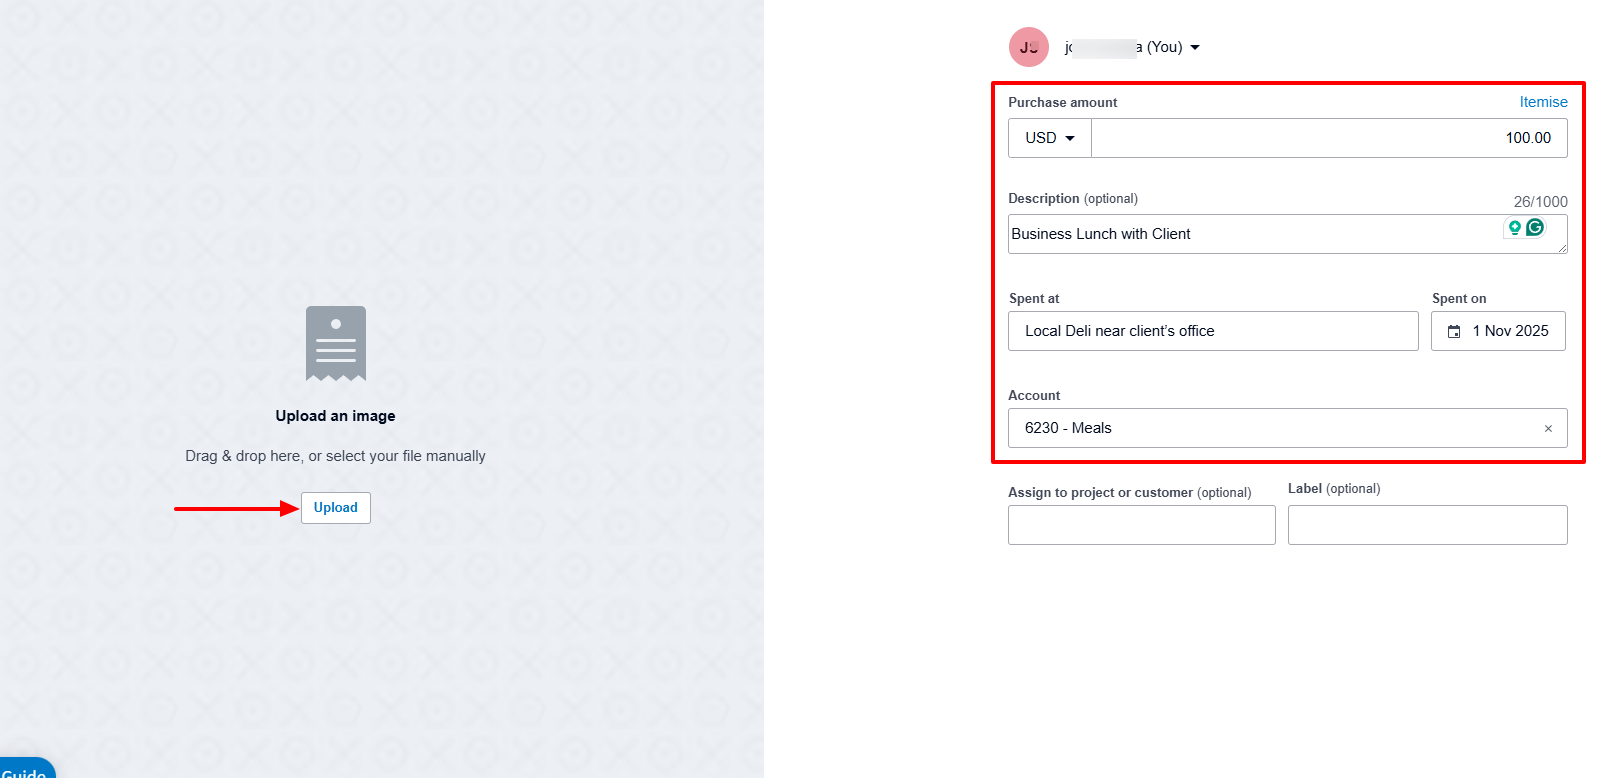
To create your expense claim, you can upload an image (e.g., a receipt), add the purchase amount, description, where and when you spent it, and the account.
Now, on the far right, you can click "Save draft." You can also select either "Submit" or "Approve" (if that's your responsibility).
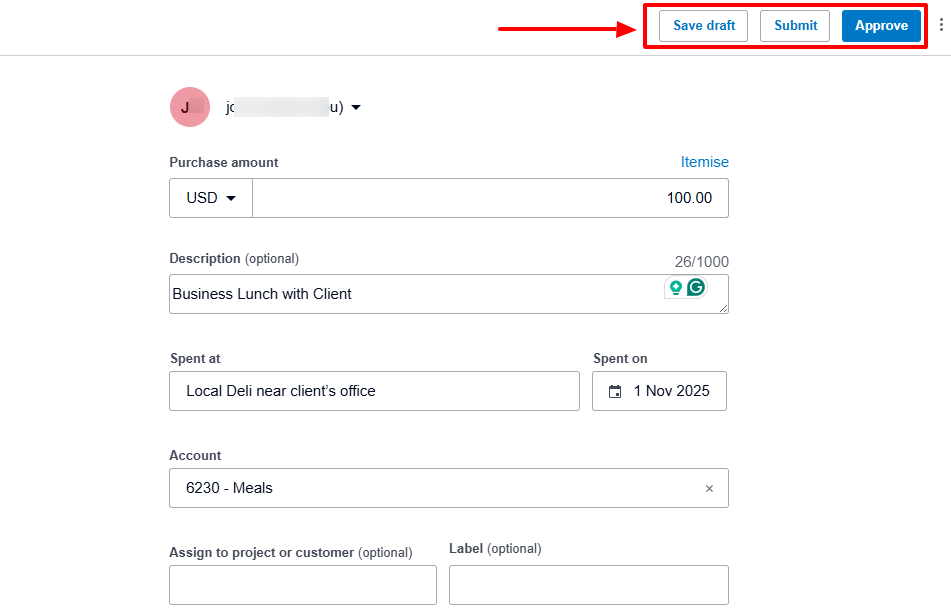
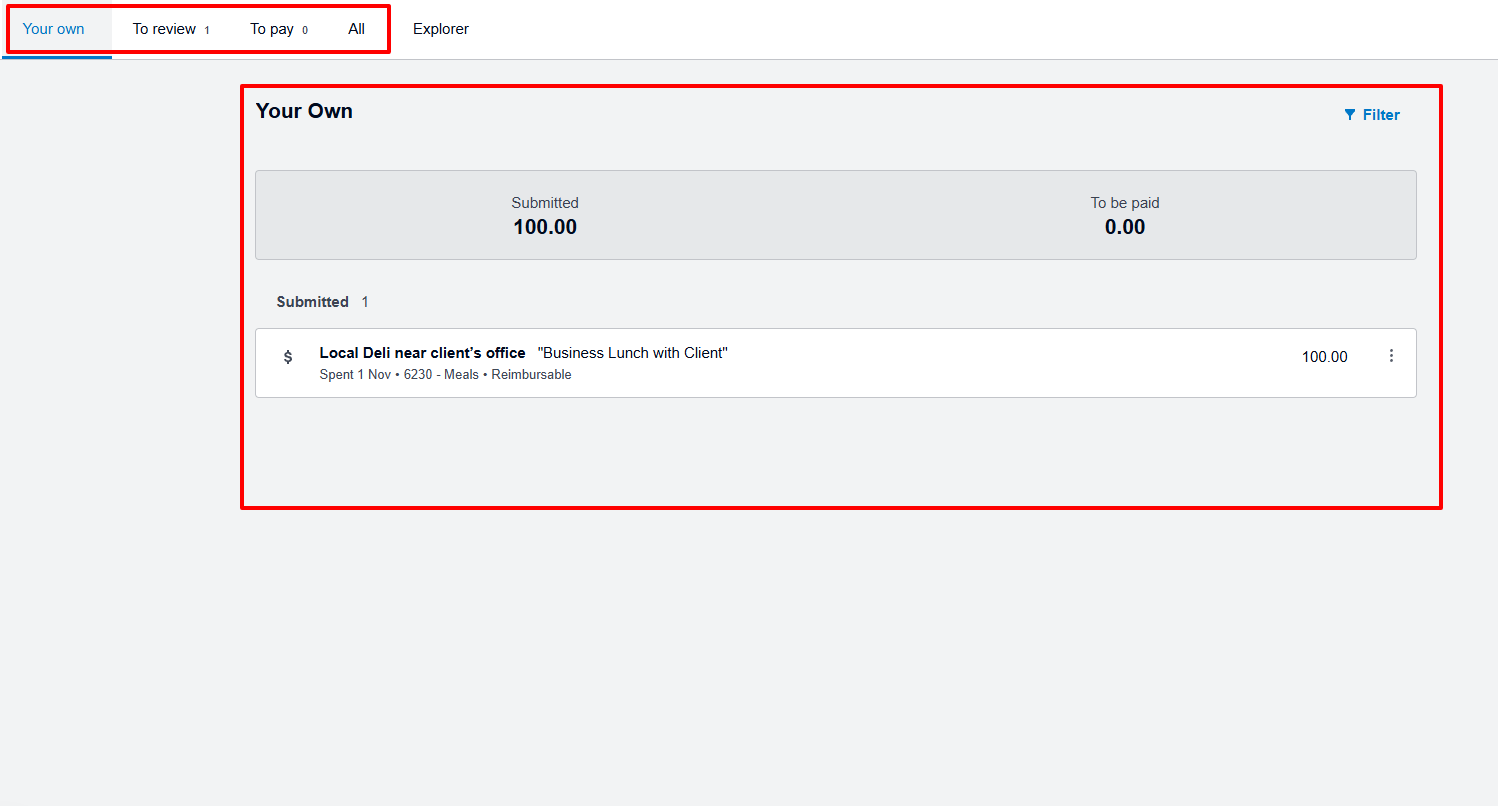
When the claim is submitted, you can see the amount submitted. But it will still be under review before being approved.
And when approved, you can see the Approved icon next to the claim.
What I Loved and What I Struggled With
|
What I Loved ✔ Allows you to upload images as proof of your expense. ✔ Love that I could attach a PDF to an email when sending an invoice. ✔ You can assign an expense to a project or customer. |
What I Struggled With ✘ The interface of the invoice setup has so many fields, which can be confusing at times. ✘ The main interface doesn't look really modern. It looks a bit old. |
Best for
- Sole traders and small businesses seeking a system to manage finances, invoicing and bank reconciliations.
Pricing
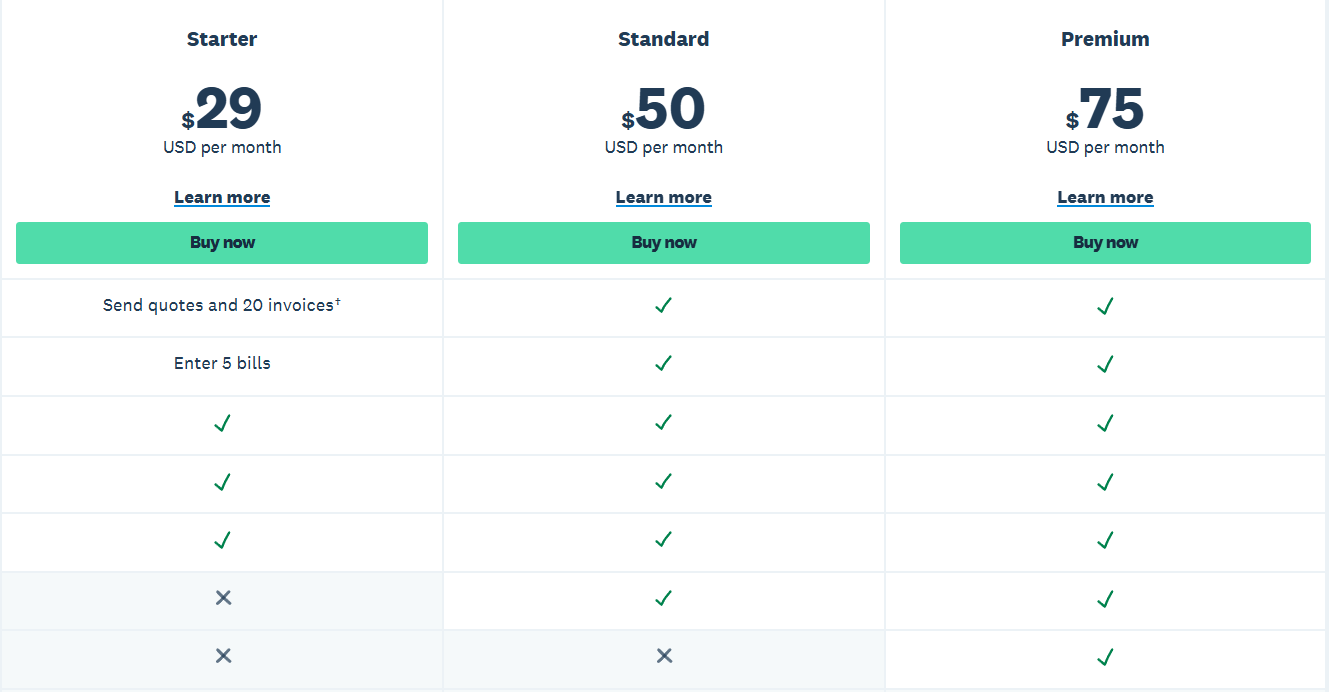
- Starter: $29/month
- Standard: $50/month
- Premium: $75/month
Start your 14-day free trial and automate your scheduling today.
6. Teamwork
| Personal rating: 4/5 stars | I love how you can automate tasks from scratch or using pre-built templates. |
Let's continue with Teamwork, another accounting practice management software.
I recommend it to large firms handling complex projects and seeking to automate tasks while managing many resources.
Now, here's how I use it.
Anytime I want to mark a time as unavailable for a team member, I simply select that time in the calendar and specify the reason.
And when I want to assign them a task, I select a project, time, assignee, start, and due date.
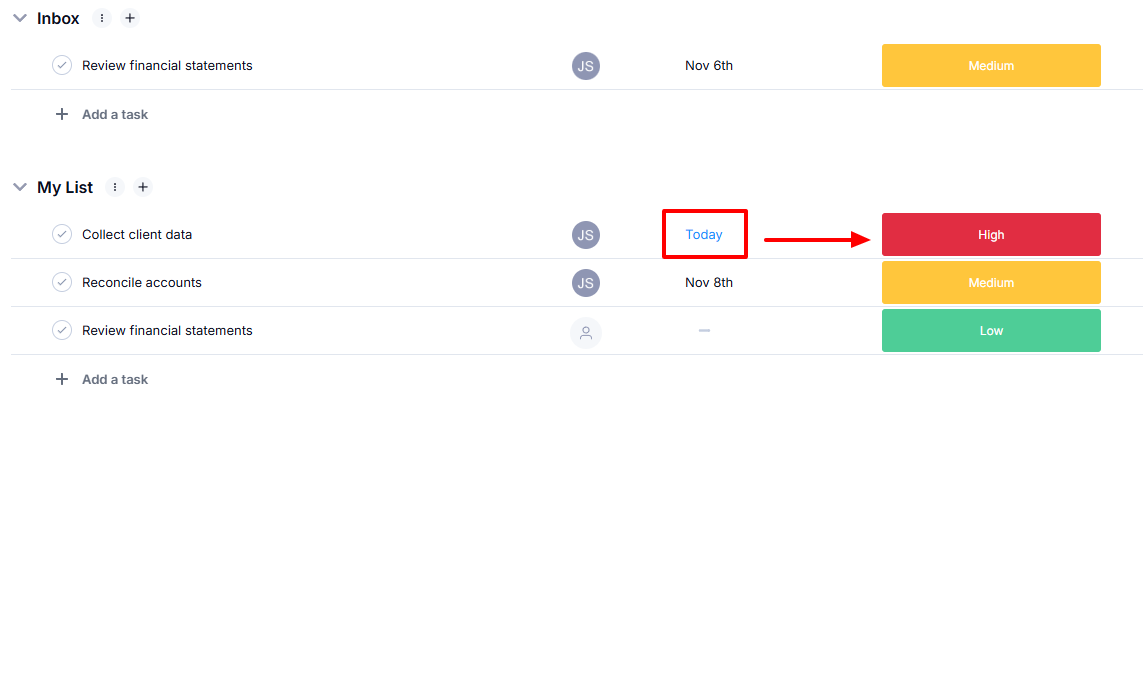
How I love the automation feature! I can automate tasks by choosing the project, then setting a trigger and action. For example, "Anytime a due date arrives, set the priority on High".
Interestingly, I can time my tasks, which is important to keep things organized. I choose a project, task, and then simply a start and end time. The platform will record the time I spend on that task.
With clients on the platform, I can see their name, who added them, on which project, and even the task completion rate.
This means I get a quick snapshot of each client's progress. So for teams managing multiple projects, you can see which clients are on schedule and which are overdue.

What I loved about Teamwork
1. Resourcing
When running a team, you must make sure tasks are assigned efficiently and fairly.
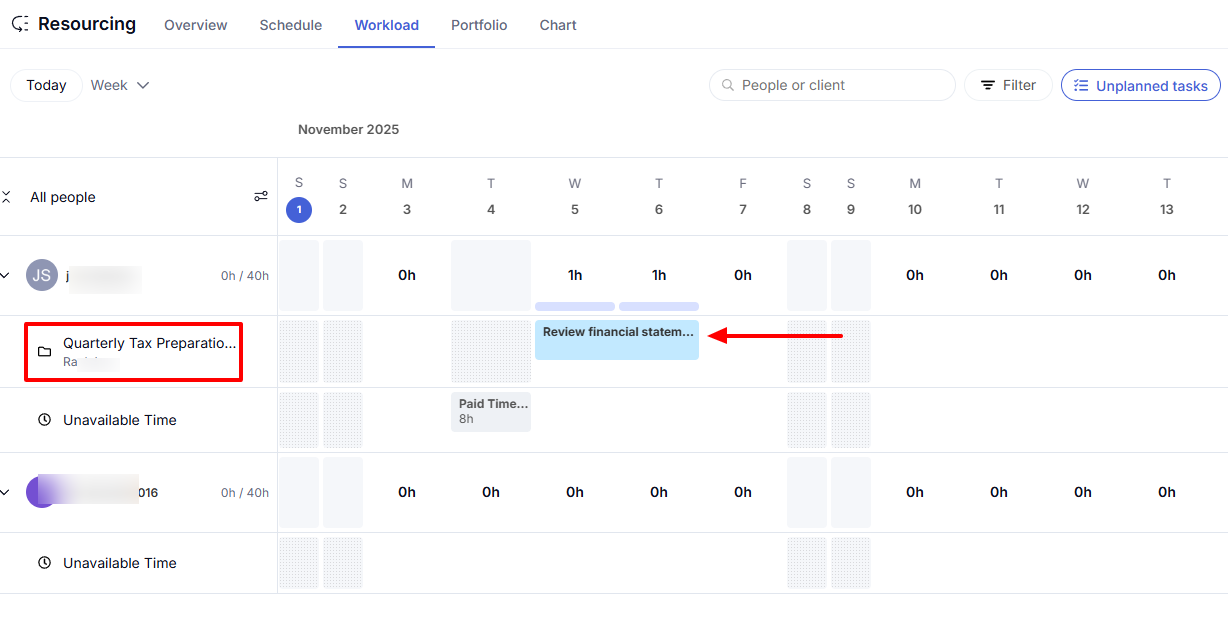
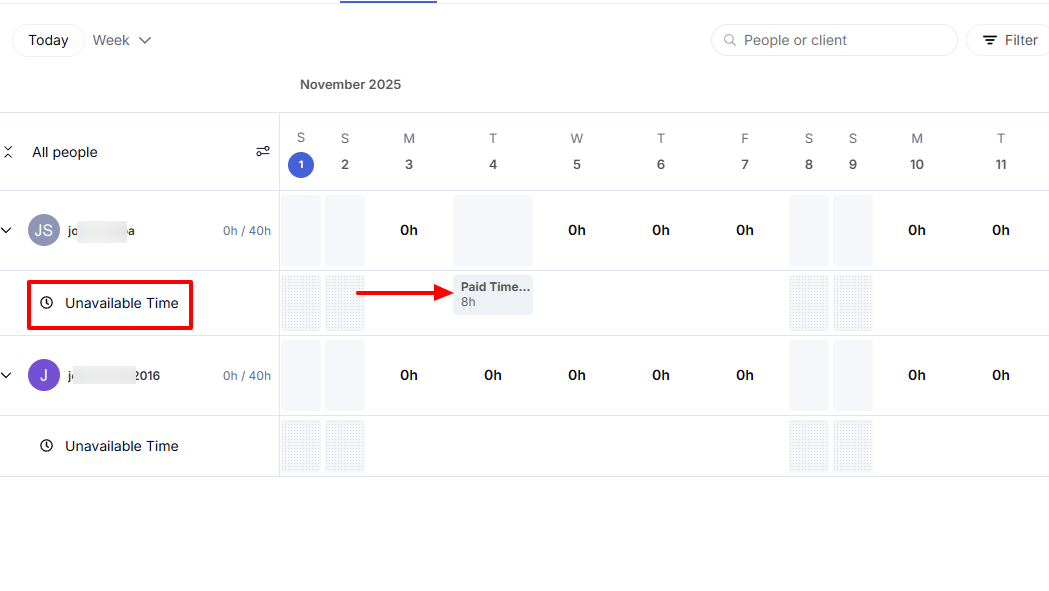
For example, if you have one of your accountant on vacation, you use the Resourcing feature to mark their unavailable days. This way, you can't assign them a task during that period.
You can find this feature in the sidebar.

I will head to Workload and simply select the time in the calendar I want to mark as unavailable for a team member.

I will choose the start and end date, total hours, a type, and add a description.
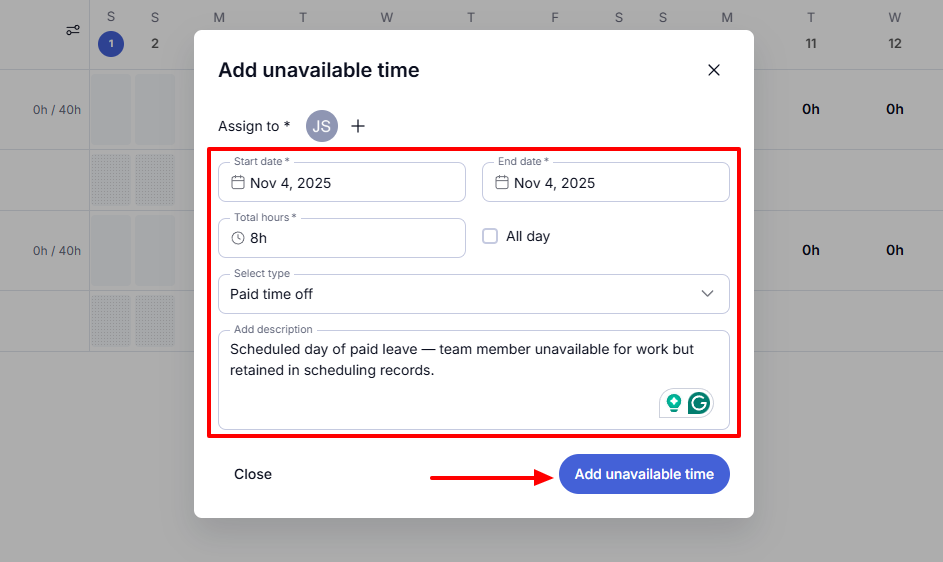
That's it! You can see the unavailable time in the calendar with the reason.
Now, you can still add tasks (just not on the same day you marked as unavailable). You simply select a project, task name, choose an assignee, dates, and estimated time.
You can also set the priority and notify the team member by email.
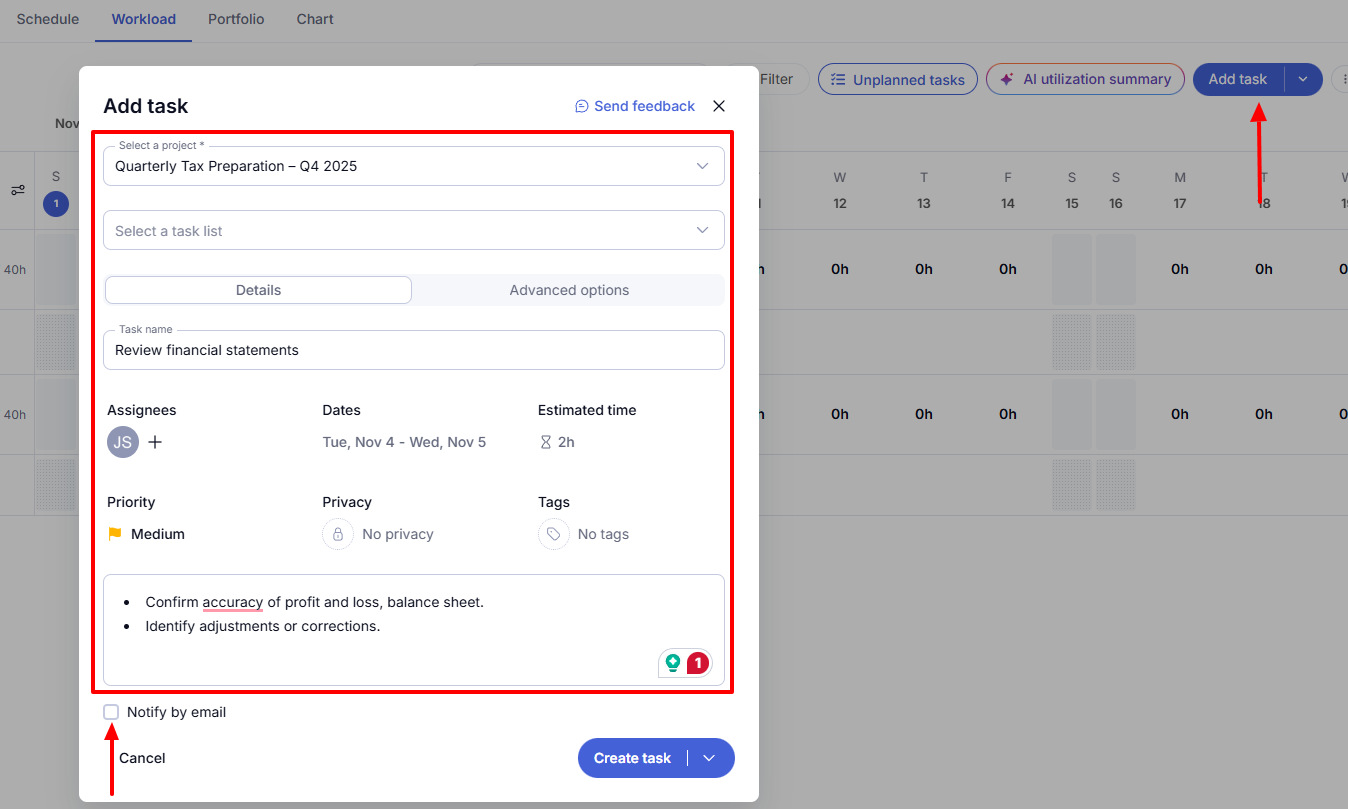
The task will also appear right in the calendar.
2. Automation
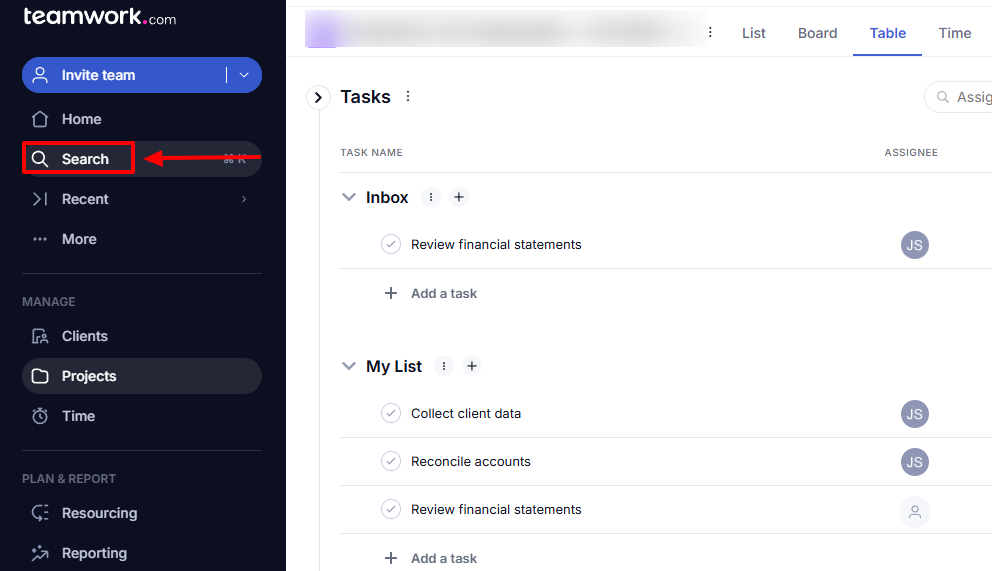
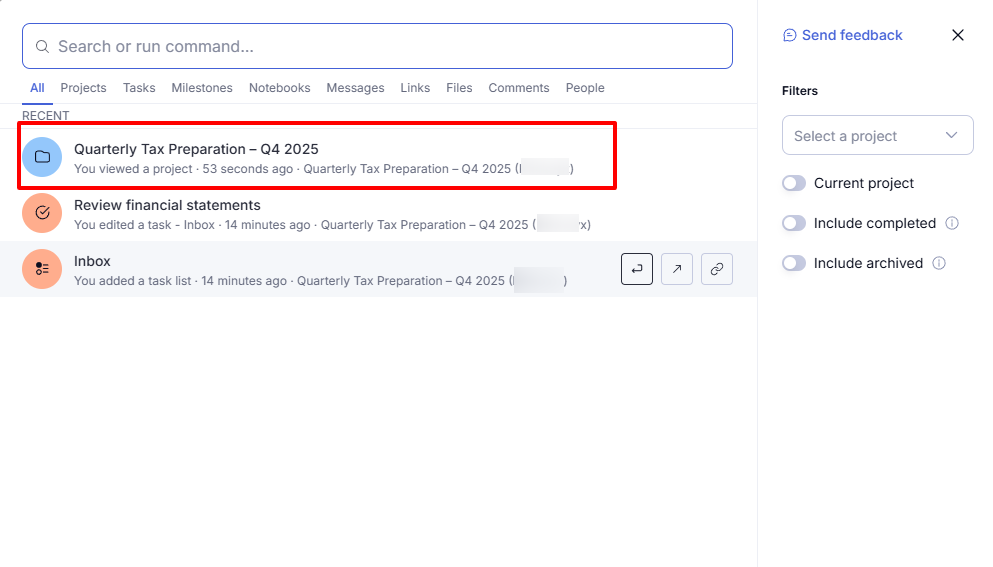
When you automate a task, it repeats itself without your input. On Teamwork, to use this automation, you must first go to "Search".
Then you need to choose a project for the automation.
On the right side of the interface, find "Automate".
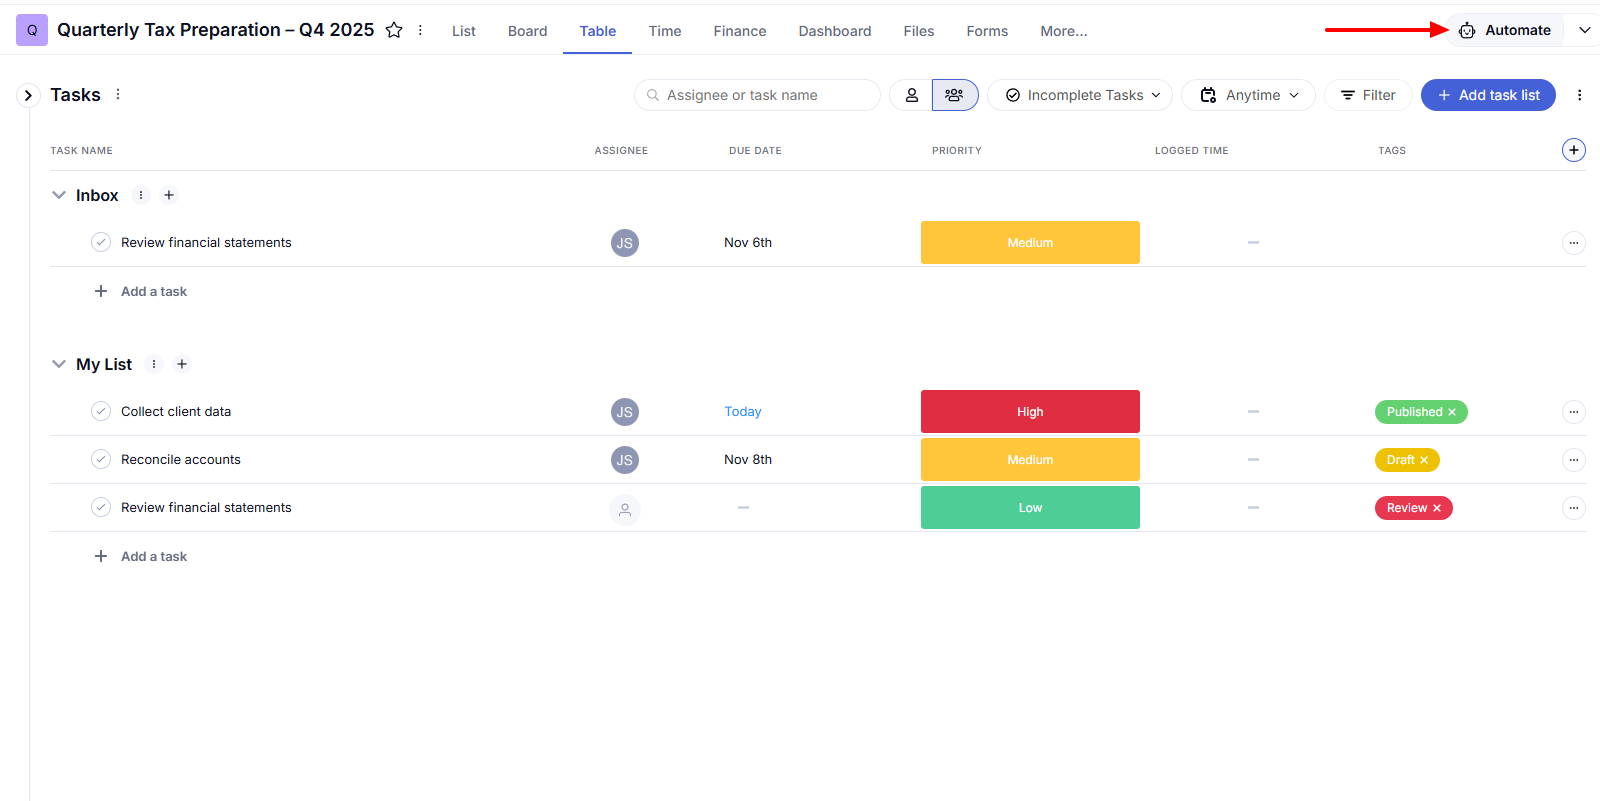
Teamwork already has pre-built templates for automation, so I didn't want to create one from scratch. I chose this template: "When due date arrives, Change priority".
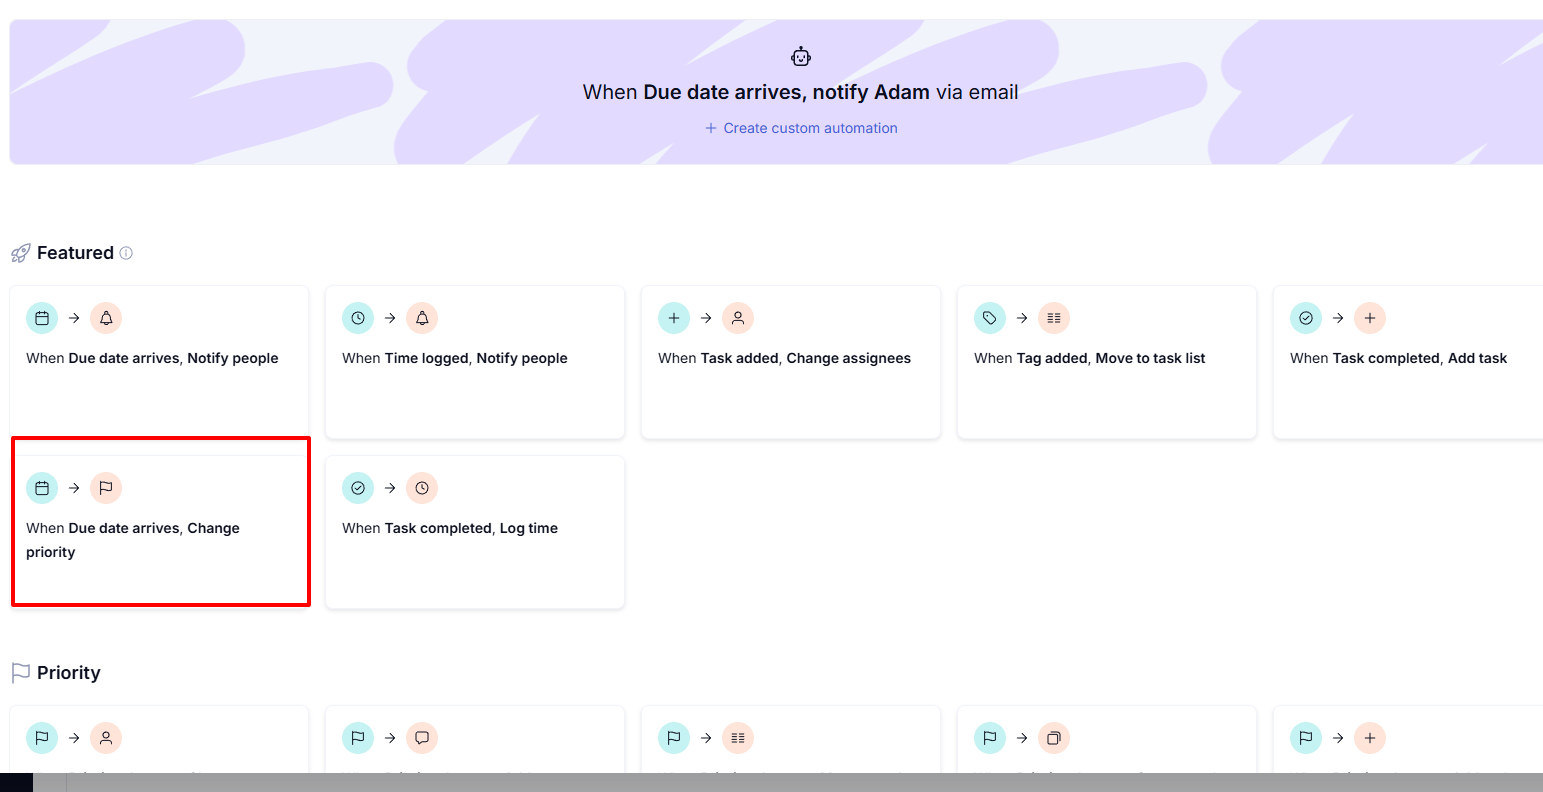
I could add more info like specific time, priority level, and project.
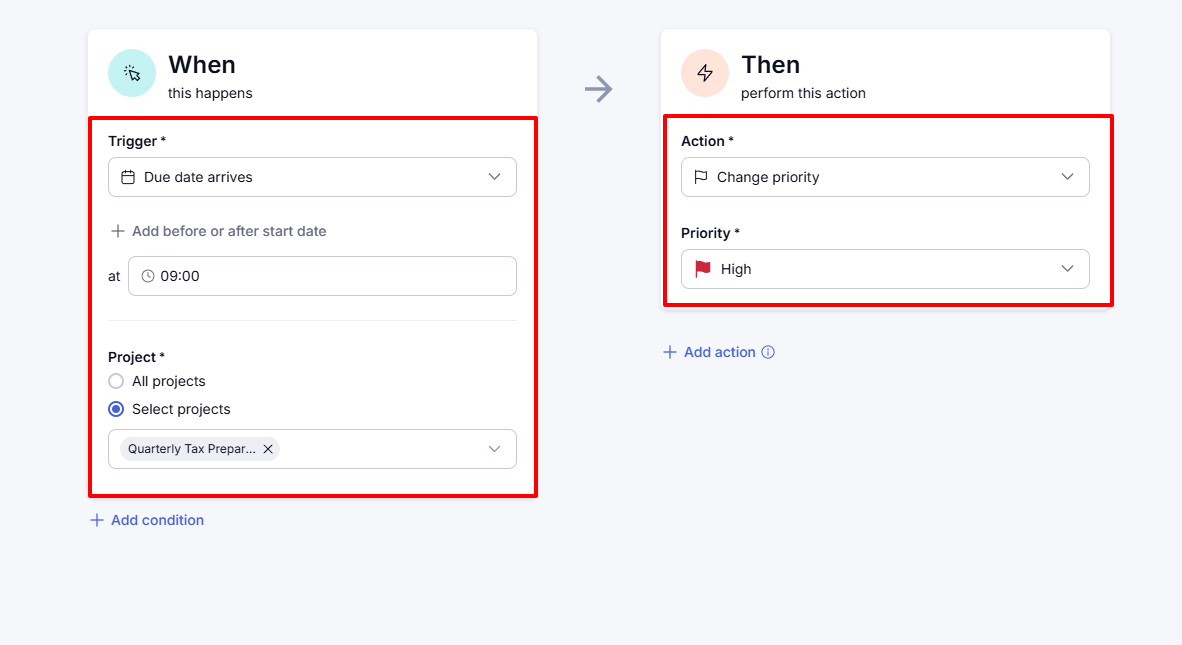
As a result, Teamwork will automatically set the priority to "High" whenever the due date arrives.
What I Loved and What I Struggled With
|
What I Loved ✔ Loved that I could notify team members via email after creating and assigning them tasks. ✔ The clean interface of the platform makes it easy to locate features and navigate. ✔ Can use the AI utilization summary to summarize the team's workload for the week. |
What I Struggled With ✘ No custom fields to add other reasons for unavailability apart from the ones the platform provides. |
Best for
- Large firms seeking to manage huge resources and complex projects using automation.
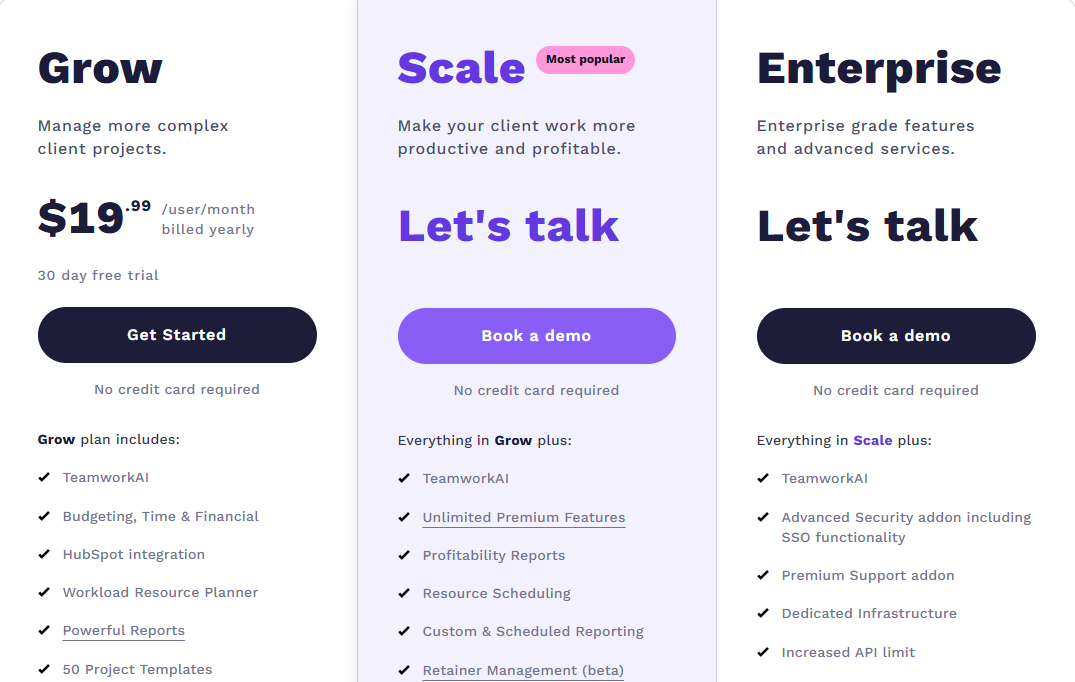
Pricing
- Grow: $19.99/user/month, billed annually
- Scale: Custom pricing
- Enterprise: Custom pricing
Choose The Best Accounting Practice Management Software
There you go! Everything that has a beginning also has an end. This article was about the best accounting practice management software. I shared my top picks: Zencal, Jetpack Workflow, Ignition, Financial Cents, Xero, and Teamwork.
They all had interesting features with their strengths and weaknesses.
If you've read the whole article, then you are ready to choose the best accounting practice management software.
FAQ
What is accounting practice management software?
Accounting practice management software is a tool that helps manage team and client work, accounting tasks, and projects.
What are the best software for accountants and bookkeepers?
The best software for accountants and bookkeepers are Zencal, Jetpack Workflows, and Xero.
Which accounting software is best for small businesses and sole traders?
Xero is an accounting software best for small businesses and sole traders.
Can accounting management software integrate with my existing accounting/package tools, like ledgers, tax software?
Yes, some accounting management software like Xero can integrate with your existing accounting/package tools like ledgers and tax software.
How much does accounting practice management software cost?
Prices typically range from $20 to $100 per user, per month, depending on features, user limits, and even support levels.
Can accounting software handle workflow automation (e.g., recurring jobs, document requests, approvals)?
Yes, accounting software like Teamwork and Jetpack Workflows can handle workflow automation like recurring jobs, document requests, or approvals.