7 Best Online Coaching Platforms in 2026!
When I first started coaching online, all I believed I needed was Zoom for calls, a calendar to schedule, and a notebook for client details.
It did not take long for all these to become a mess. I had to send links back and forth, deal with missed sessions, and I even lost track of notes at one point. I spend most of my focus on managing these tools rather than on my clients.
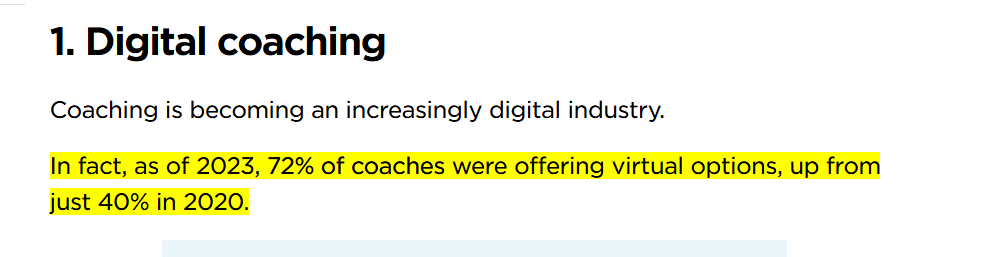
It was around then that I learned from Luisa Zhou's report that virtual coaching sessions had grown from 40% to 72% between 2020 and 2023, and over 62% of coaches globally have adopted online platforms for their coaching.
I realised that I was not the problem. All I needed was the right system to support my online coaching, so I picked a dozen coaching platforms and tested them.
Some of these tools focus on areas like good video calls, group work, notes, and client management. Only a few brought it all together.
In this article, I've narrowed down the list of online coaching platforms to the best seven after testing and using each one for some time. These tools include Zencal, one of the best meeting scheduler tools.
I will compare these tools, guide you on how to use them first-hand, explain what each offers, and teach you how to choose the right fit for your style.
Top Online Coaching Platforms Compared
| Coaching Platform | Features | Customization Level | Integrations with other tools | Ease of Use | Starting Price | Best For |
|---|---|---|---|---|---|---|
| Zencal | Meeting topics Summary Clients Event Discount Coupons | High | Stripe Make MailerLite Zapier HubSpot | Very Easy | Free | Career coaches who seek to sell and schedule client sessions through a branded booking page with calendar syncing. |
| Notion | Database Goal Tracker Project Page Inbox | High | Slack Jira Zapier Make | Moderate | Free | Life coaches who seek to build customizable client trackers, session templates, or resource libraries using flexible blocks and databases in one space. |
| Practice | Scheduler Appointment Contacts Form Availabilities | Medium | Stripe Outlook & Google Calendar Zoom Zapier | Easy | Free | Life coaches who seek to manage client sessions through an all-in-one CRM. |
| Slack | Channel Canvas Automations Huddles | Medium to High | Trello Zendesk GitHub Asana Zoom | Moderate | Free | Business coaches who seek to manage coaching conversations in organised channels with a searchable history. |
| EasyTools | Products Course Affiliates Customer | Medium | Airtable Discord Pipedrive HubSpot Mailchimp | Very Easy | Free | Product-based coaches who seek to sell digital coaching resources via one-page branded checkouts. |
| Miro | Boards Documents Slides TalkTrack | High | Smartsheet Azure ClickUp Asana Cards Jira Cards | Easy | Free | Business coaches who seek to visualize client goals and session structures on a collaborative whiteboard. |
| Zoom | Meetings Hubs Whiteboard Tasks | Medium | Asana Miro Slack Microsoft Teams HubSpot | Very Easy | Free | Fitness coaches who seek to conduct live virtual training sessions by scheduling and hosting video meetings with clients. |
Start your 14-day free trial and automate your scheduling today.
7 Best Online Coaching Platforms
1. Zencal
First on the list of online coaching platforms is Zencal, a scheduling platform that lets you create a booking page for a coaching session.
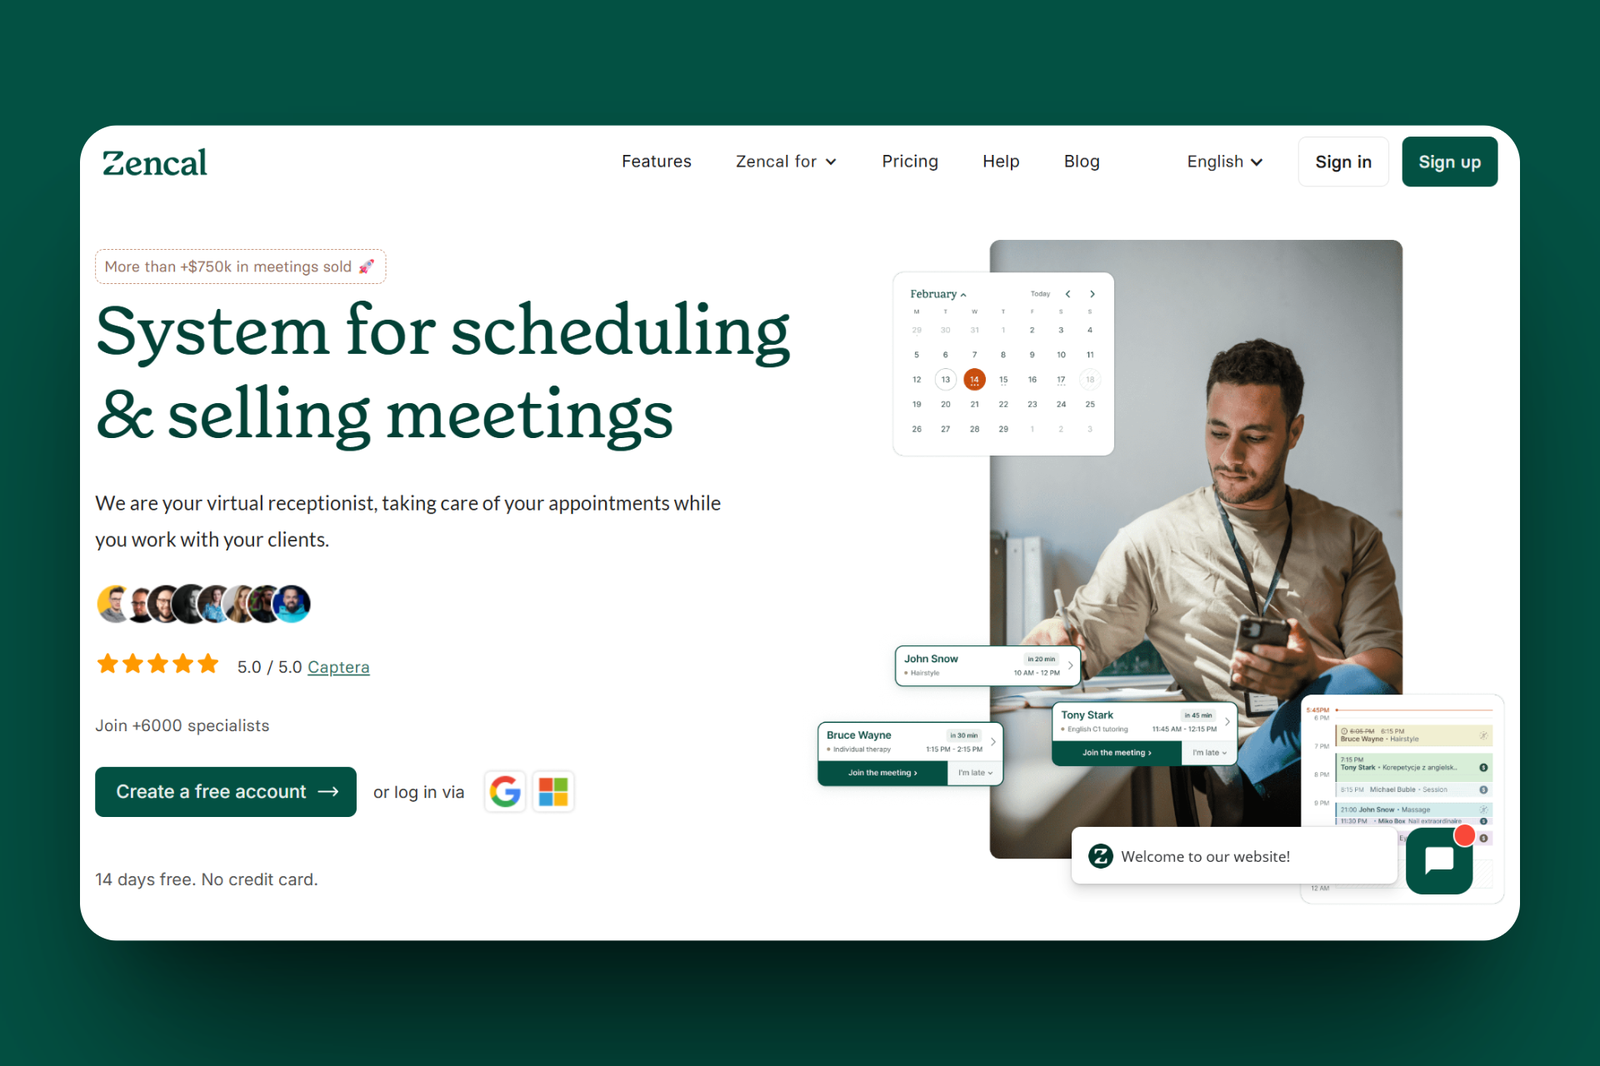
This tool allows you to create a specific session when you enter the session's name, set its duration in minutes, indicate its price, and select available time slots. In fact, you can enable the option to request reviews and email confirmation before saving it for clients to book.
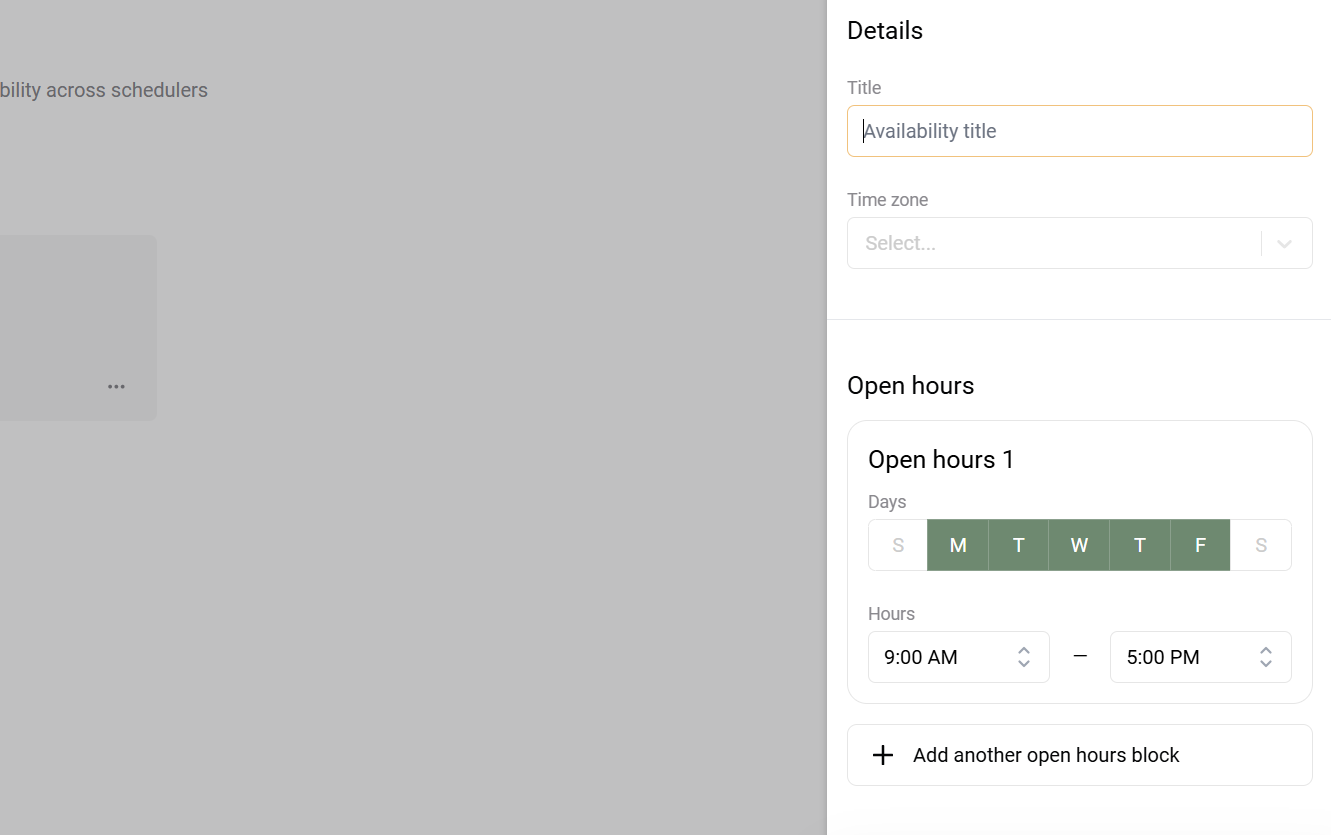
Zencal has an Event feature that lets you host group sessions for your coaching. To set it up, simply name or give it a title, specify its date and time, select the timezone, indicate the maximum number of participants, enable payment, and generate a booking link to share.
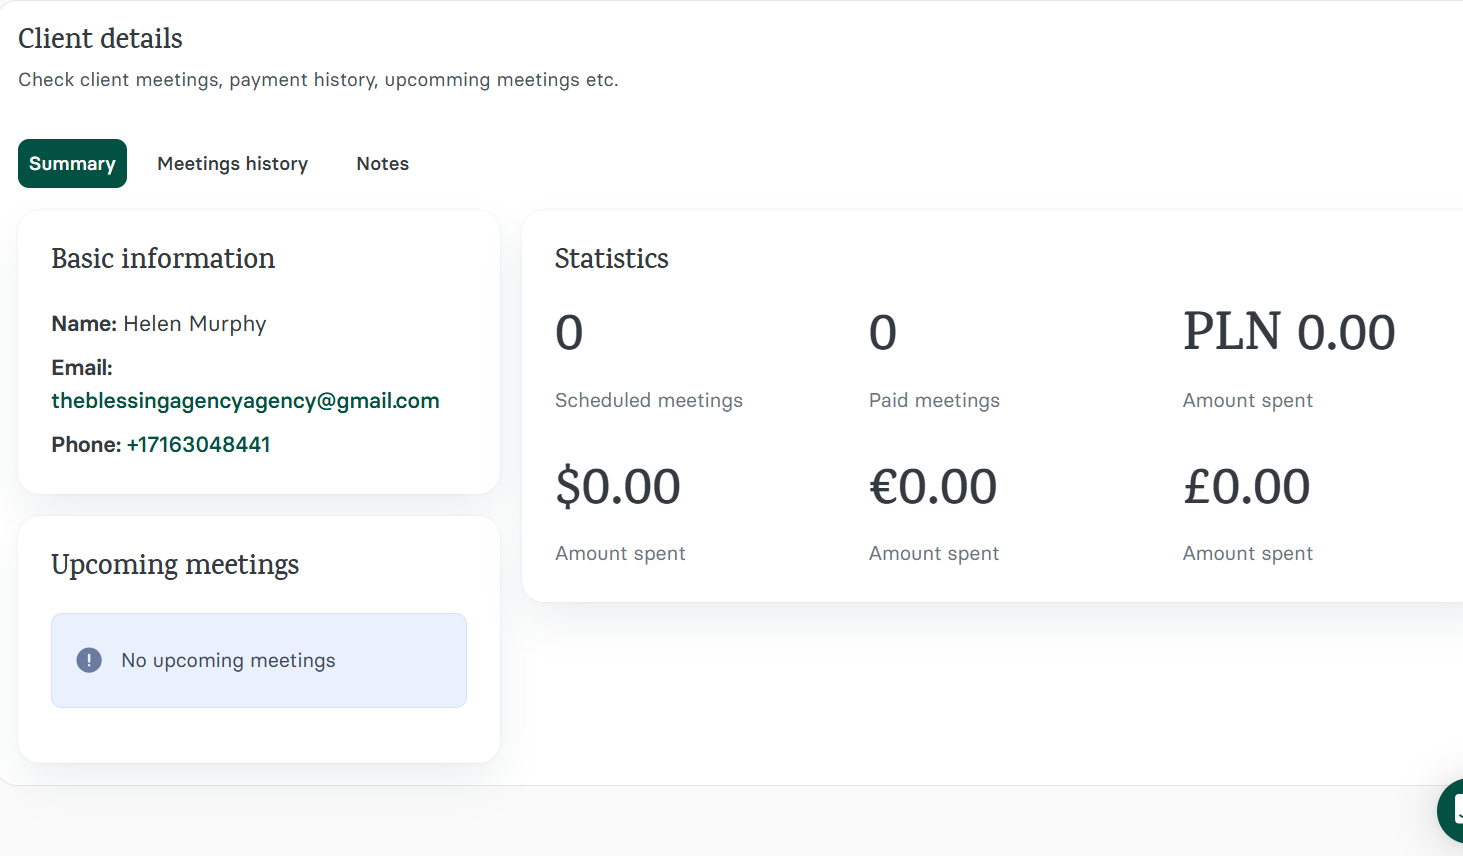
It also comes with a feature called Clients, which allows you to organise your clients. It stores your booked clients' details, such as name, email, and phone, tags them with booked topics, and links them to their session history and statistics.
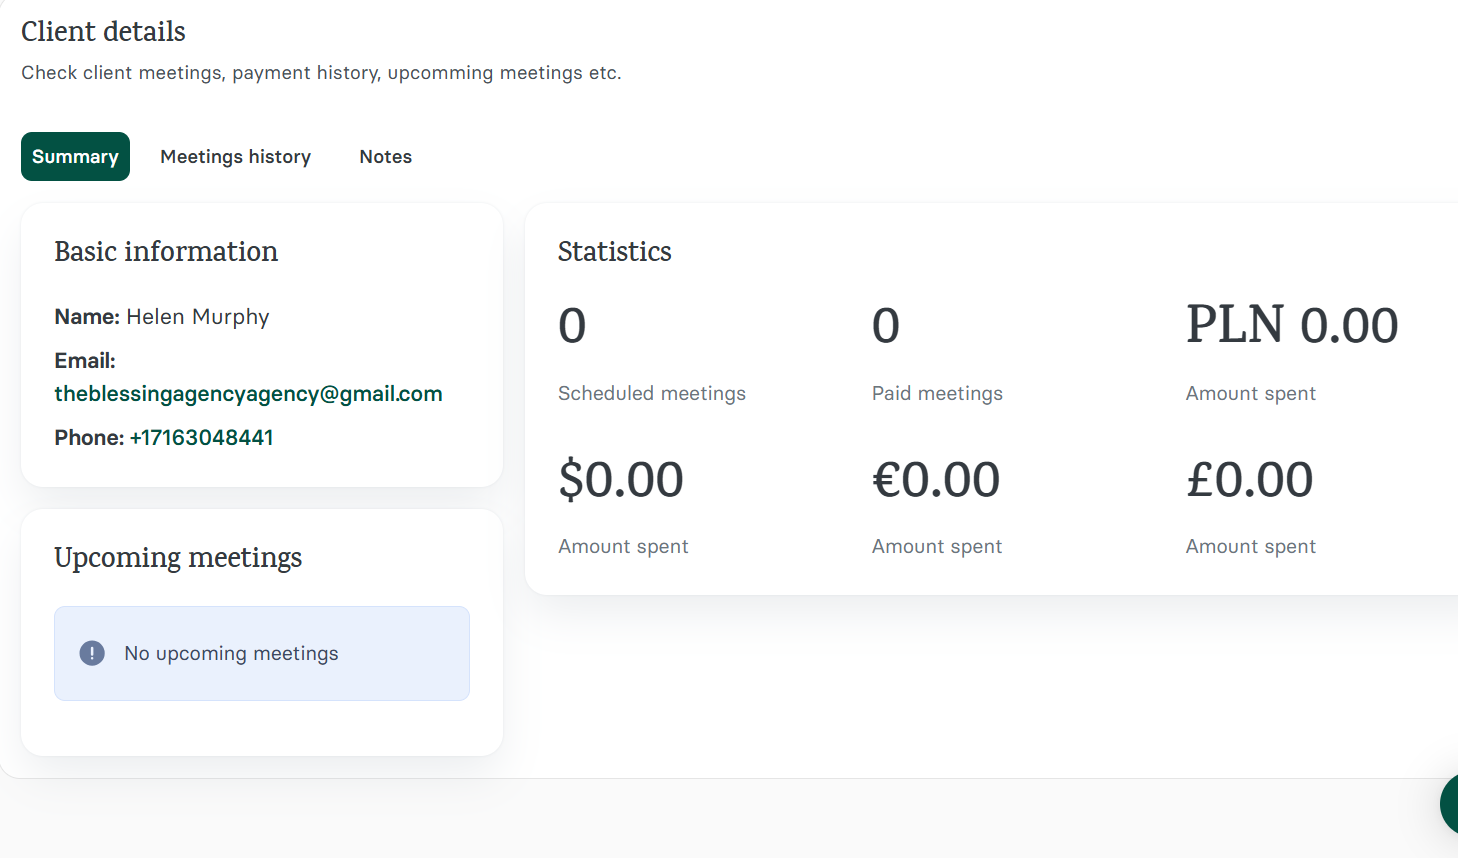
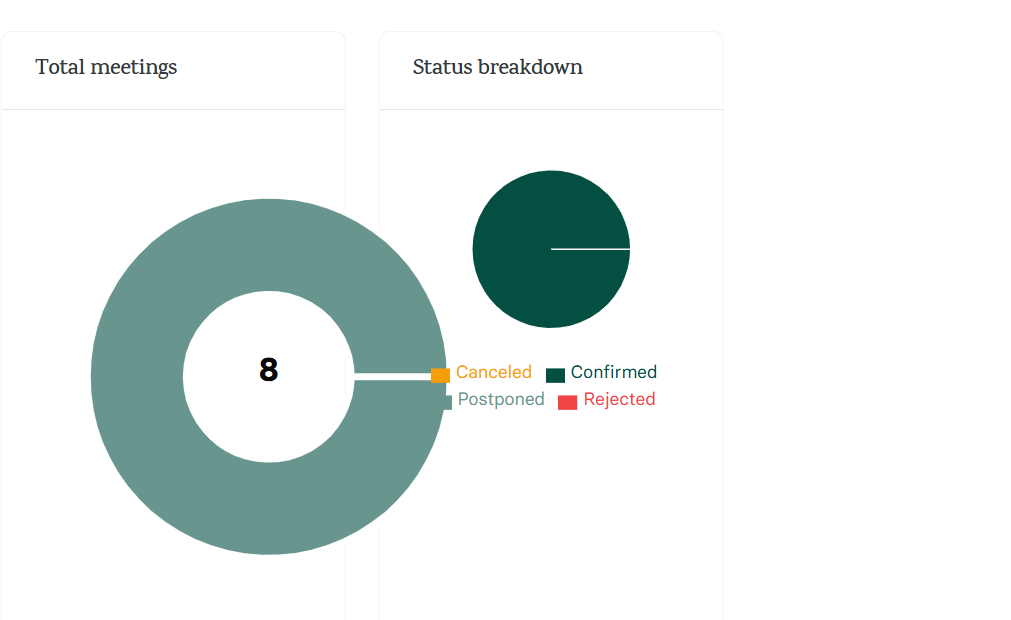
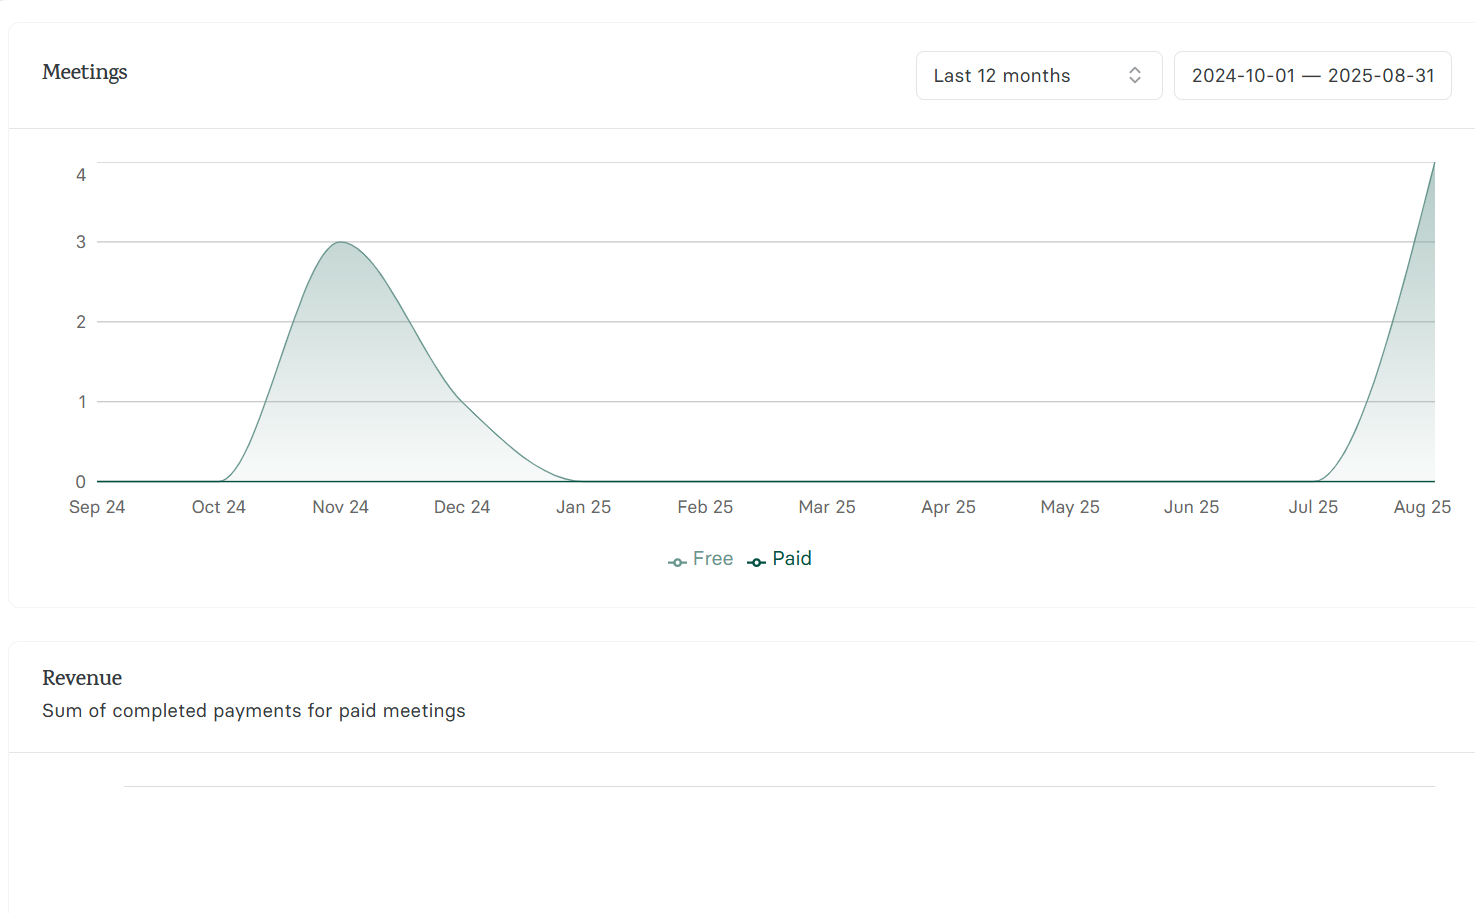
Moreover, Zencal features the Summary tool, a built-in analytics dashboard that allows you to select a date range and apply a filter. This returns key metrics on your meeting performance, such as total meetings, revenue, attendance rate, and booking count.
Zencal's Meeting topics is the core feature for your coaching-related scheduling. It lets you create a variety of sessions for your clients to book.
Coaches use them to create different types of sessions, such as discovery calls, paid coaching sessions, or program check-ins. You can indicate the session's duration, pricing, and availability for clients to book the right one.
Let us say you are a career coach; let me guide you on how to create a sample career coaching session with this feature.
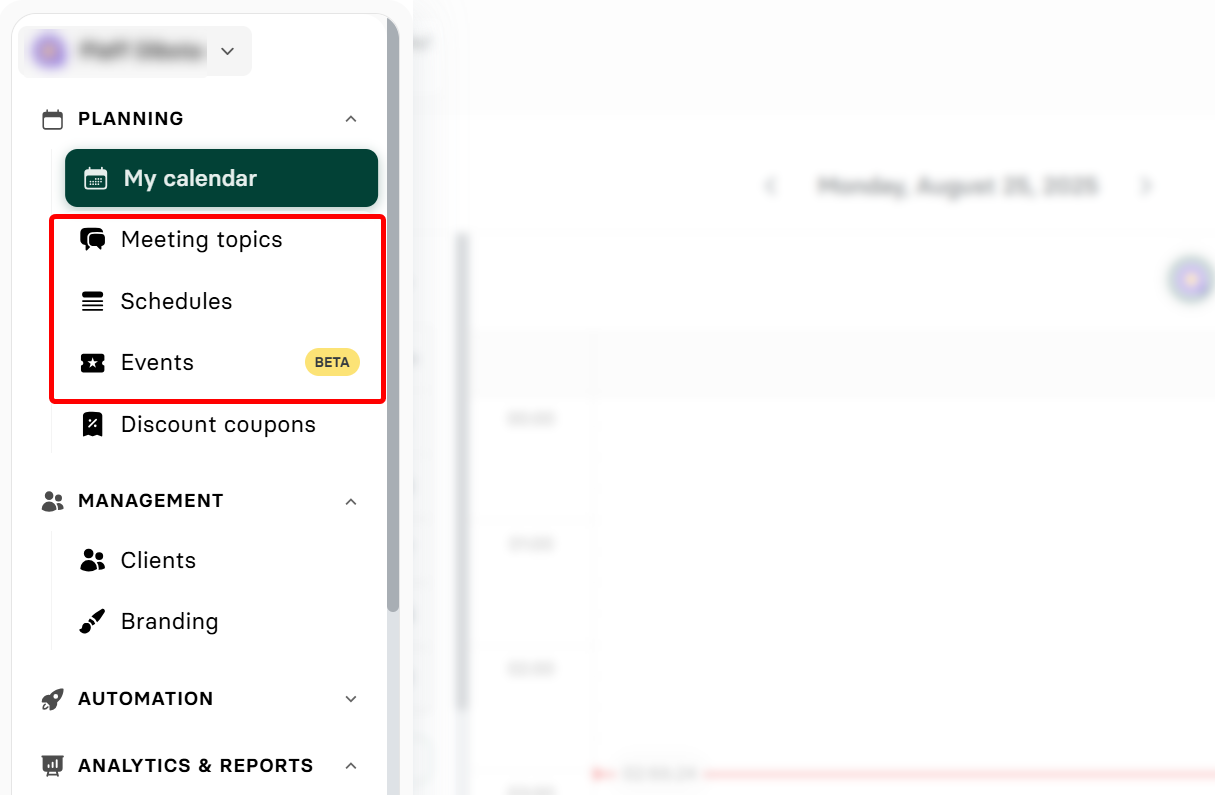
First, locate the meeting topics feature in the planning section of the main dashboard.
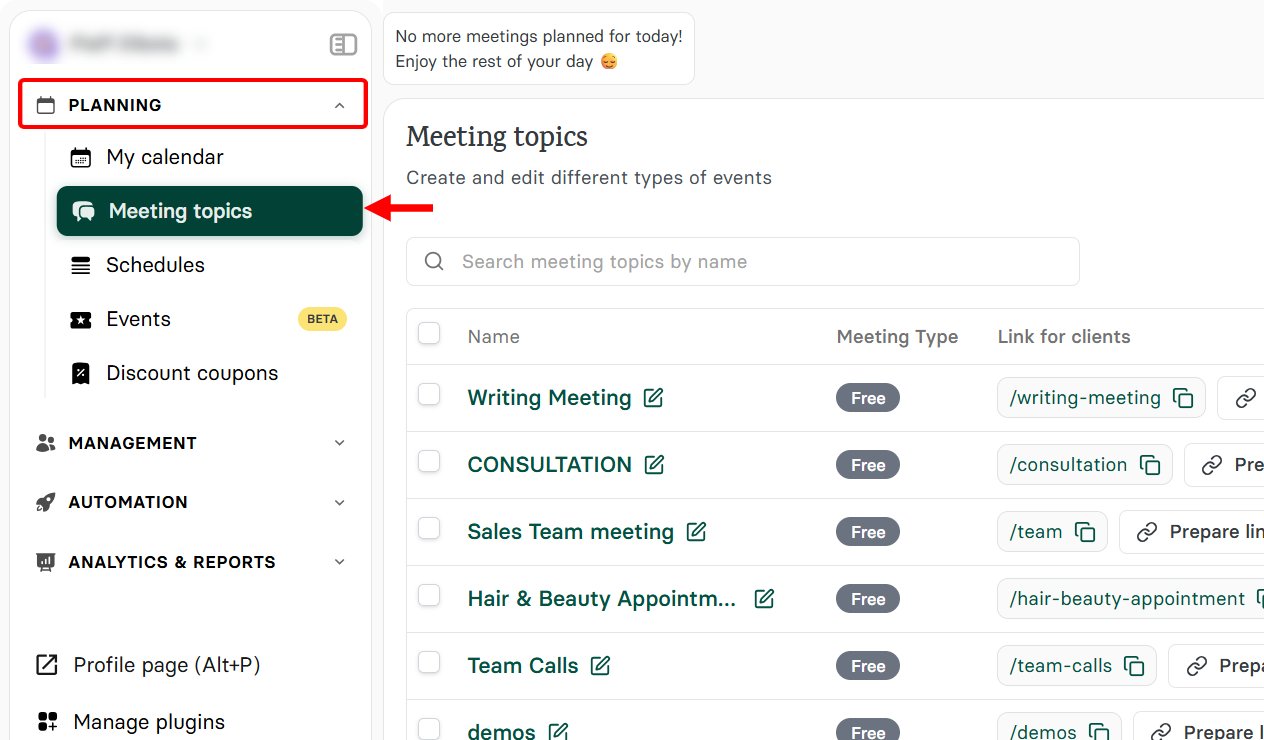
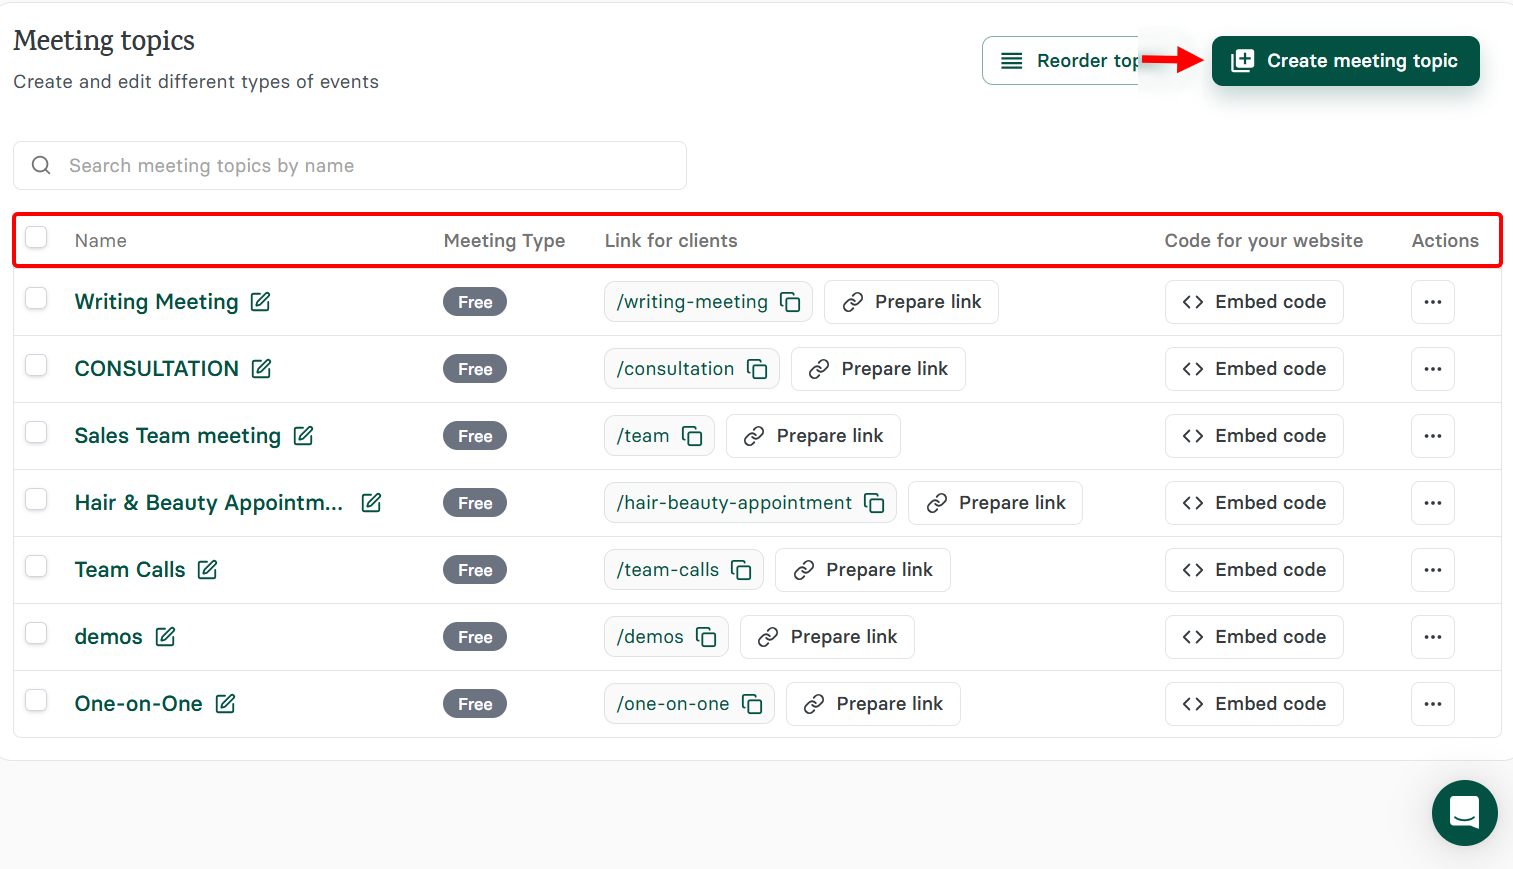
In the meeting topics section, you will find existing topics that you can embed, edit, and manage.
In this section, select "create meeting topic" to create another.
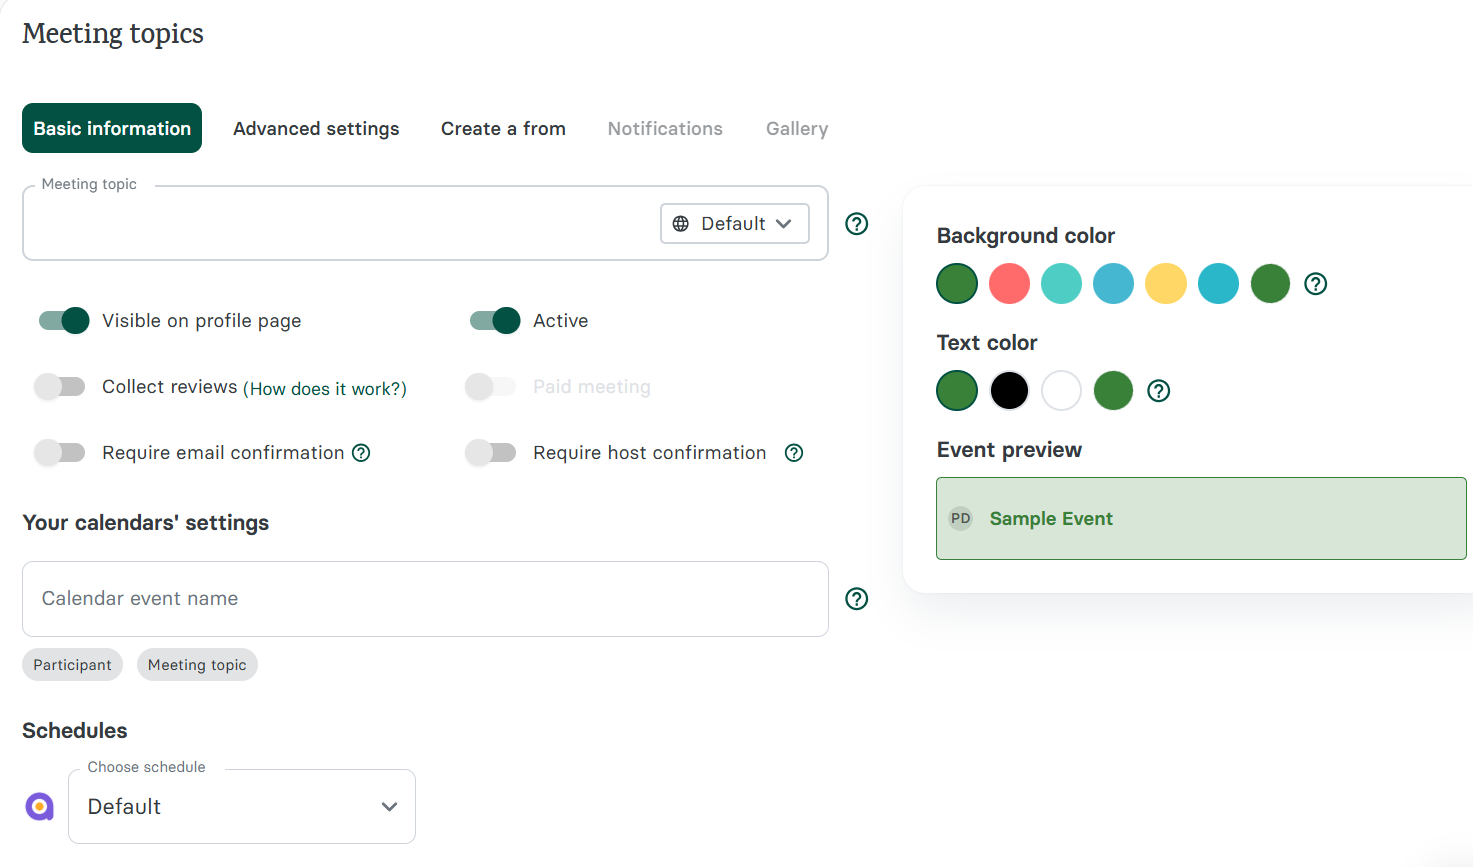
First, you set up the session's basic info. Here, you enter the session's name on the calendar, pick its colour, and then give it a name.
Also, you can make the session visible, collect reviews, make it paid, and require confirmation.
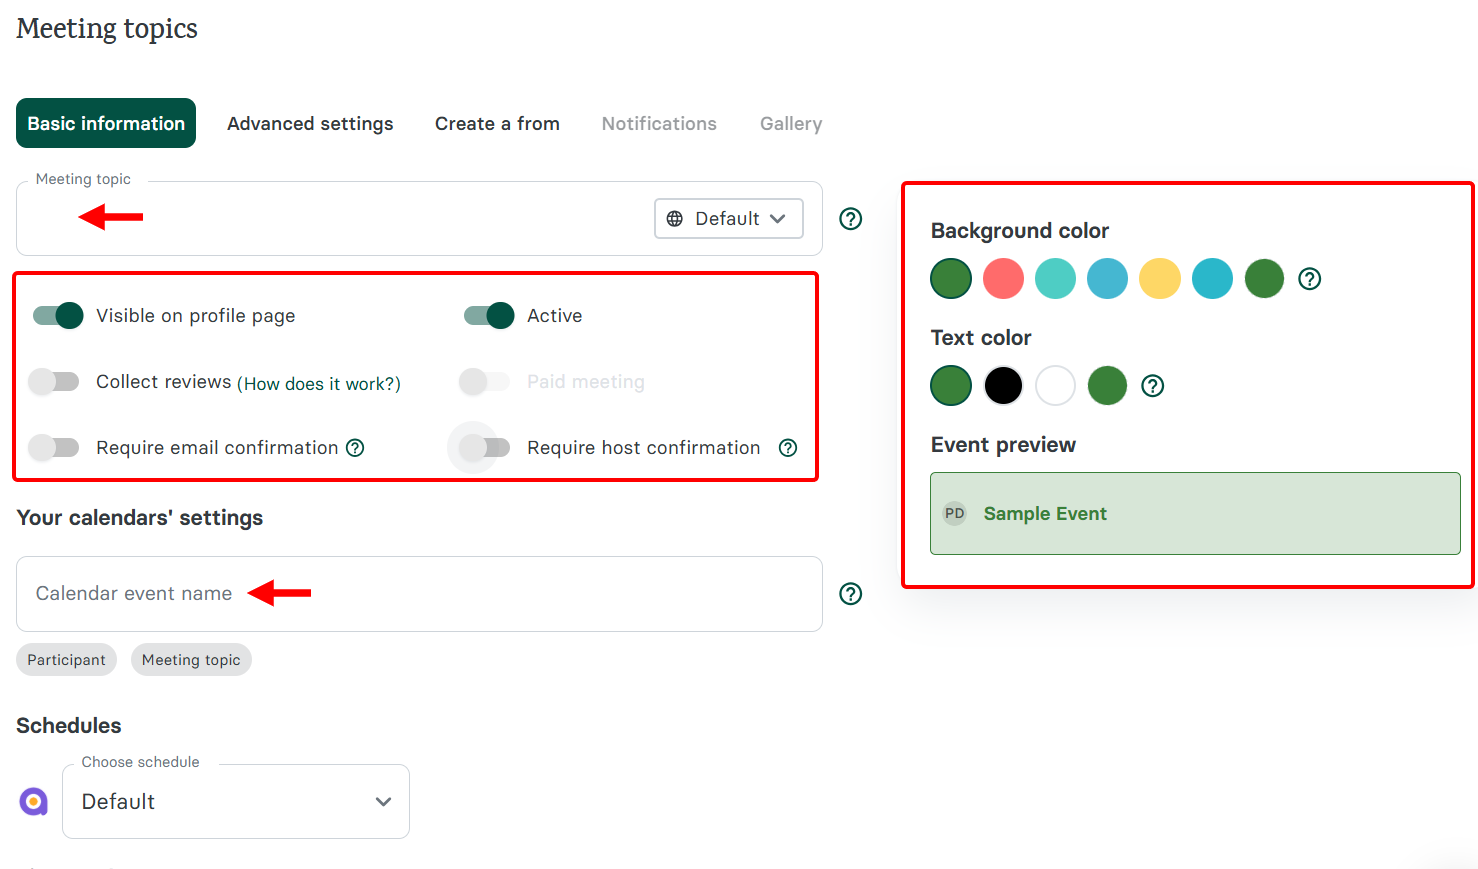
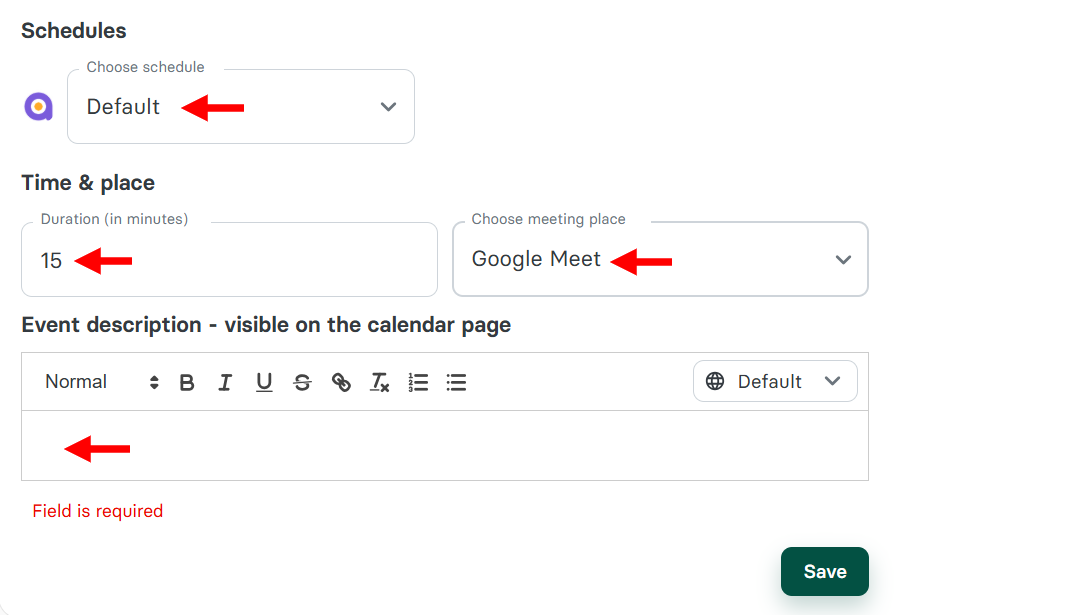
Next, scroll down to the Schedules section and describe the session, assign its availability, indicate its duration, and select the hosting platform, such as Google Meet.
Next, switch to the advanced settings tab, where you can select the booking page's calendar layout, enter the limit on the number of bookings per date, and add your confirmation page's URL.
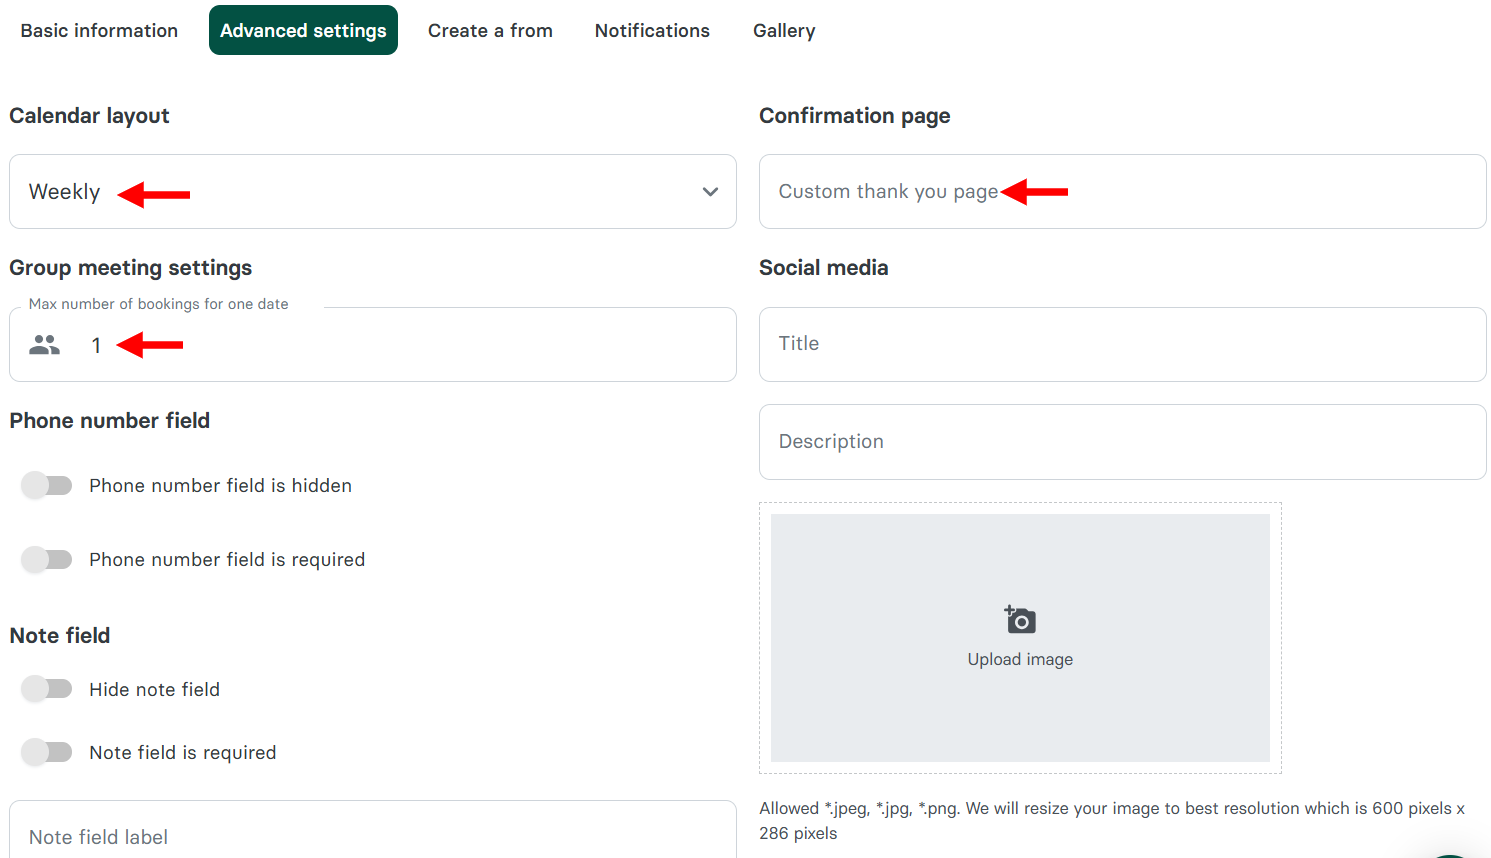
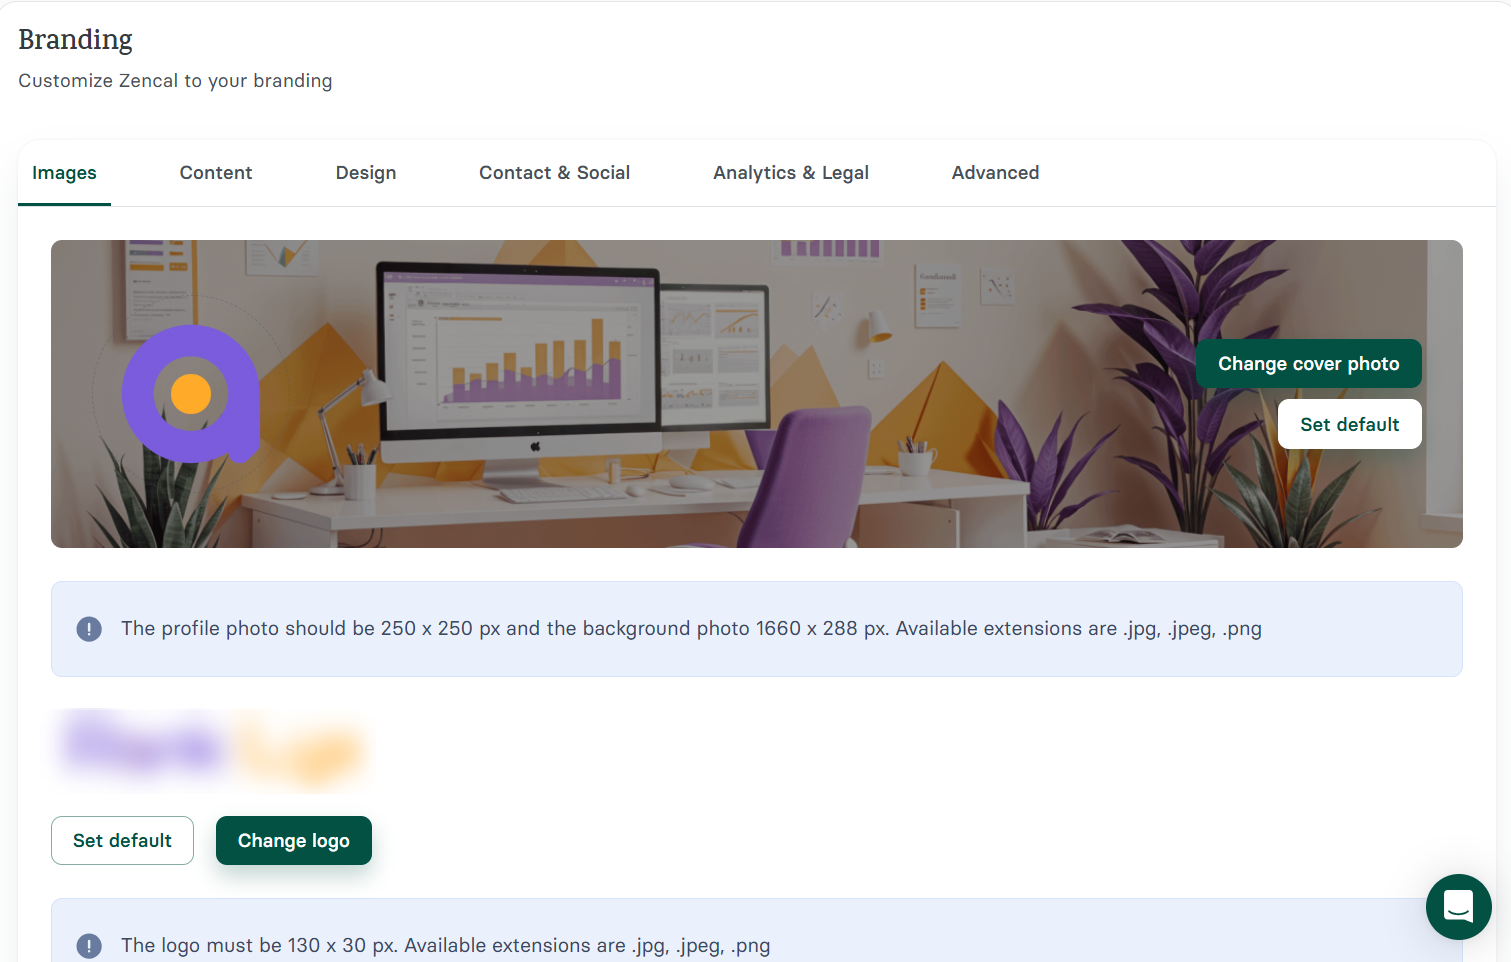
In addition, you can add the session's social media title, description, and image. You can enable fields like phone number and notes on the page.

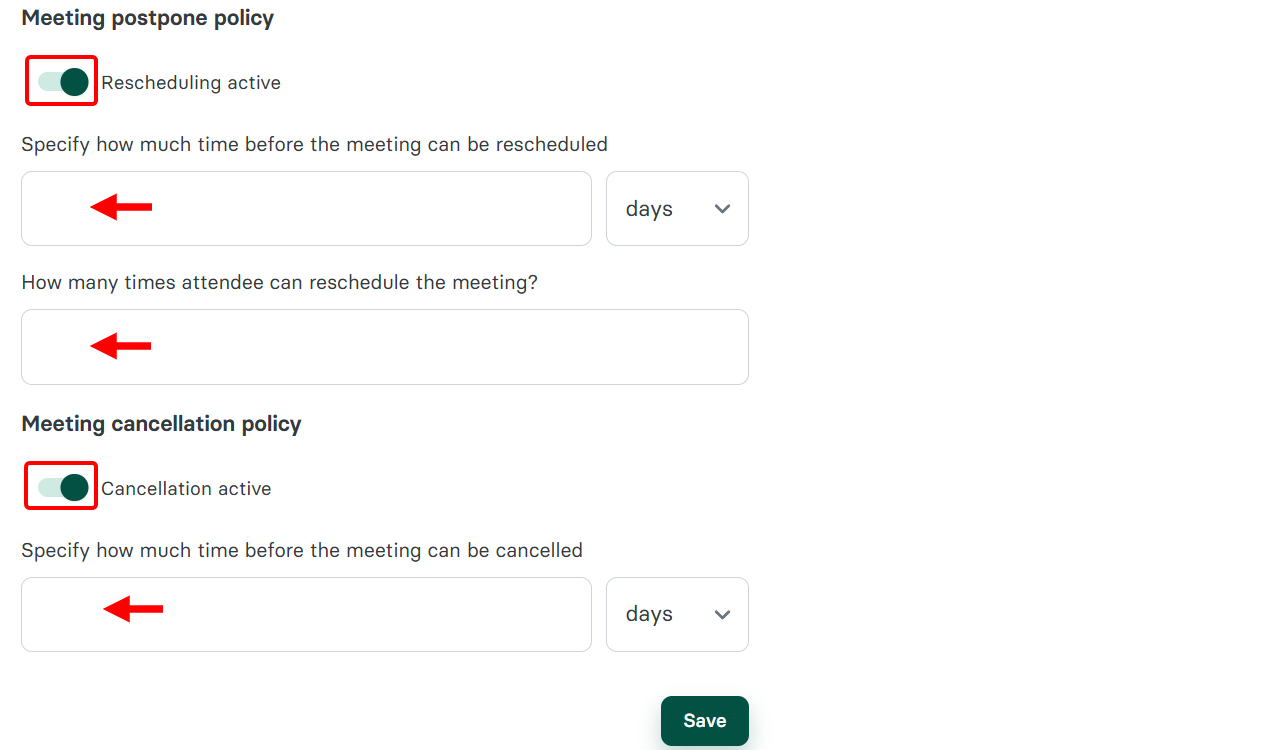
When you scroll further down in the advanced settings, you can enable rescheduling and cancellation of the session, set the time limit for rescheduling and cancellation, and specify the number of times clients can reschedule.
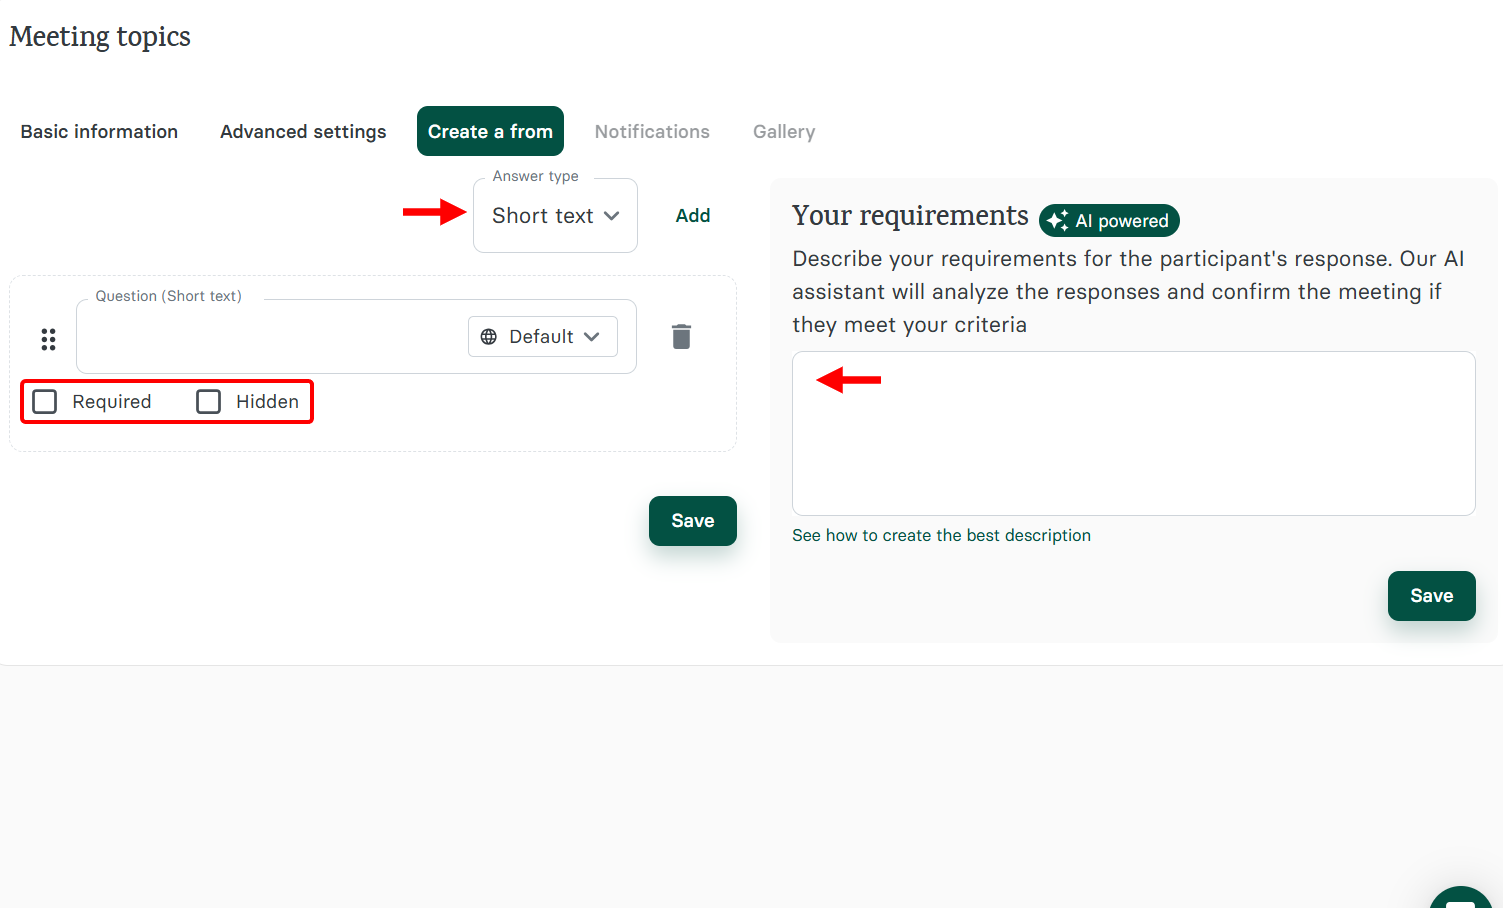
If you want to add a form to the booking page, switch to the Forms tab, select the form type (e.g., short text), make it required, and then add it.
Alternatively, you can prompt the AI to create a form.
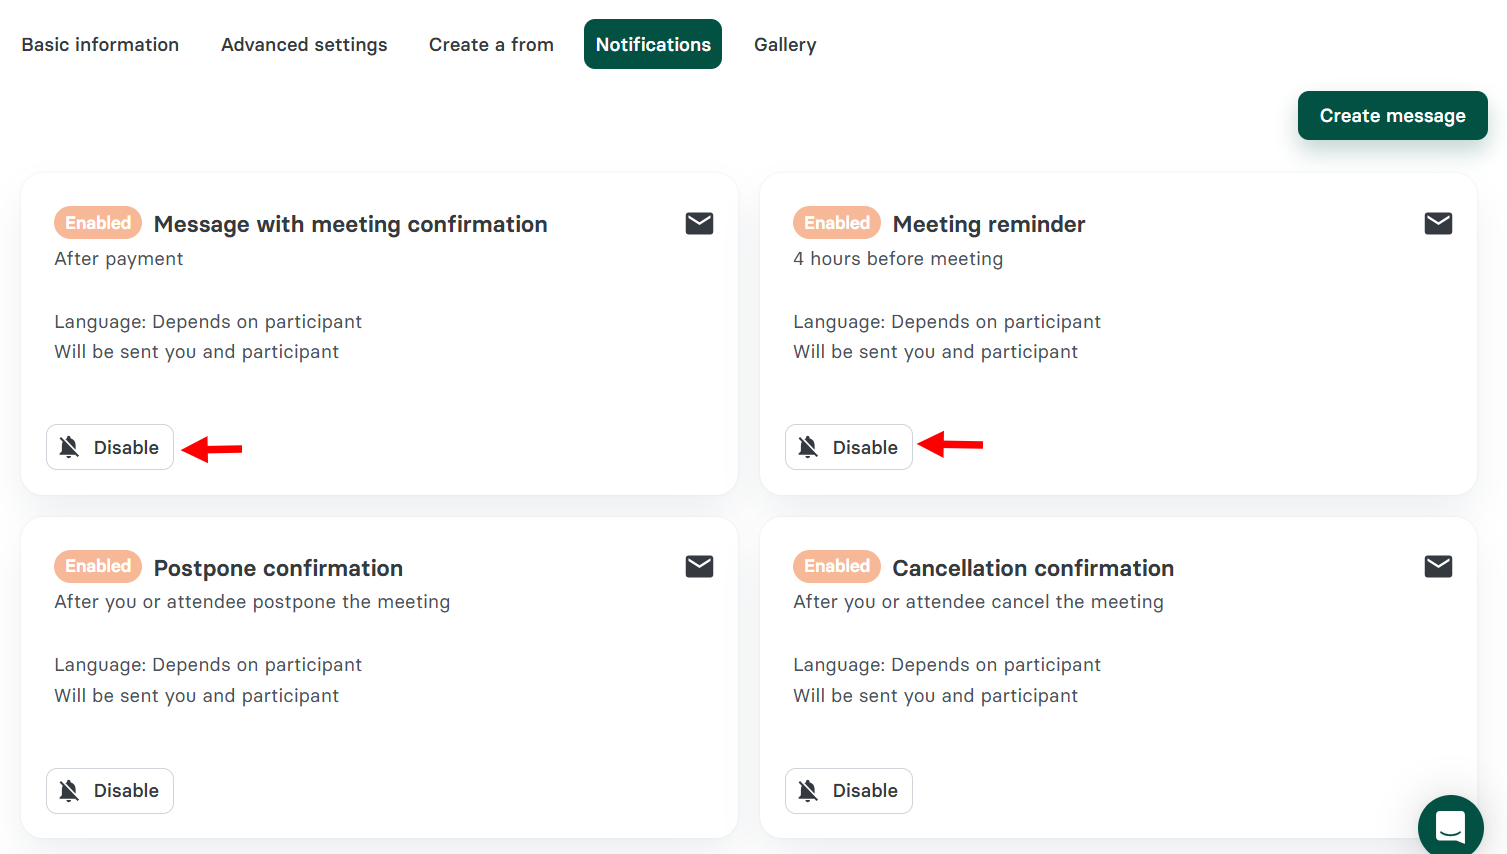
There are other tabs, such as notifications, where you can enable alerts for meeting reminders, meeting confirmations, and more before publishing the session.
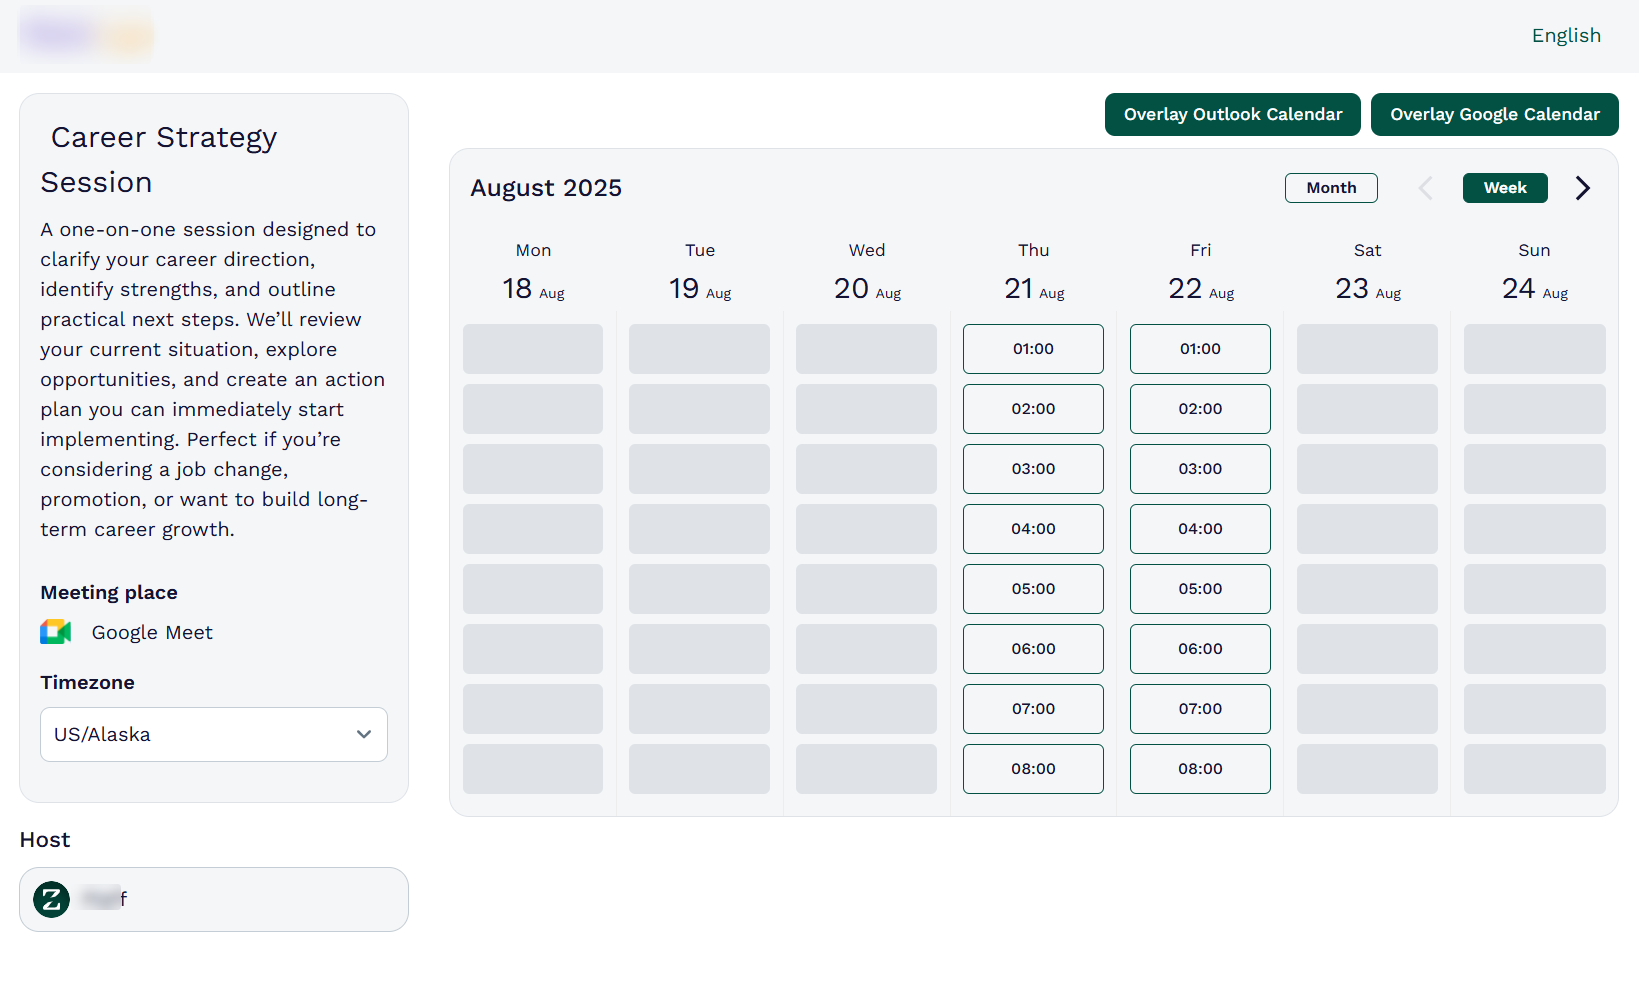
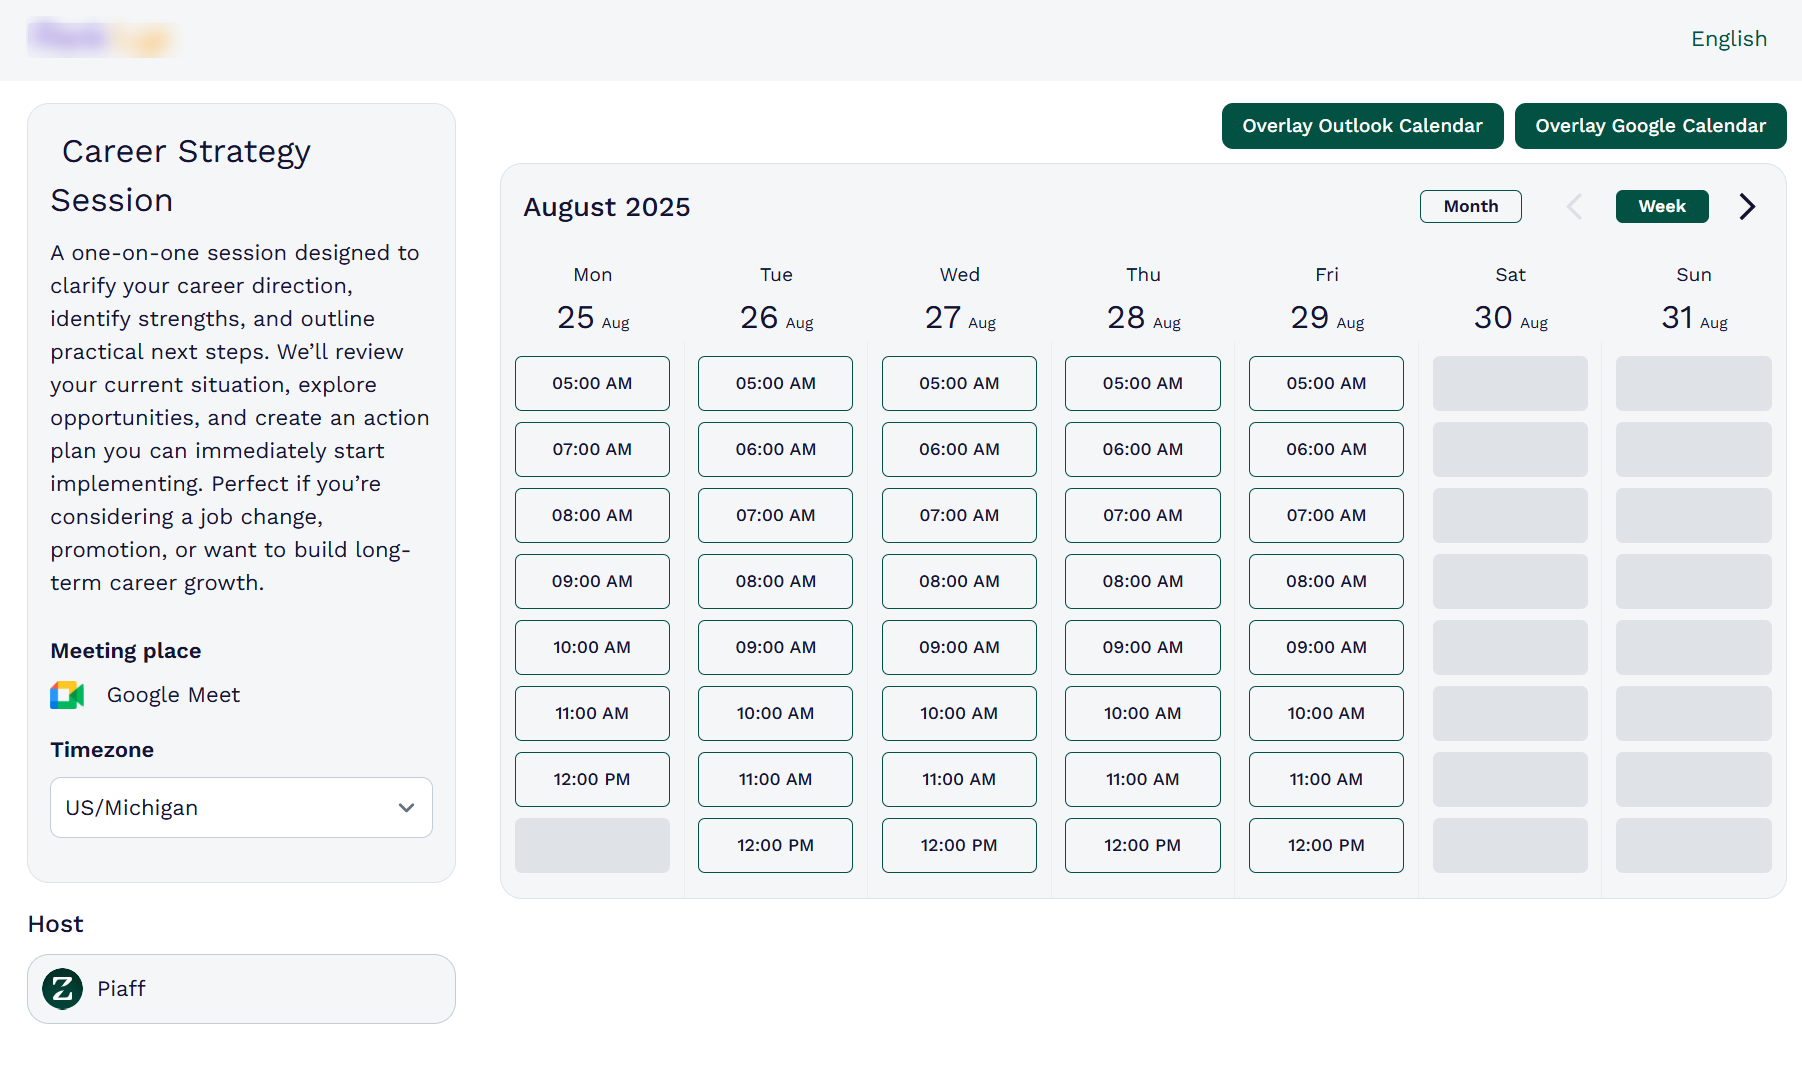
When your session is published, clients can access its booking page, select the timezone, switch to the calendar type, and select an availability to book, as shown on this Career Coaching booking page.
As a coach, the meeting topics were very beneficial. It always saves my time, manages clients more efficiently, and offers a professional booking experience.
Key Features
1. Events
Zencal does not just let you create meeting types; there is more to it. You can use the events to host group sessions such as workshops, webinars, and training programs through a professional booking page.
Similar to the meeting types, you set up the events' booking page, manage payments, and handle registrations all in one platform.
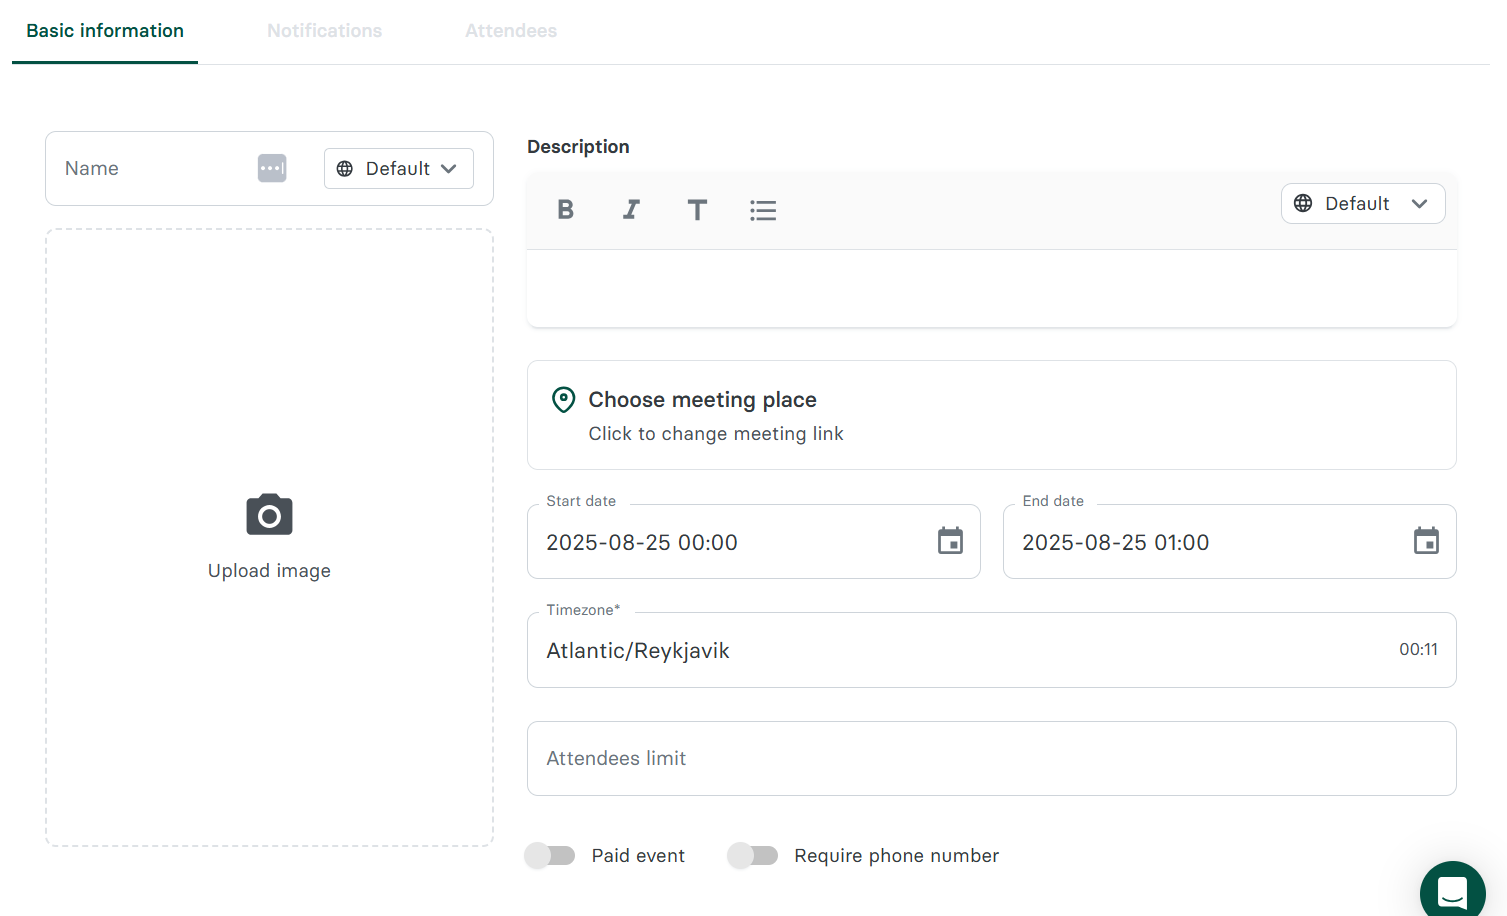
To set up your event, you have to start with the basic info. You describe the new event, make it paid, select its platform (e.g., Google Meet), set the date, duration, and timezone, and enter the attendee limit, before giving the event a name. 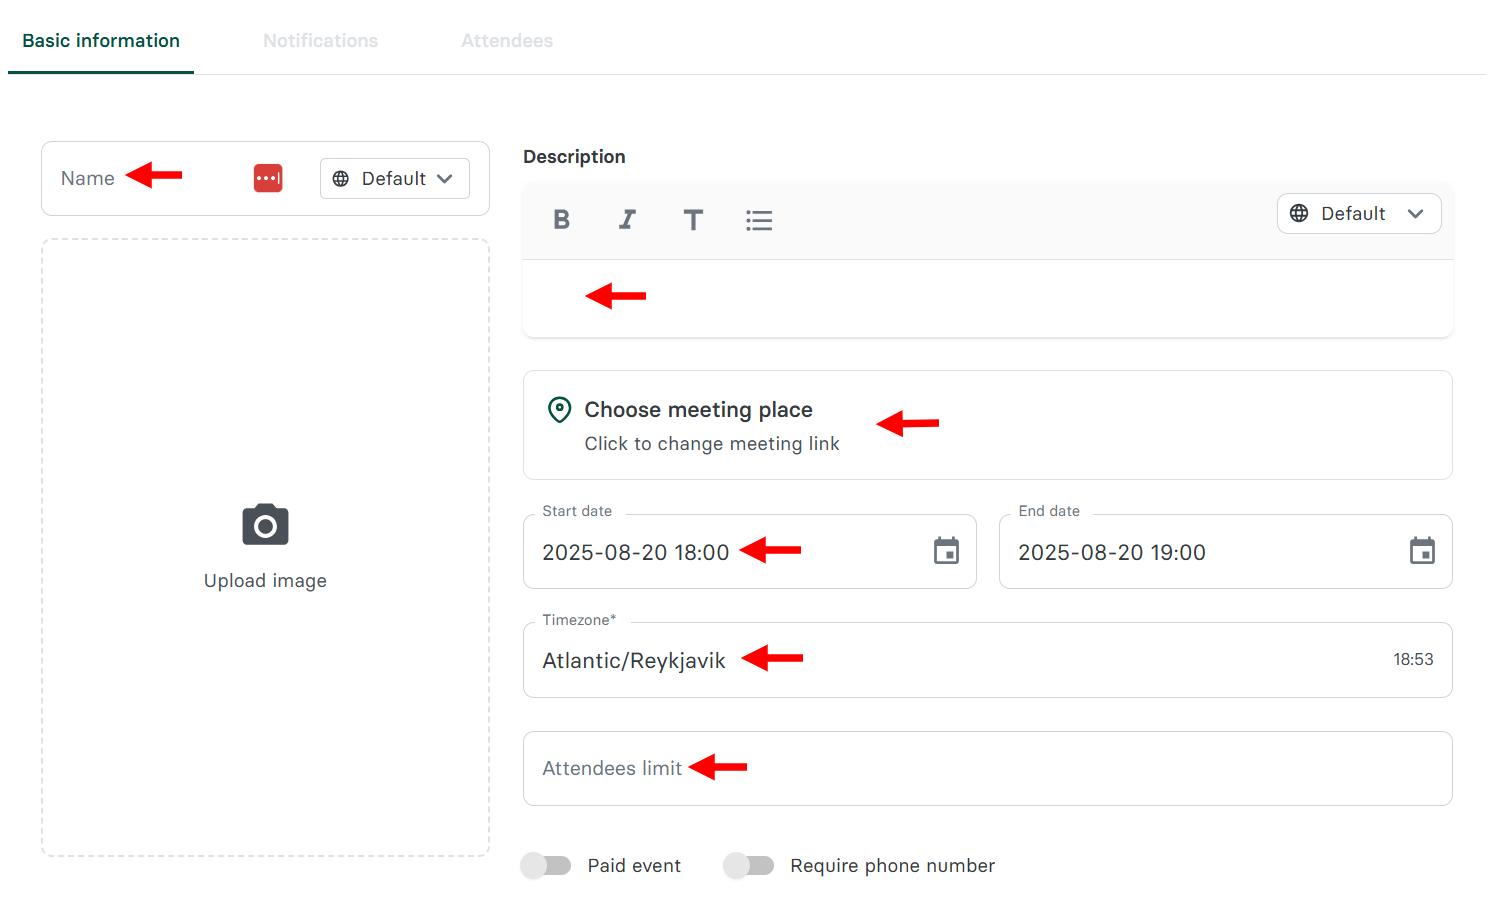
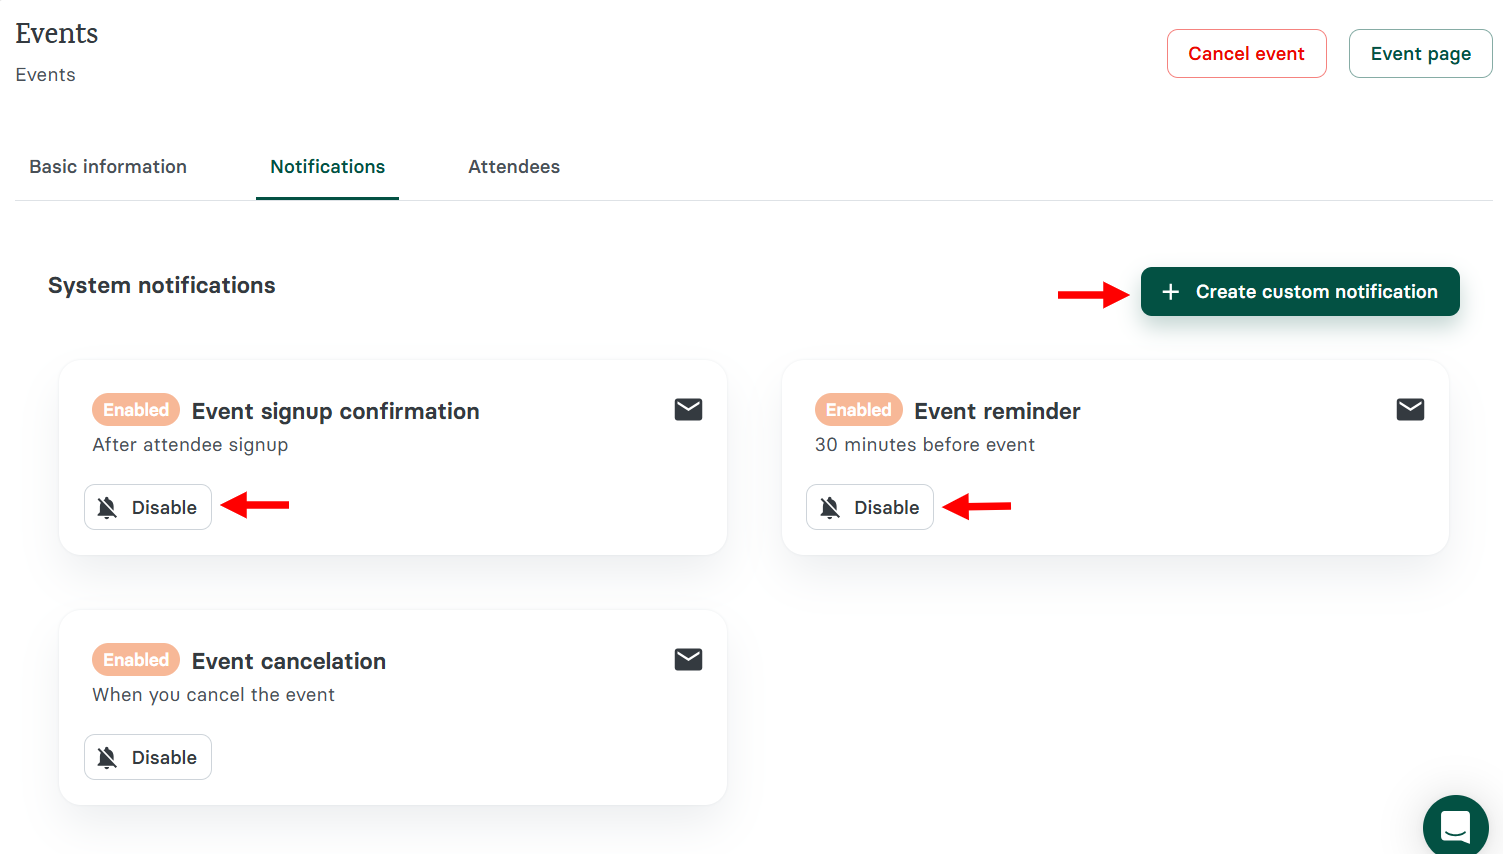
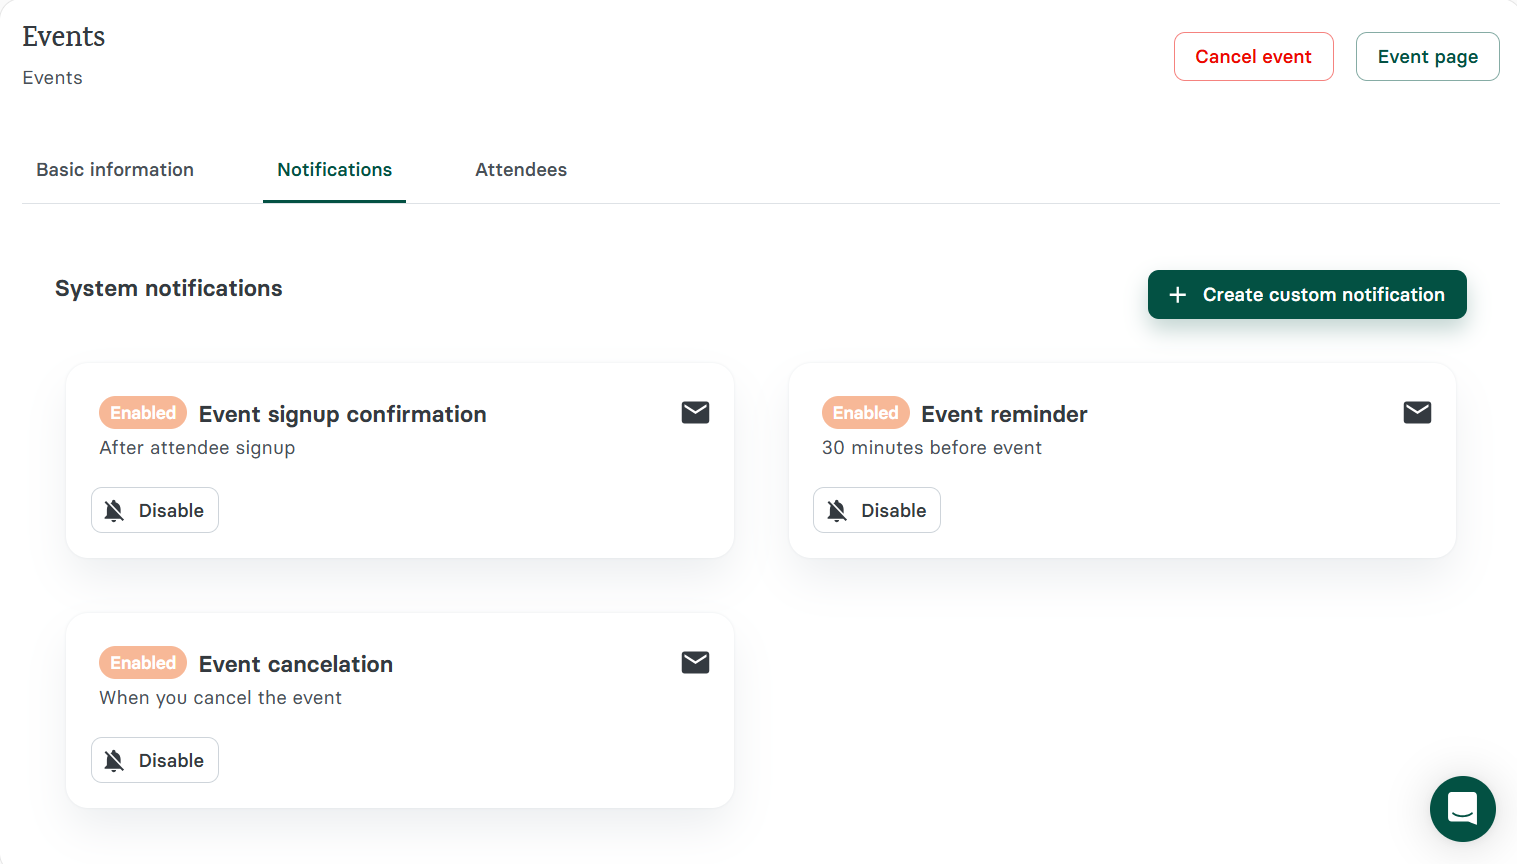
Additionally, there is a notification tab that enables alerts for upcoming events, cancellations, and sign-up confirmations.
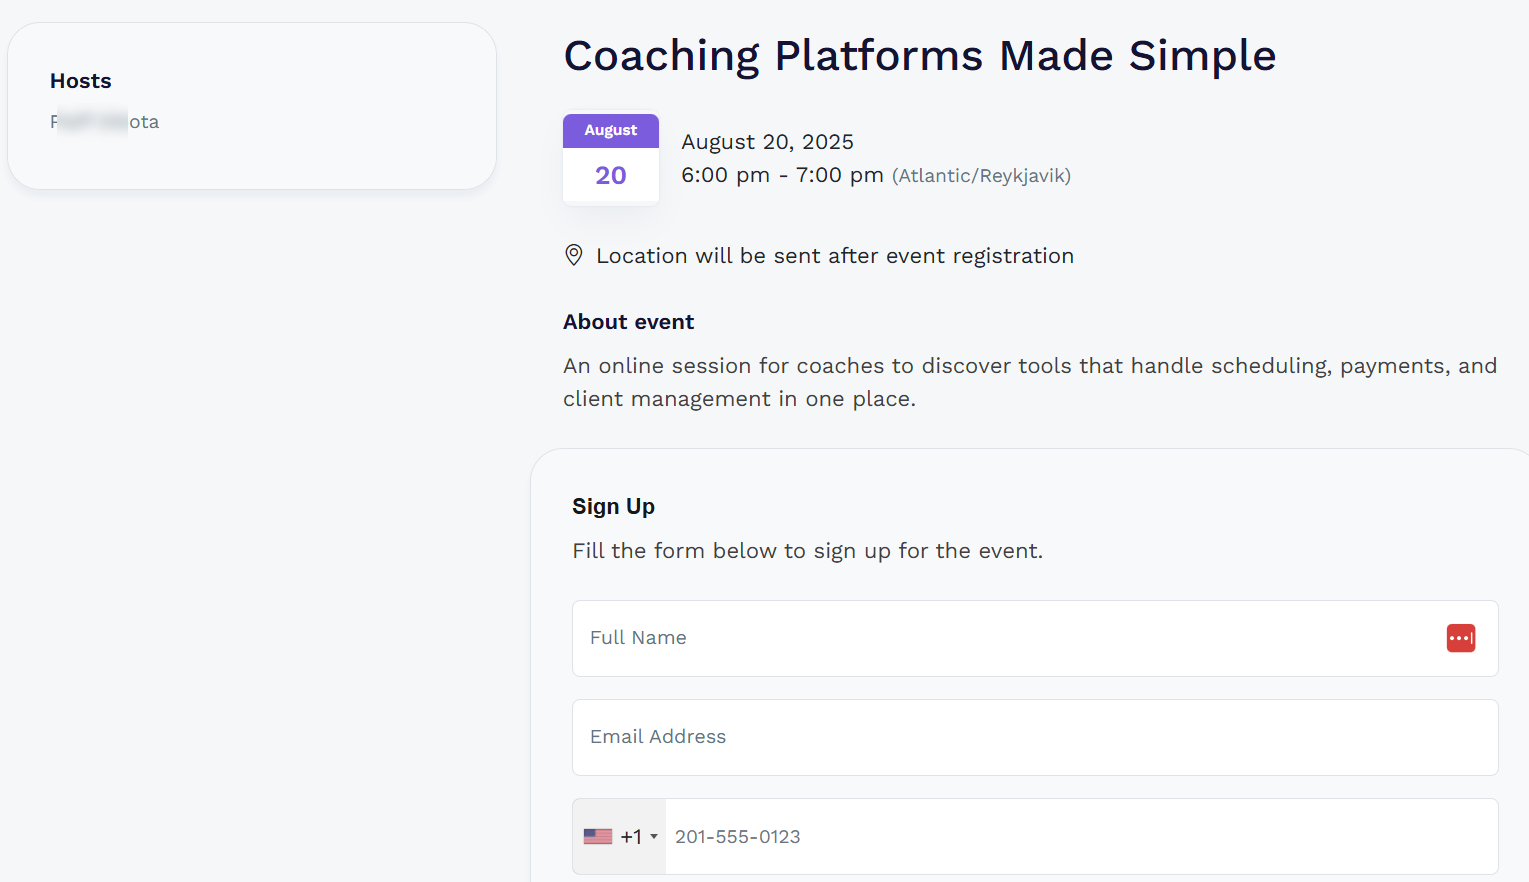
This is how your events registration page should look. Clients can sign up for the events by entering their details, like email, full name, and phone number.
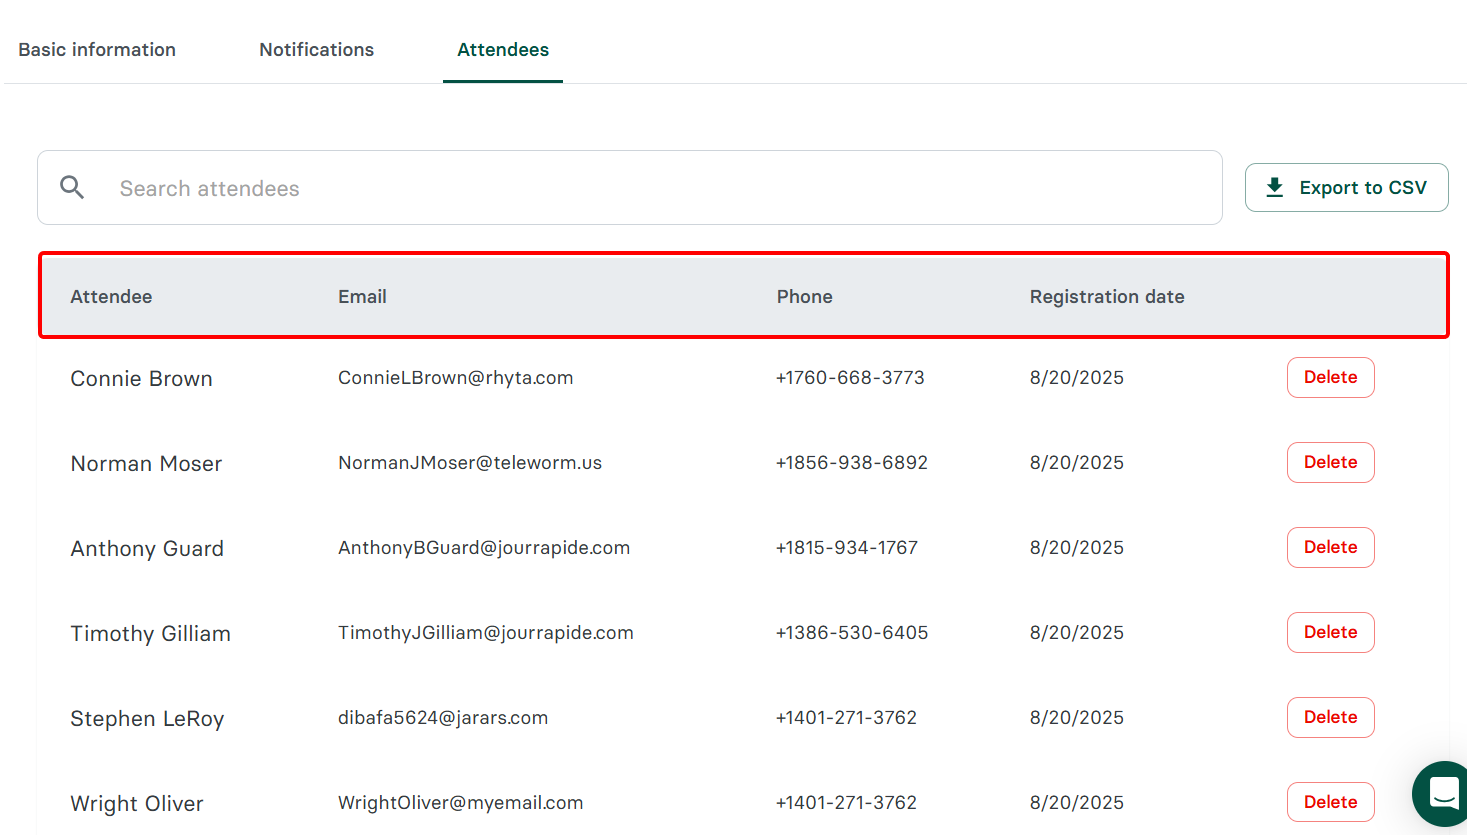
You can track clients or attendees who sign up for events in the Attendees tab within that event section. Here, you can view their details, which they added to the form, including their email address and name, as well as their registration date.
As a coach, I use this feature to scale my coaching programs, engage more clients, and simplify event management.
2. Calendar
Zencal provides a clear view of all upcoming coaching sessions, events, and bookings in one place, thanks to its Calendar feature. It lets you sync with external calendars, avoid double bookings, and stay organised across multiple programs.
On the calendar dashboard, you can select the layout type, apply filters, and select a period to view upcoming events, tasks, or schedules.
You can create an event directly from the calendar by clicking on an empty date. 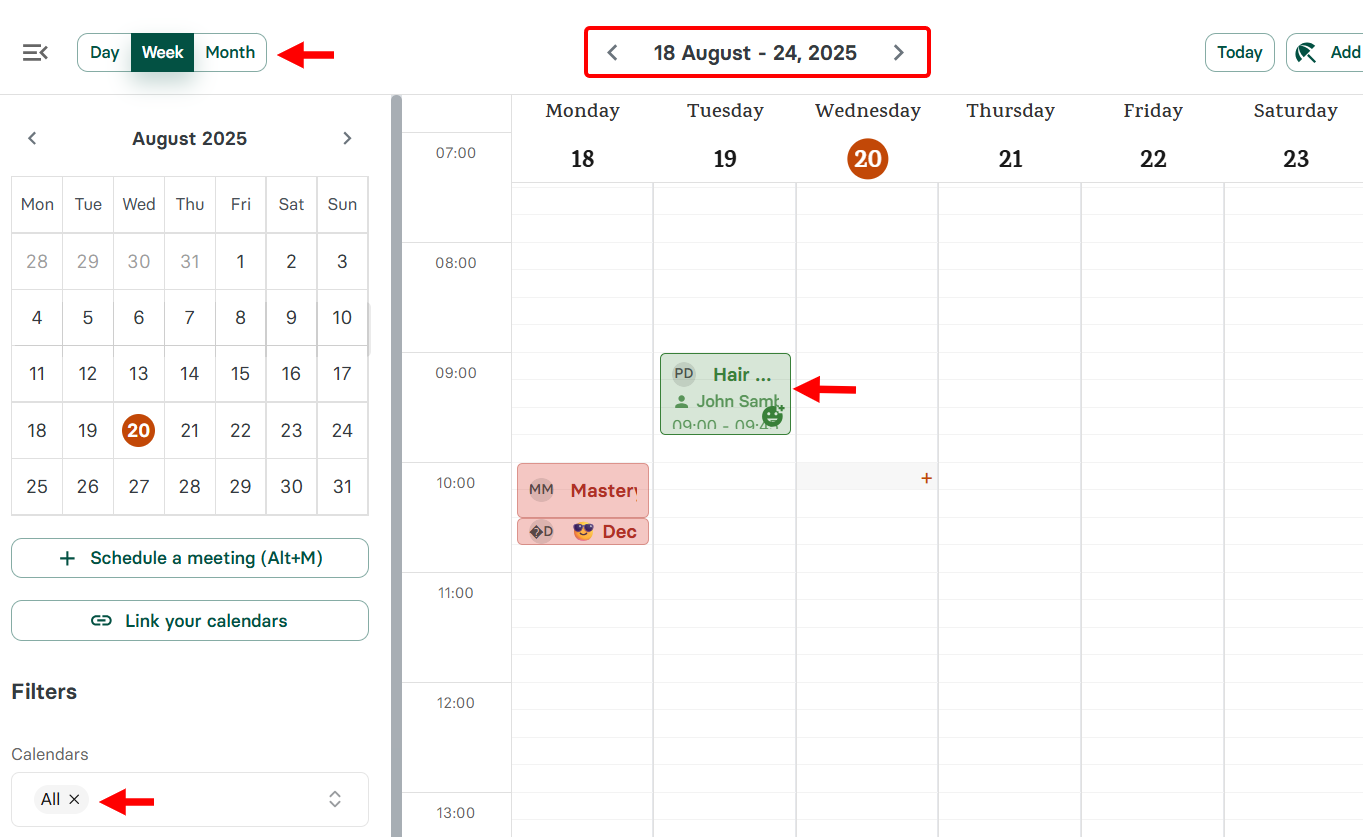
When you select an empty date, Zencal allows you to indicate whether you want to create a single meeting, a series of meetings, add tasks, or mark that date as time off.
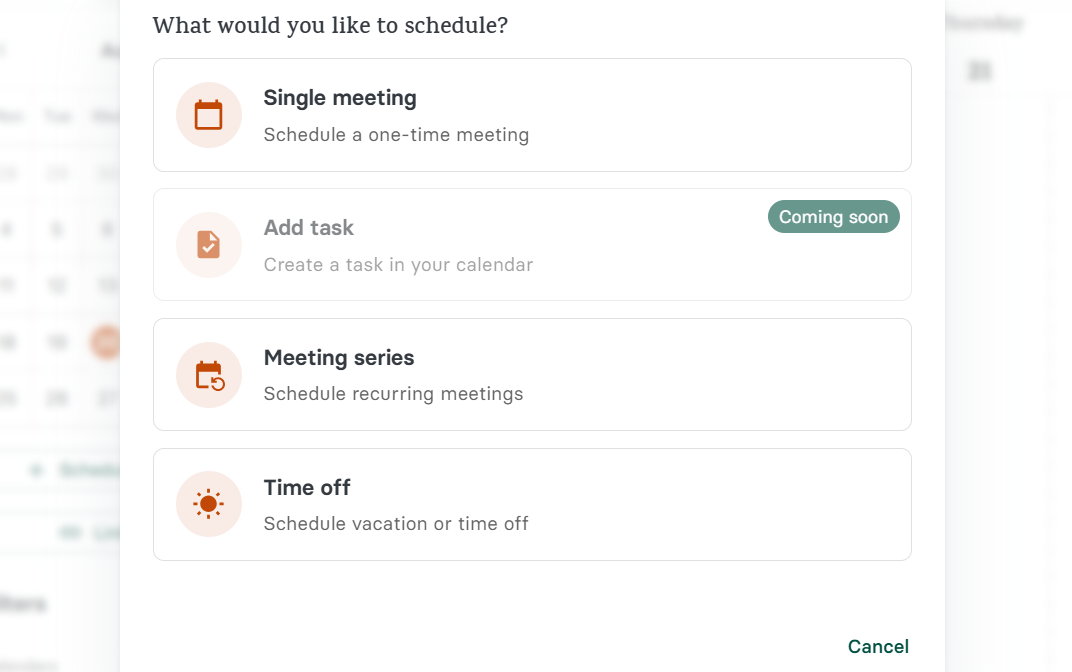
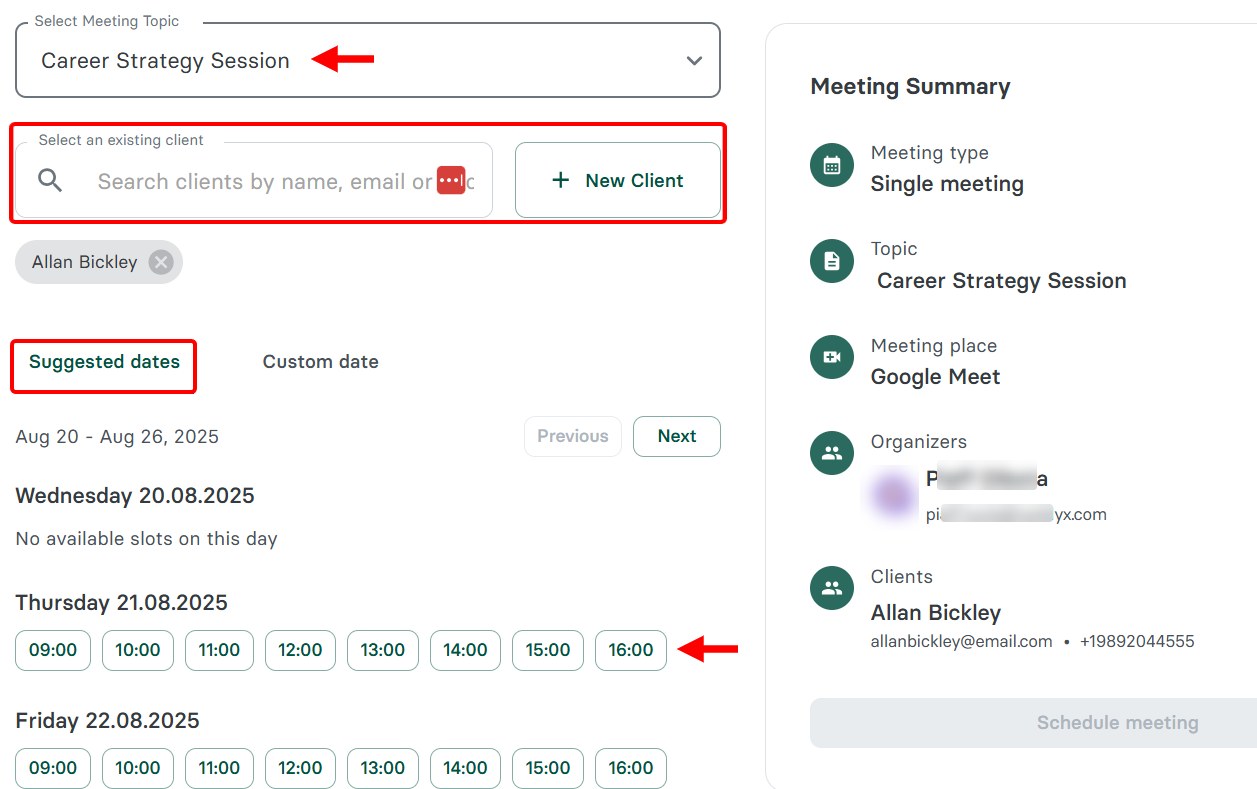
When you choose to create a single meeting, for instance, you simply need to assign an existing meeting topic to the meeting, add new or existing attendees, and select availability to create the meeting instantly.
Best For
Career coaches who seek to sell and schedule client sessions through a branded booking page with calendar syncing.
Pricing
- Free plan - Free/ monthly package [per user]
- Basic - $5/ monthly package [per user]
- Pro - $15/ monthly package [per user]
- Team - $30/ monthly package [per team]
2. Notion
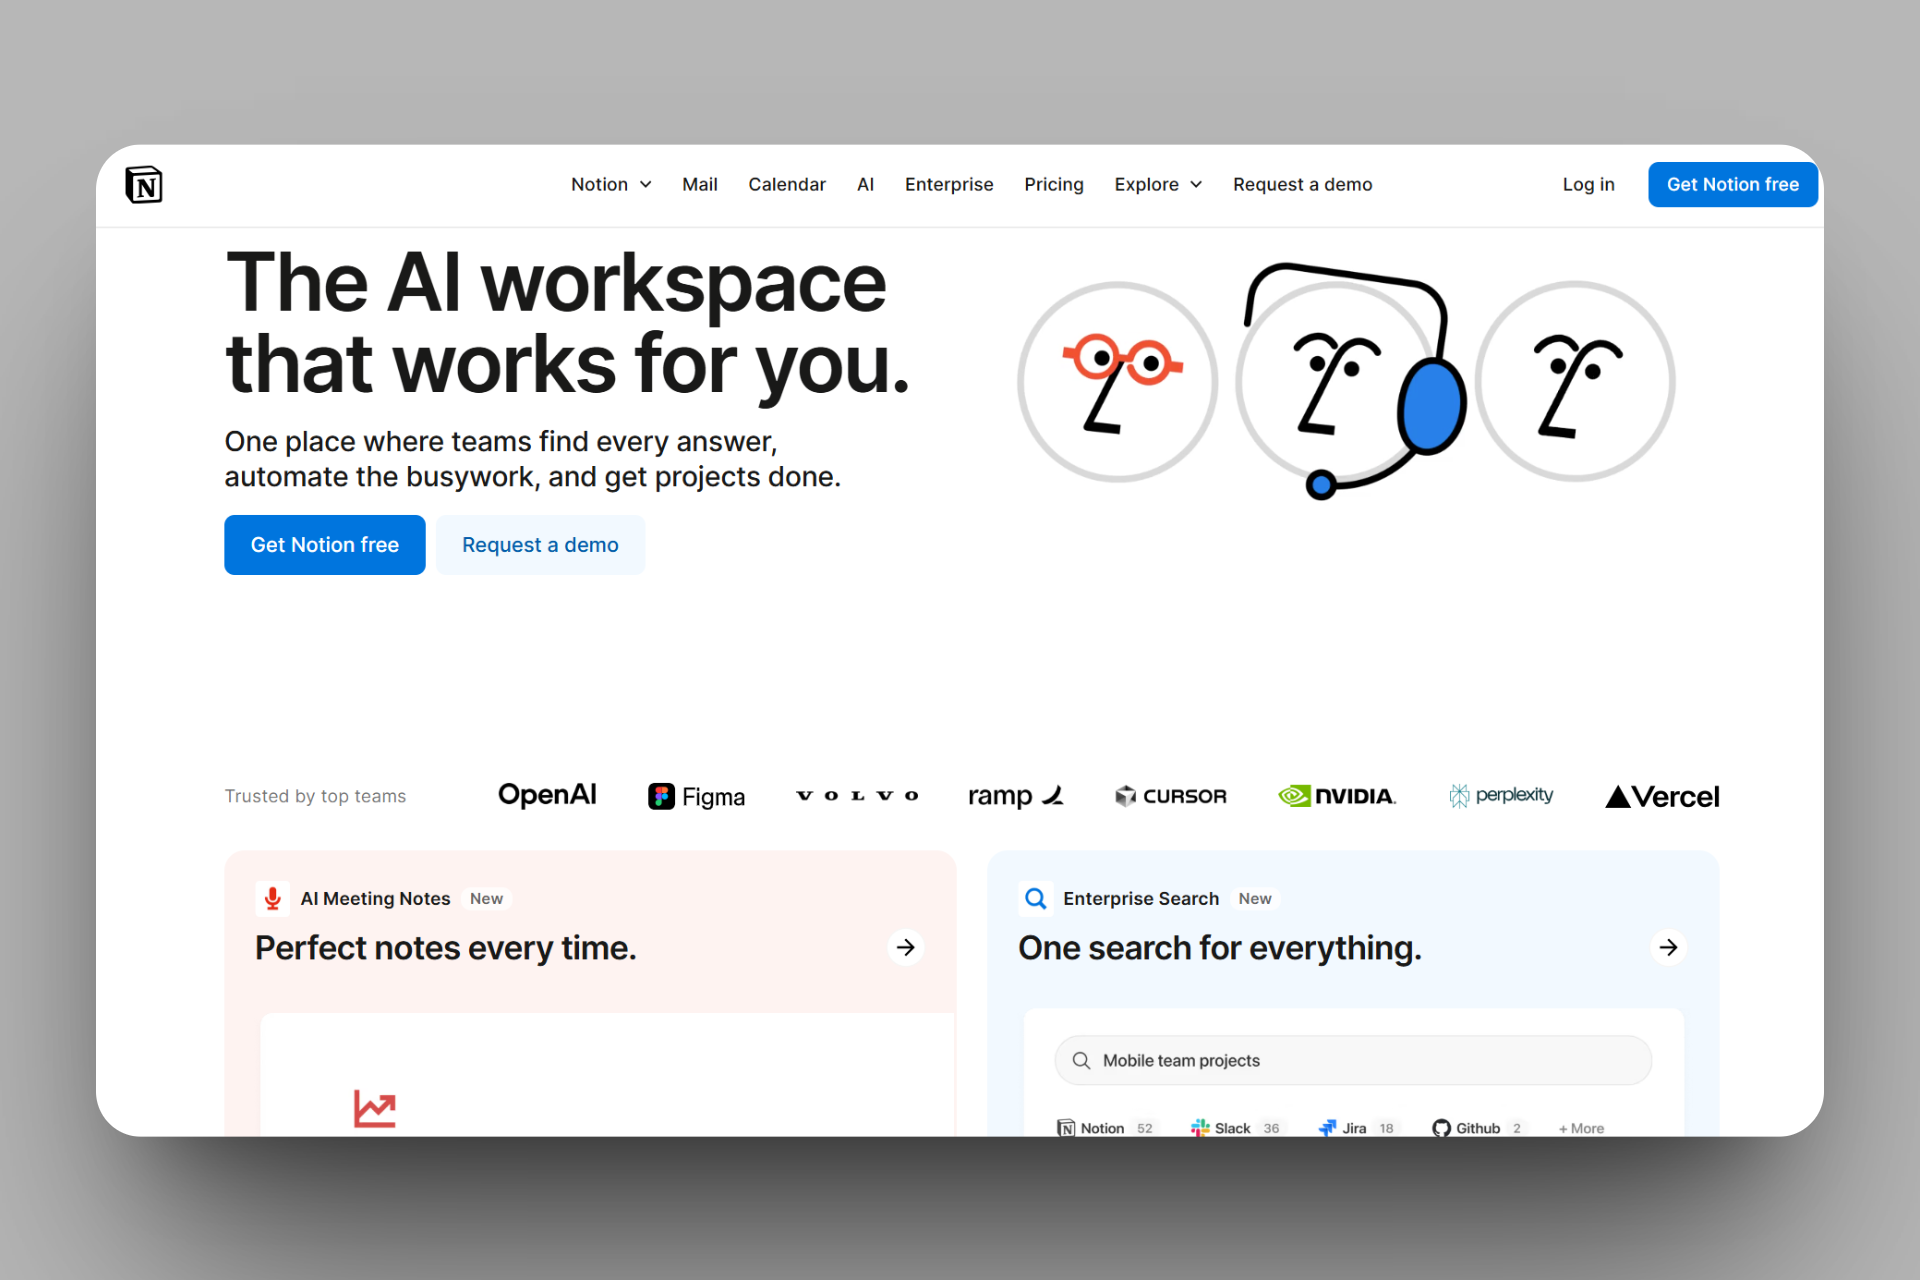
Next on the list of online coaching platforms is Notion, a productivity and collaboration workspace where you can organize coaching materials.
Notion has a database feature that allows you to record data, such as client sessions. You add a table, create columns for data like client names, dates, and focus areas, and fill each row after every session.
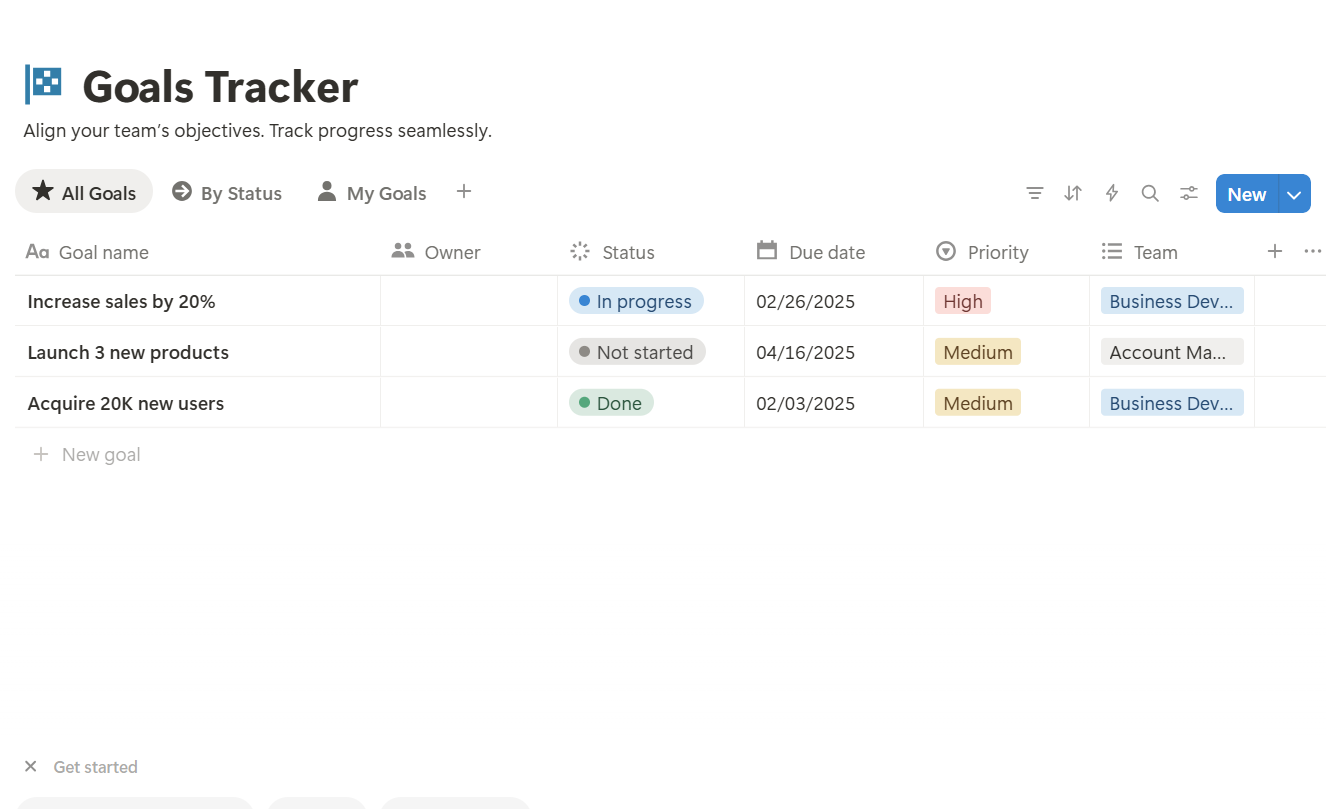
Additionally, a Goal Tracker is available to track client progress by setting up a Kanban board, creating goals as cards, adding deadlines, and moving them across columns as progress is made.
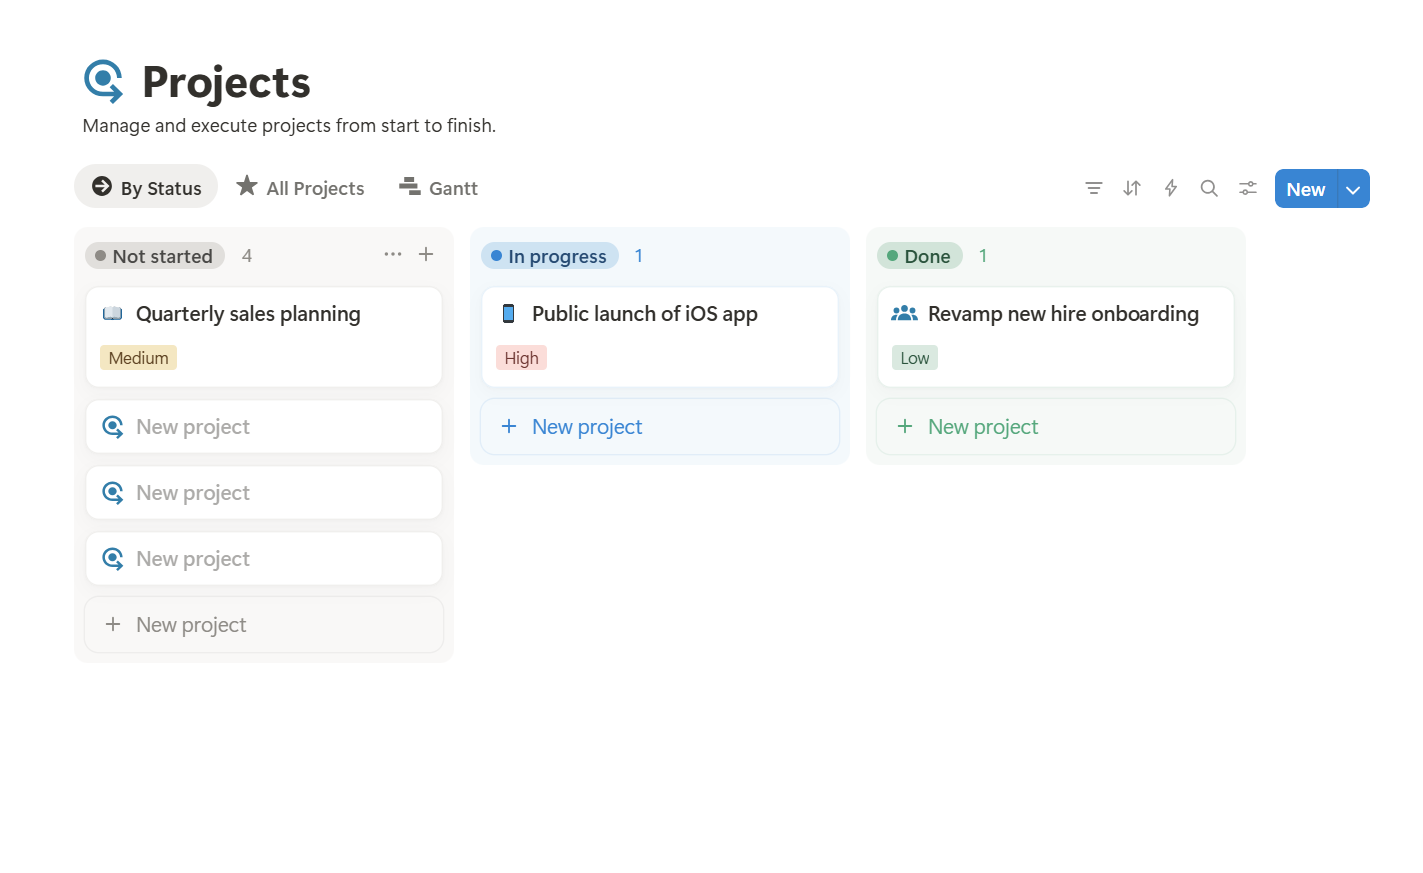
There is a Project feature that allows you to create a project board, add milestones (such as tasks), assign them to categories, and check each task once it is completed.
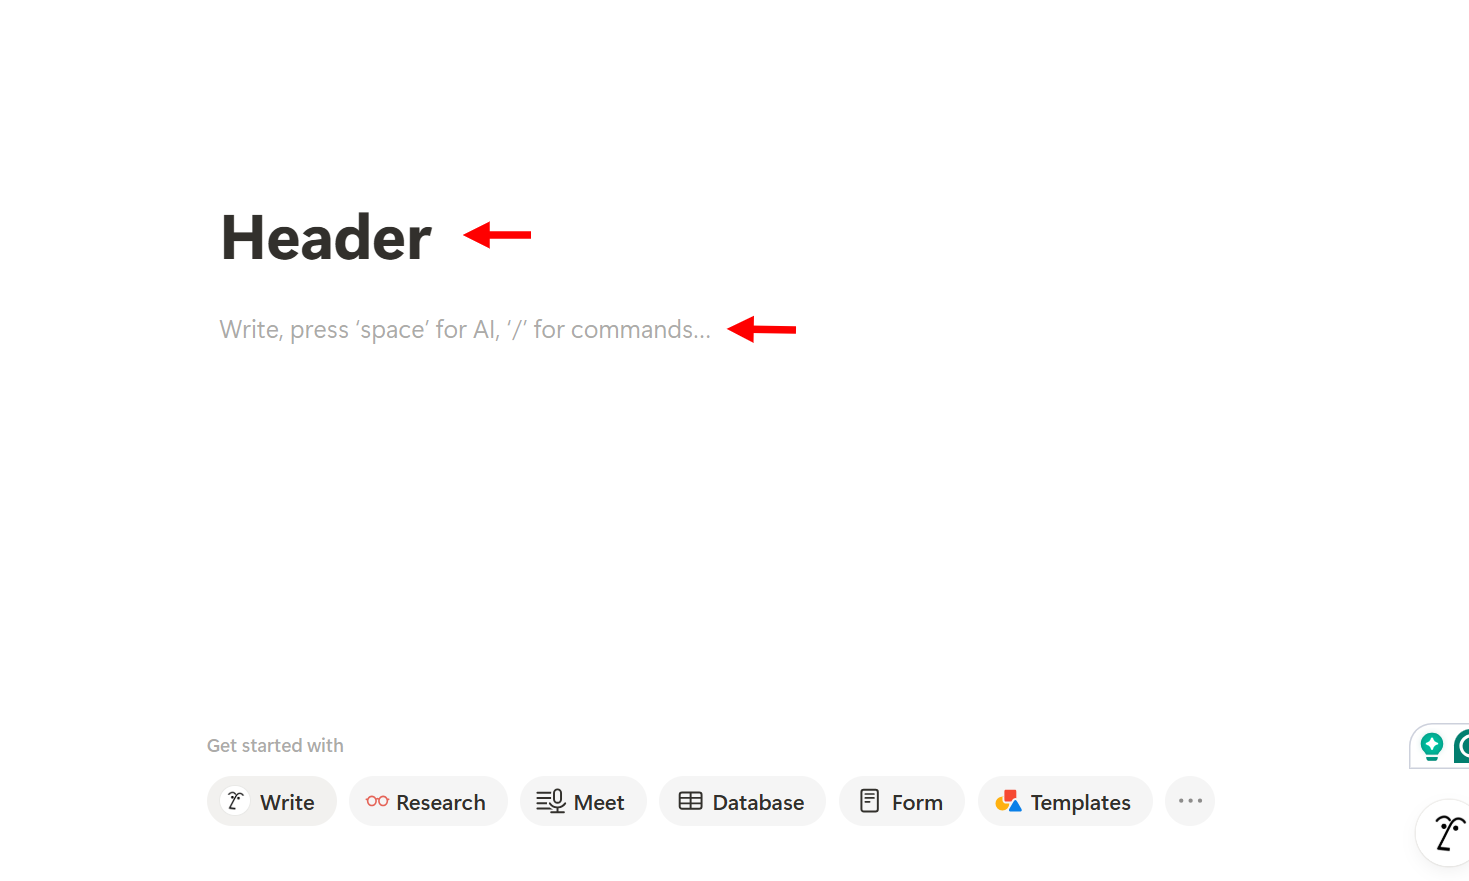
Notion also features a page that allows you to build a structured document, like lesson plans. You simply insert headings for topics, toggles, bullet lists, and embed worksheets or videos.

Notion's database feature is the core feature for your coaching-related activities. This is a structured system that allows you to organise and manage information.
It allows you to connect related data, switch between views such as tables, calendars, and Kanban boards, and keep all coaching workflows in one place.
You can use it to organise and track your client information, sessions, goals, payments, and resources in a structured system. Let me show you how to use one to organize your clients' information and track them.
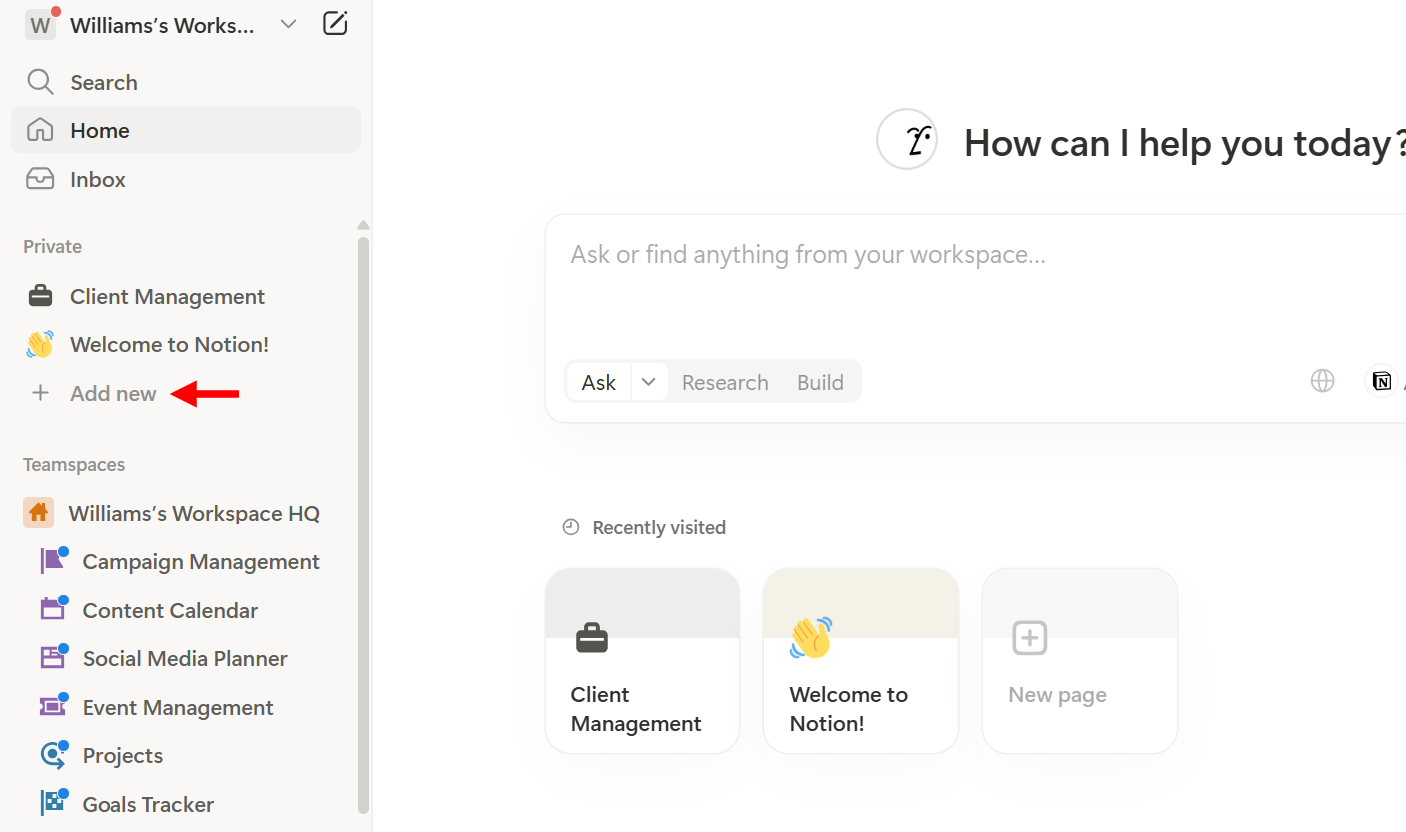
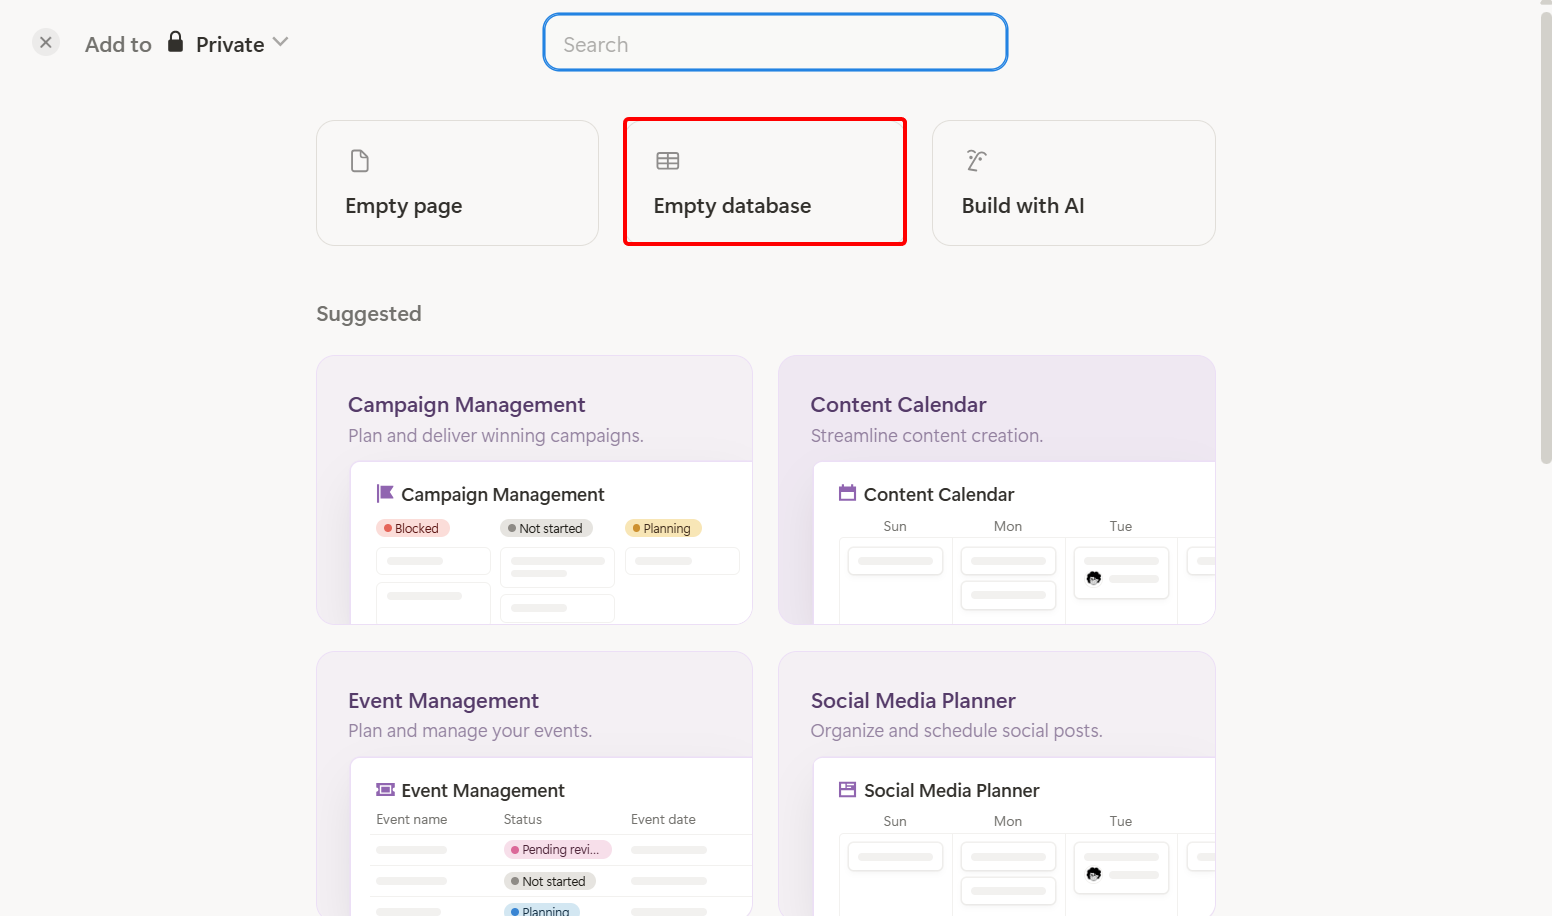
To create a new database, click "Add new" on the main dashboard.
Notion provides templates, such as event and campaign management, to get started. Also, you can create a page or build with AI.
Let's stick to our database creation, so select the empty database.
When creating a new database, you can give it a title, add views to the database, and set properties for its tables. Let me show you how to go about it.
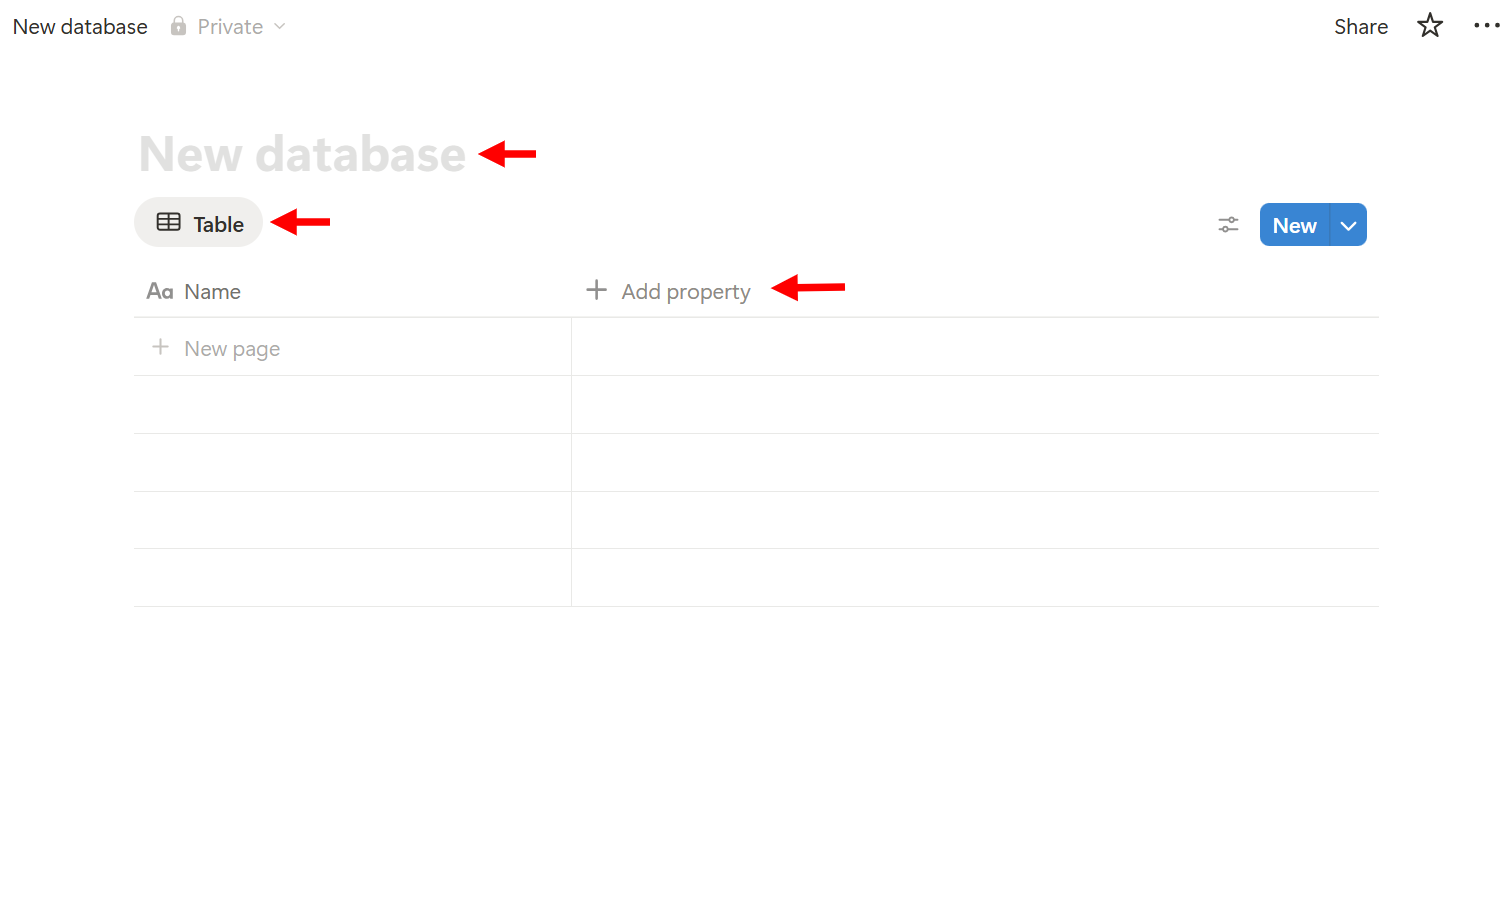
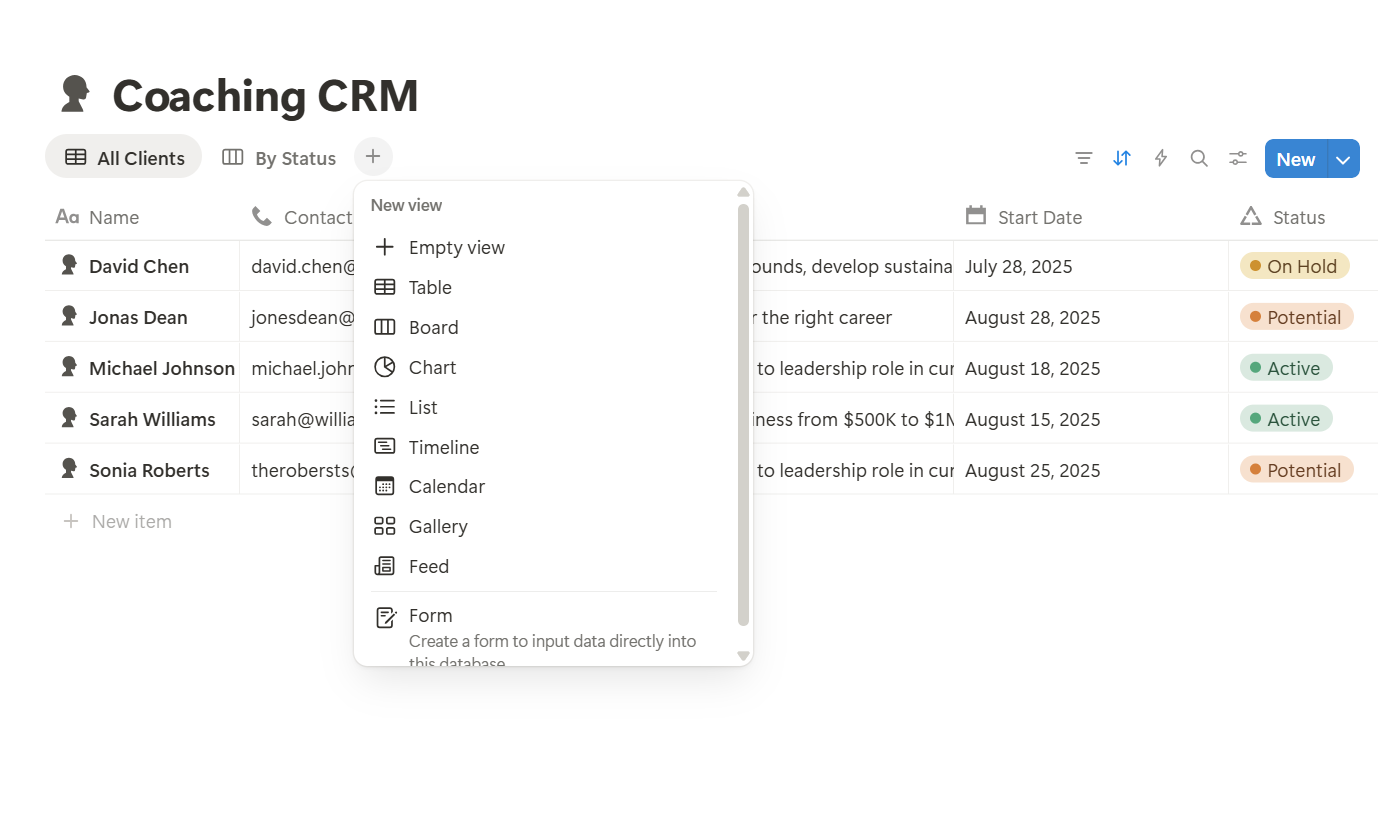
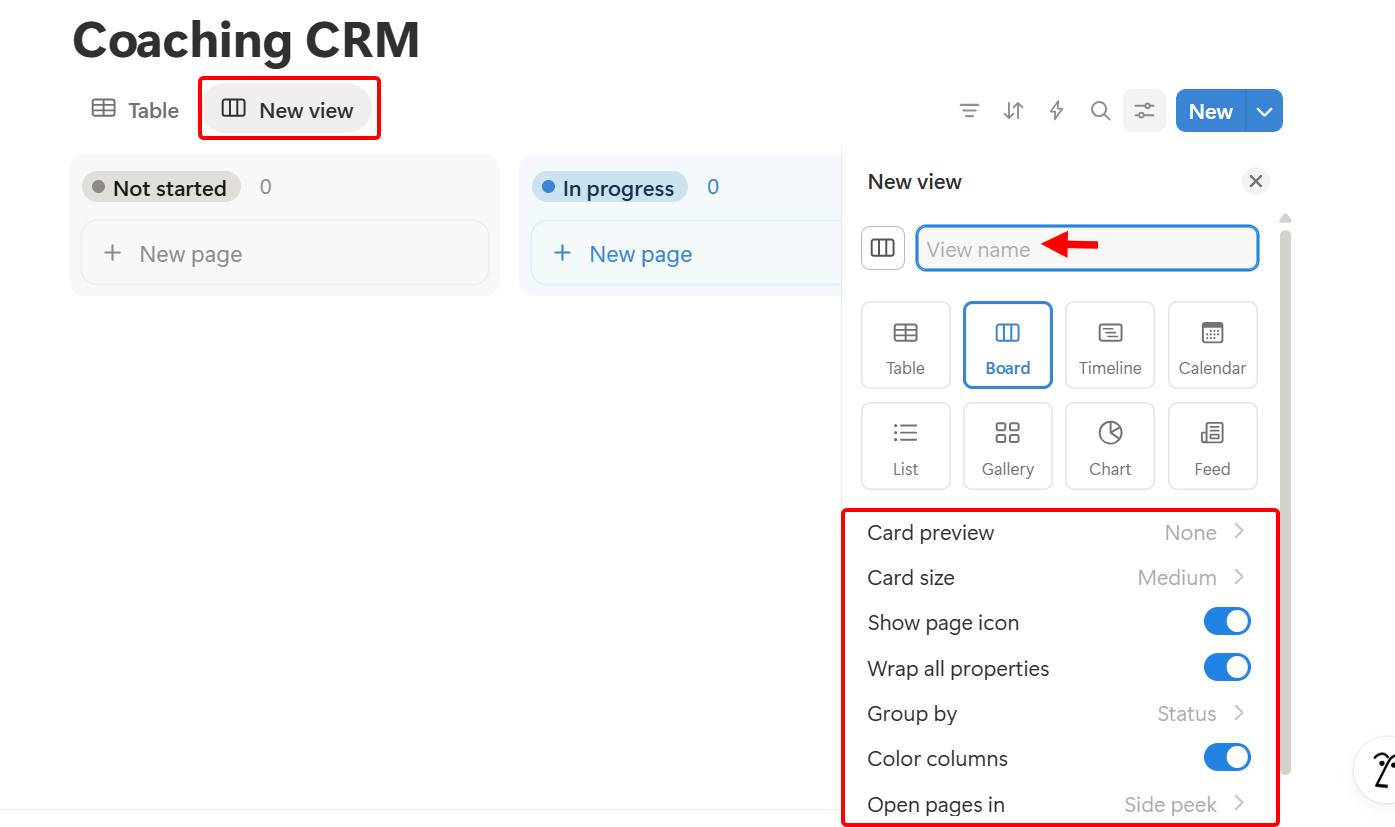
When you give the database a title, select "+" to add a new view. You can add views such as tables, charts, calendars, and lists. Let's select the board view type.

After adding the board view, you give it a name and set its properties, such as card size and group by. Also, you can enable colours for the board column and make it wrap.
You should be able to view tables for all clients and a board view for clients' statuses.
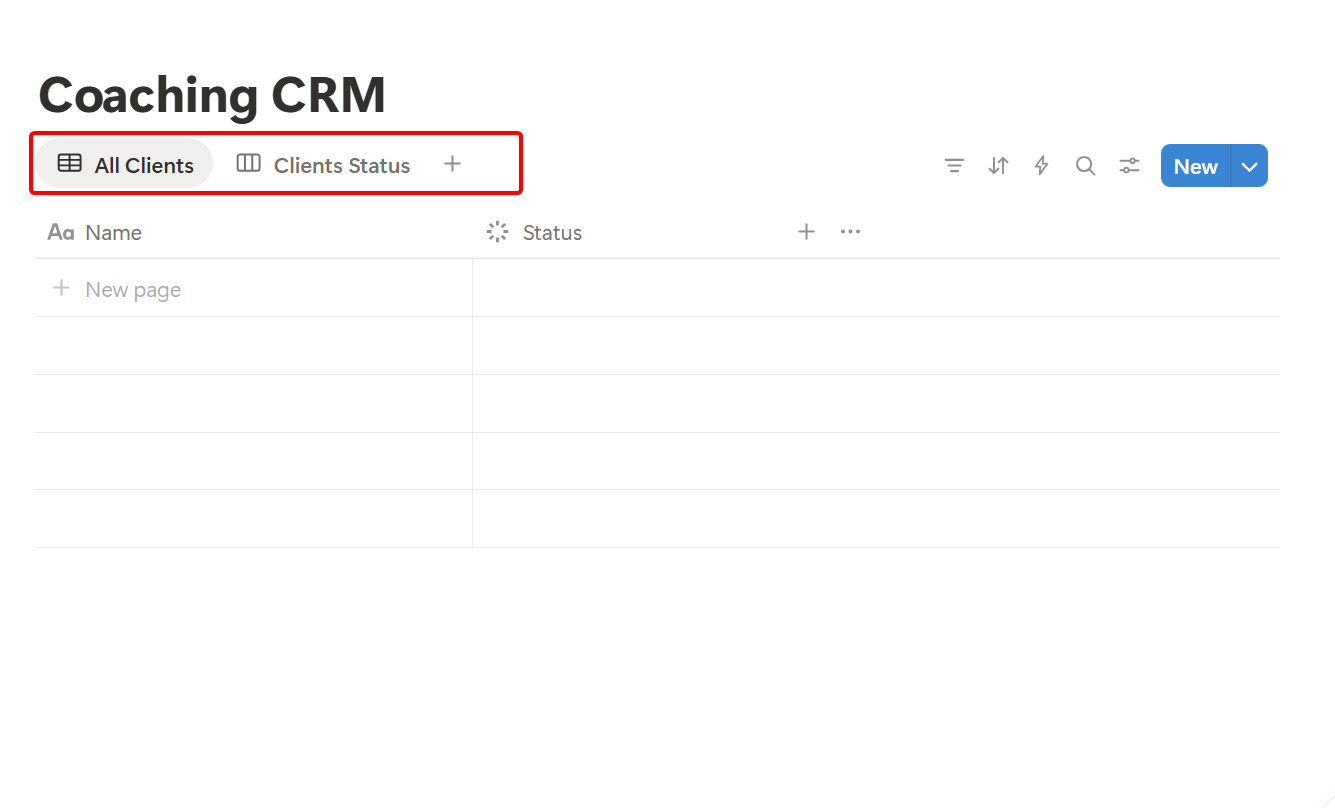
Next, select the existing table column and rename it. You can use this for the clients' name column.
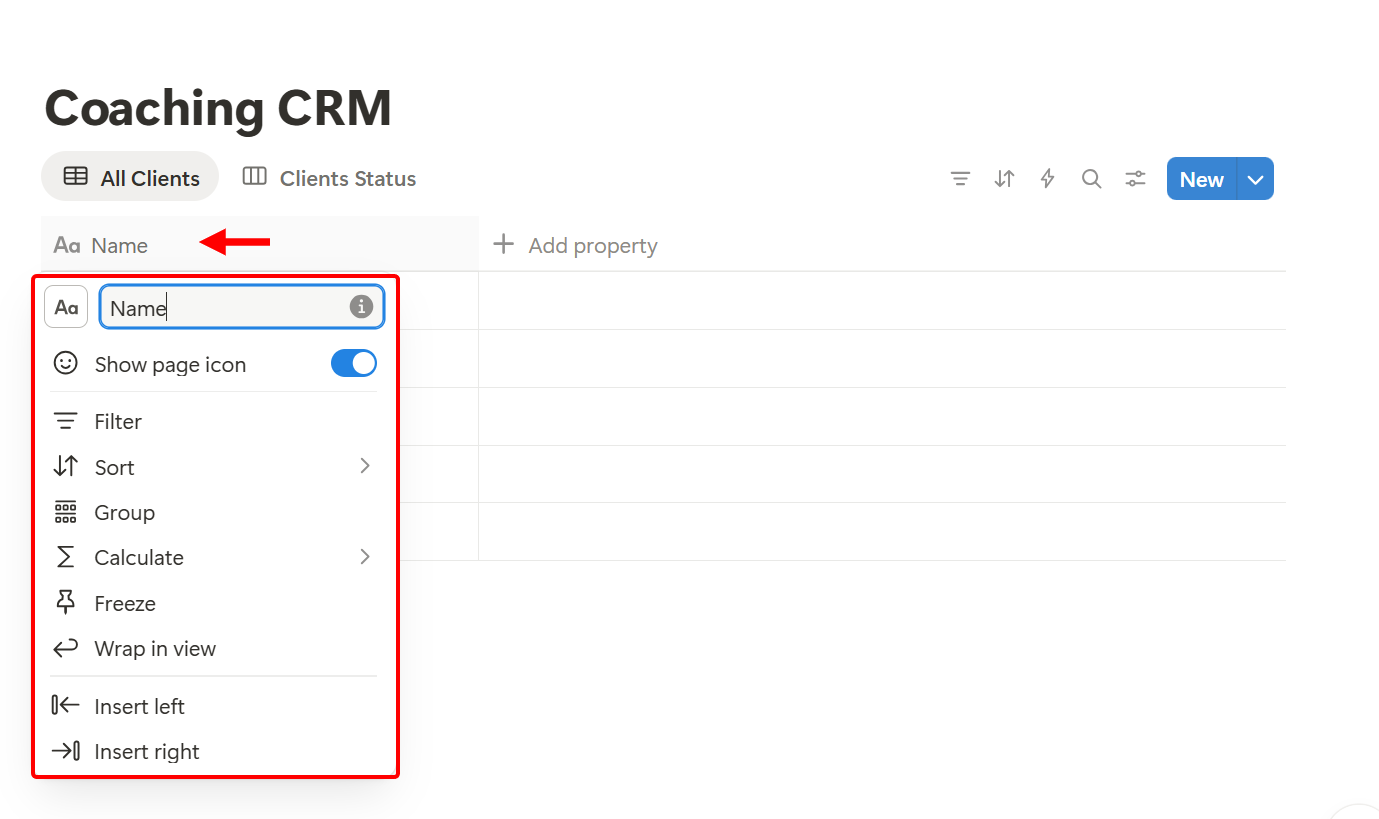
Next, select the "Add" button next to the existing column to add another property, such as status, dates, contacts, files, and media, and then select.
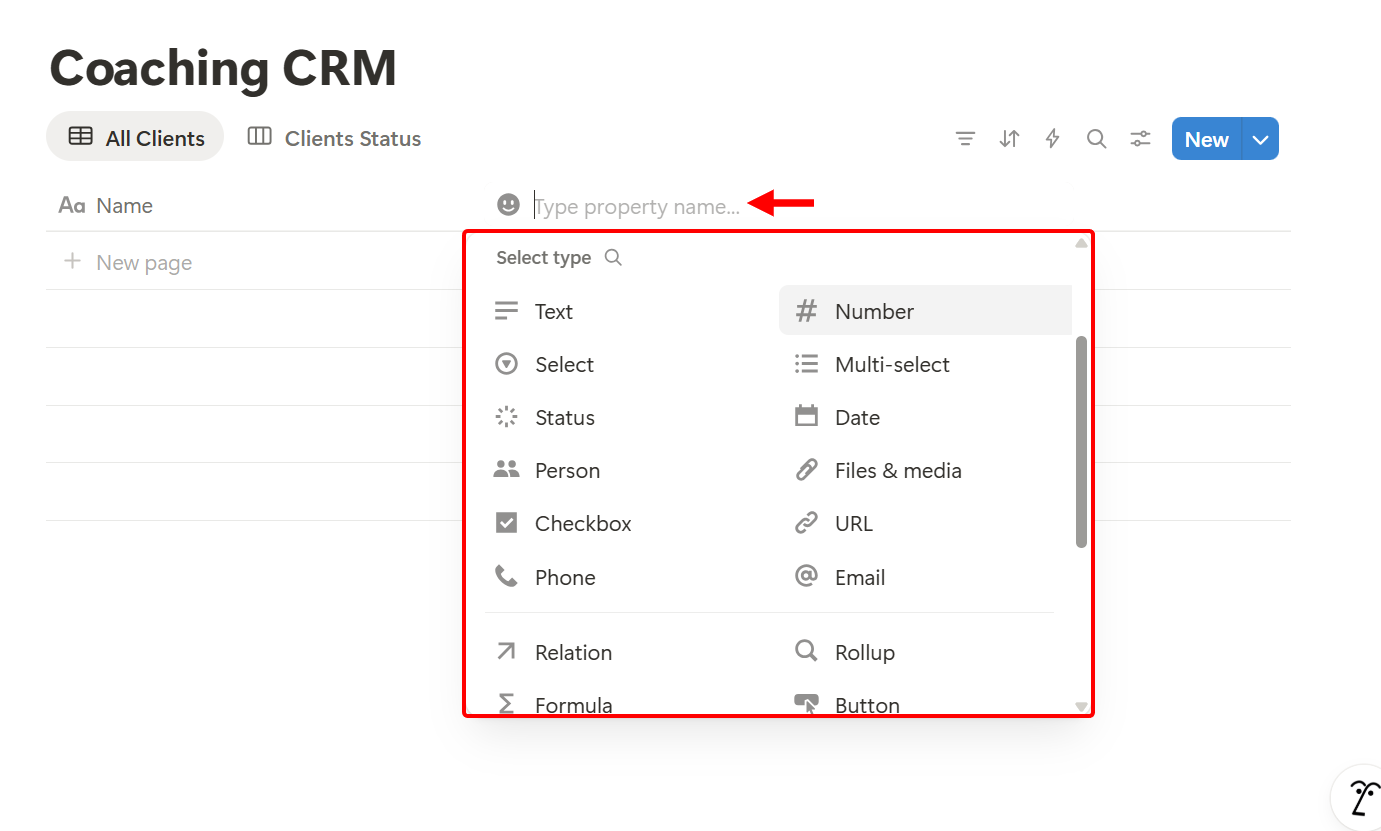
You can use it to add properties, such as contact information, coaching type, goals, start date, and more, to manage your clients' details effectively. After that, you can enter your client's data under each property.
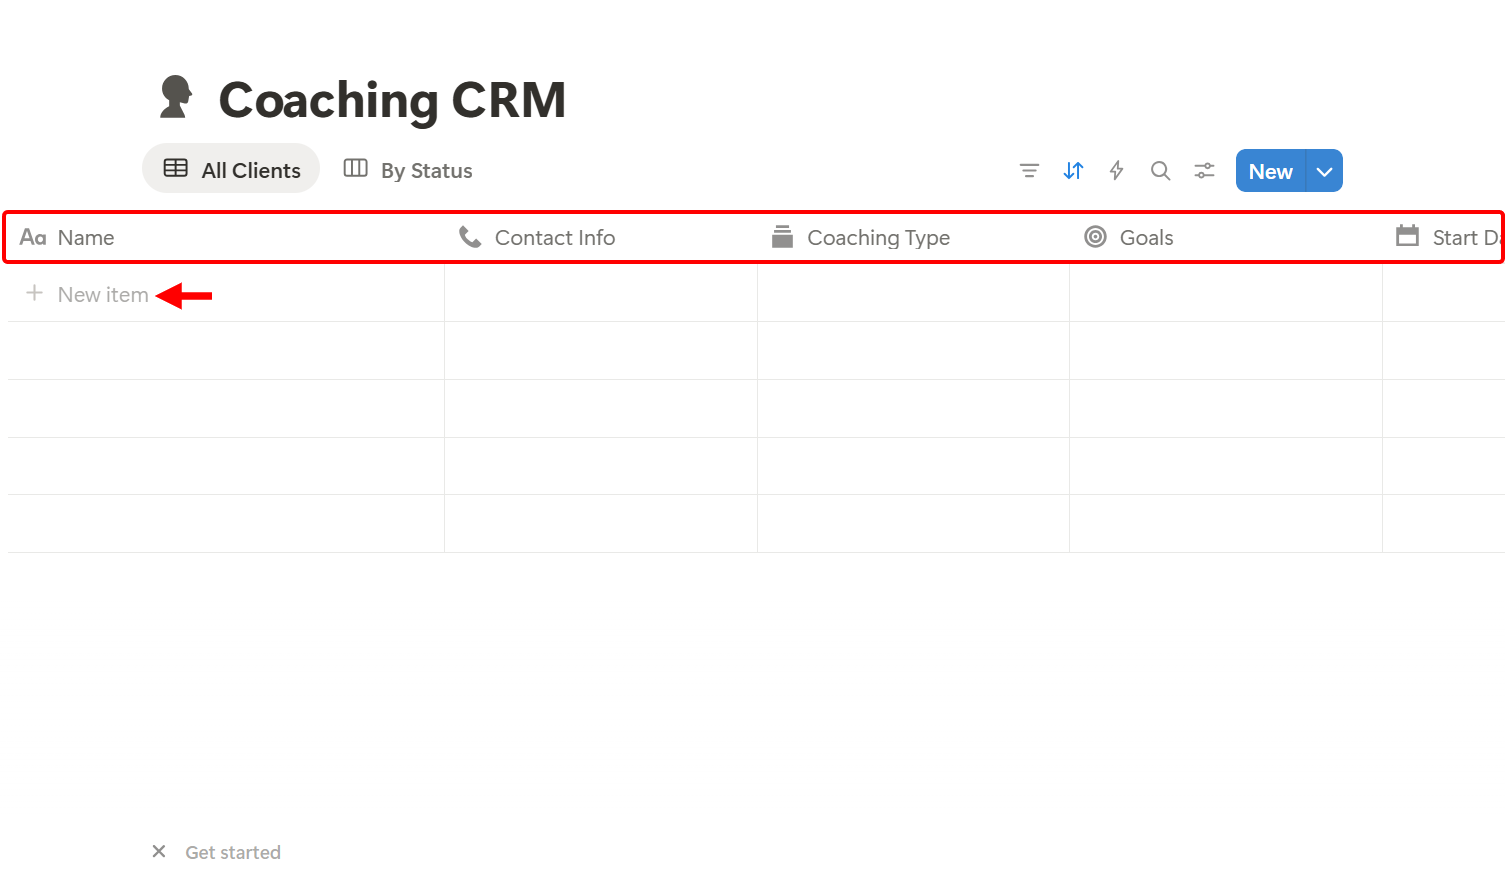
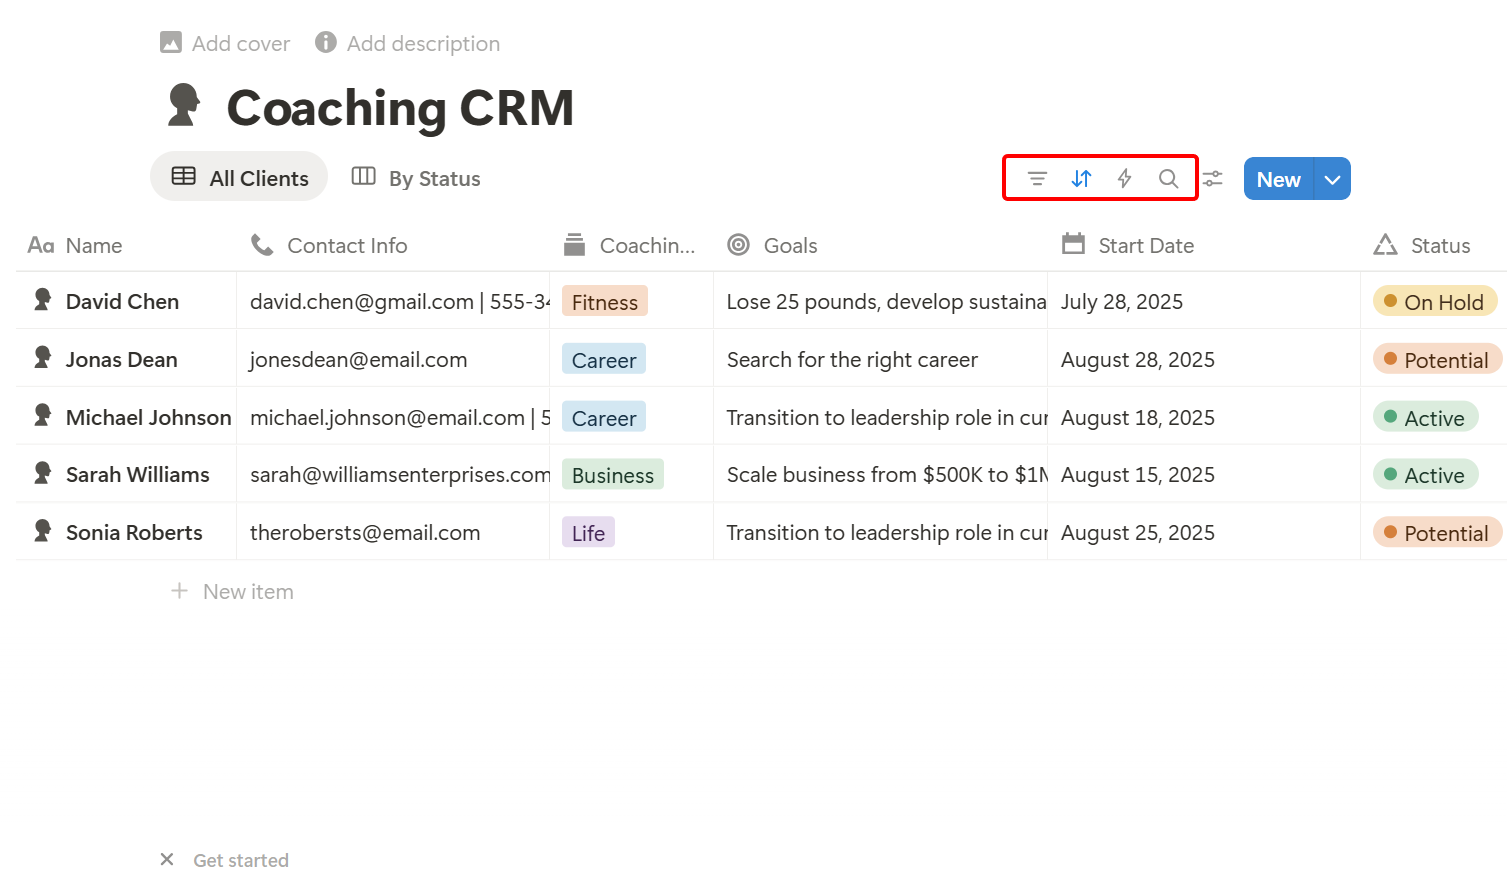
Your client's details should be organised like mine below. You can use it to track their coaching type, goals, and duration.
Additionally, Notion enables you to integrate the database into a workflow.
Key Features
1. Page
Notion's Page provides a flexible workspace where you can create and organize content, such as notes, guides, or client-facing materials.
You can use this to create portals, program hubs, onboarding guides, and resource libraries for your clients. You add text, images, links, and embedded tools in here.
Also, you can add an existing database, form, research, or AI to summarise notes and transcripts. You can also add views like a list and a board.
If you don't want to create manually, you can use its AI.

When you select the AI, you provide it with a prompt or use its suggestions. You can include files, pages, and mentions so the AI can generate more focused content.
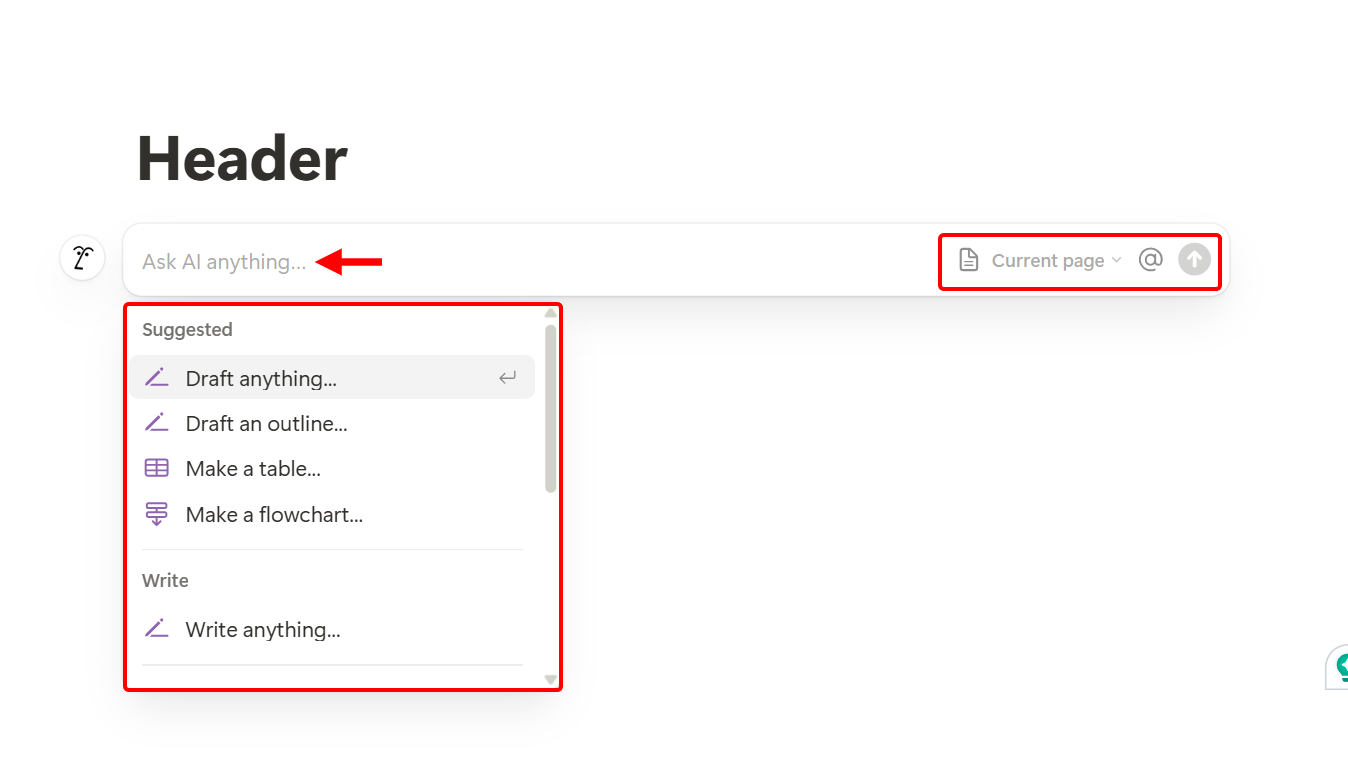
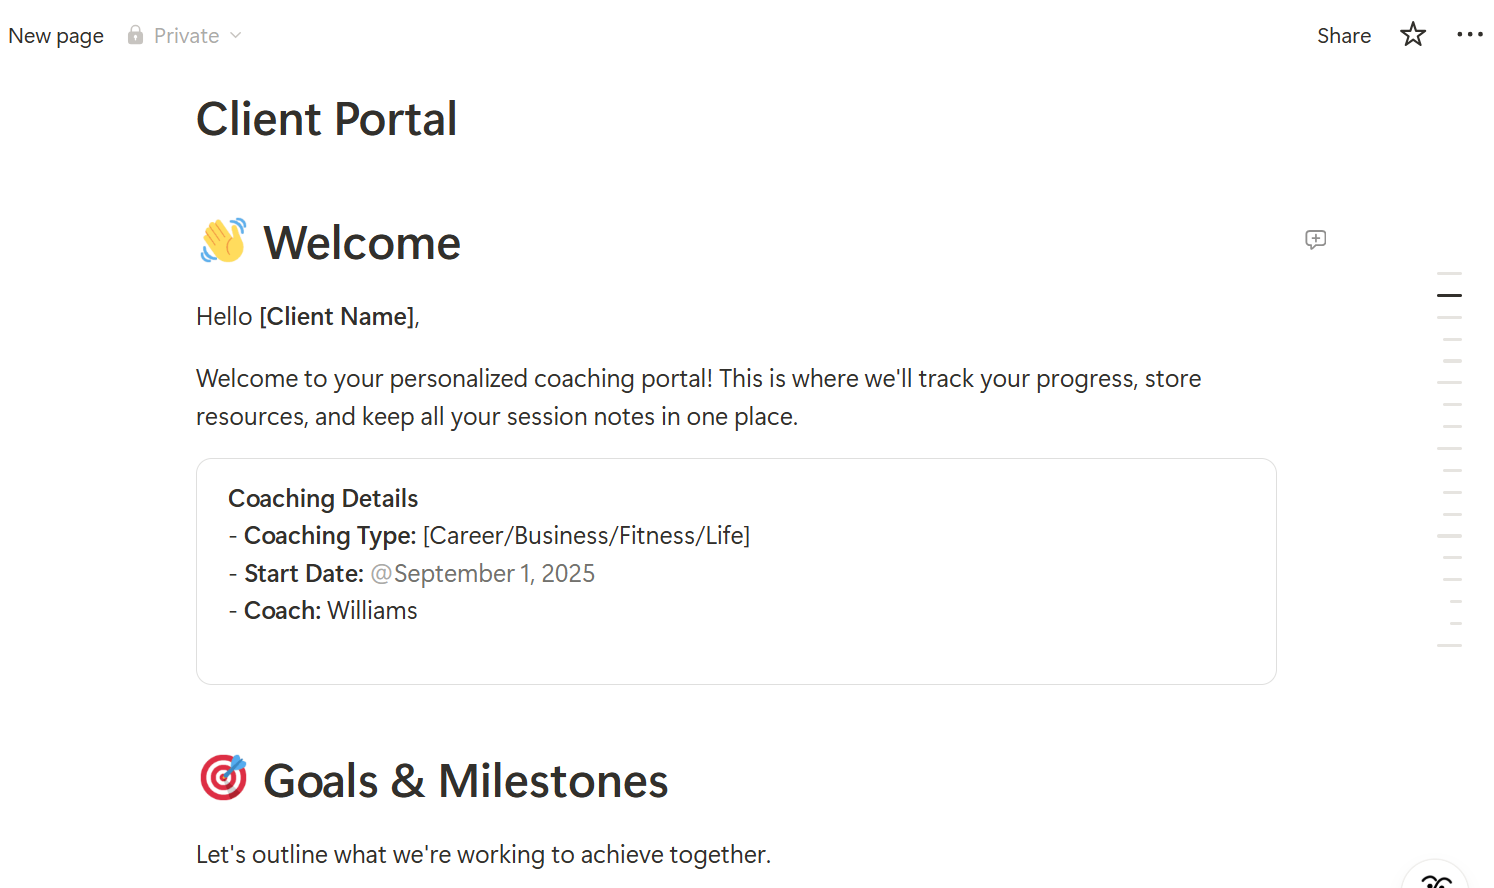
For instance, you can prompt it to generate a client portal page template for coaching, and you can make changes to the generated content.
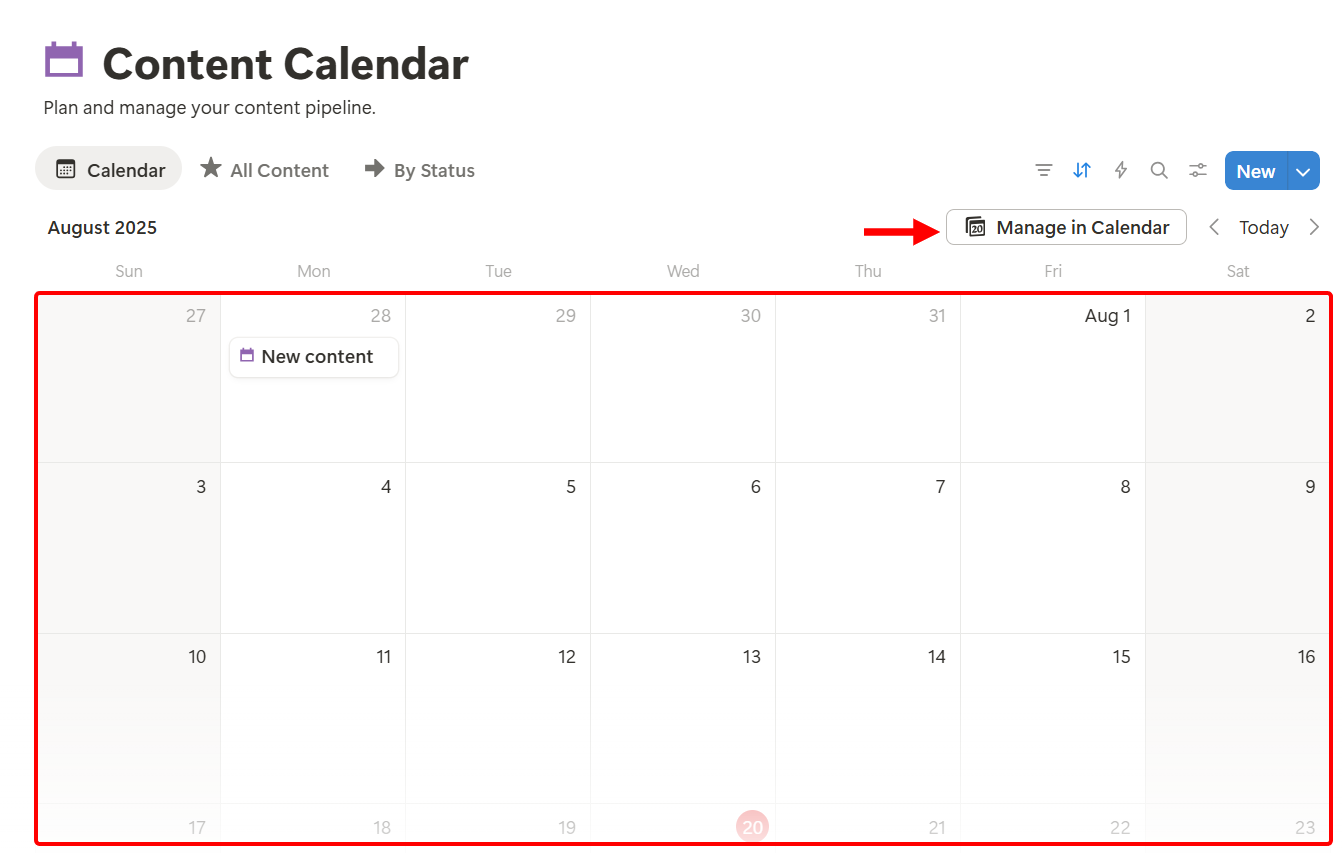
2. Content Calendar
The content calendar feature is a database view that lets you plan, schedule, and organise content across days, weeks, or months.
You can create blog posts, social media updates, newsletters, or program materials directly on the calendar.
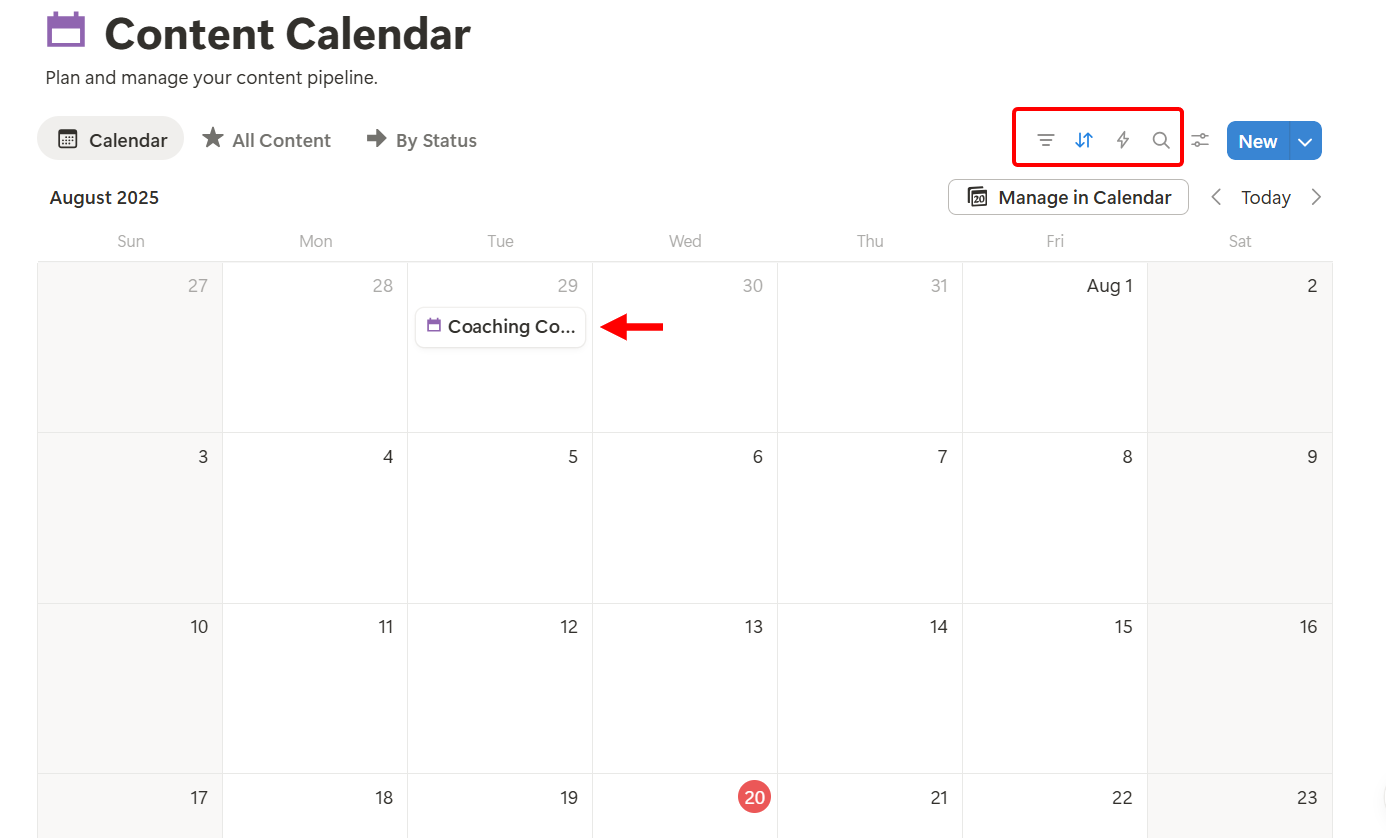
On the calendar, you select a layout, apply filters, and select a period to track contents. Also, choose a date from the calendar and add content to it.
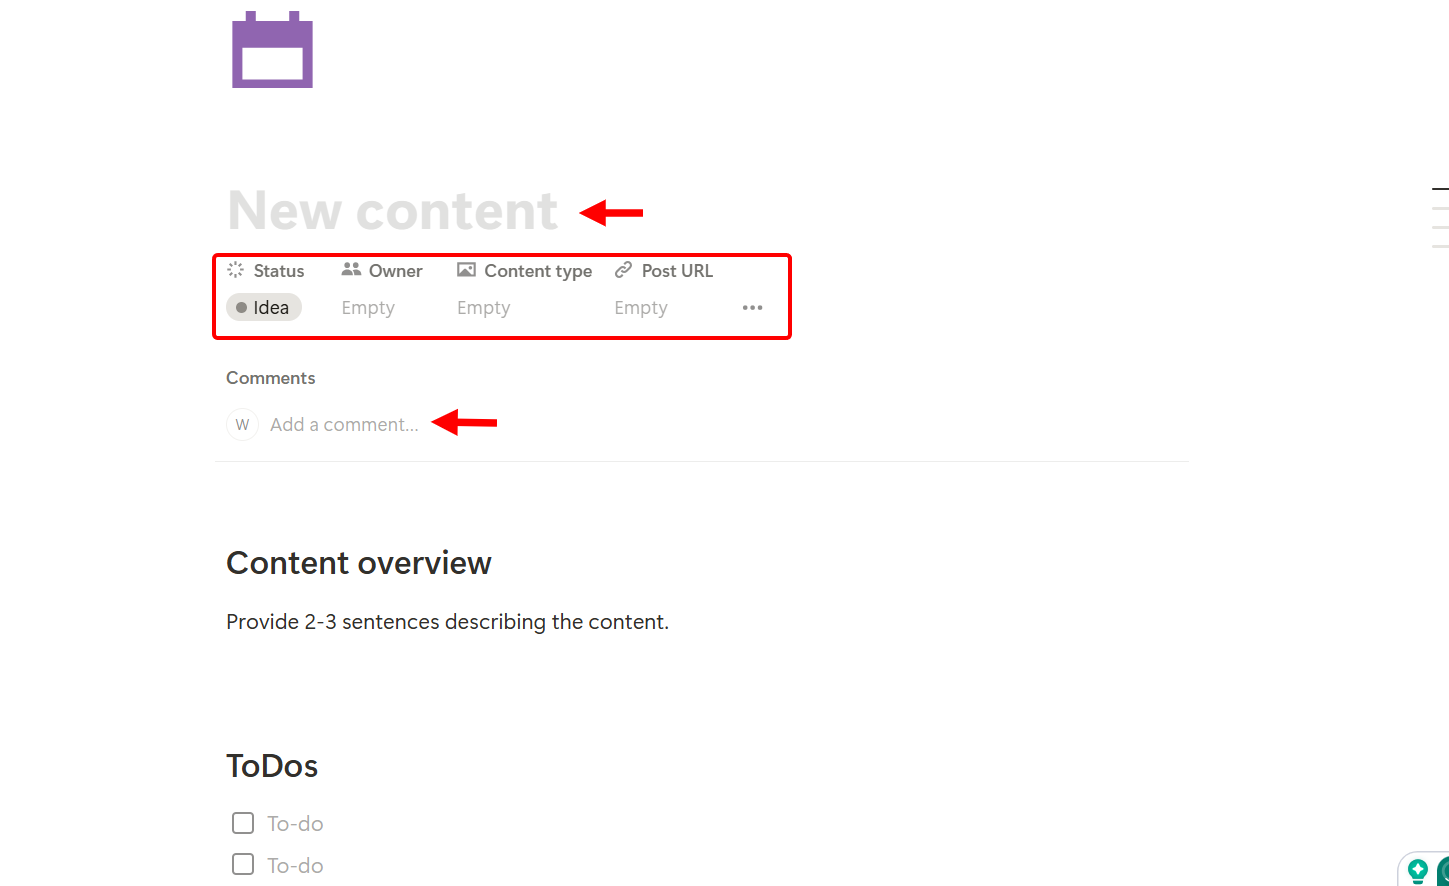
To add content to the calendar, provide a title, set its status, assign an owner, specify the content type, and enter its URL. You can also add comments.
After adding content to the calendar, you can track, edit, and manage it. More so, you can add the calendar to a workflow.
Best For
Life coaches who seek to build customizable client trackers, session templates, or resource libraries using flexible blocks and databases in one space.
Pricing
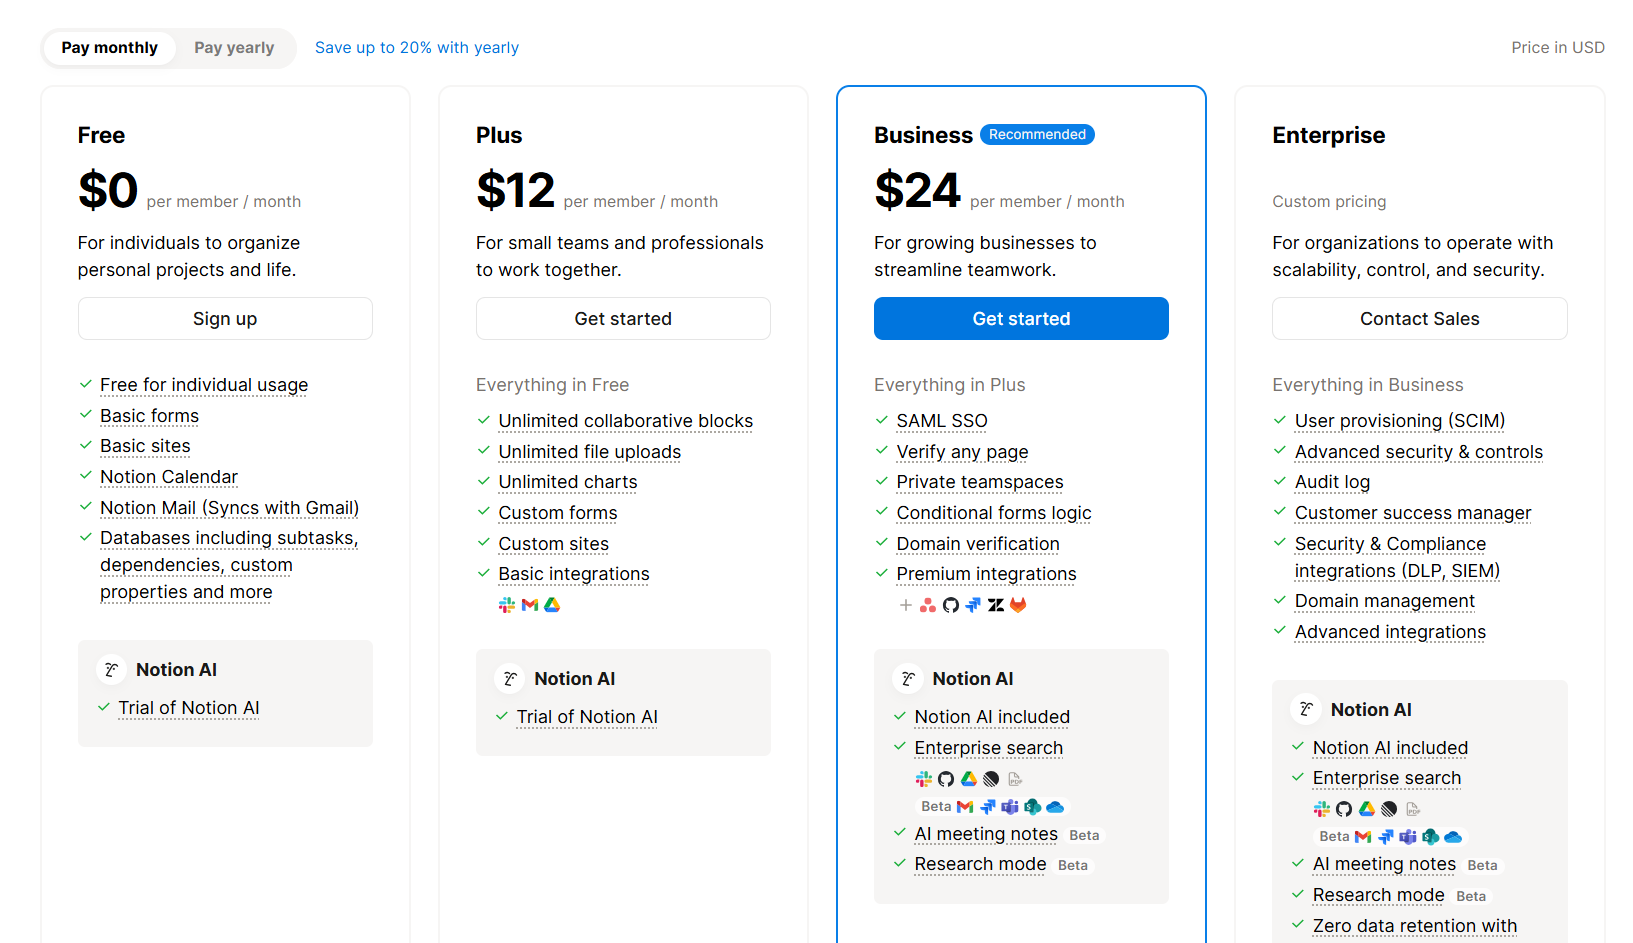
- Free plan - Free/ monthly package [per user]
- Plus - $12/ monthly package [per user]
- Business- $24/ monthly package [per user]
- Enterprise - Custom pricing
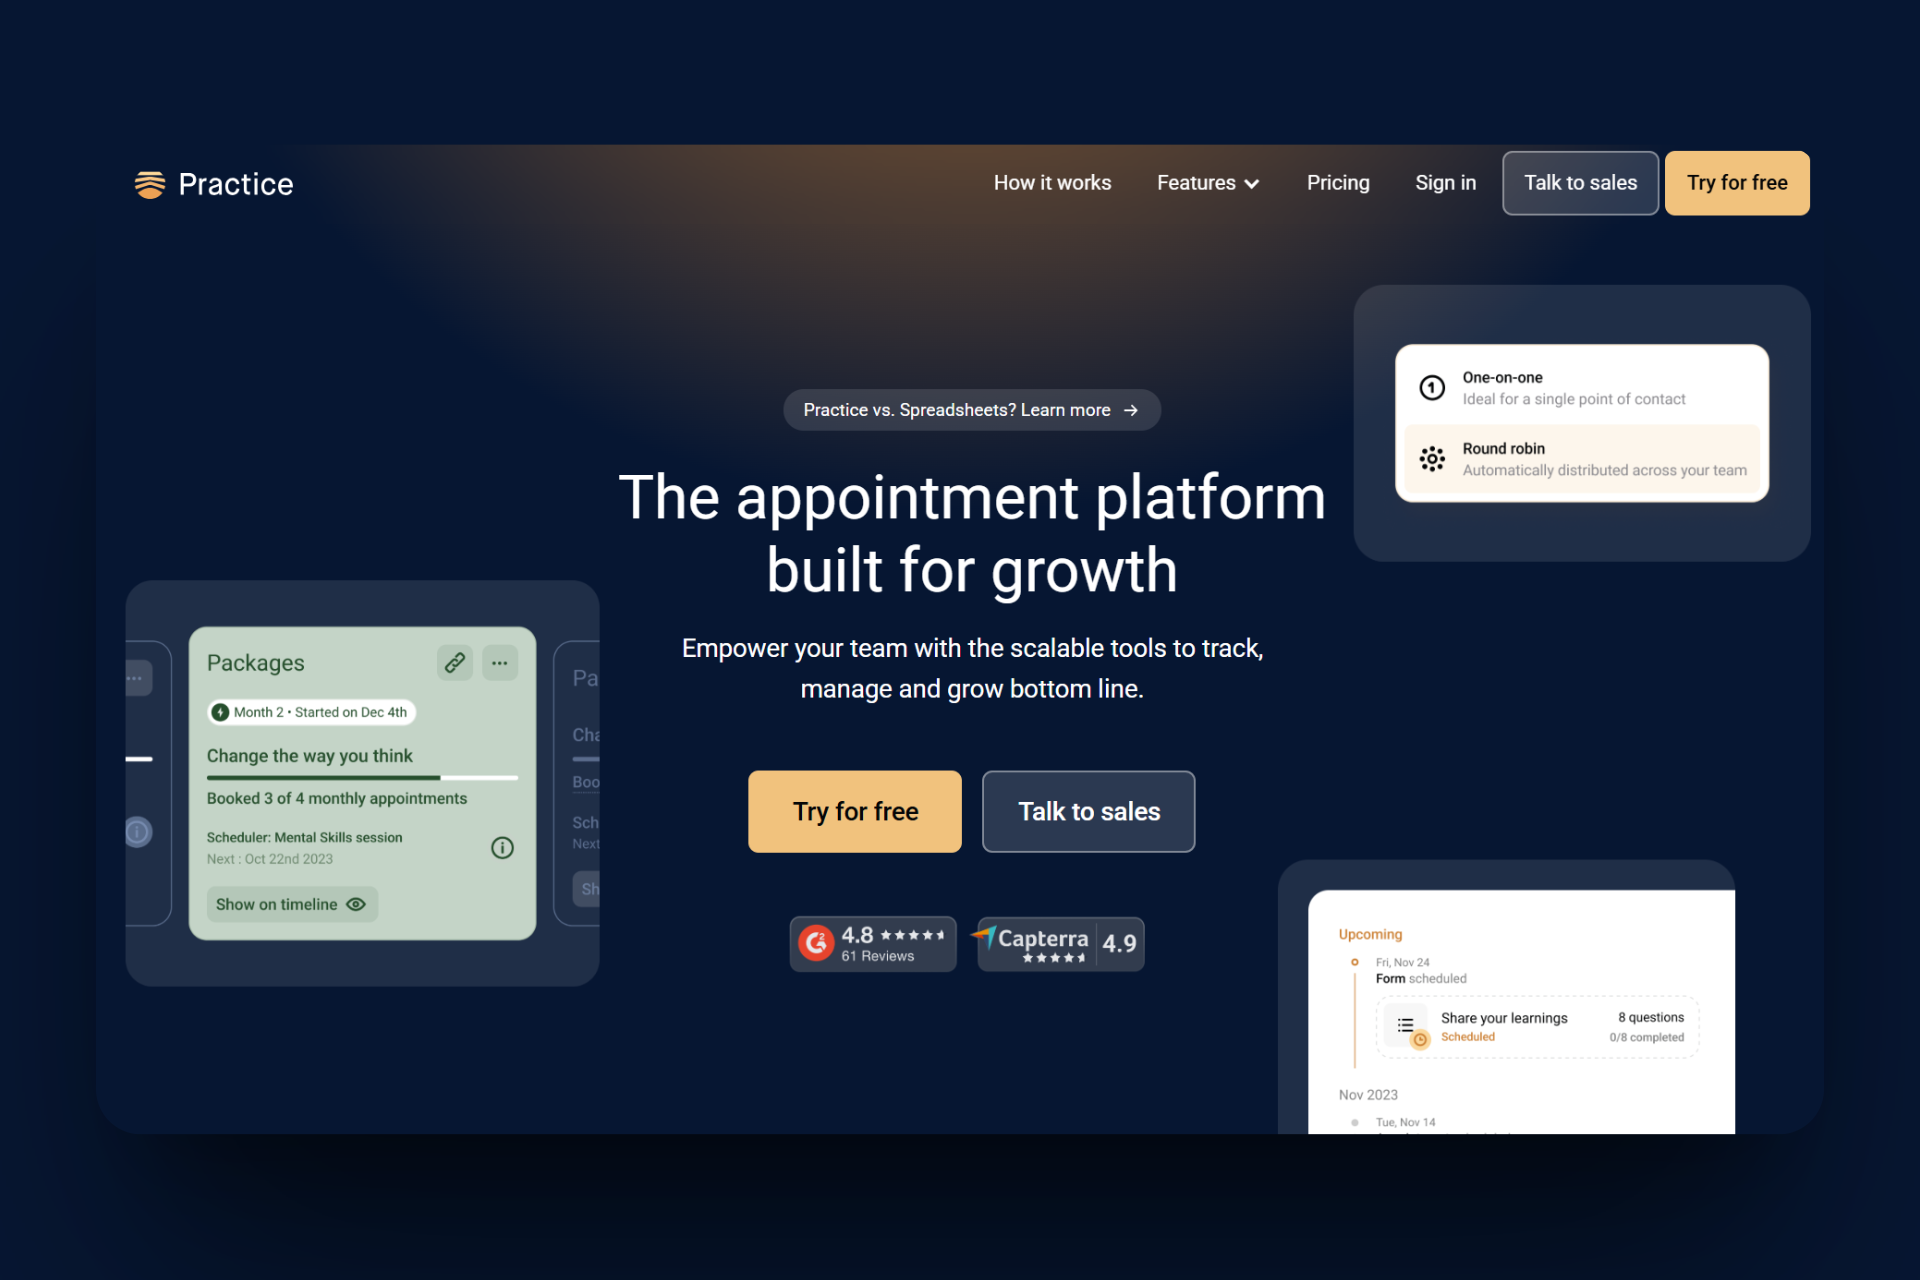
3. Practice.do
Practice is the next tool on the list of online coaching platforms. It allows you to manage clients and schedule appointments.
This tool offers a Scheduler that lets you create booking links. When creating, you choose available days, indicate the session lengths, add the URL, enable buffer times, set the payment option, and then copy the link to share with clients.
Practice.do features an Appointments section that allows you to track and confirm sessions by selecting a client, choosing a date and time from the calendar, adding notes, and sending the confirmation.
Furthermore, it features a Contacts section that stores the details of your booked clients, including their names, email addresses, and goals.
This allows you to attach related files to each profile, track booking history, assign to-dos, set plans, and edit their details.
Lastly, there is a Form feature you can use to collect client information. This feature allows you to create a new form, assign a name and title, add custom fields such as text, multiple-choice options, or ratings, and assign it to clients.
The Scheduler is used to set up and manage your availability, allowing clients to book sessions easily without the need for back-and-forth emails. This makes it a core feature for your coaching.
With it, setting up one-on-one meetings, events, and group meetings is straightforward. The Scheduler also integrates with tools like Zoom and syncs with personal calendars.
Let's say you ran a workshop, hosted a webinar, or taught classes as a coach. You can use the events in the scheduler feature to create and set up specific time slots where clients can register and join your group coaching sessions. Let me show you how.
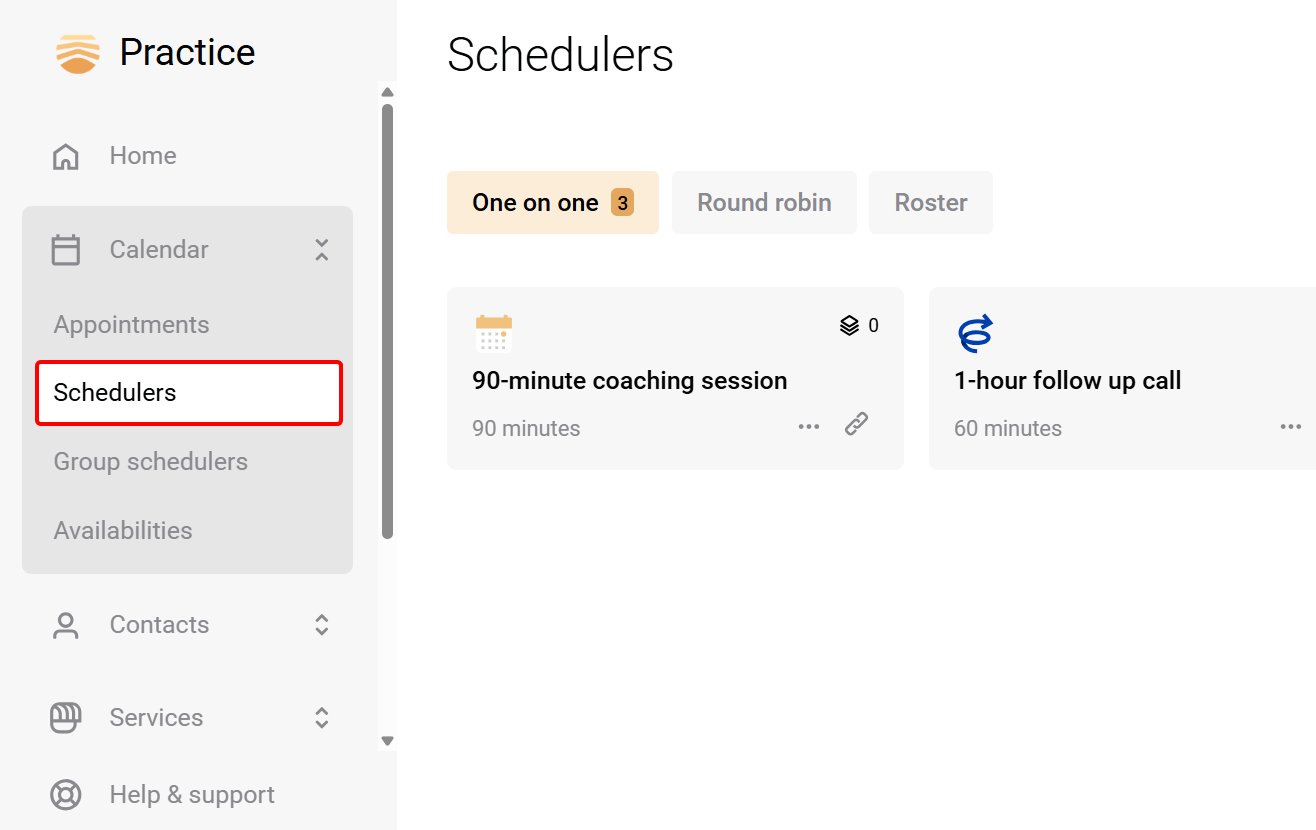
First, select the "Scheduler" within the calendar dropdown on the main dashboard.
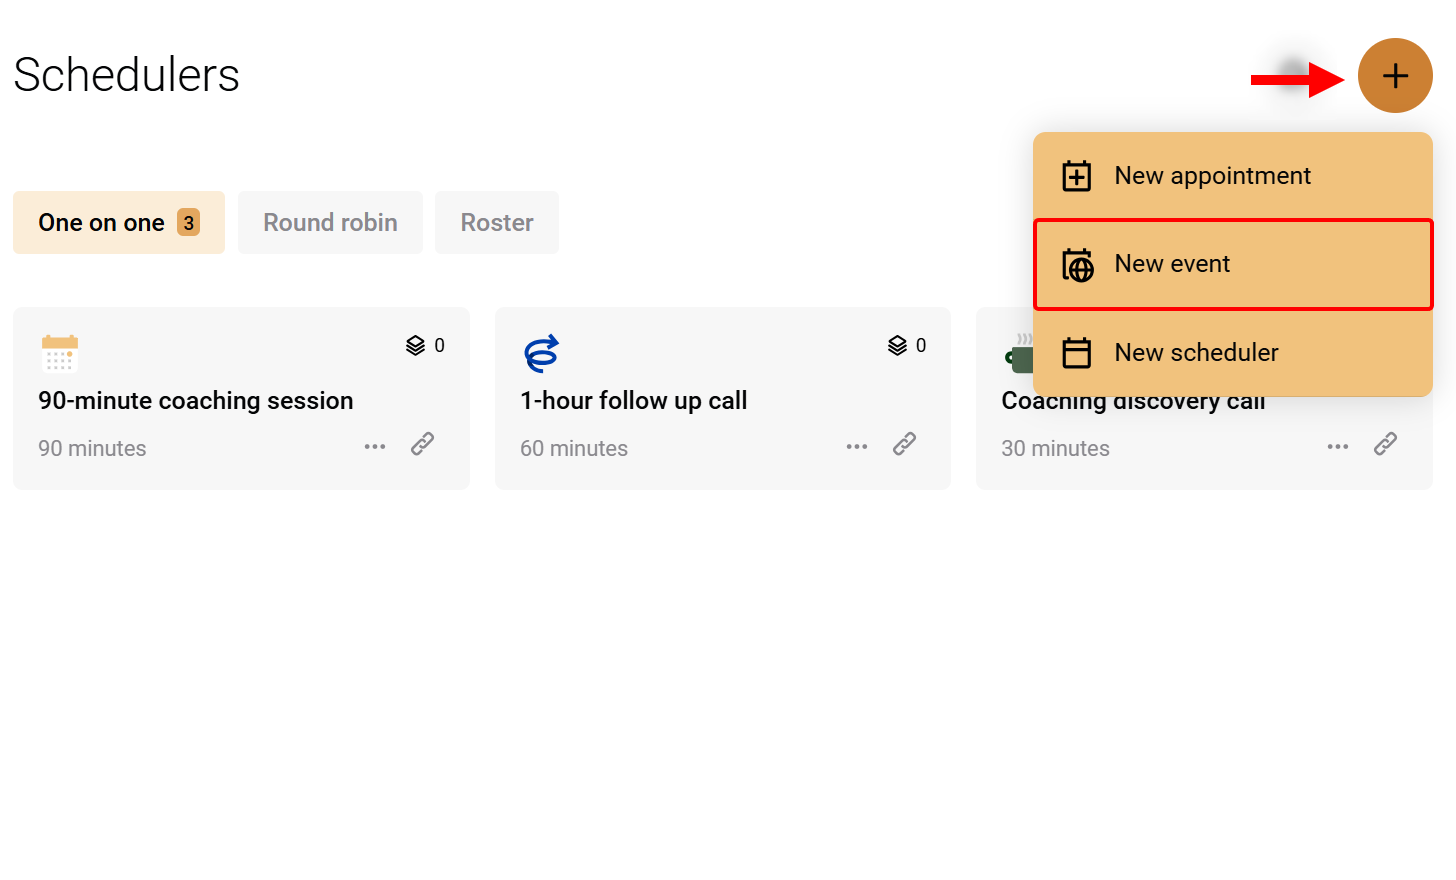
To create your events, select the New button and choose "New event" from the dropdown.
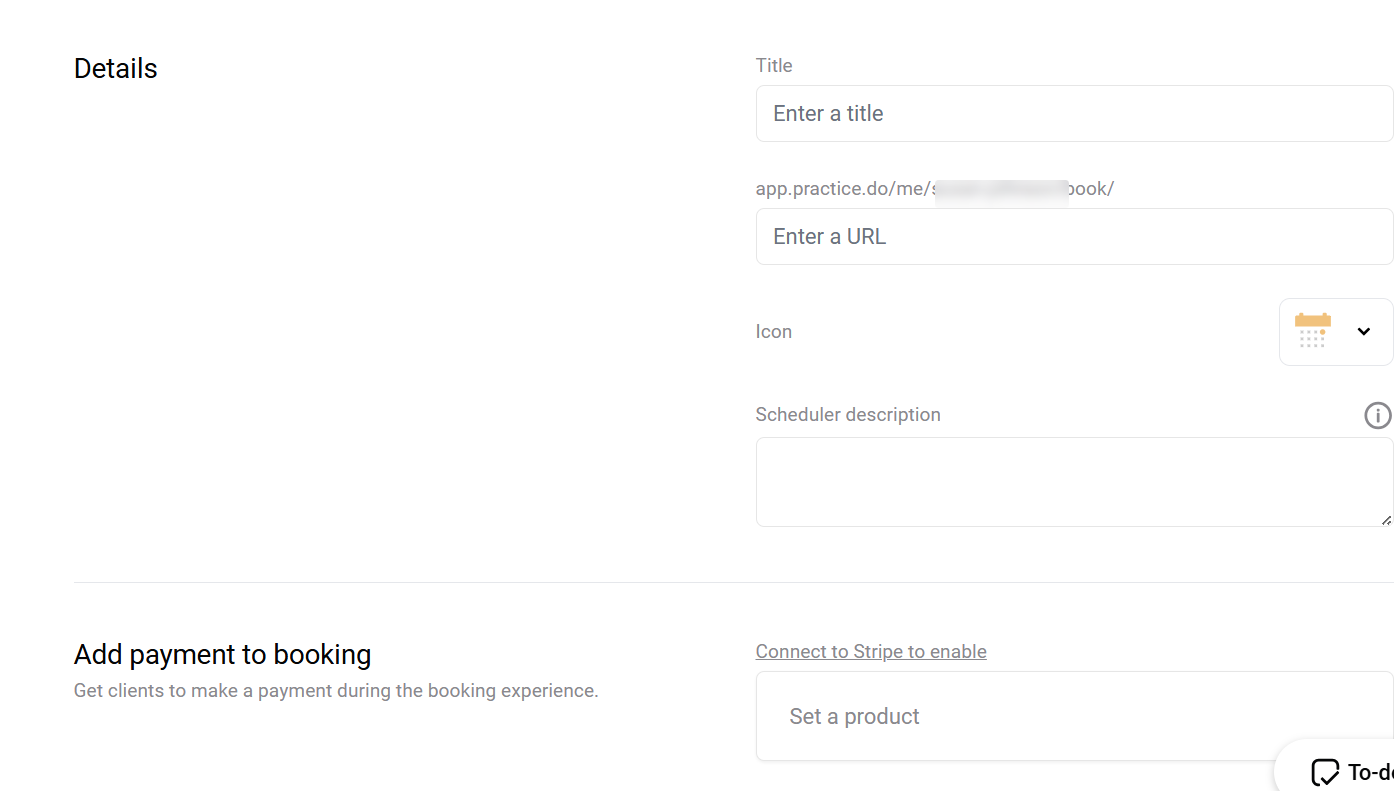
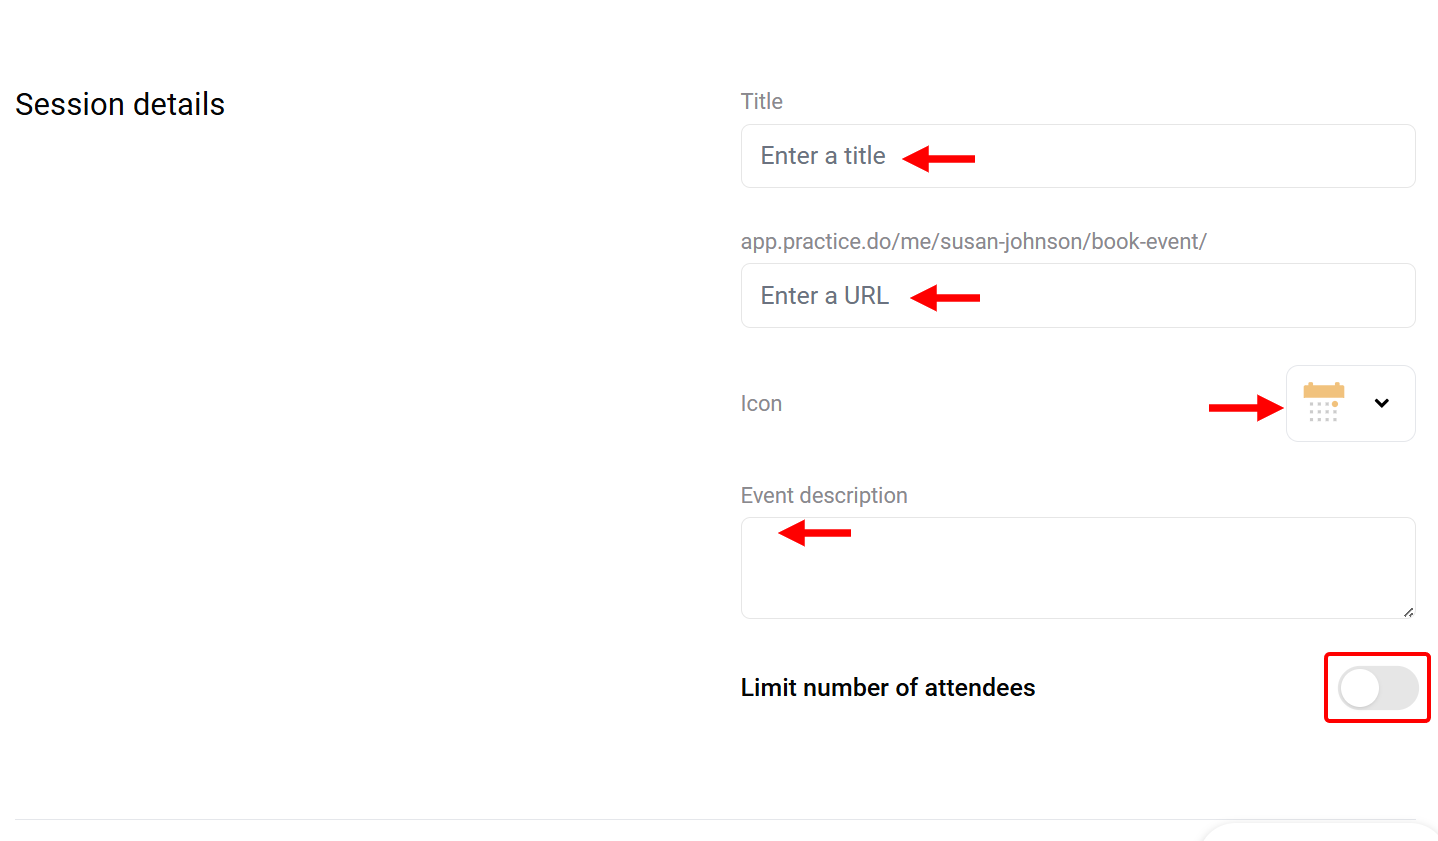
This opens the event setup screen. Here, you first define the event by adding its link and description, selecting the icon, and then naming it. Also, you can limit the number of attendees.
Next, scroll to the date and time section and set the date, time, duration, and time zone for the event.
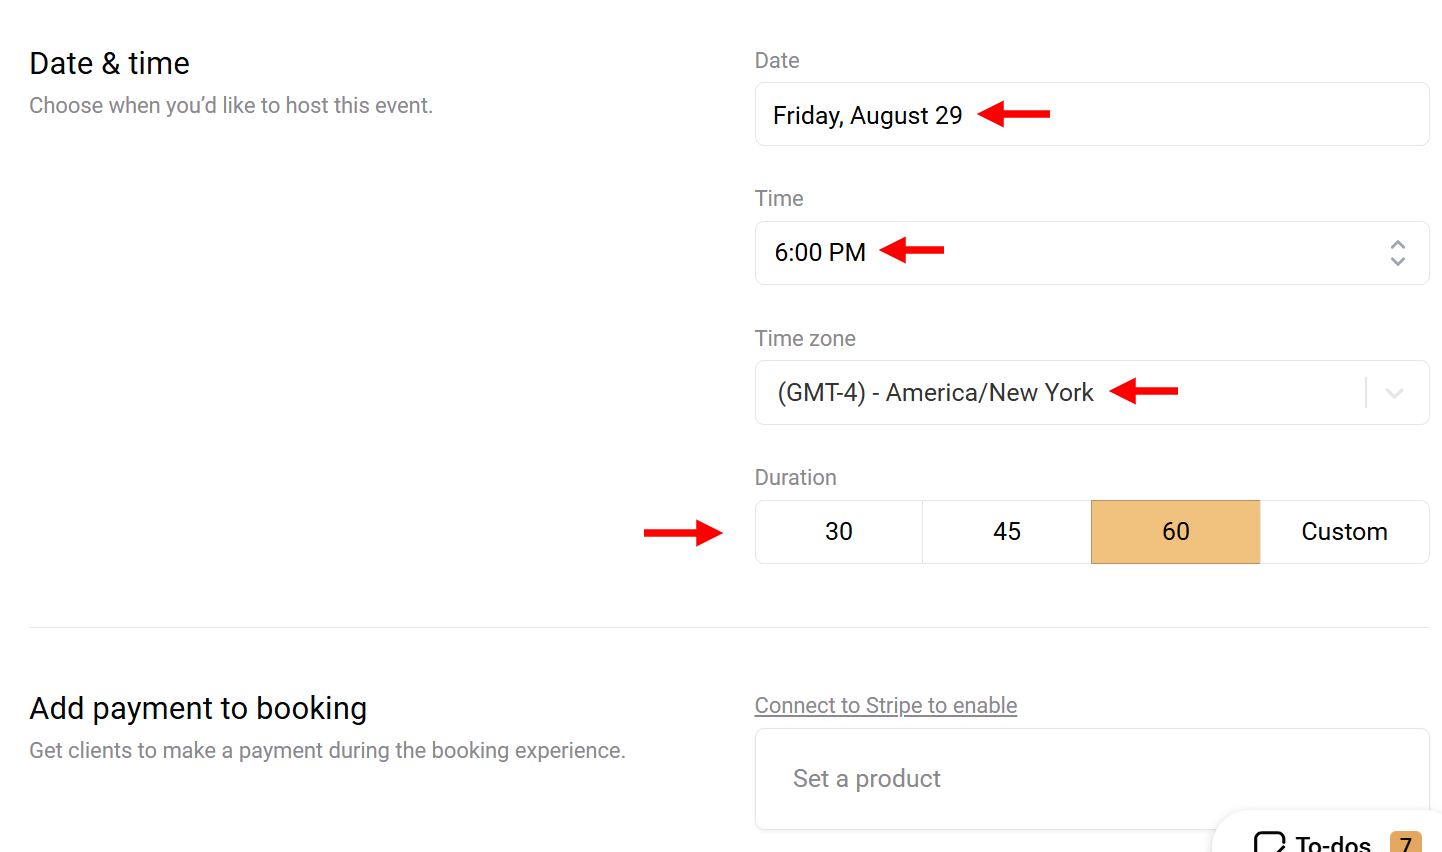
After that, select the calendar on which you want to create the events. If you want to collect payment for the events, you can add it to the payment section.
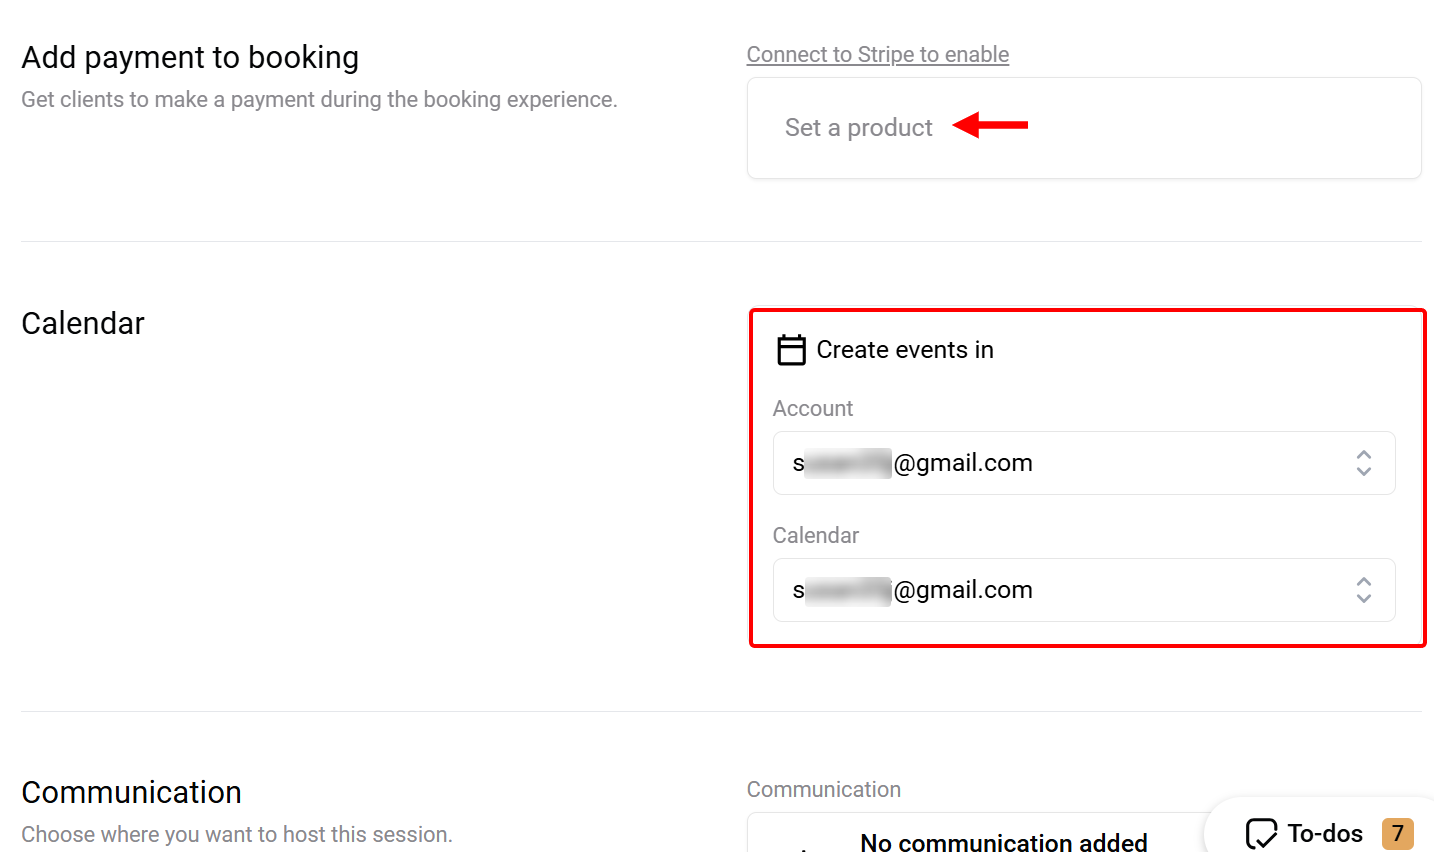
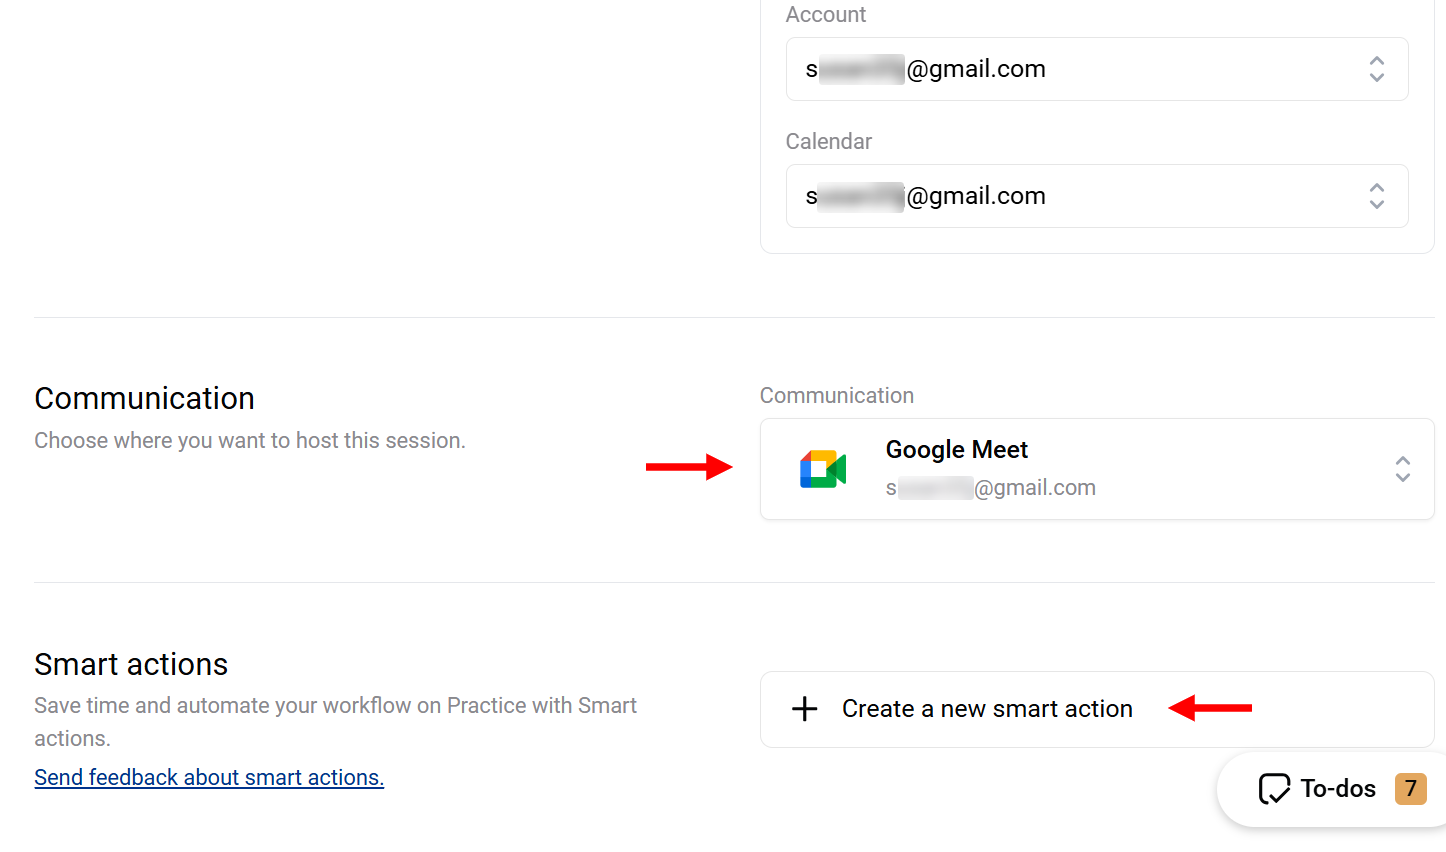
Finally, indicate the platform you want to use for hosting the event, such as Google Meet or Zoom. You can also add smart actions, such as notifications, to the events before saving them.
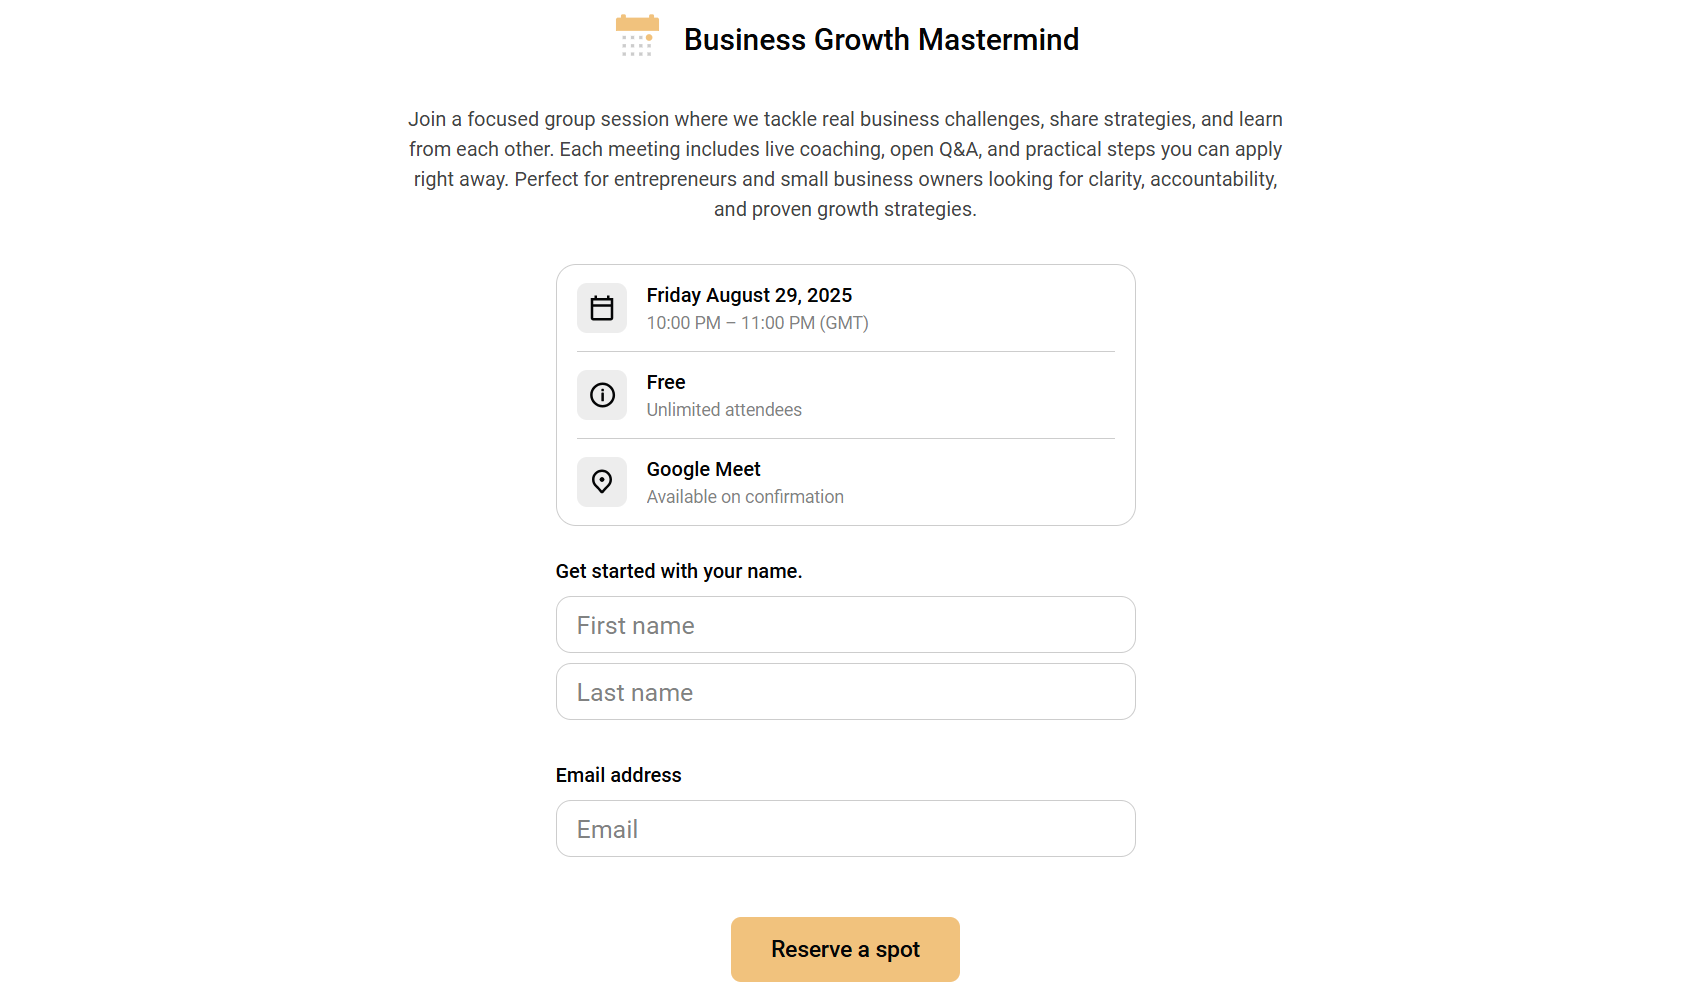
After launching the events, your clients who visit the page can view the event details and fill out its form before reserving their spot.
Key Features
1. Appointments
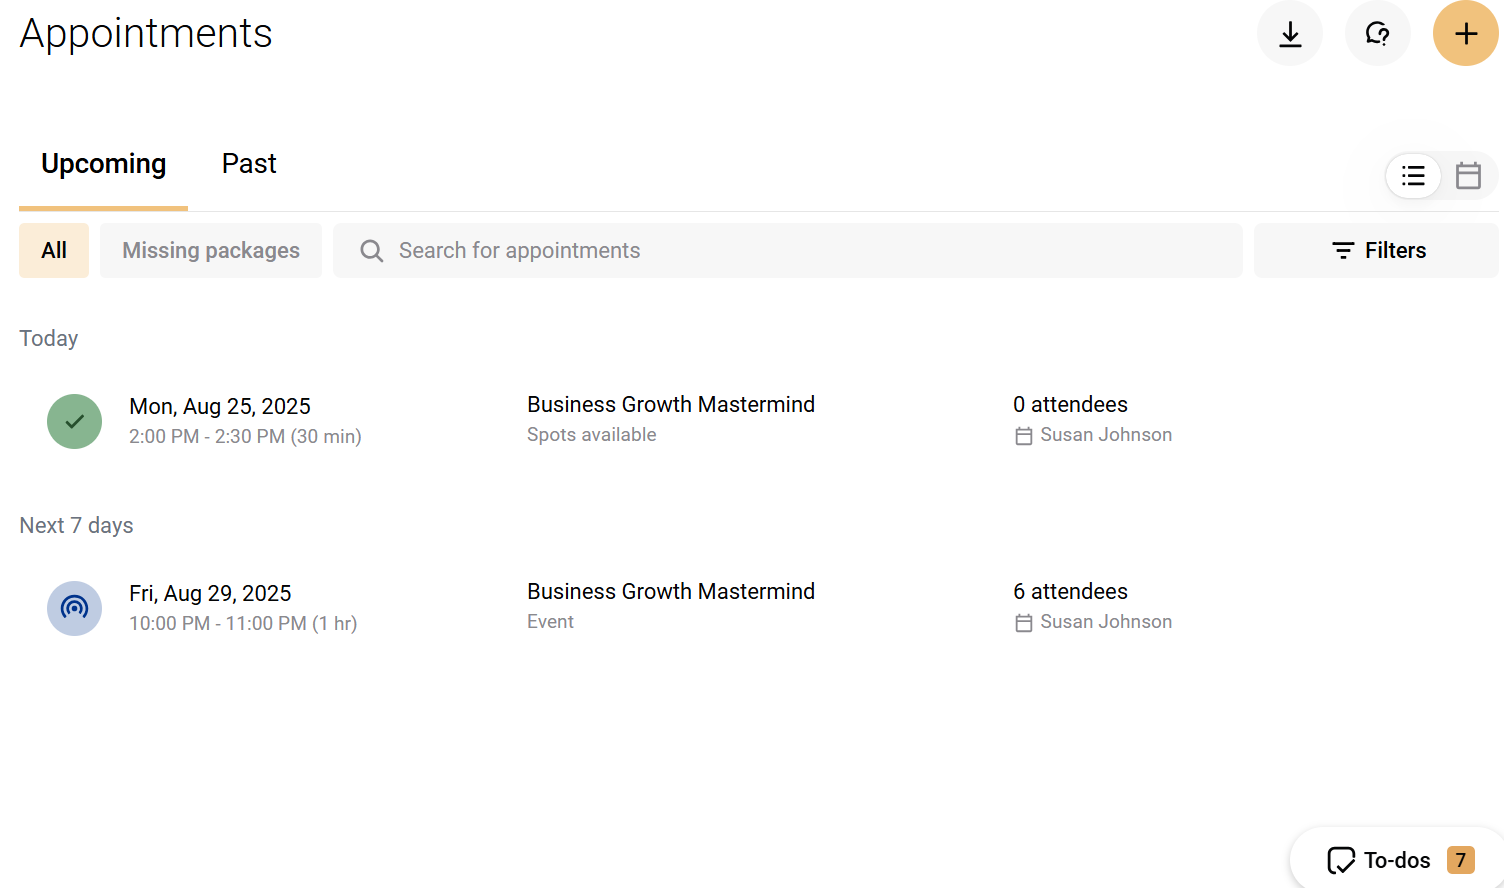
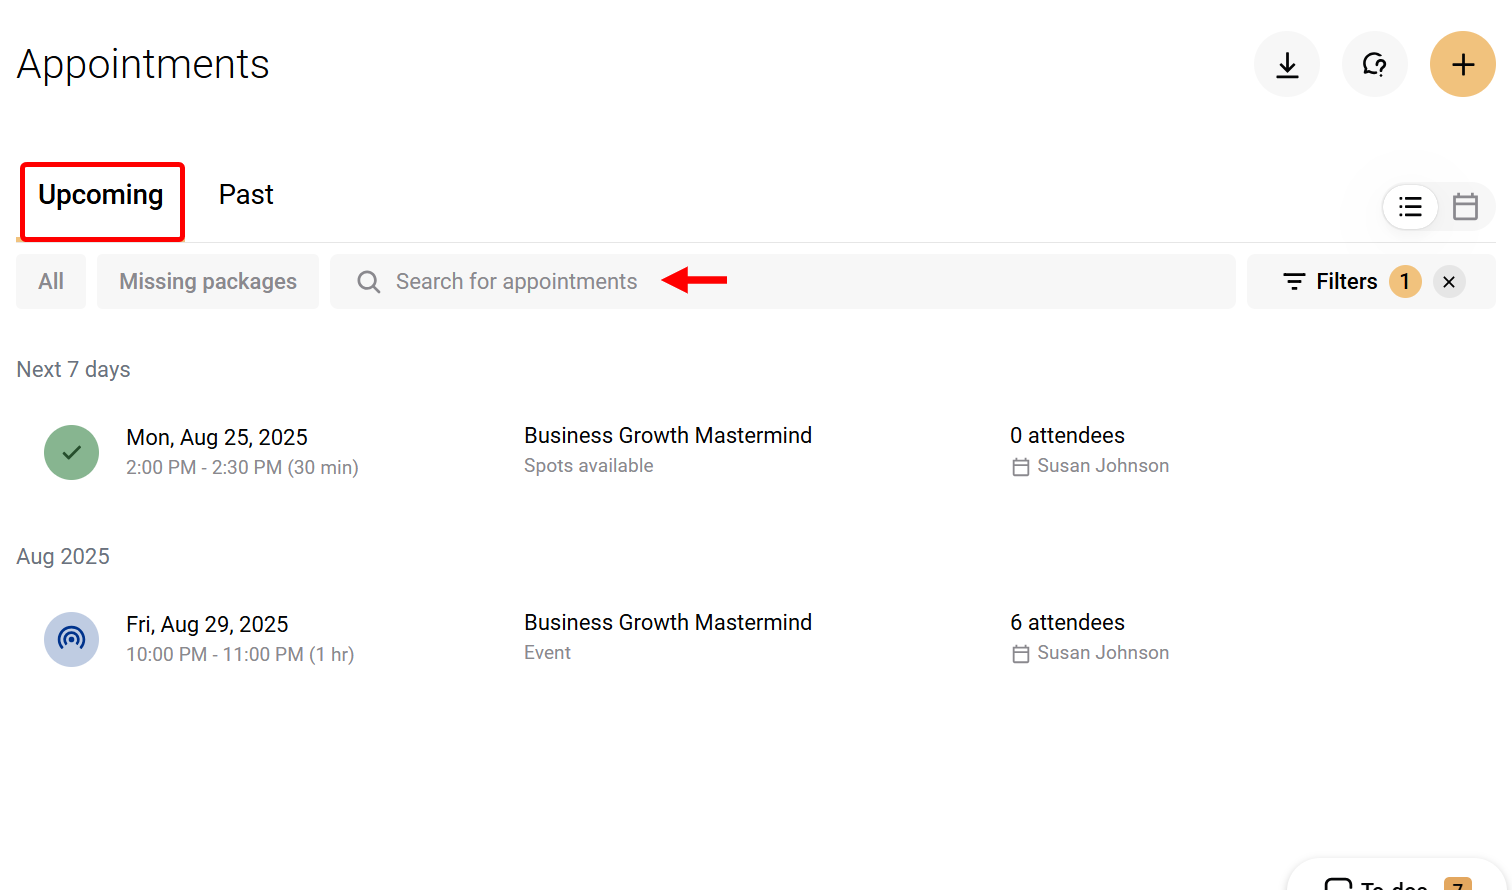
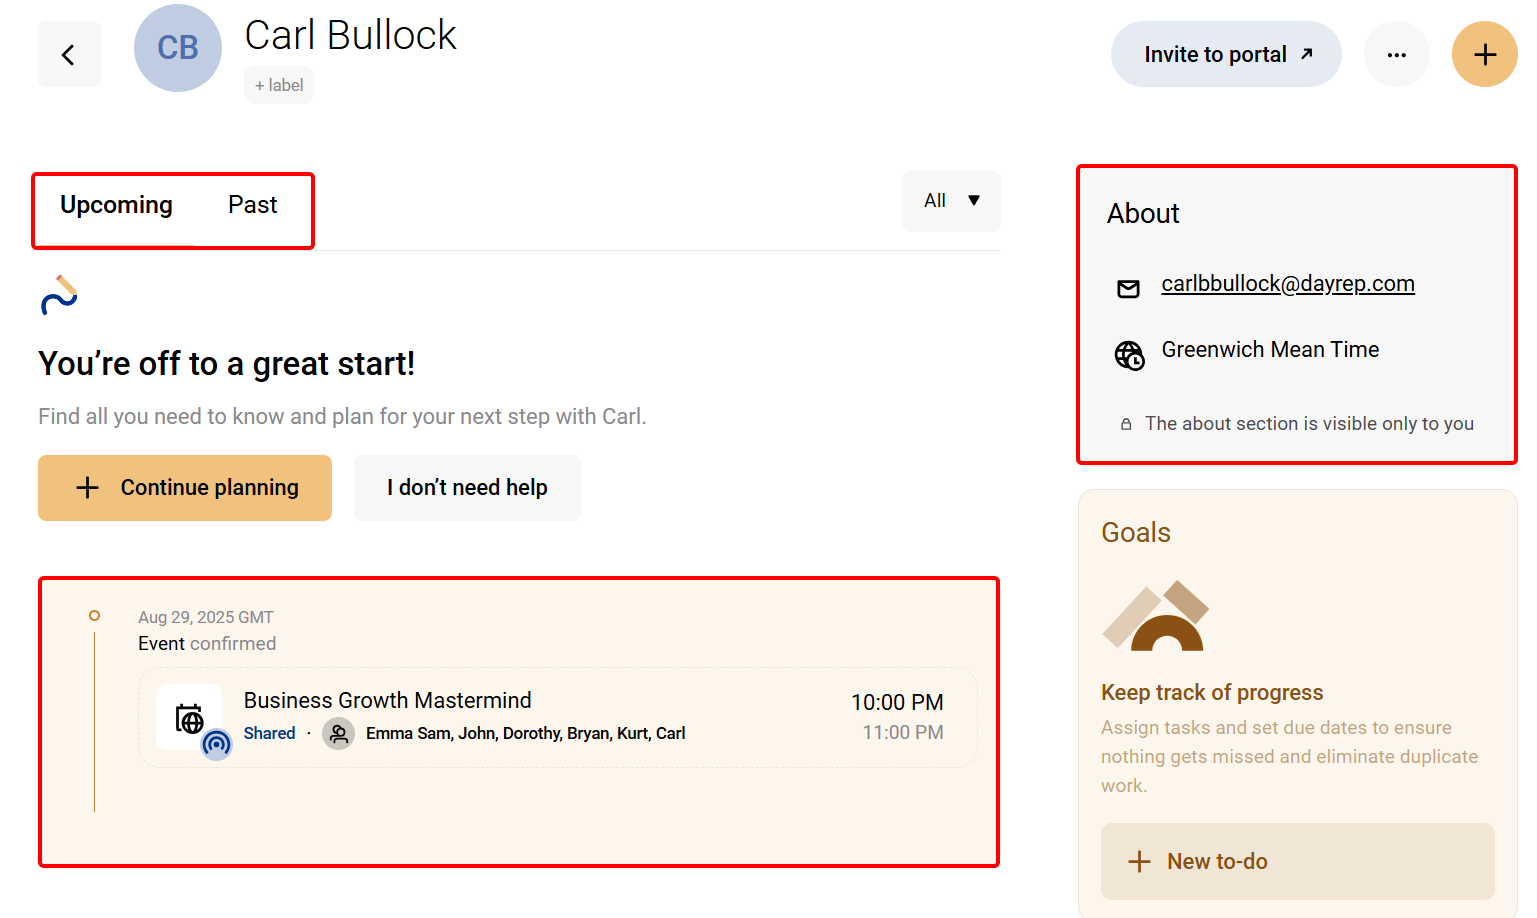
The Appointment feature is a dashboard where you can manage and track all clients' scheduled sessions. It displays both upcoming and past scheduler appointments and events, along with booked clients' details, including session status.
You can use this to stay organised, prepare for meetings, and maintain a clear history of client interactions.
When you access the appointment section, you can switch between the past and upcoming sections to track all scheduled appointments and query them.
When you select an appointment like an event on the list, you can view and edit details like status, outcome, date, event type, and location. It also allows you to view the list of clients who have booked the event.

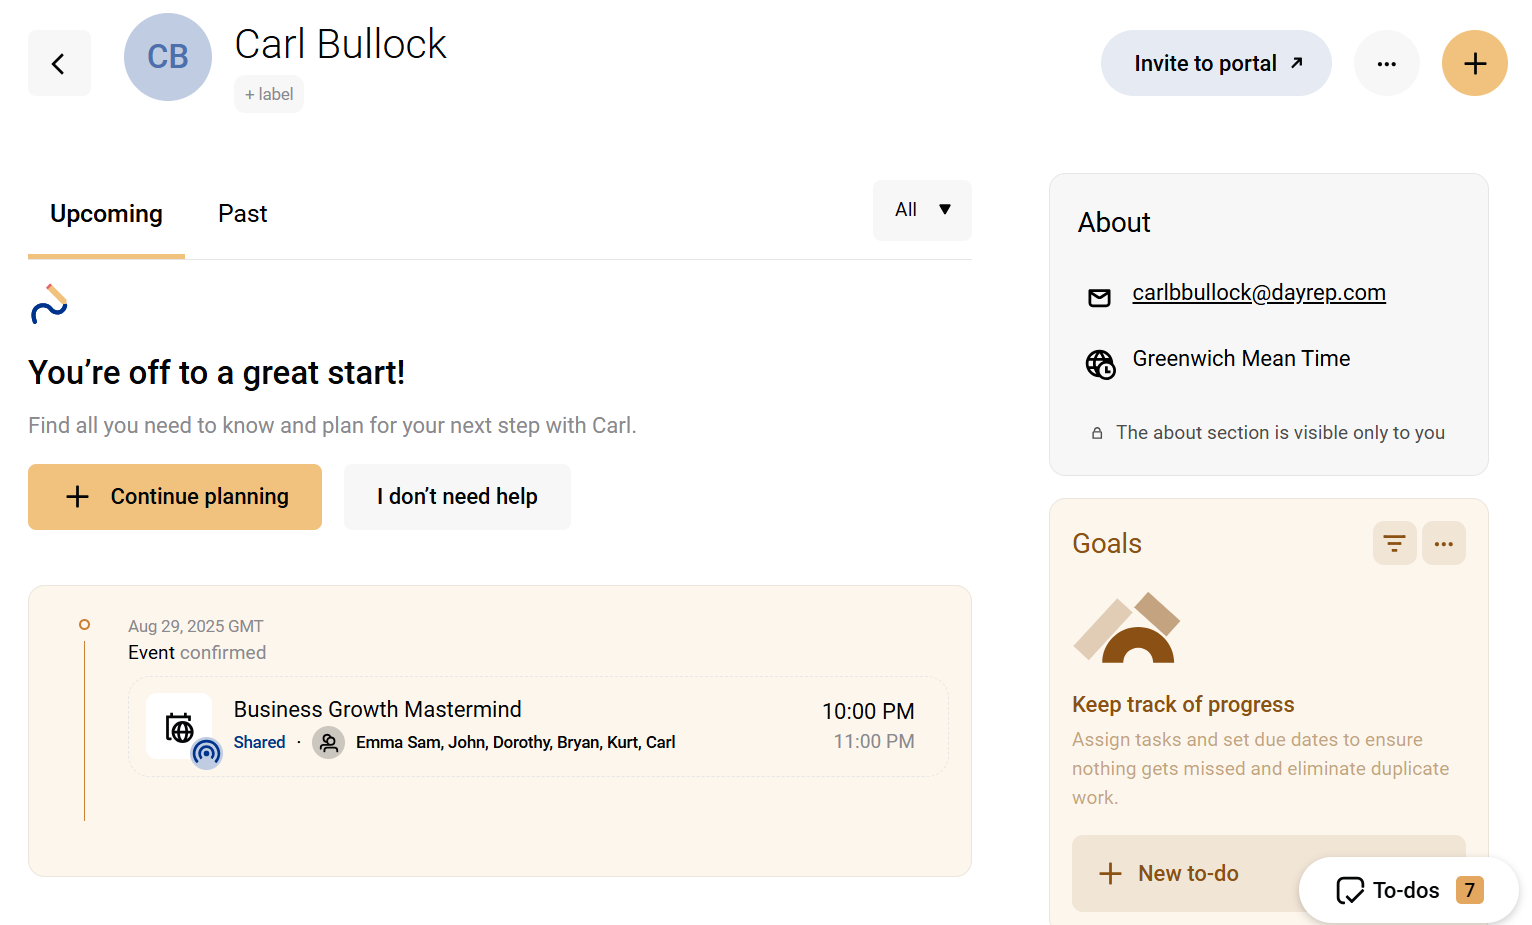
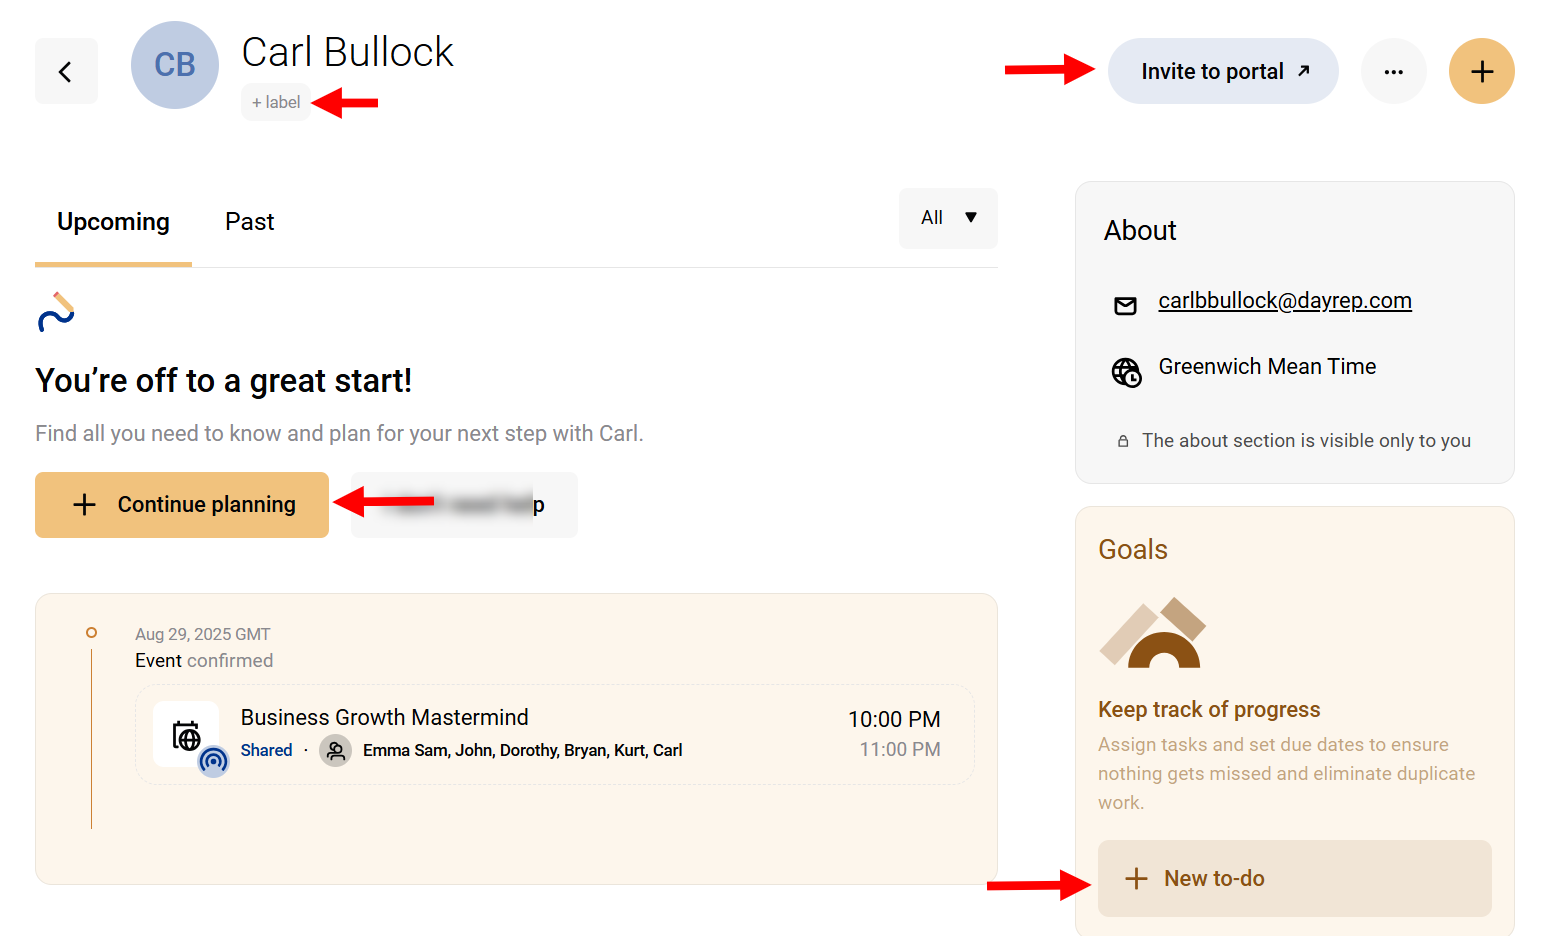
When you click on a booked client, you gain access to their details page, where you can view their email, timezone, and track their booking history.
The details section also lets you plan for the client and add a to-do task to the contact.
2. Forms
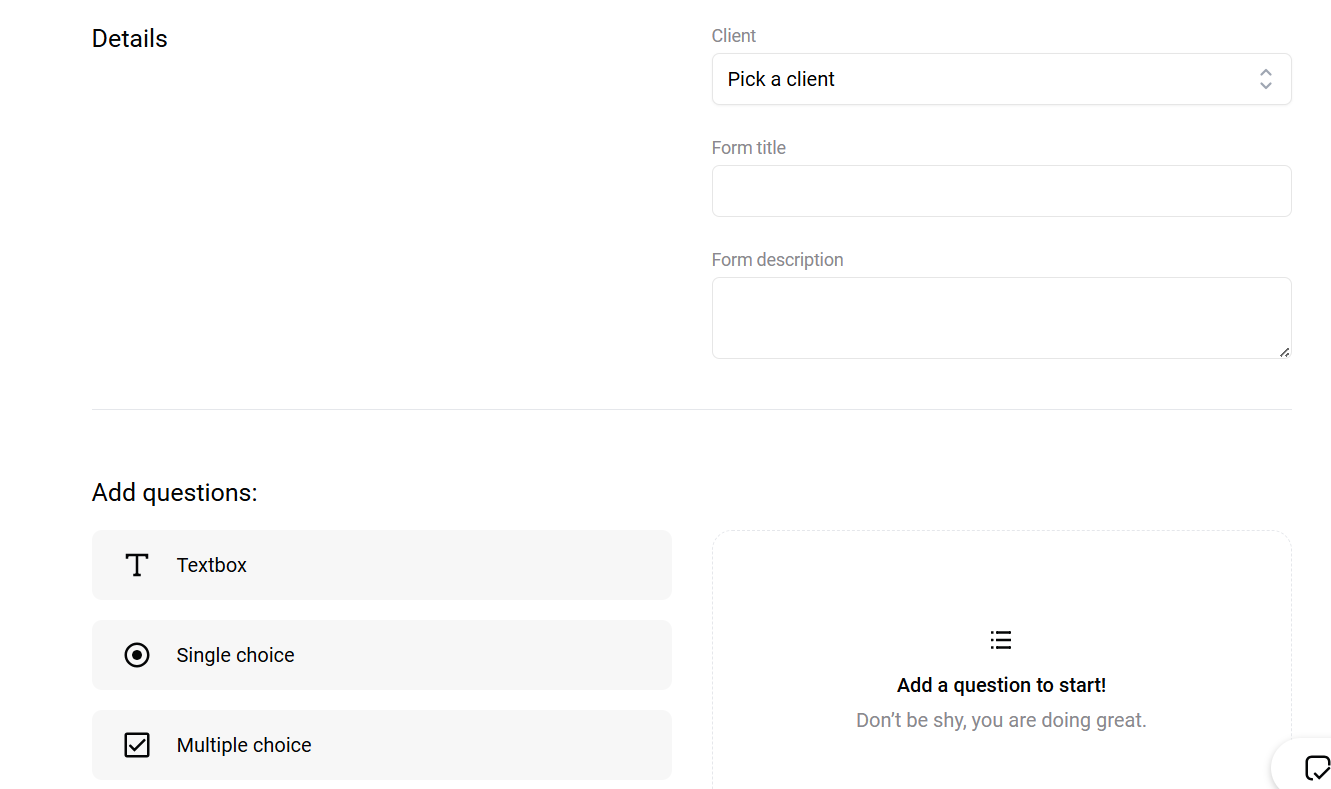
Practice's Forms feature lets you create and share customizable intake forms, feedback forms, or questionnaires with clients. You select a field and set its properties.
You can use it to gather important information like goals, progress, or feedback from clients, before or after the session. This helps you handle onboarding, track your clients' needs, and collect data to enhance coaching.
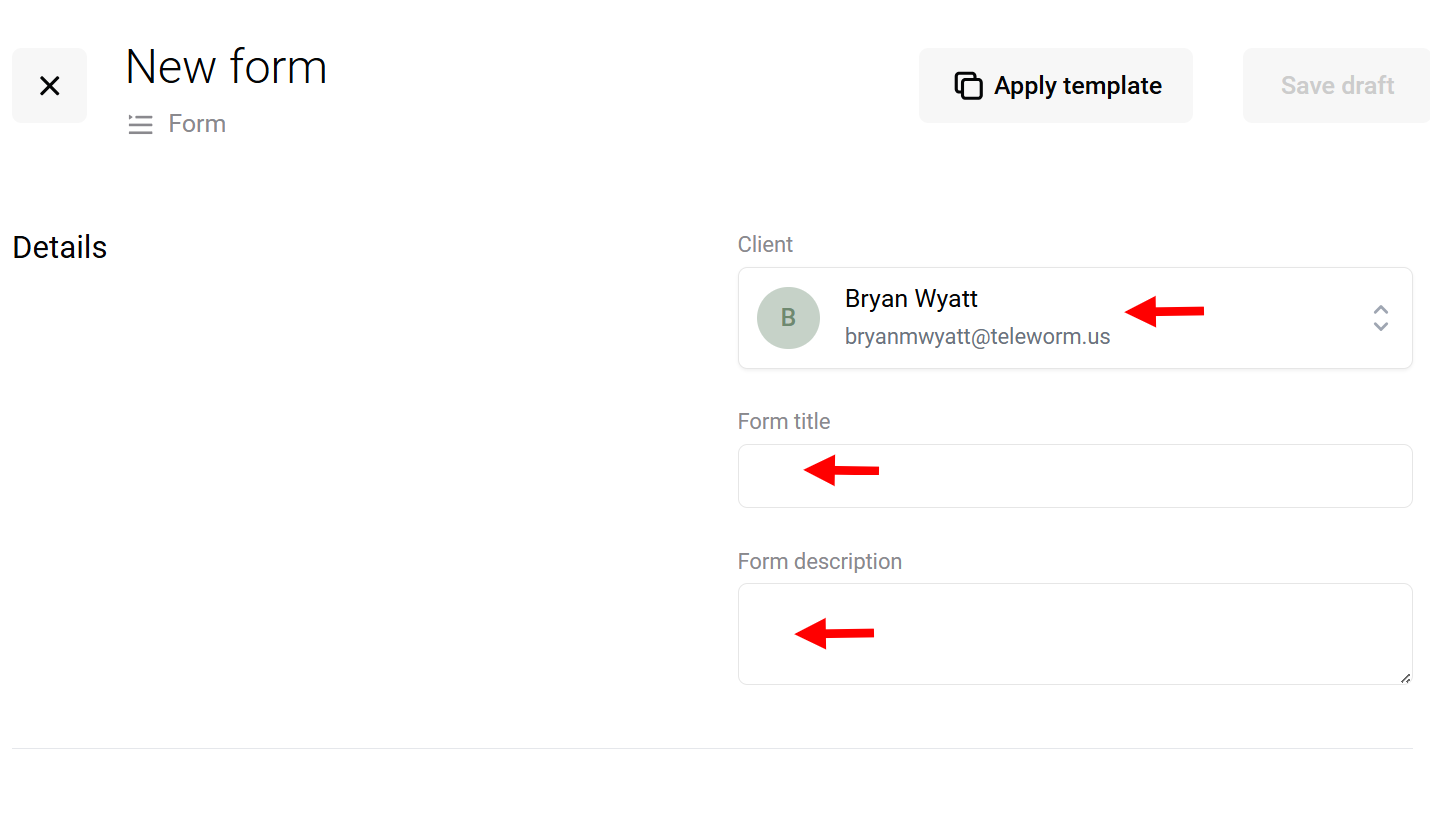
To create a form, you first have to give it a title and description, then assign it to a client.
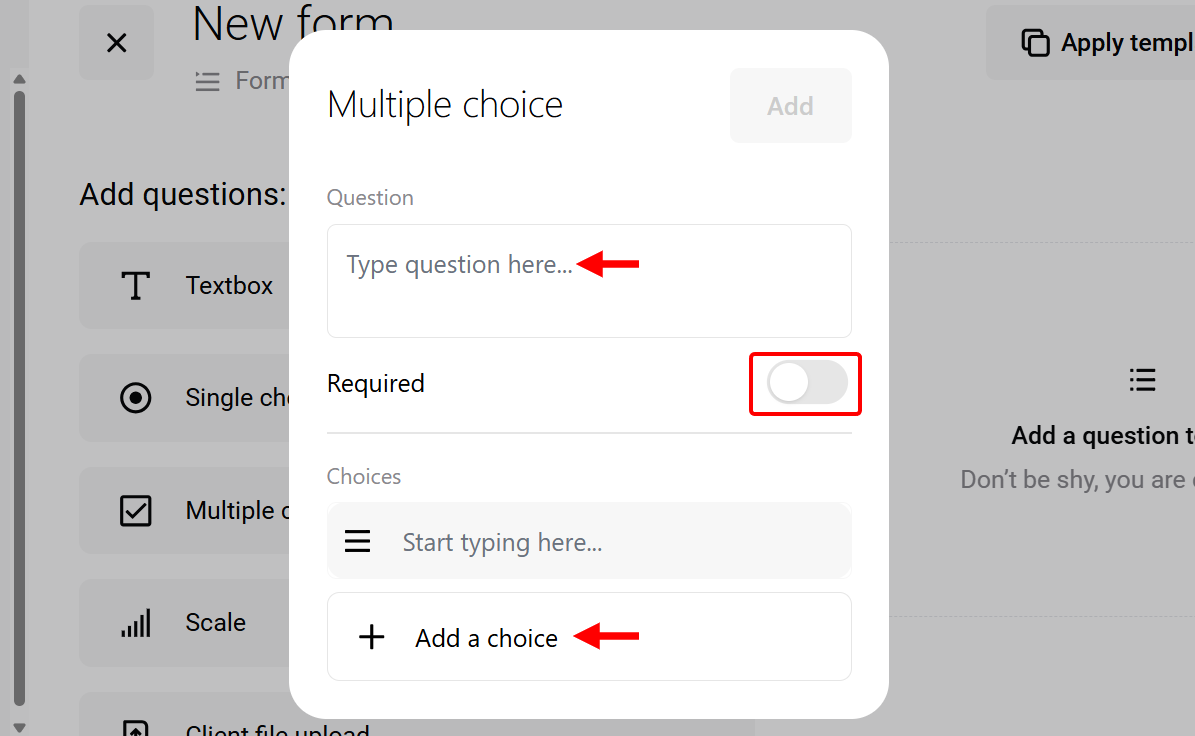
Next, you can add fields, including text boxes, single and multiple-choice options, scales, and many more, to create your form.
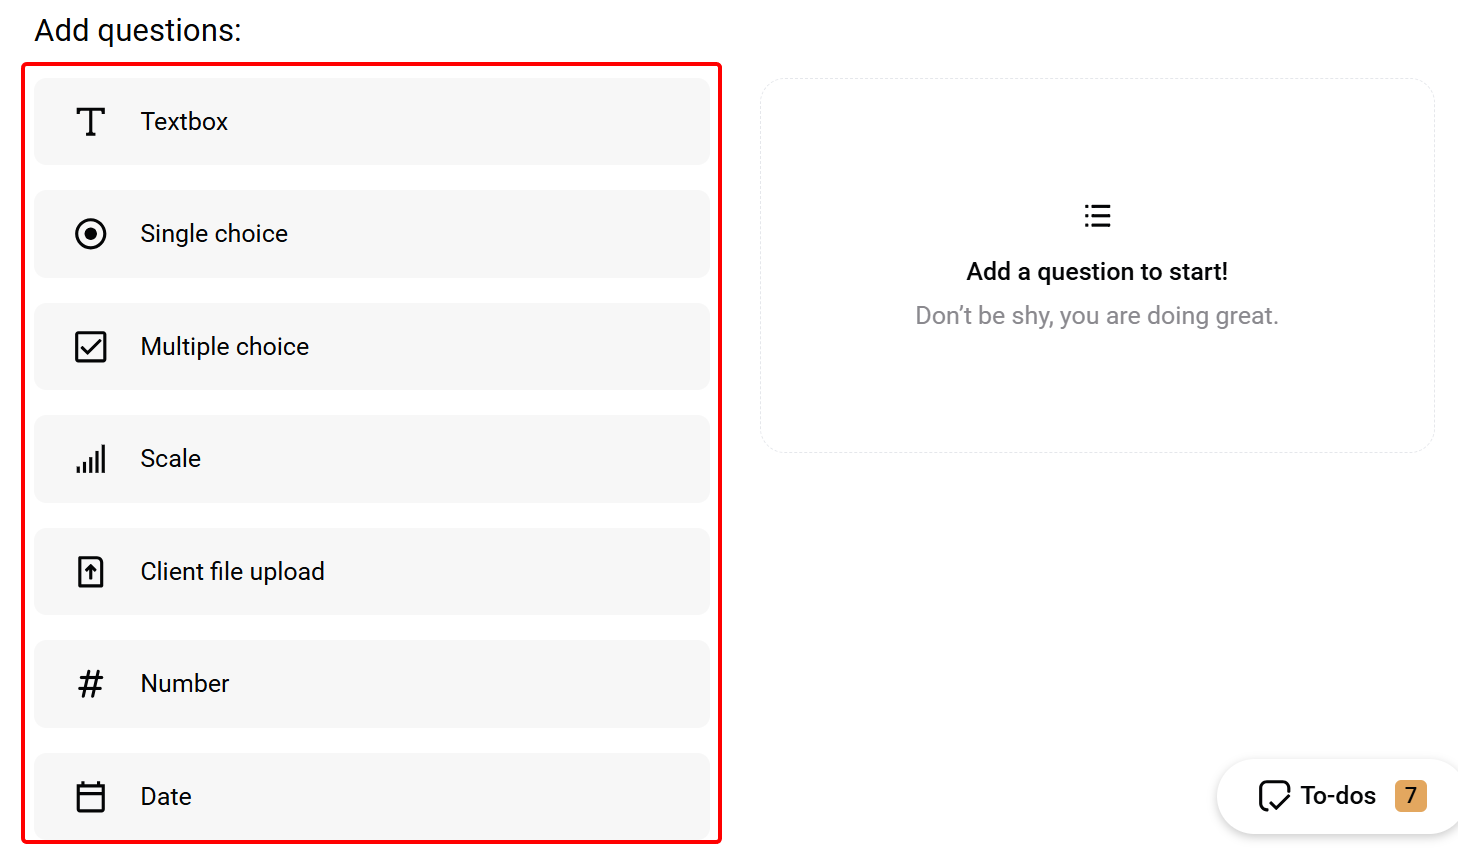
When you select a field multi-choice, you add its question and choices, then make it required.
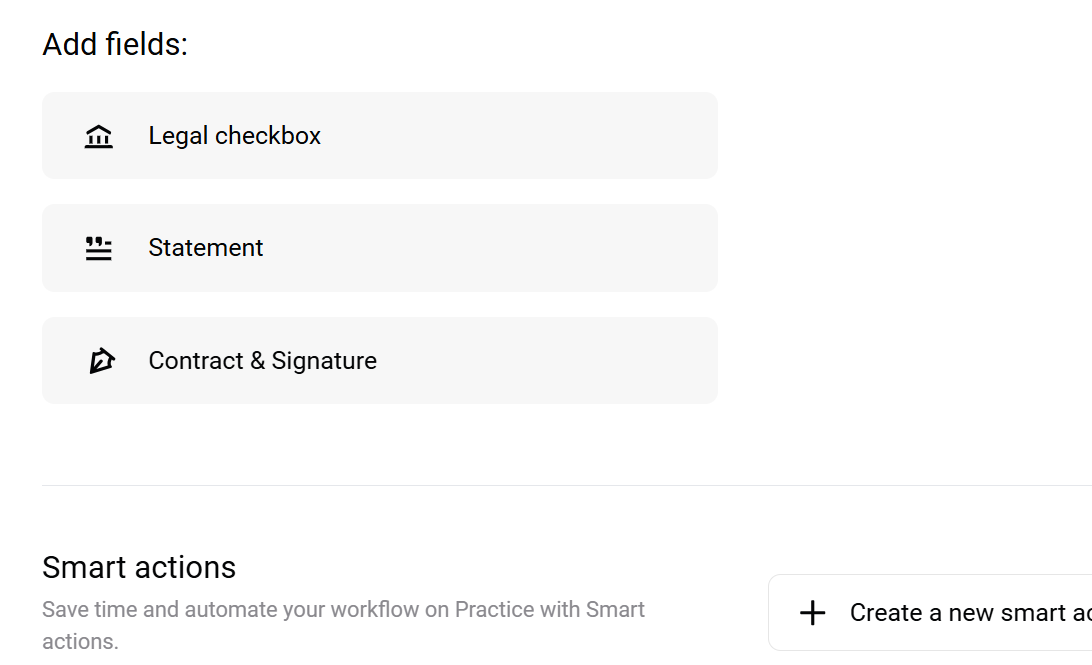
Practice also provides advanced fields, such as a legal checkbox, statement, contract, and signature, to add to the form.
Best For
Life coaches who seek to manage client sessions through an all-in-one CRM.
Pricing
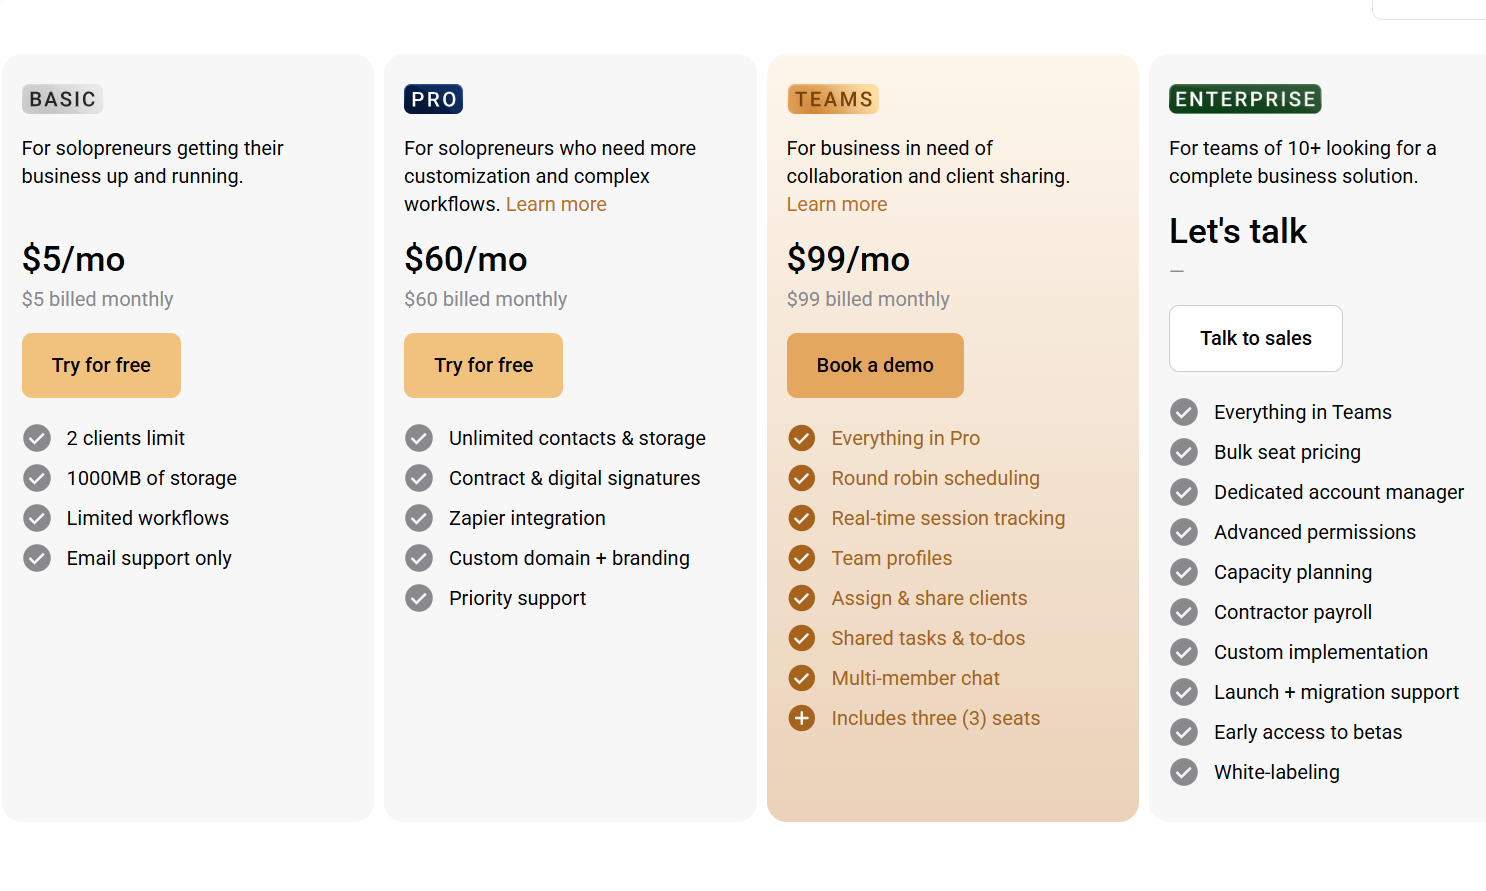
- Basic - $5/ monthly package [per user]
- Pro - $60/ monthly package [per user]
- Teams - $99/ monthly package [per team]
- Enterprise - Custom pricing
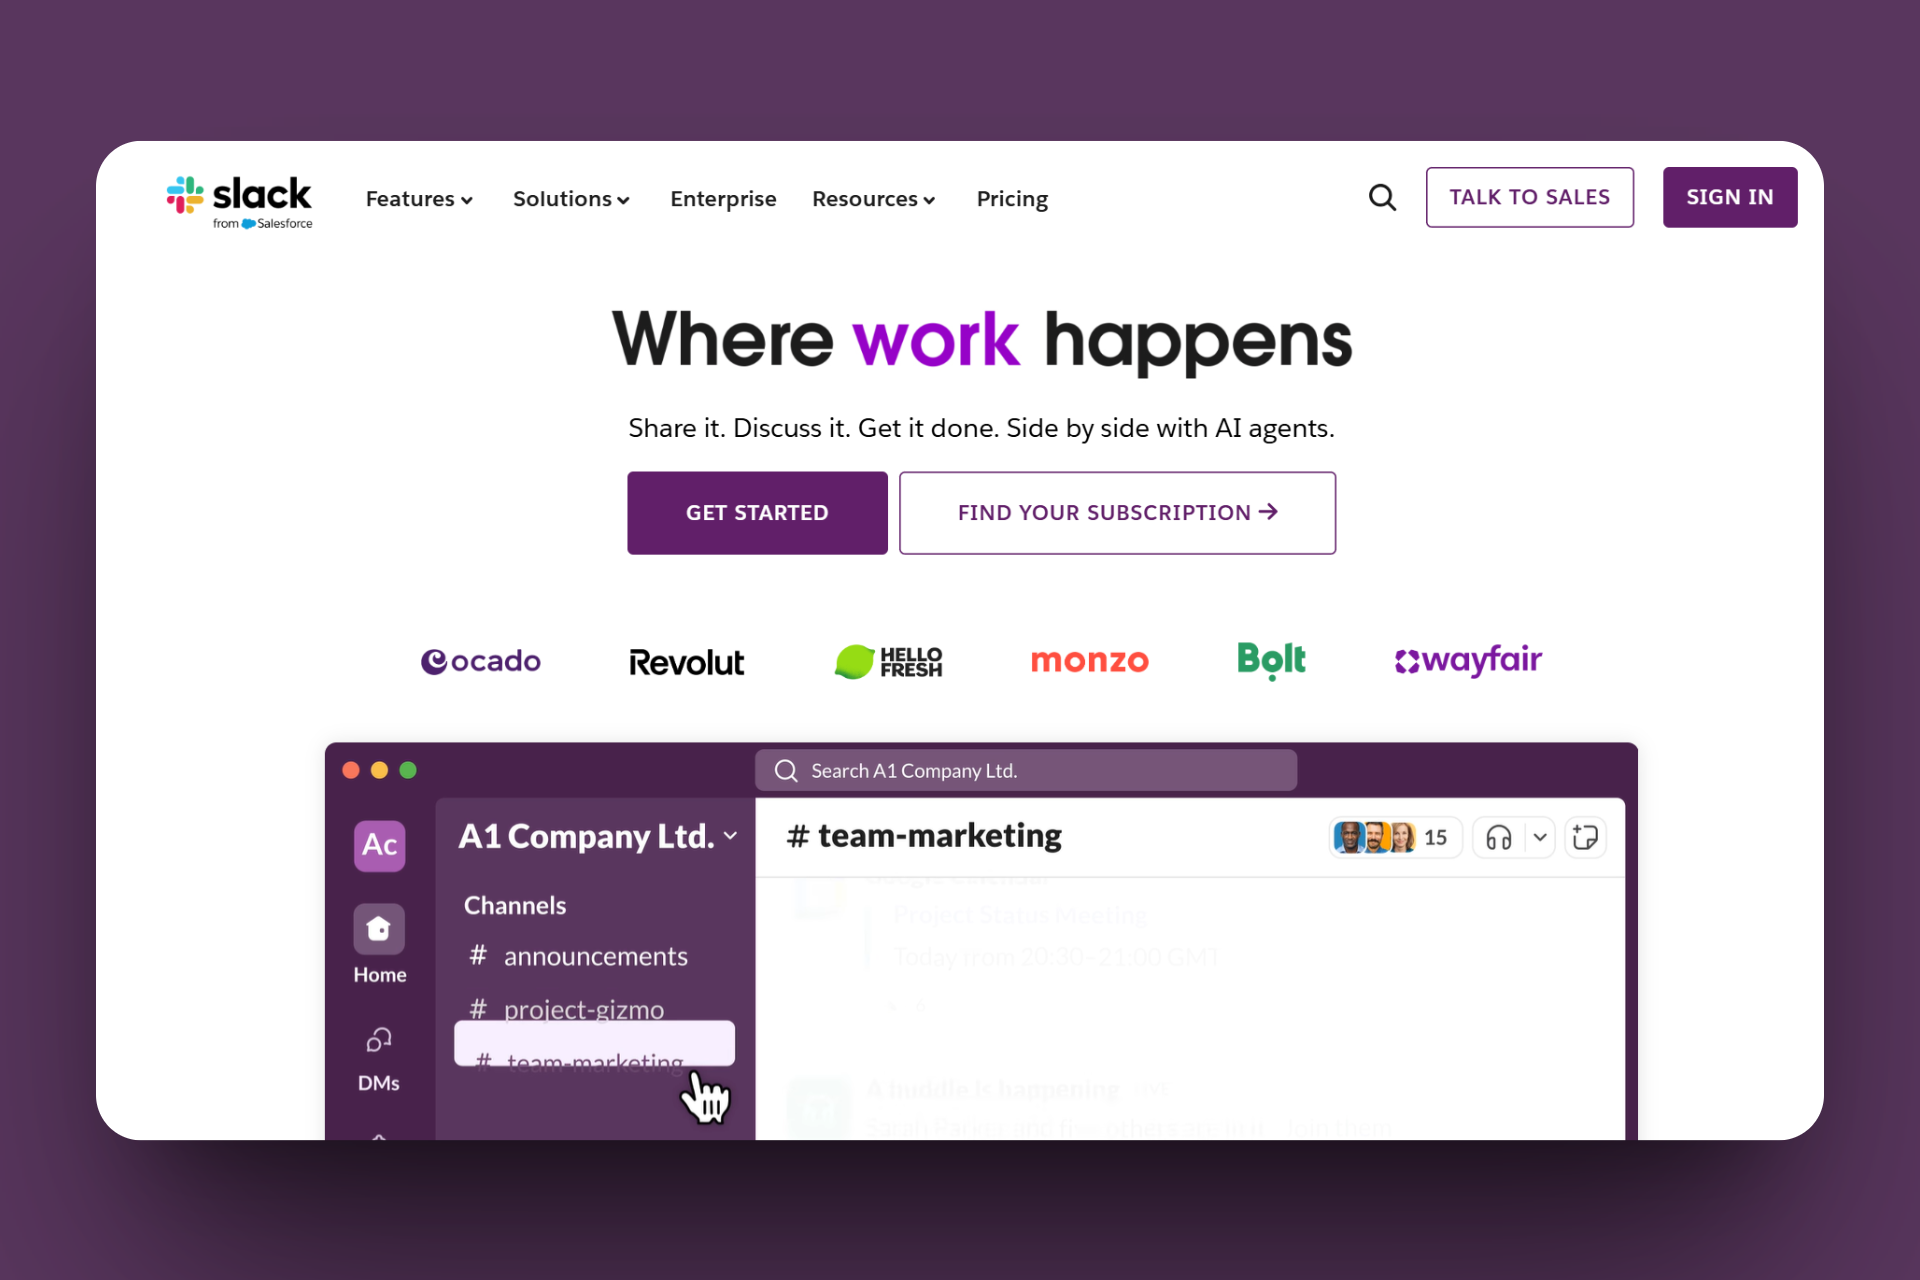
4. Slack
We move on to Slack, the fourth tool on the list of online coaching platforms. This is a team communication platform you can use to manage real-time collaboration and communication with clients as a coach.
Slack features a Channel tool that allows you to organize topics and client work. To do this, you add a new channel, name it, set it to public or private, and then invite and add clients to it.
You can write a message and upload a relevant file or reference document on the channel.
There is also a Canvas feature, which is a space where you can pin key resources and share with clients.
You do this by opening a channel, clicking the canvas tab, pasting in resources such as meeting notes or agendas, formatting headings, and saving the changes so that clients can see the updates.
Slack can handle your repetitive tasks thanks to its automations feature. To set one up, you select a trigger, such as a scheduler, set an action, like sending a message, draft the message, and assign it to a channel.
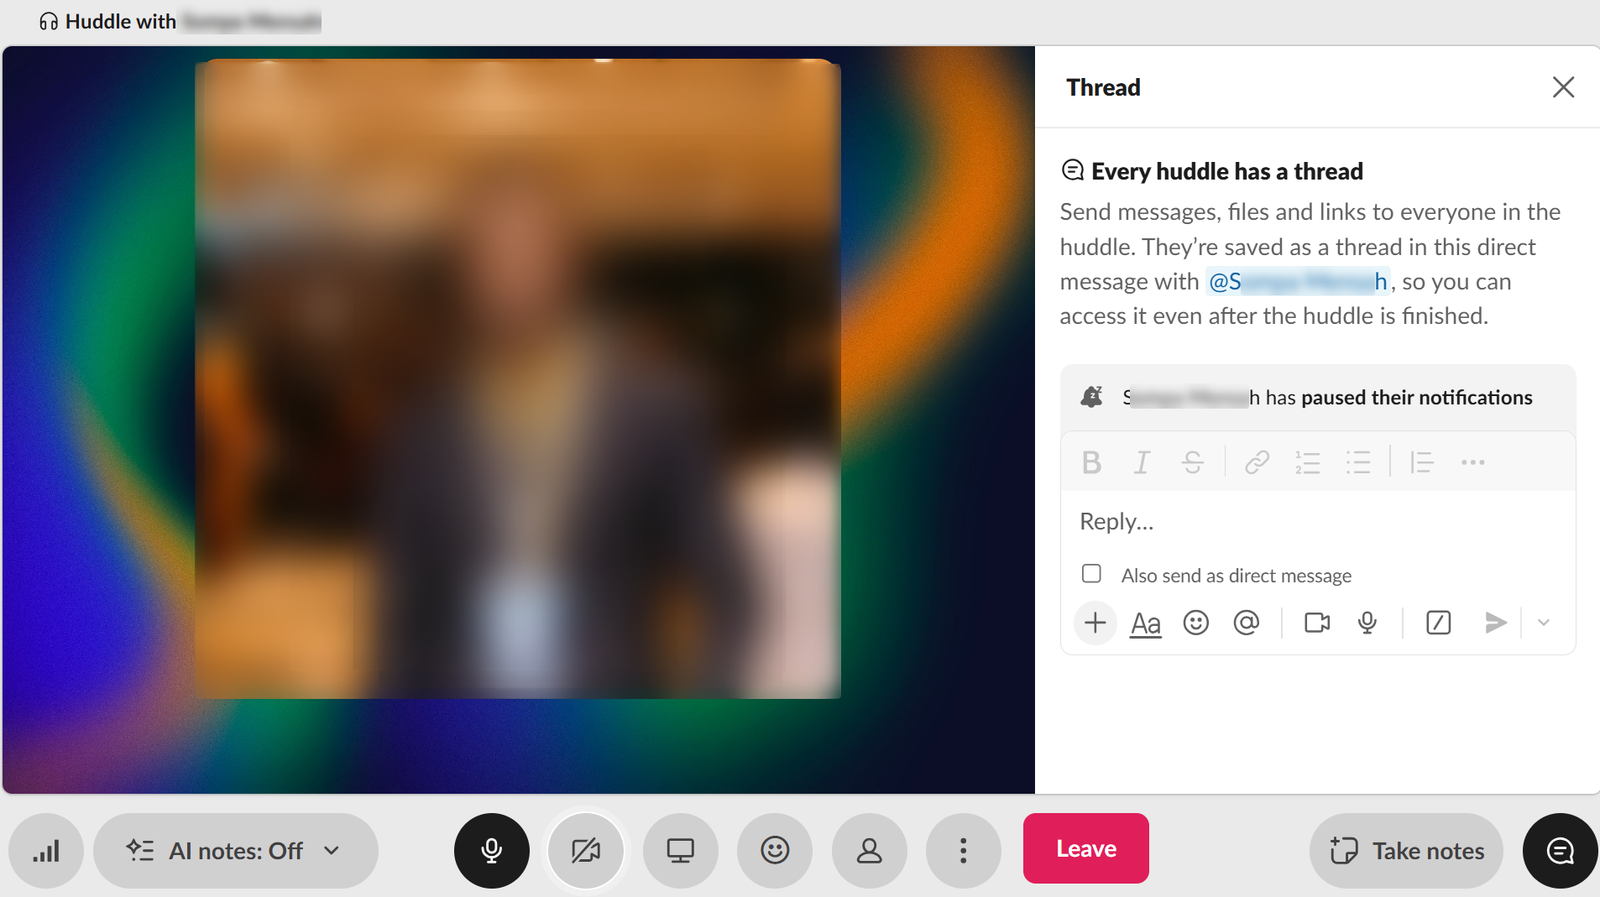
Another Slack feature is Huddles. It helps you initiate live audio chats with clients. You launch it, select clients, and join their room, where you can enable screen sharing and discuss topics in real-time.
When it comes to Slack, the best tool it offers for your coaching is its channels. This is a dedicated space designed for you to organise your clients' communication.
It allows you to create private spaces for individual clients, group programs, and resources, as well as accountability topics.
For instance, if you are a business coach, you can create channels for marketing, sales, and startups for specific clients.
In every channel, you or your clients can share files, send updates, and track progress without messy email threads. Let me guide you on creating a sample channel for your clients.
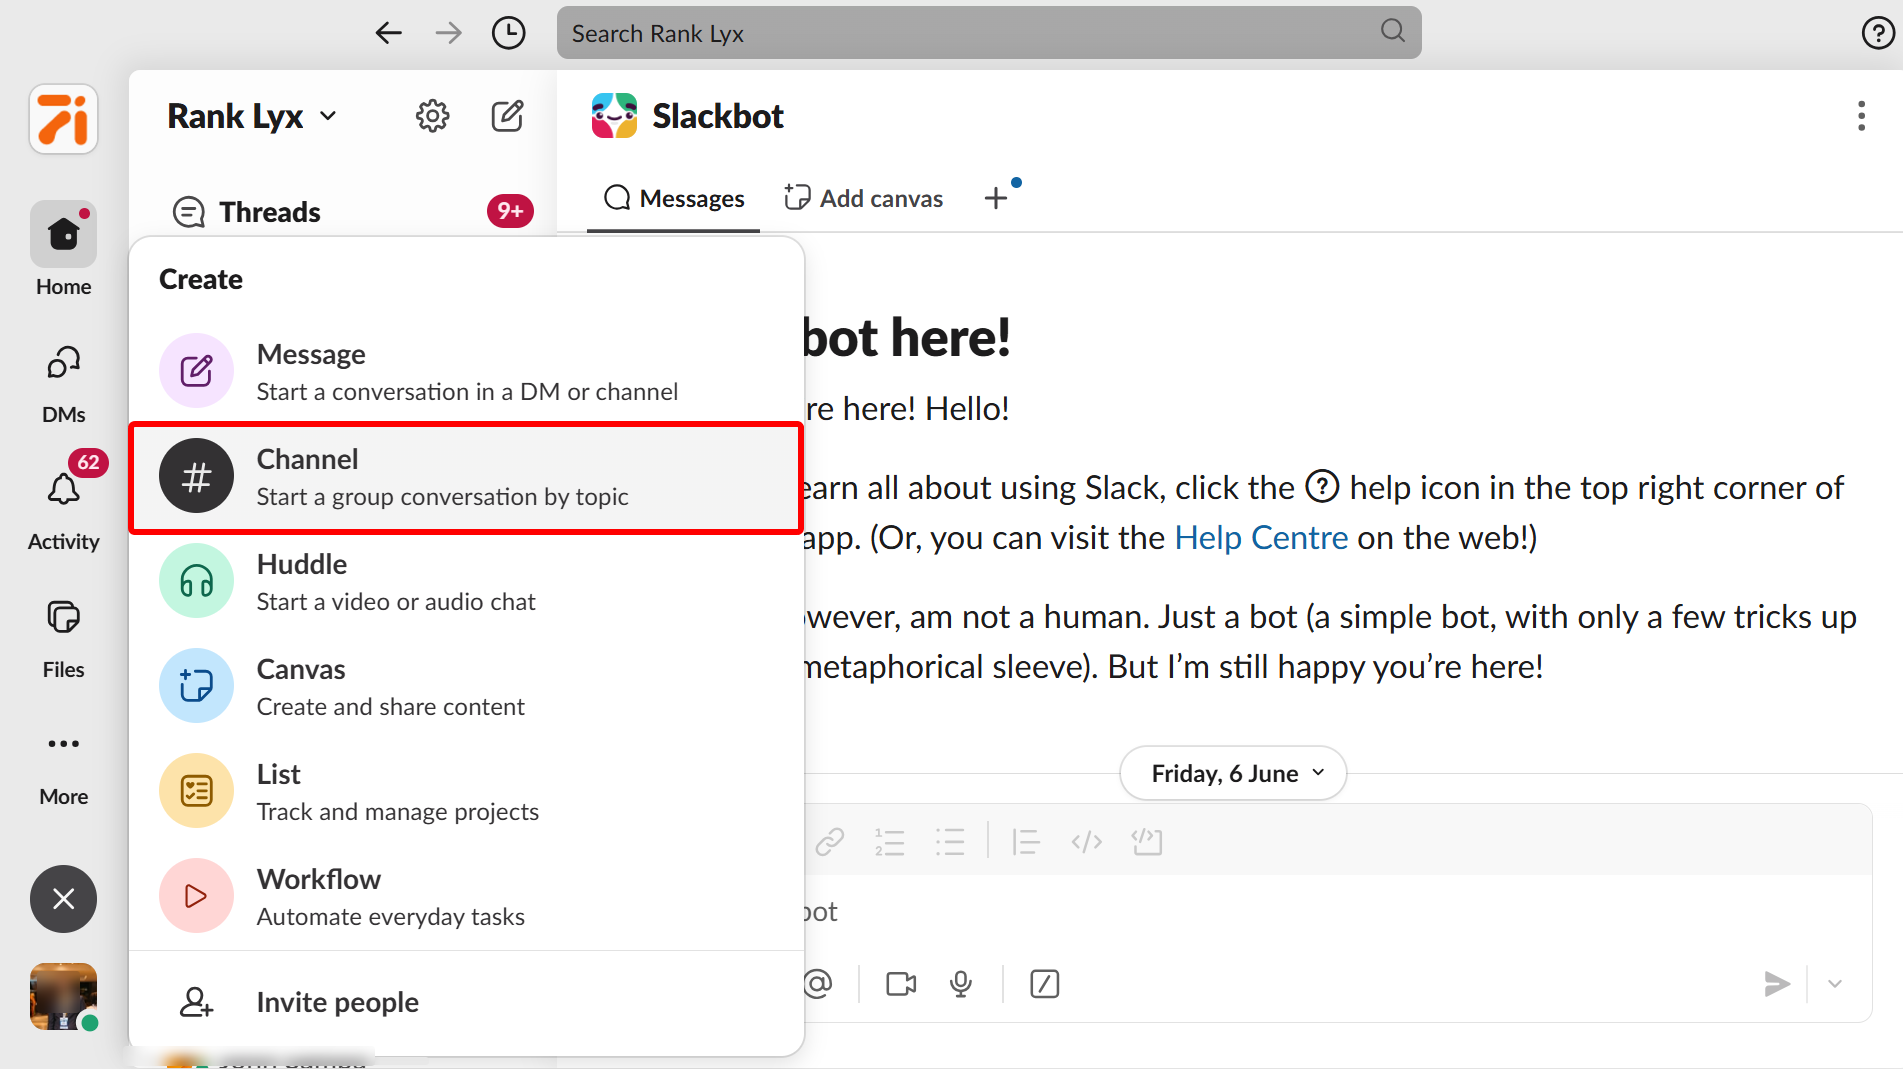
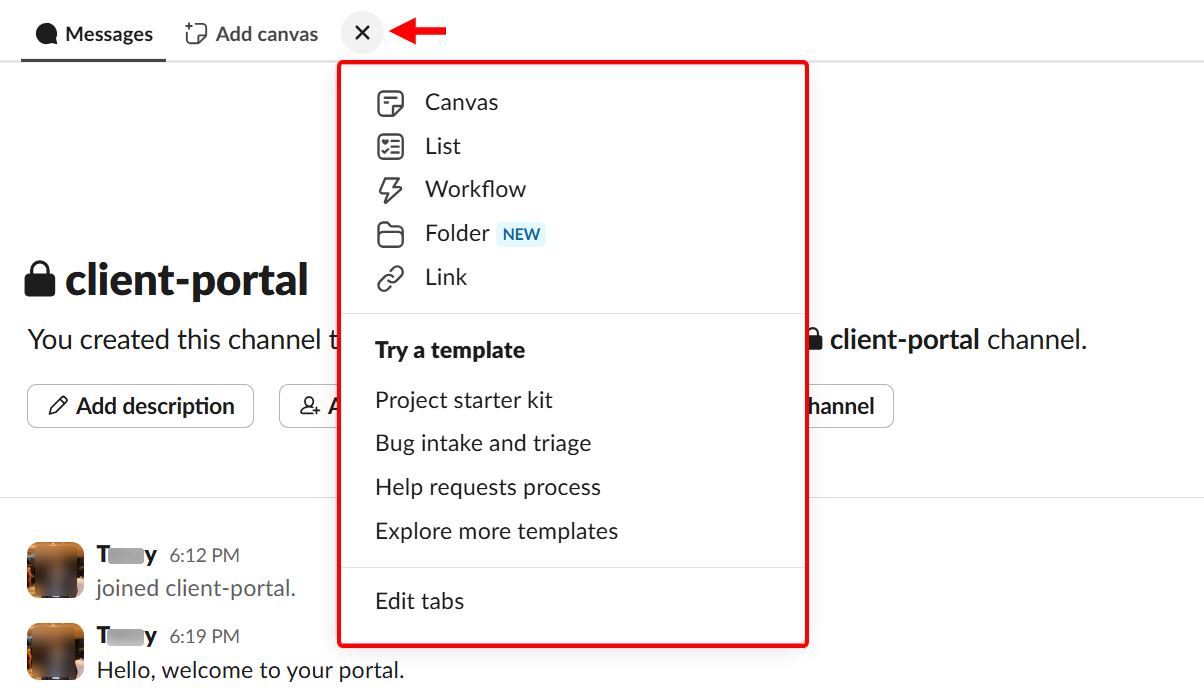
To create a new channel, select the more or "+" button on your Slack main dashboard.

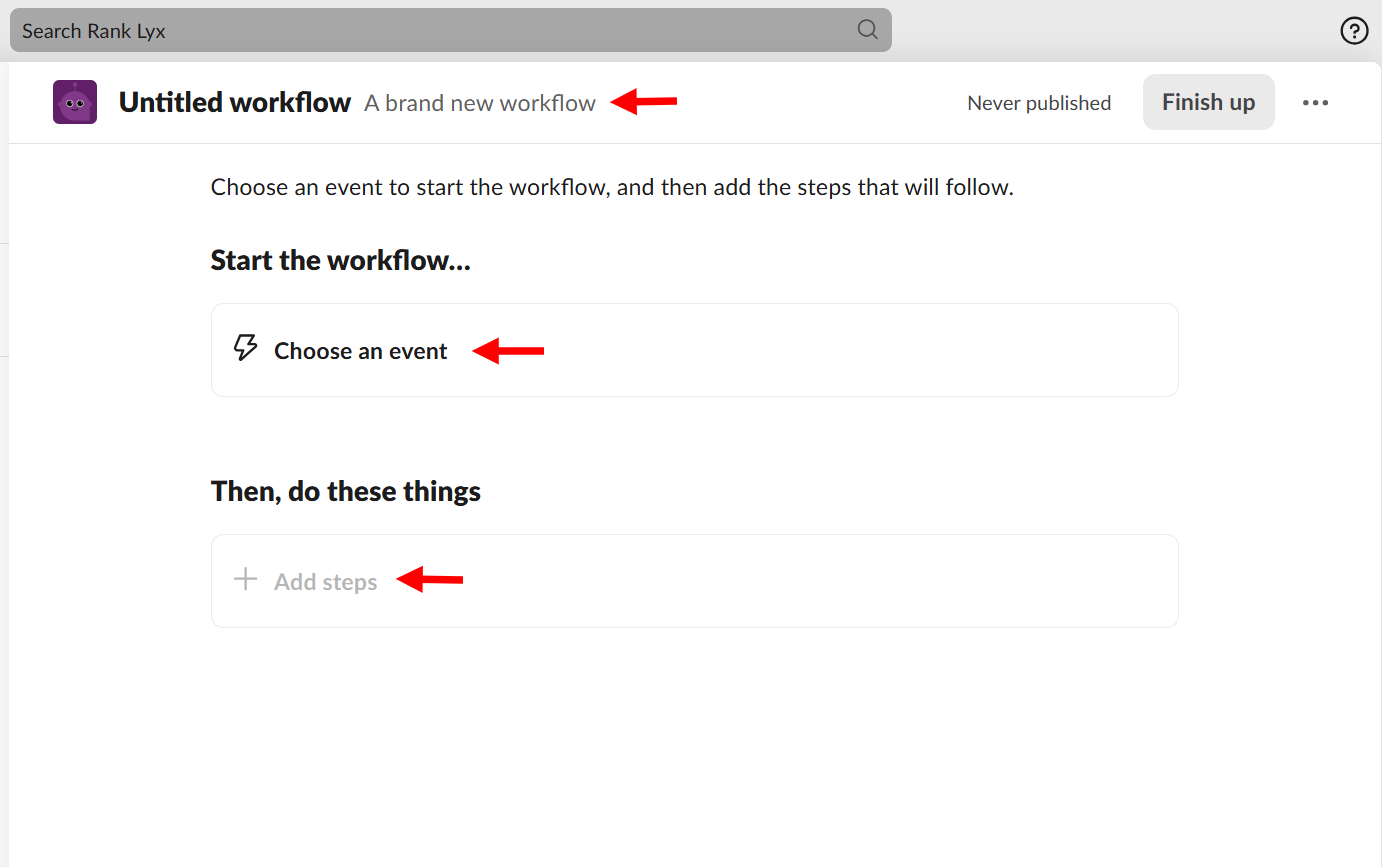
This brings out more options that let you create new messages, canvas, workflow, and much more. Select the channel to start creating one.
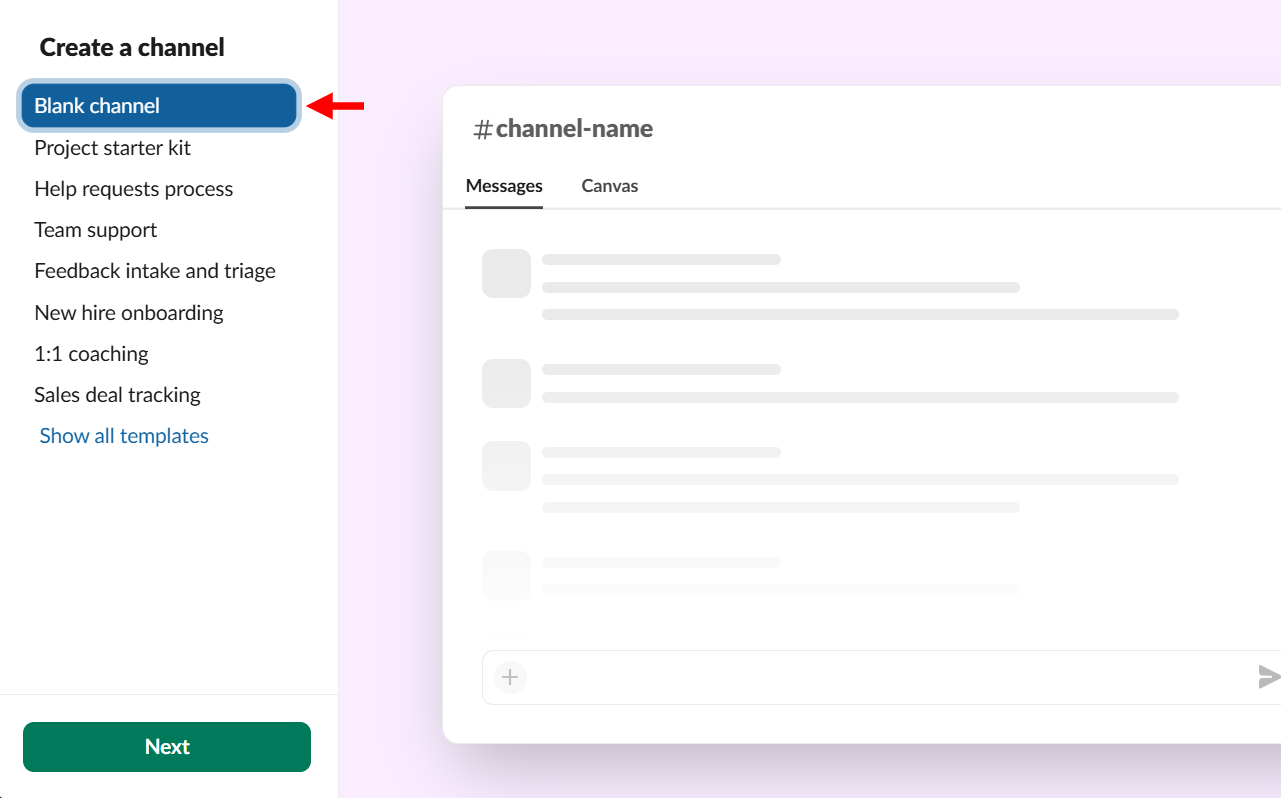
Slack provides templates such as project starters, team support, and feedback channels to help you get started. We have to start from scratch, so select the blank channel.
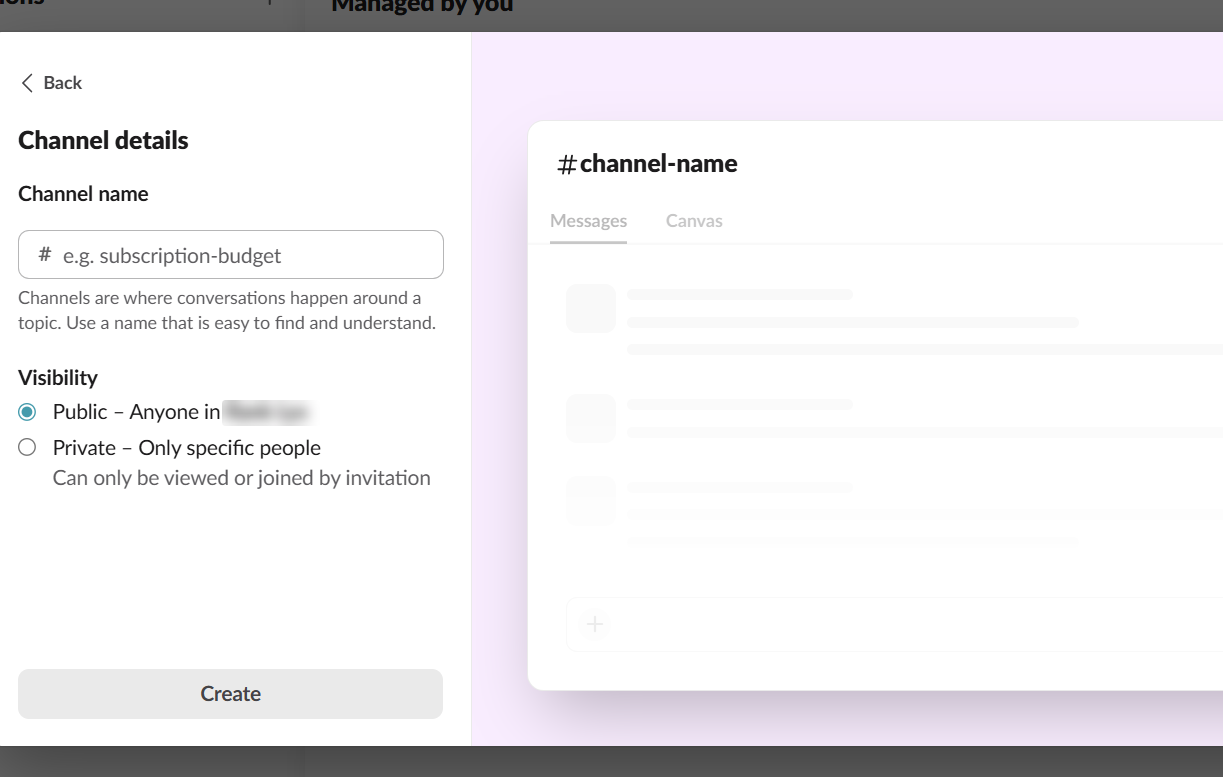
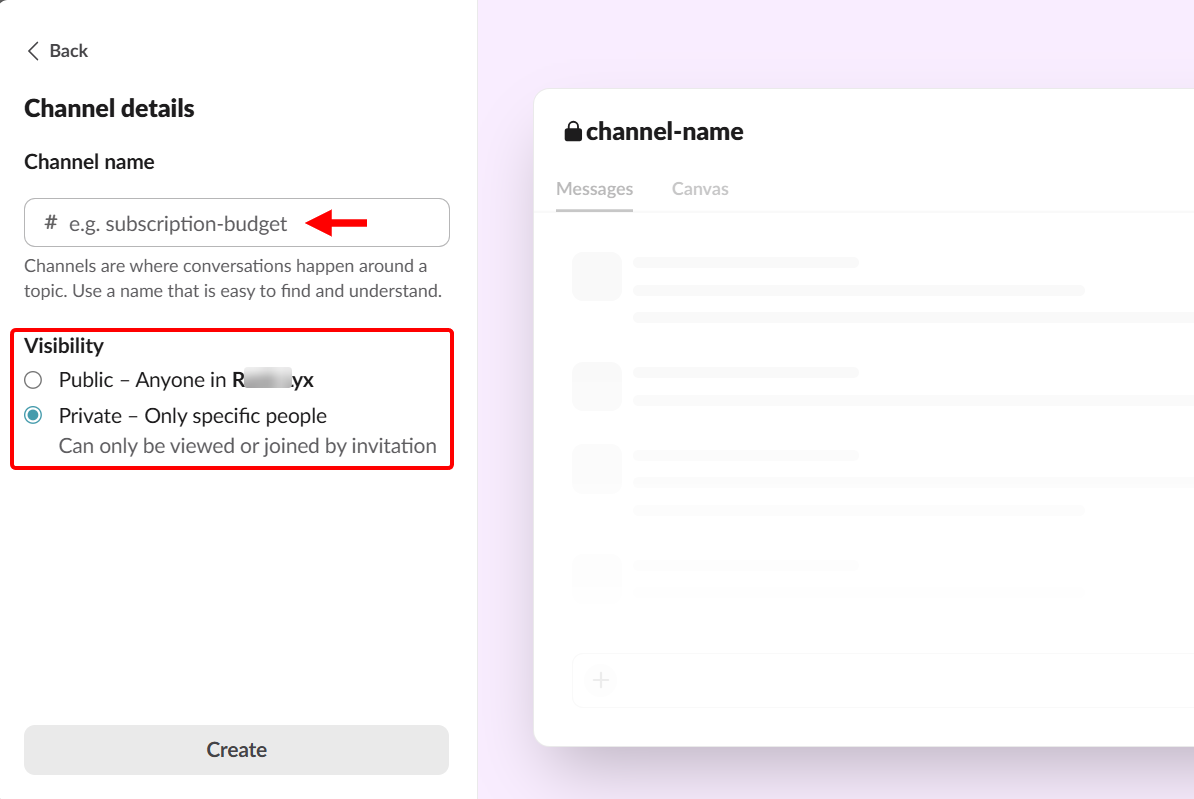
Next, you set the channel's visibility and give it a name. Here, you should make it private so that only specific clients can access it.
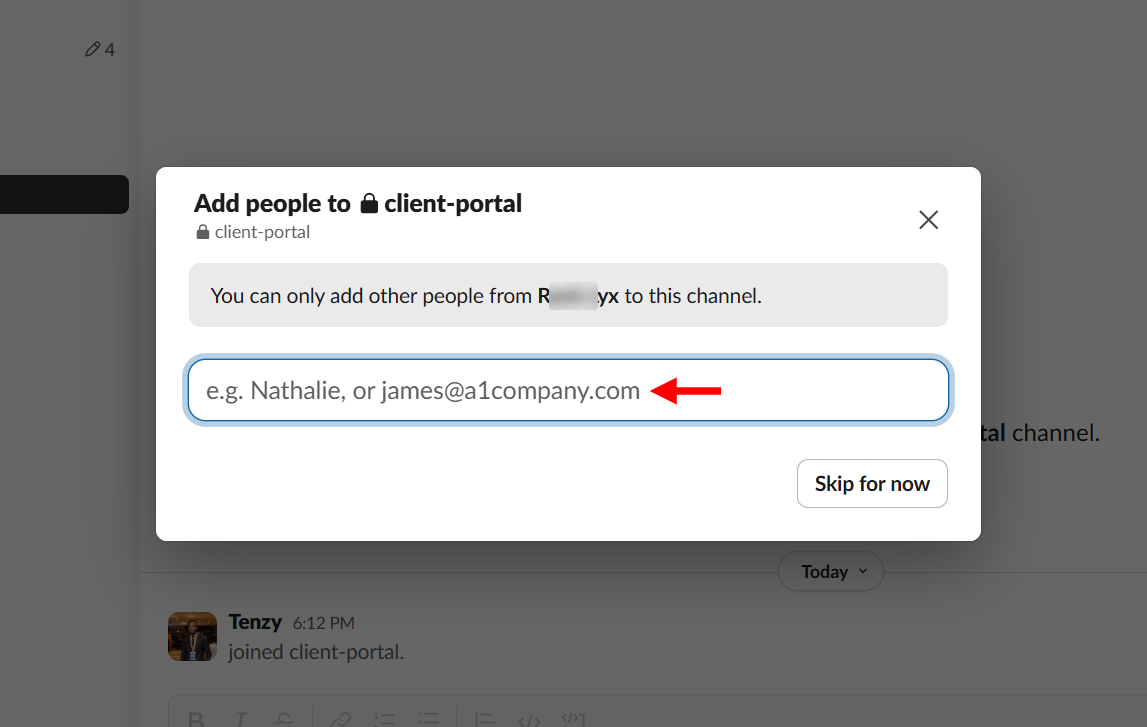
After you make it private, Slack lets you enter and submit the email addresses of the clients you want to add to the channel.
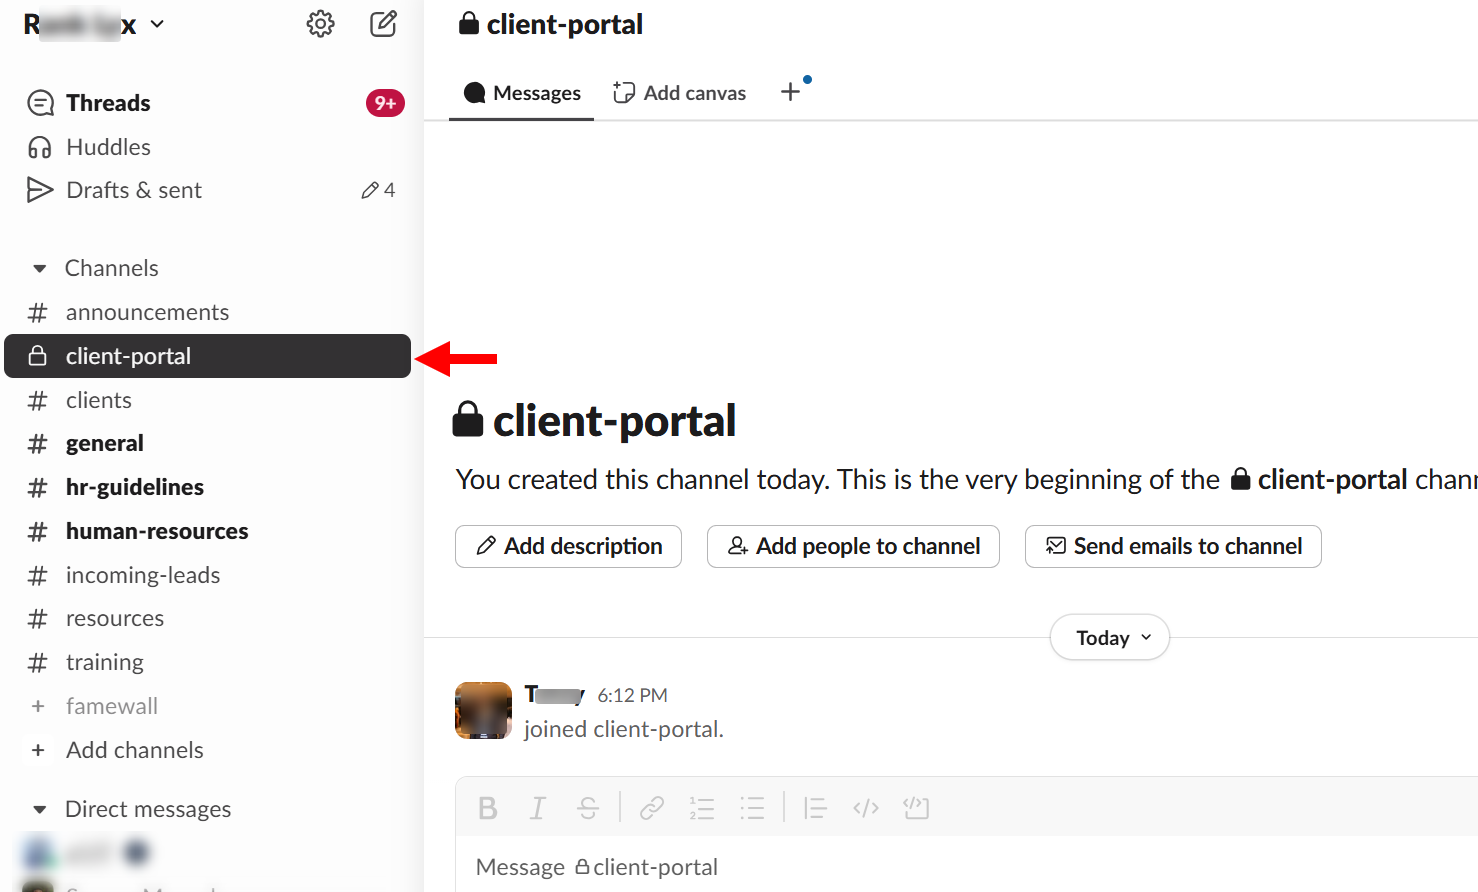
When you save your new channel, it becomes part of the list of existing channels. You can locate it in the navigation pane, similar to the client portal here.
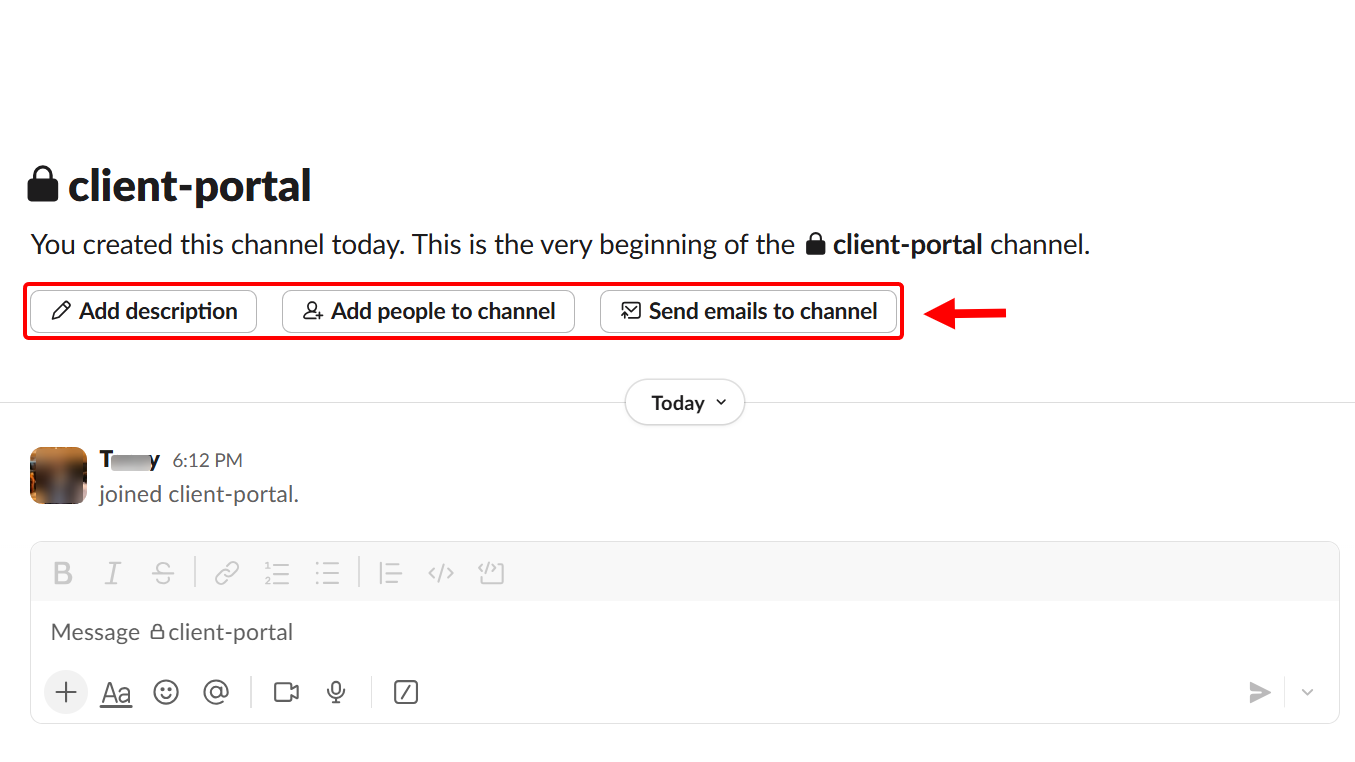
When you access the channel, you can add new clients, connect an email address, so all incoming emails appear in the channel, and describe the channel.
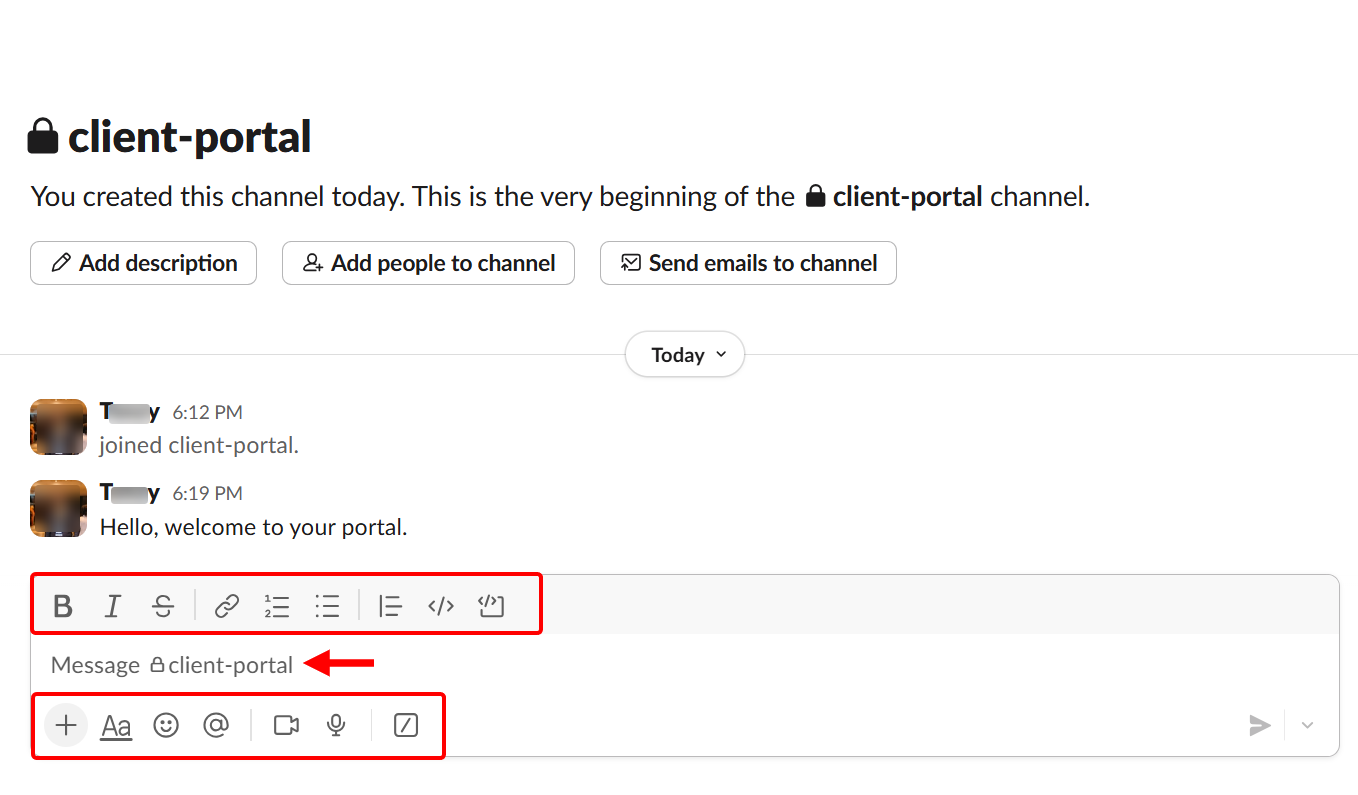
You use the chat box to communicate in the channel. You can send customised texts, lists, and links. The chat box allows you to add emojis, videos, and audio, as well as mention clients, topics, and channels.
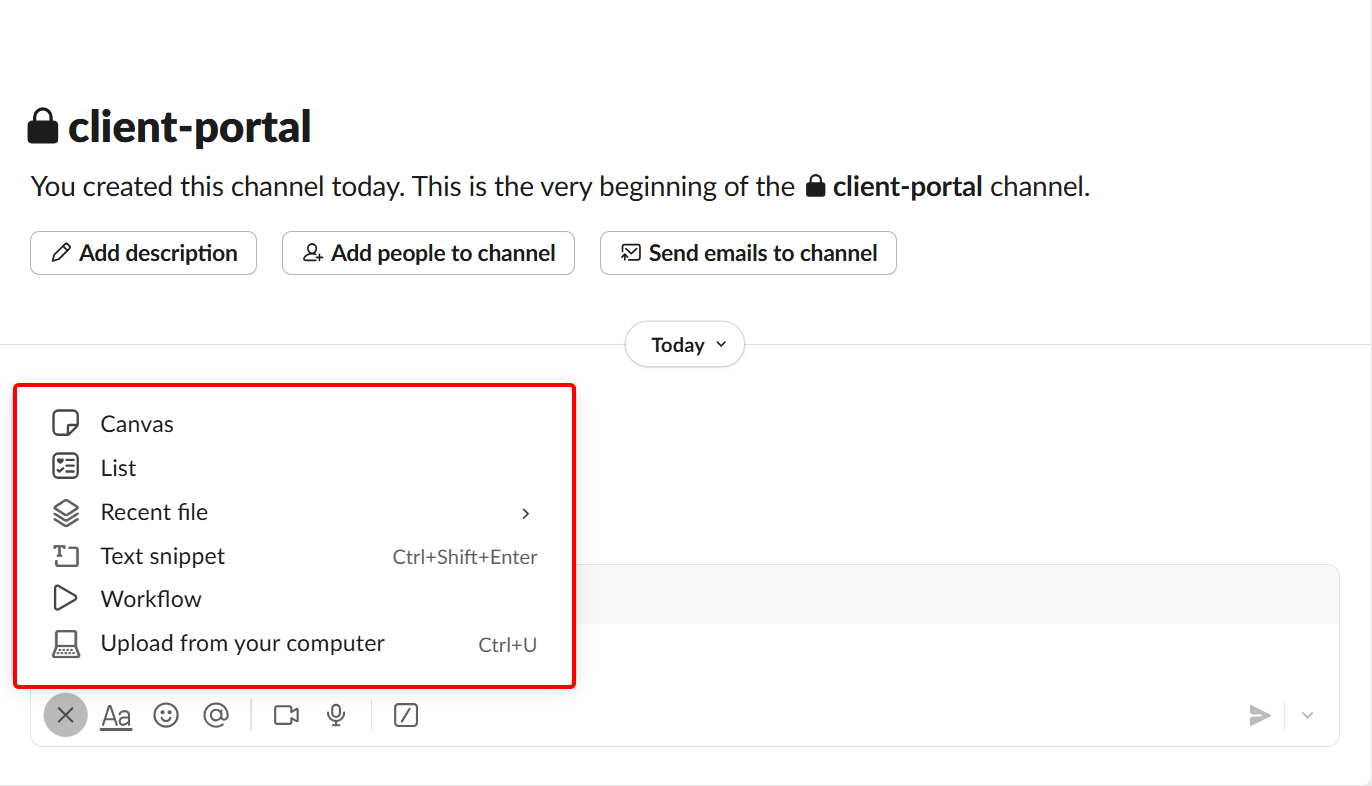
The more button lets you send canvas, list, files, workflow, and text snippets to the channel.
You can also add tabs to the channel, which you can dedicate to canvas, workflow, or a folder.
Key Features
1. Canvas
As a coach, you can utilize the Canvas feature to create structured pages with notes, checklists, links, and resources, thereby engaging clients and staying connected to the conversation. This is a built-in collaborative document.
For example, you can use it to create and share onboarding guides, session agendas, client resources, or program roadmaps without leaving Slack.
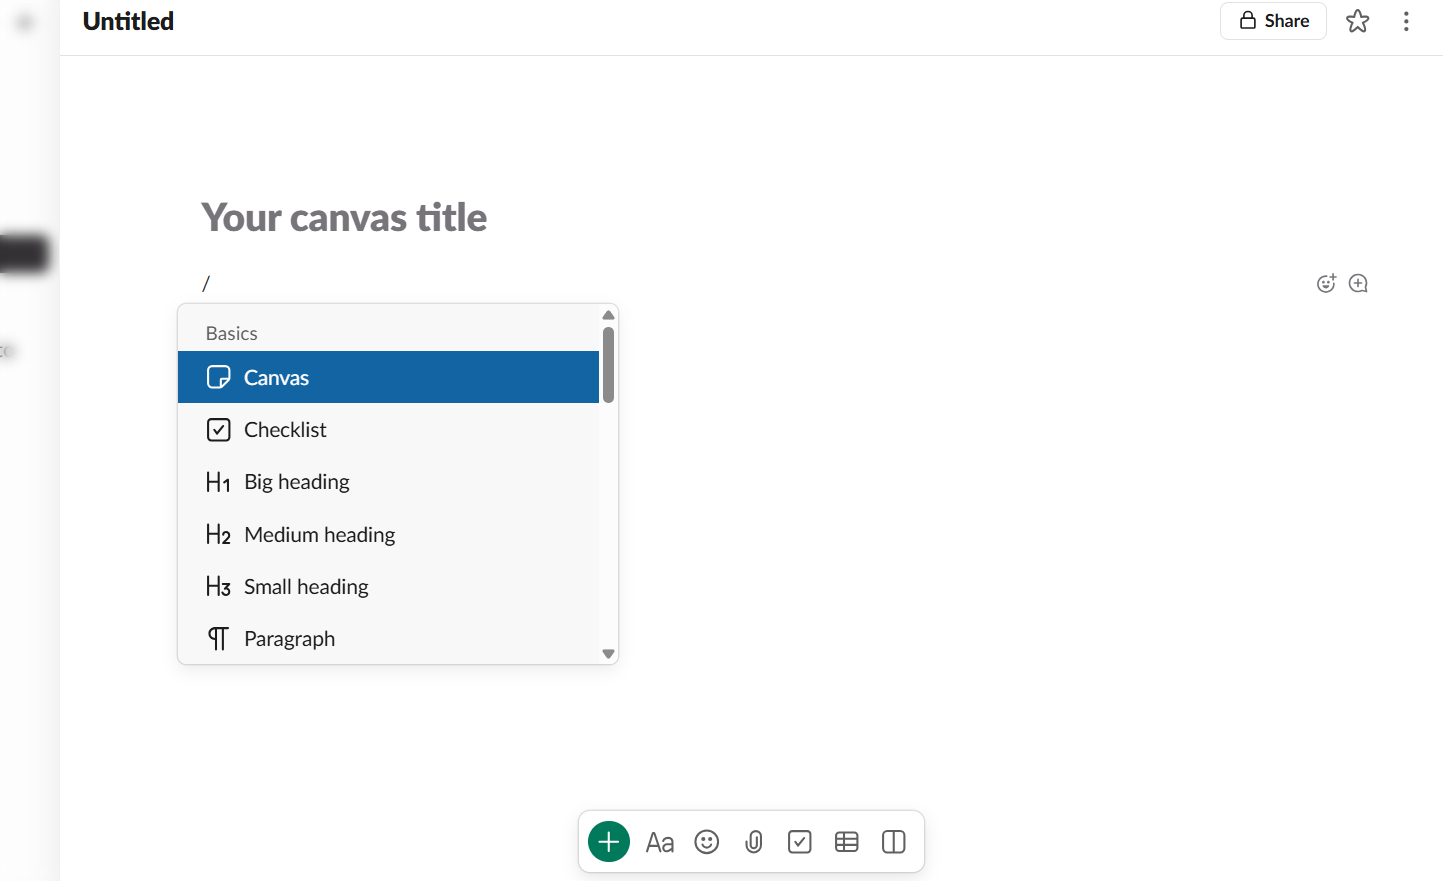
On the canvas board, you can start your content with text and its title.
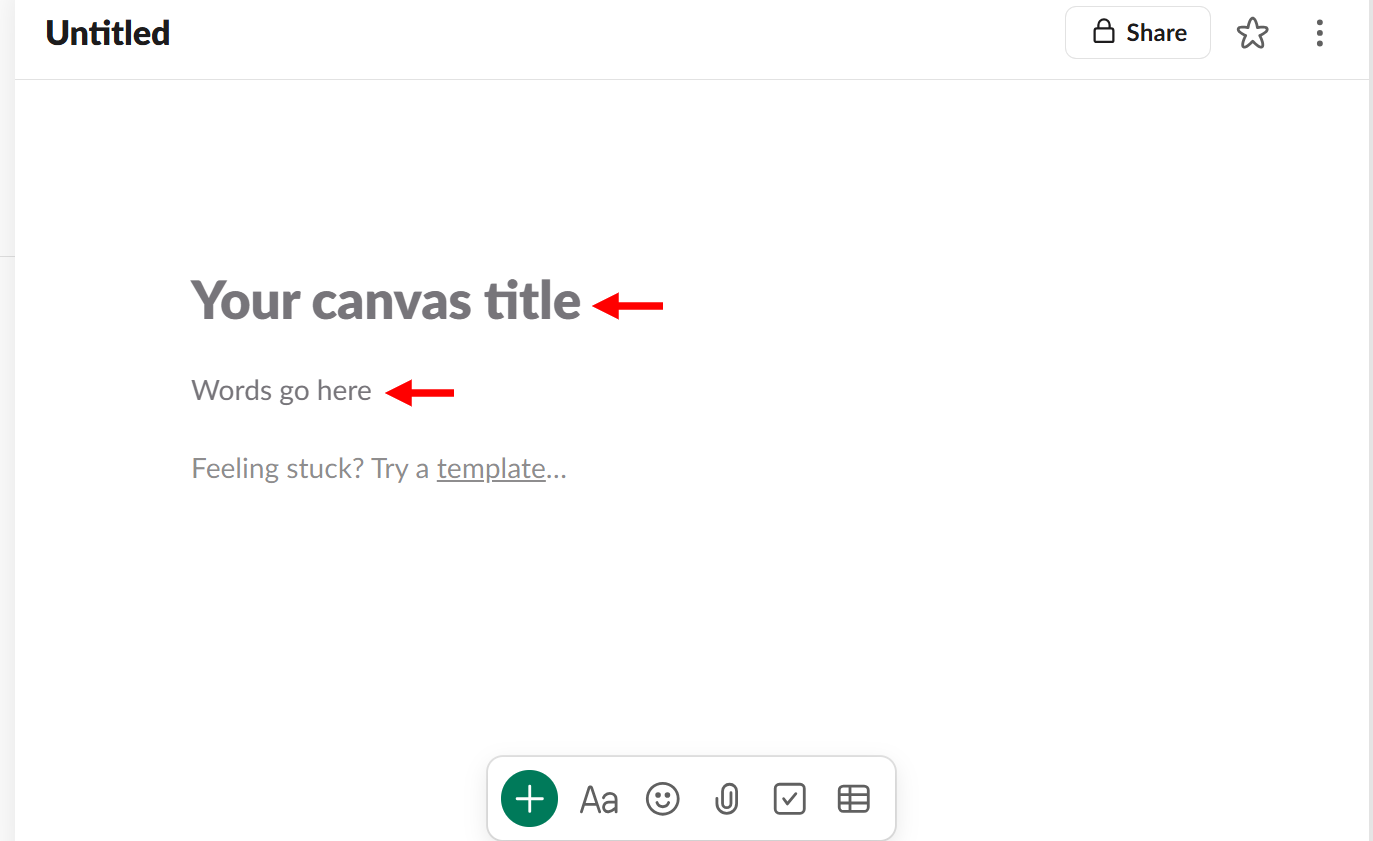
When creating canvas content, you can add basic elements, such as canvas, checklist, paragraphs, and heading levels.

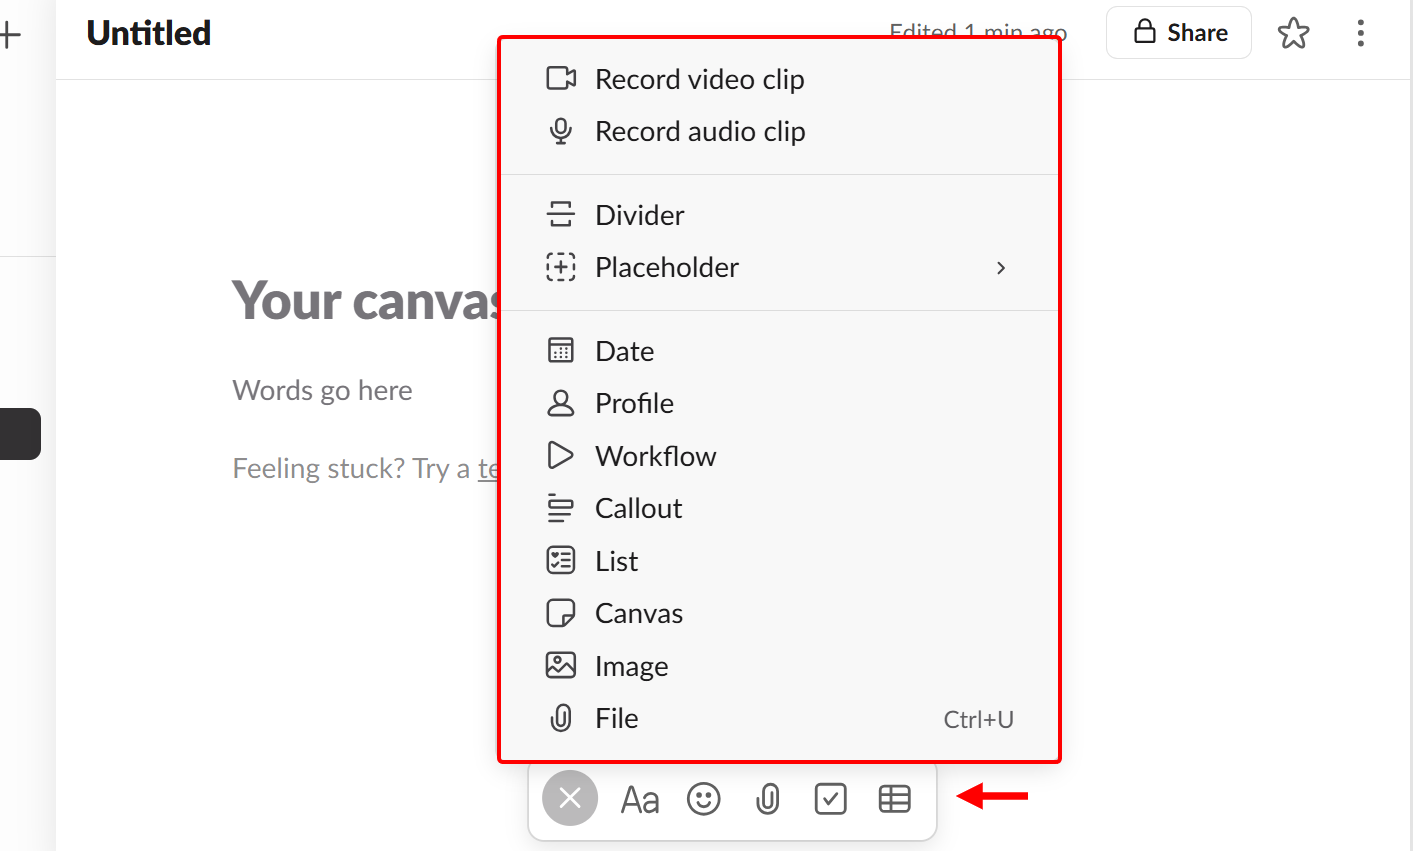
Additionally, you can access the toolbar on the canvas to add advanced elements, such as images, audio, video, a divider, workflow, a placeholder, and a list, for enhanced content.
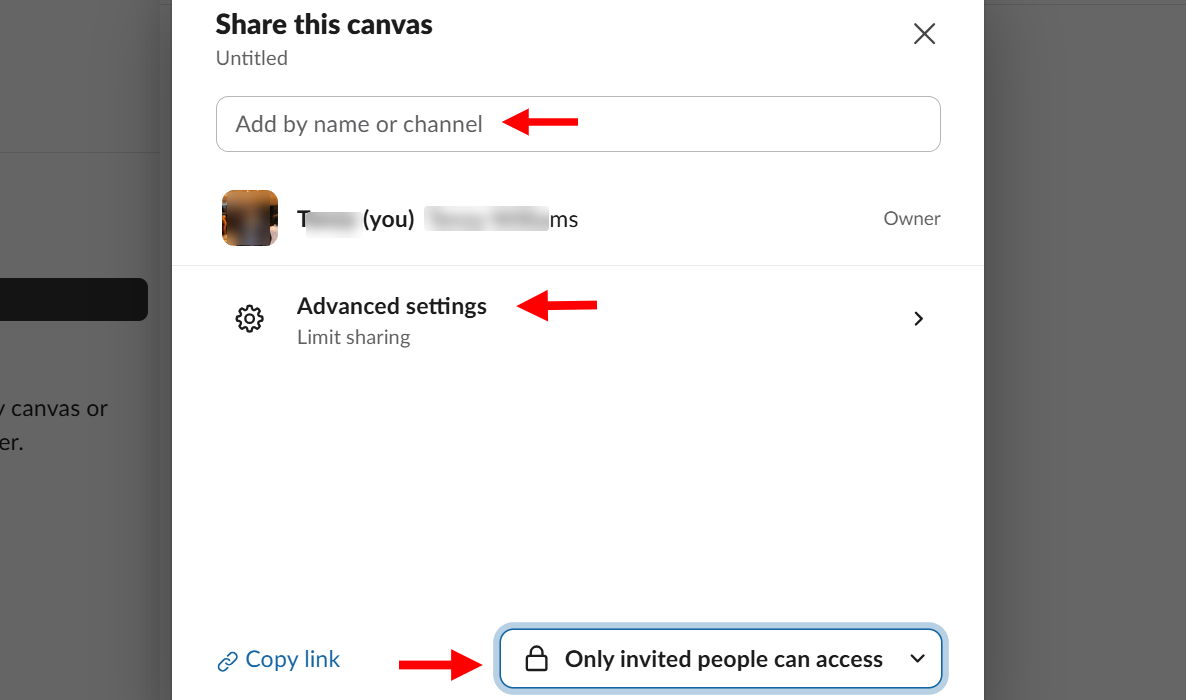
After creating, you can share the canvas. You have to enter the channel or clients you want to share with, set the access level, and limit the sharing.
2. Automations
The automations feature in Slack is what you use to build workflow that handles your repetitive tasks within the workspace.
You can use this feature to set up triggers and actions that send reminders, collect form responses, or post updates automatically in channels.
You can also set it to handle routine tasks, such as onboarding new clients, tracking weekly check-ins, or sharing program resources with minimal manual effort.
To set up an automation, simply select its trigger, assign an action, and then name the automation.
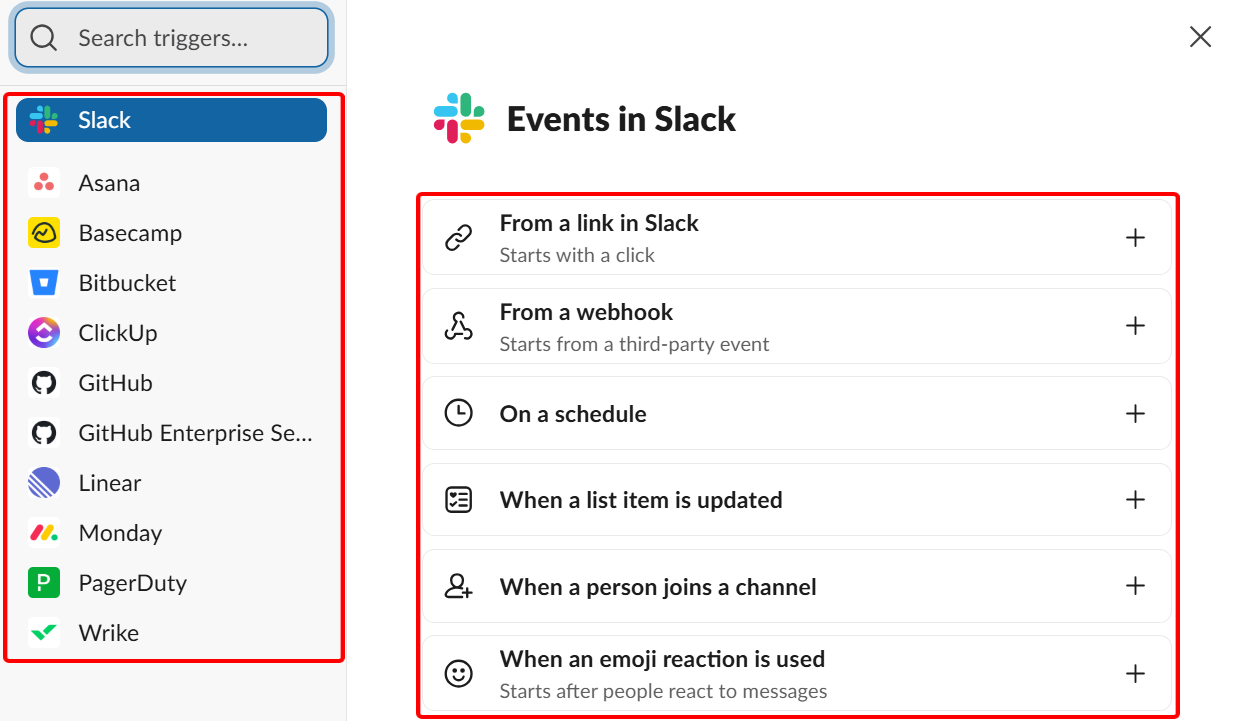
To select a trigger, for instance, select an integrated app and pick its events. When you select an in-built app like Slack, for instance, it has a variety of events, such as link in Slack, webook, schedule, and list update events.
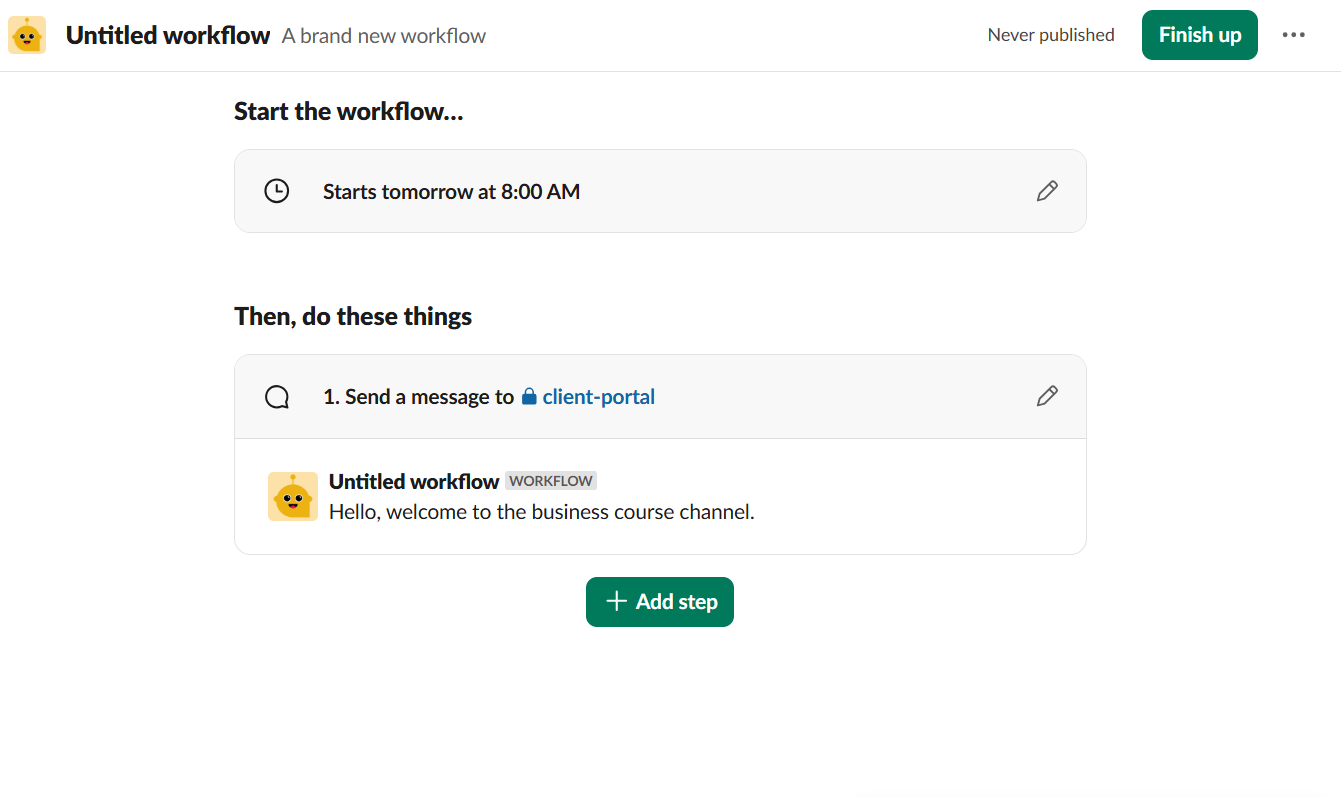
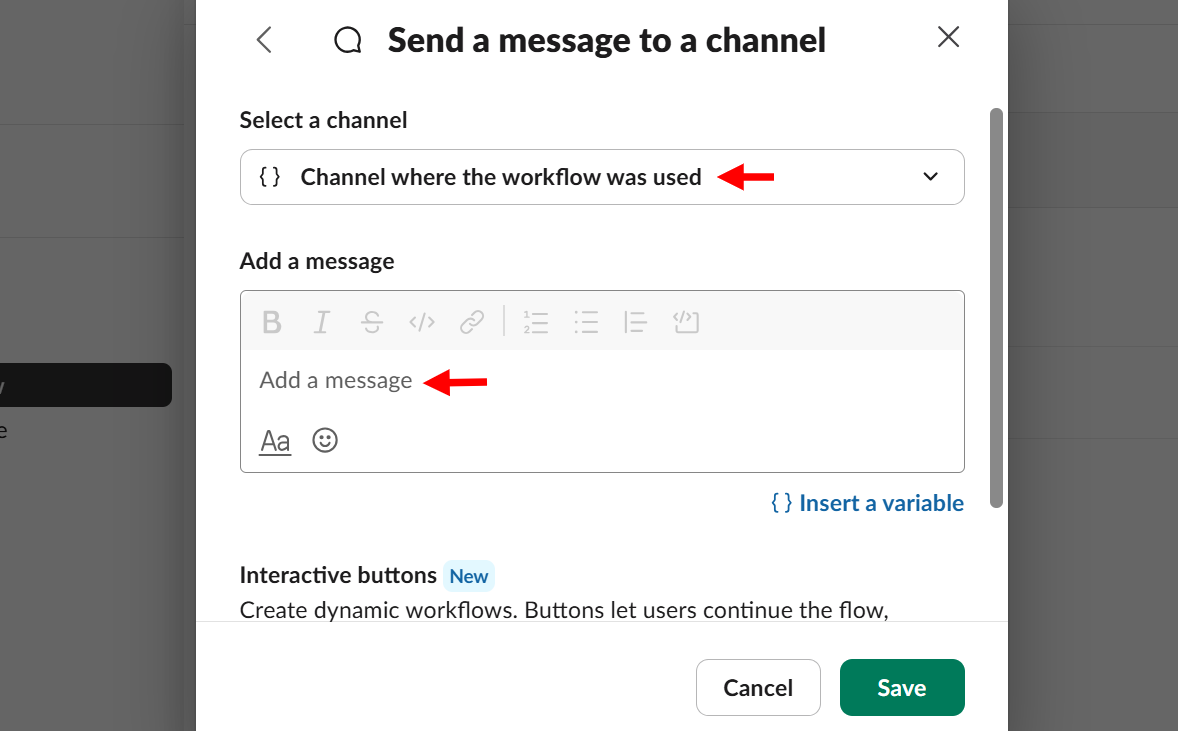
After selecting a trigger, you select its action in the same way before you configure it. For example, when you select "Send a message" as an action, you draft your message and then choose the channel to which it will be applied.
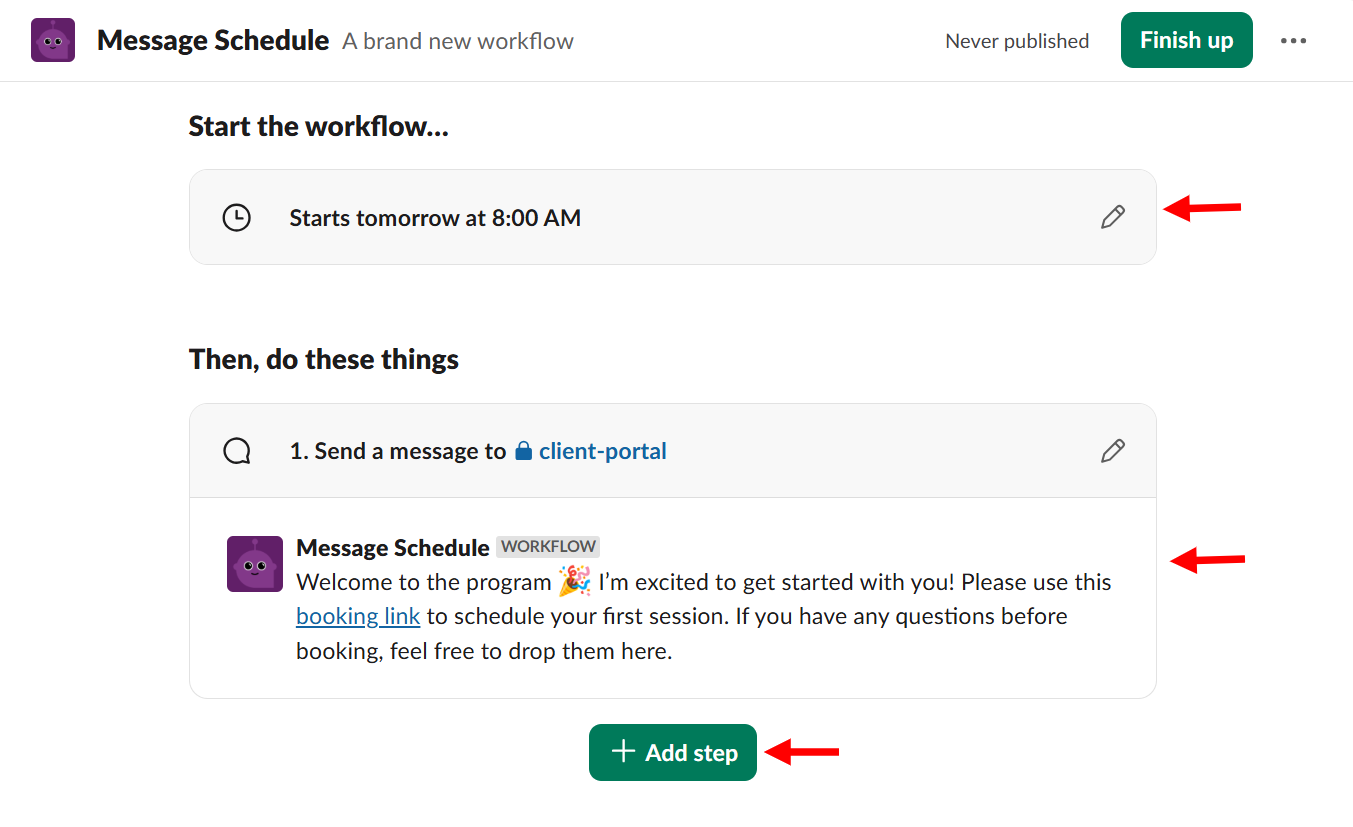
For instance, you can select a schedule as the trigger and let it send your drafted message to your clients in a channel as an action. Aside that, you can add multiple actions for the same trigger.
Best For
Business coaches who seek to manage coaching conversations in organised channels with a searchable history.
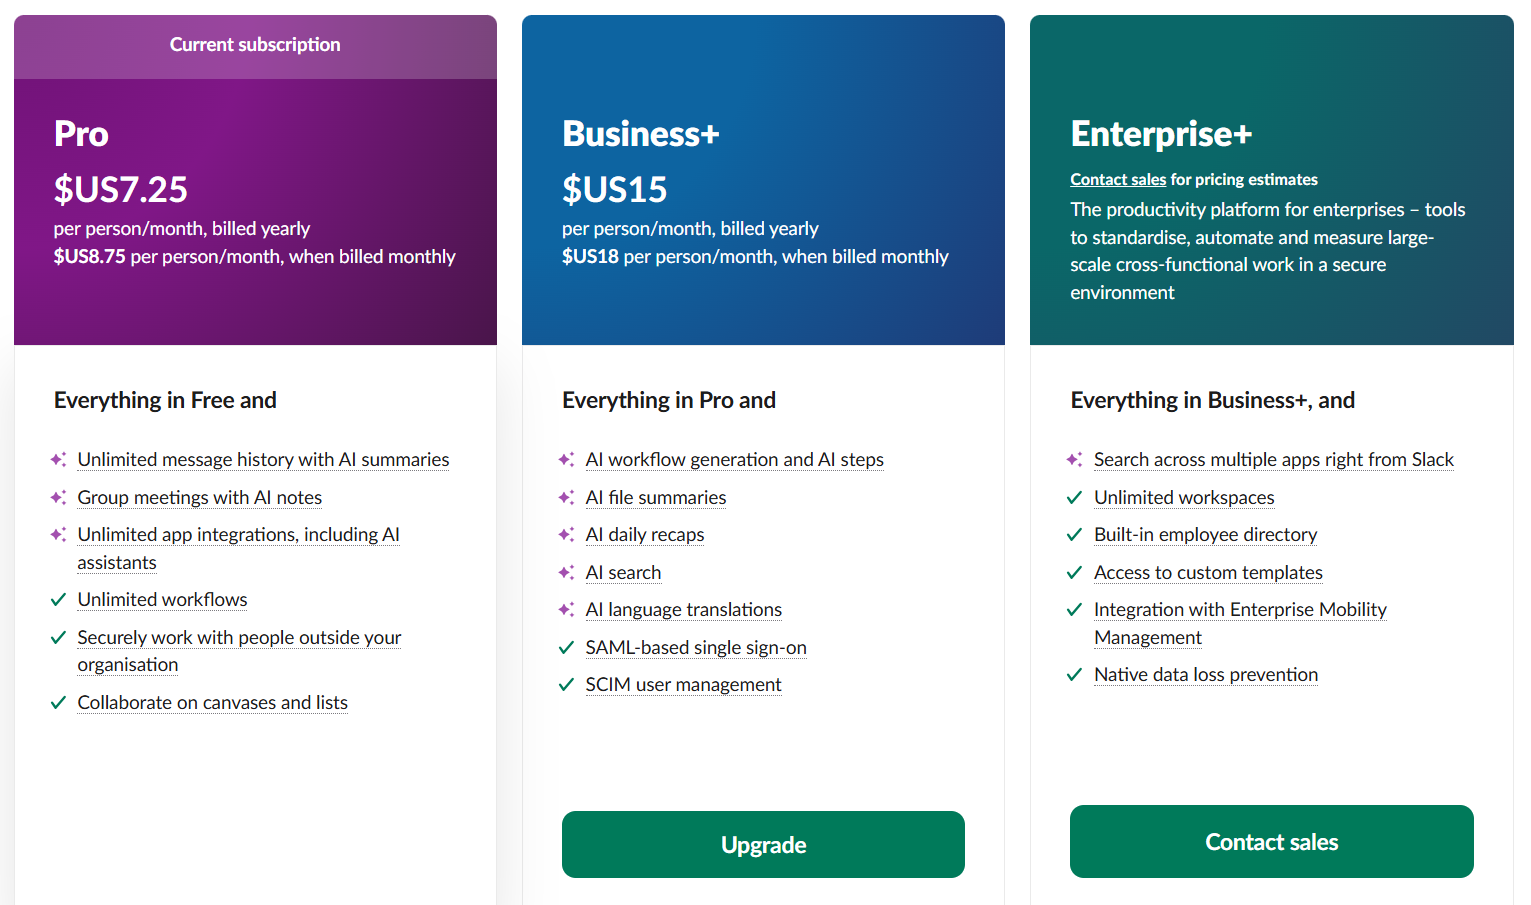
Pricing
- Free plan - free/monthly package [per user]
- Pro - $7.25/ monthly package [per user]
- Business+ - $15/ monthly package [per user]
- Enterprise+ - Custom pricing
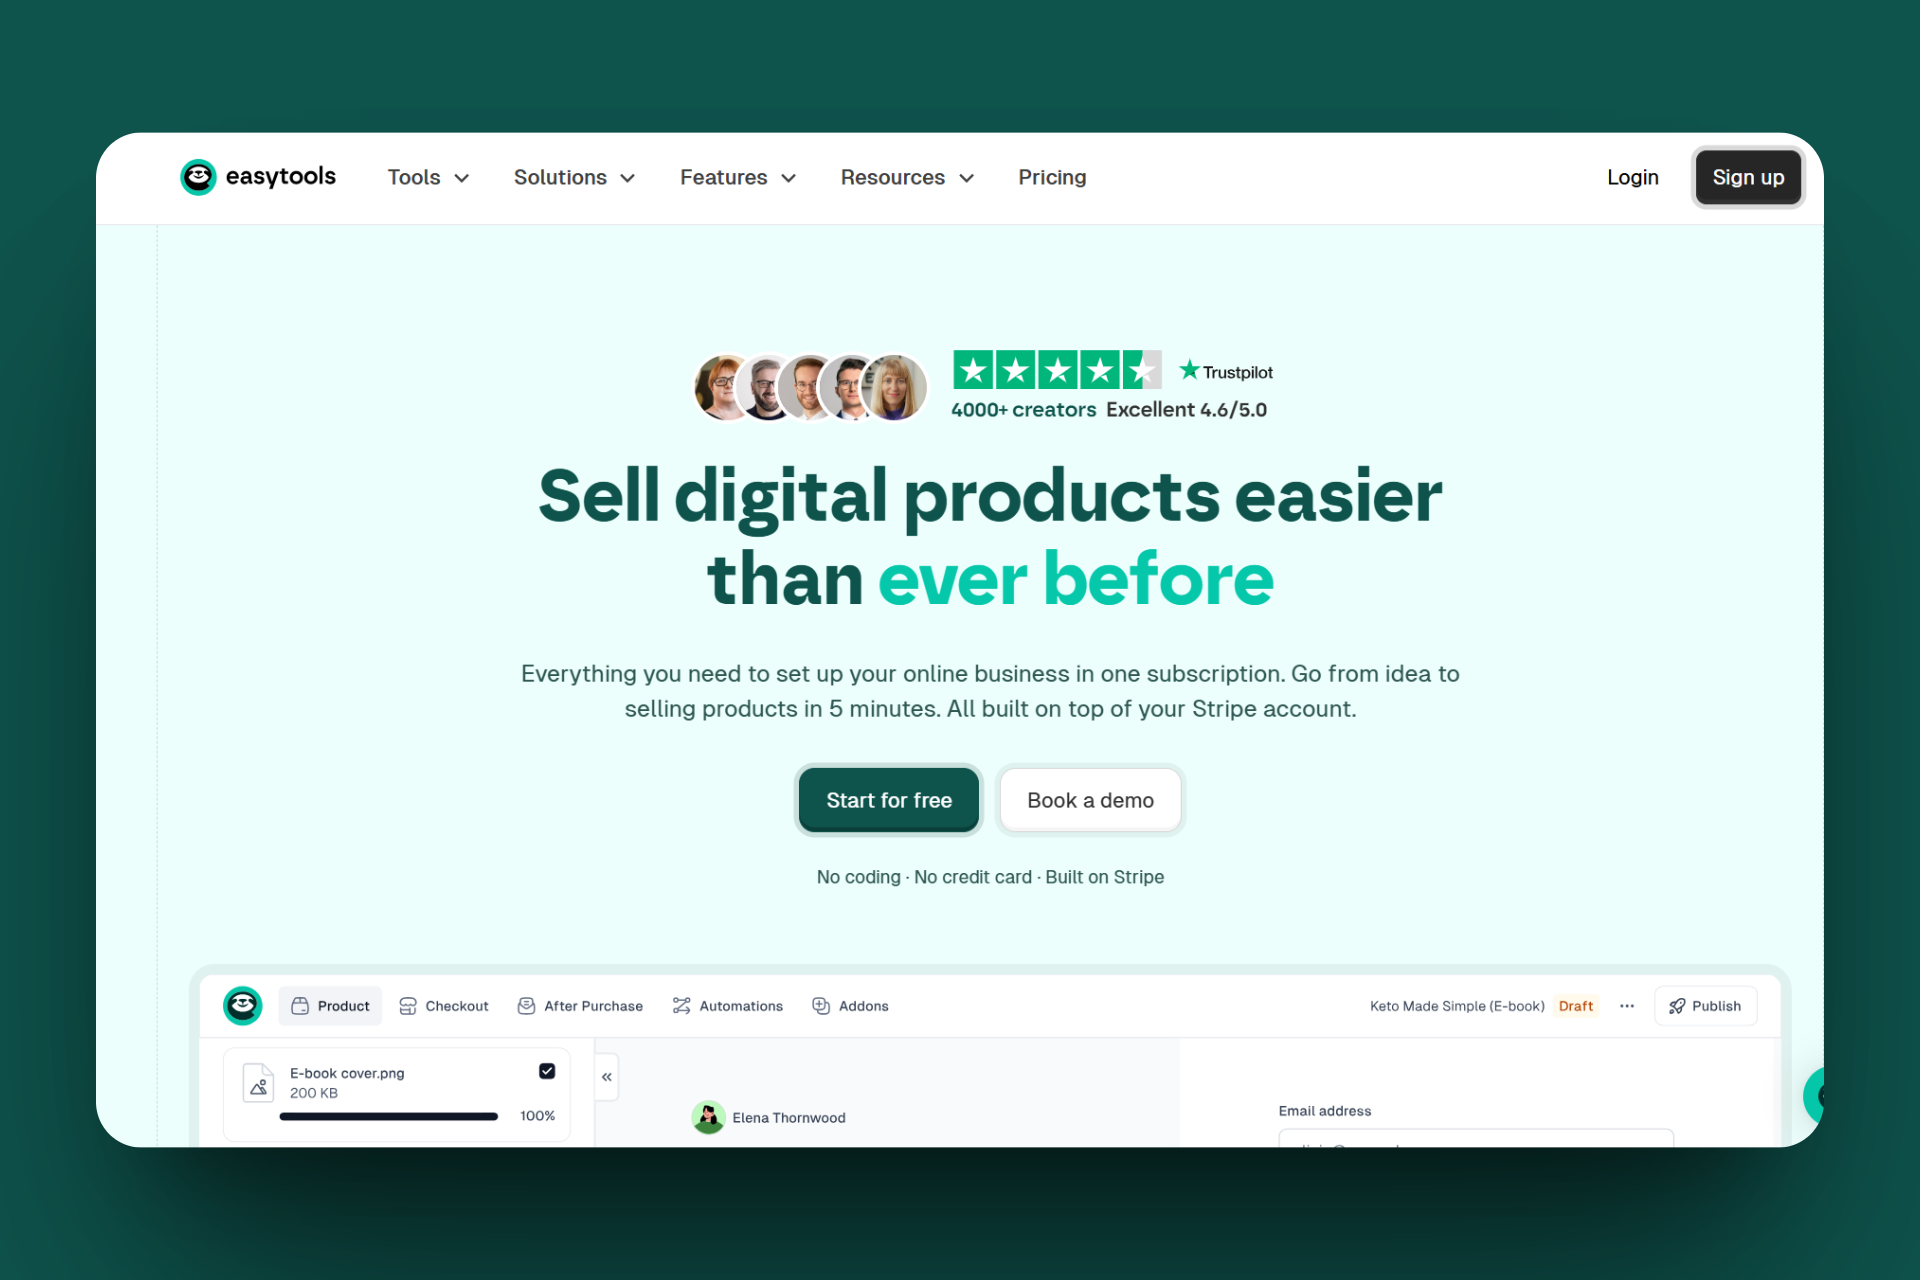
5. EasyTools
EasyTools is the next online coaching platform on this list. It is a digital product platform you can use to manage and sell coaching-related products.
EasyTools has a Products feature that allows you to create paid offers, such as an e-book. You only need to add it as a new product, upload the product file and its thumbnail picture, select its pricing plan, and specify the price.
Then, enter the storefront title and description before assigning it to a course or page.
EasyTools does not limit you to only products as a coach; it offers a course feature allowing you to build a structured learning curriculum.
You create one by uploading its resources, such as videos or PDFs, setting the lesson's availability, and then giving it a name before saving it.
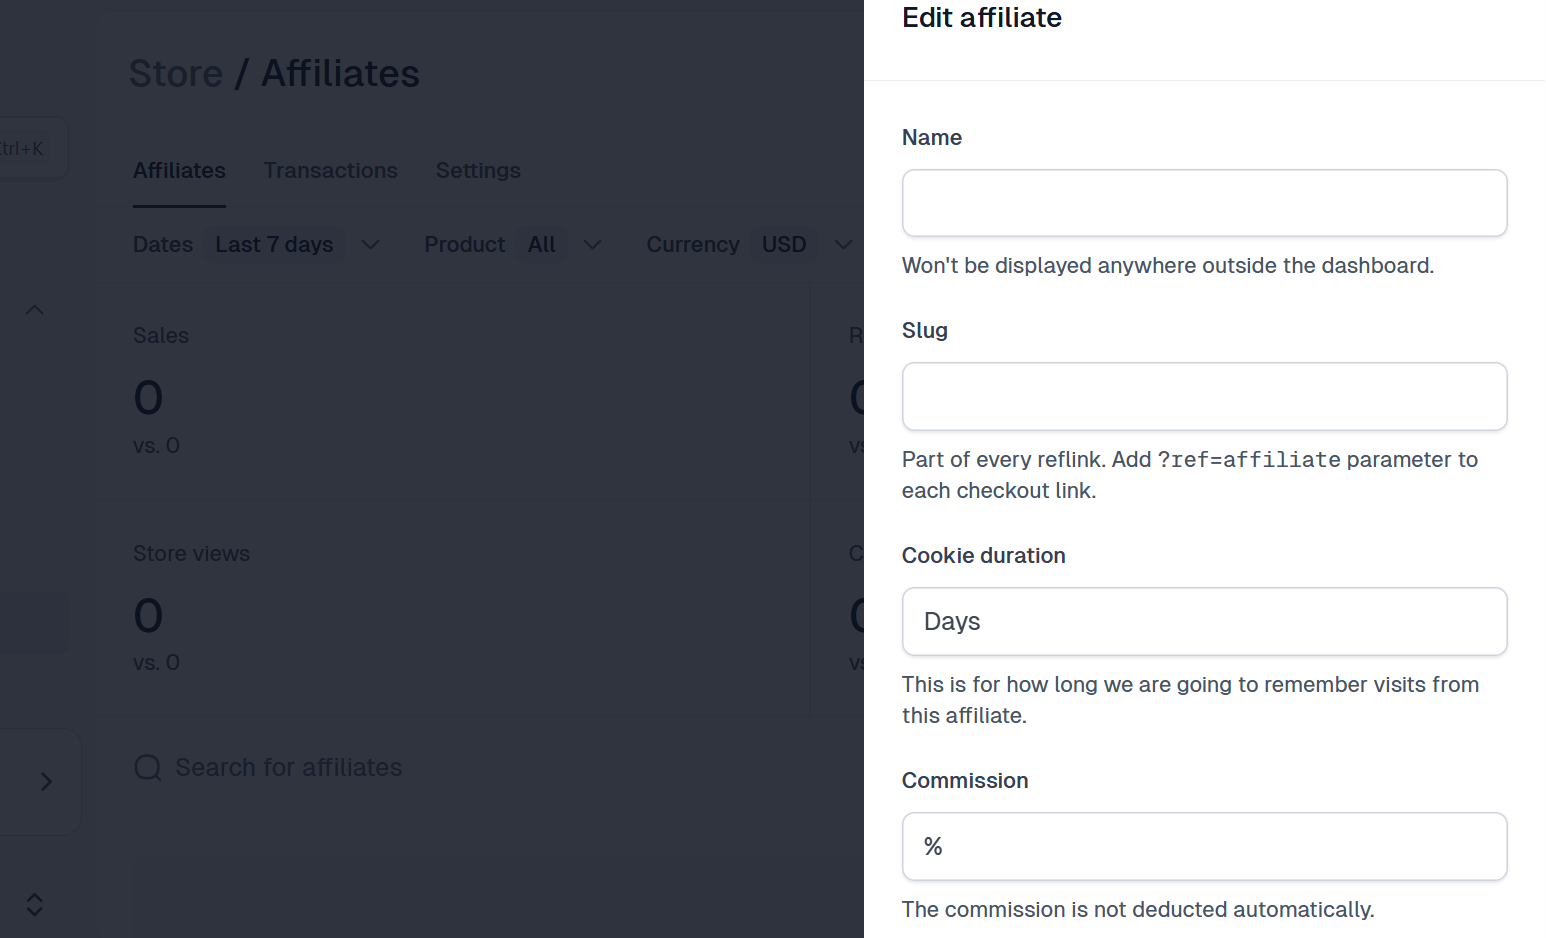
Moreover, this tool includes Affiliates, which enables you to track partners by inviting them via email, setting their commission percentage, assigning eligible products, generating tracking links, and viewing their stats on its dashboard.
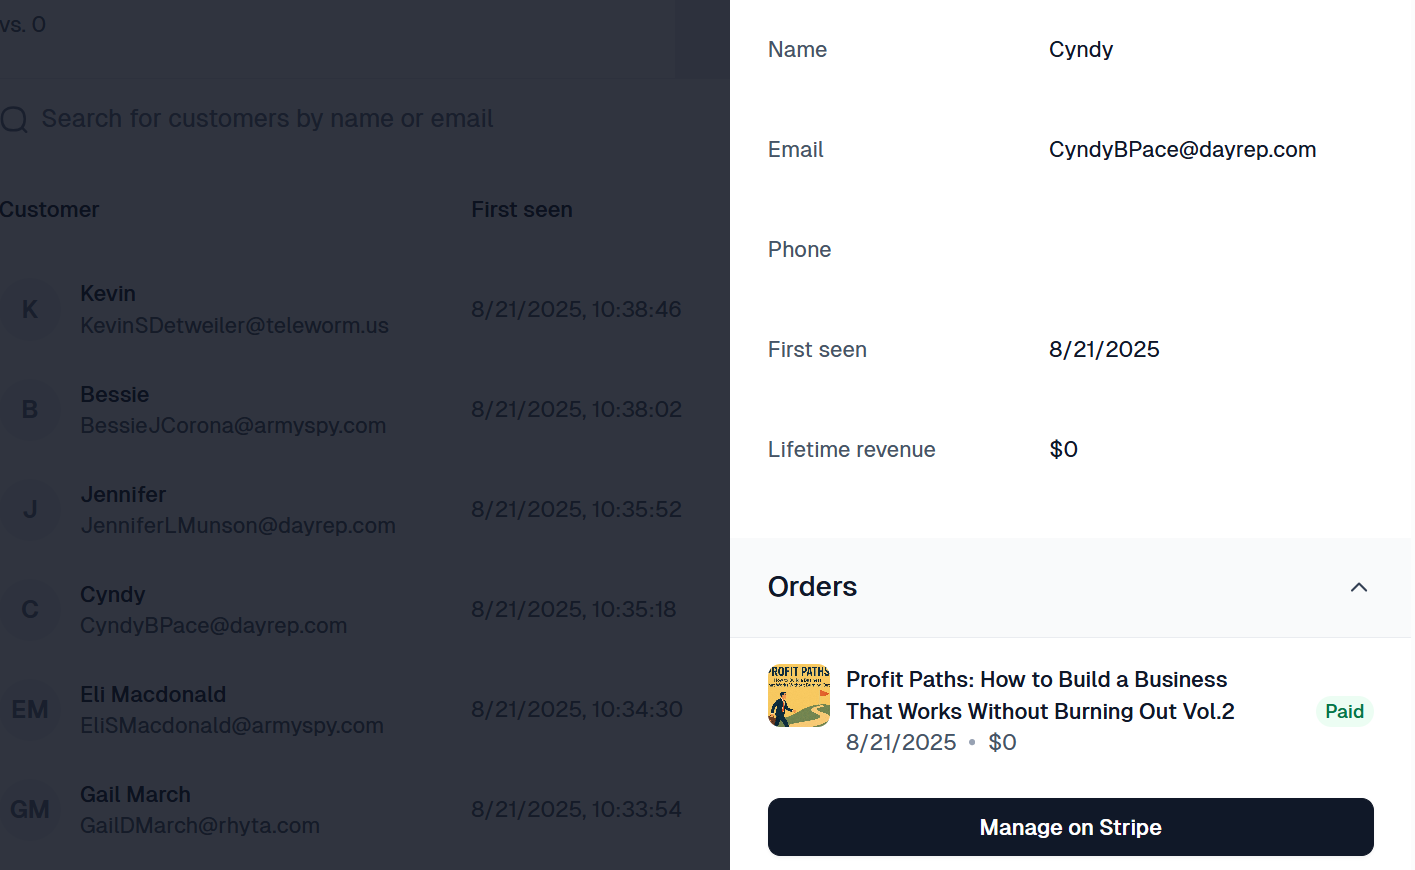
Furthermore, you can manage your enrolled clients by opening the Customer tab and searching for them by name or email. You can then select their profiles, view their product access, and revoke or reassign access if needed, thanks to the customer feature.
As a coach, the products should be the go-to feature for your coaching. This is where you create and manage your digital products, such as courses, e-books, templates, or coaching programs, to sell them on your platform's storefront.
You can use this tool to package and sell services, such as business, fitness, and career coaching sessions, memberships, or digital resources, in a professional and straightforward storefront.
Let me show you how to create an e-book product to sell to customers as a one-time purchase at a fixed price.
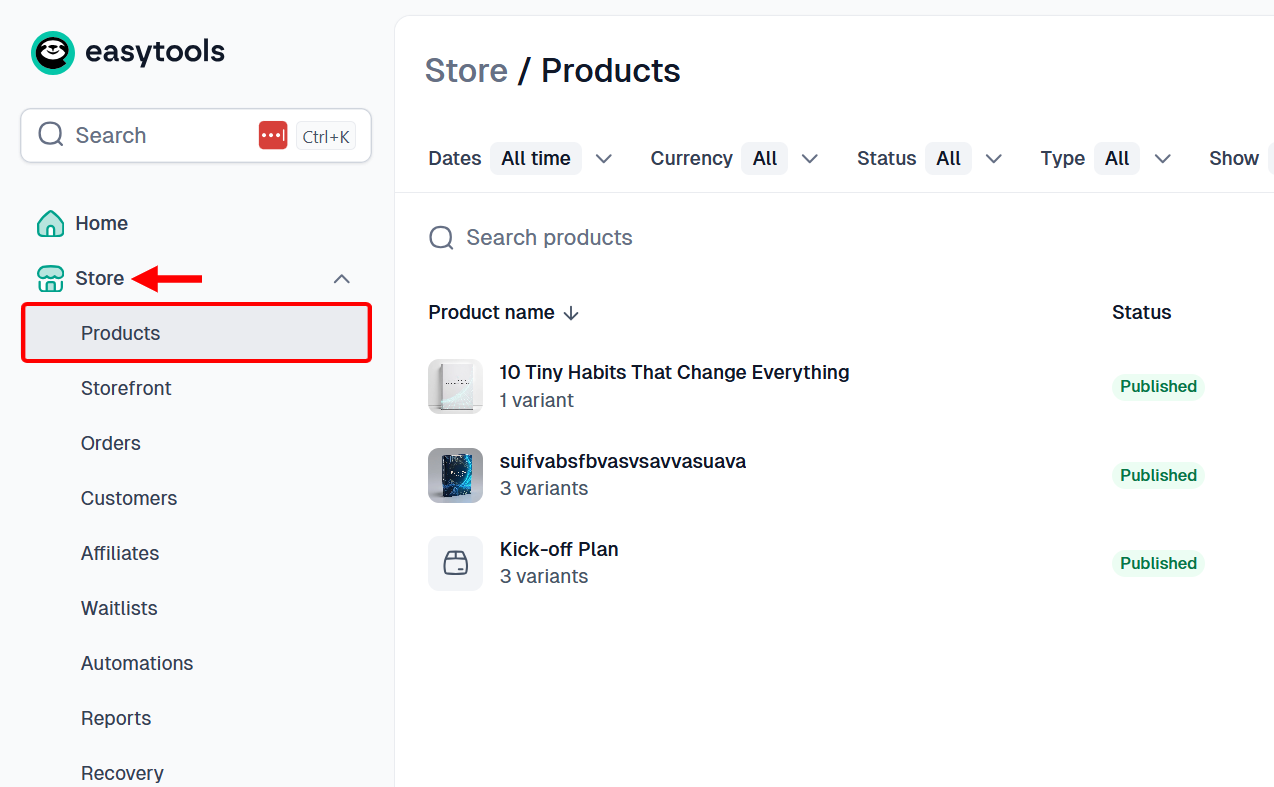
First, expand the store section to access the Products feature.
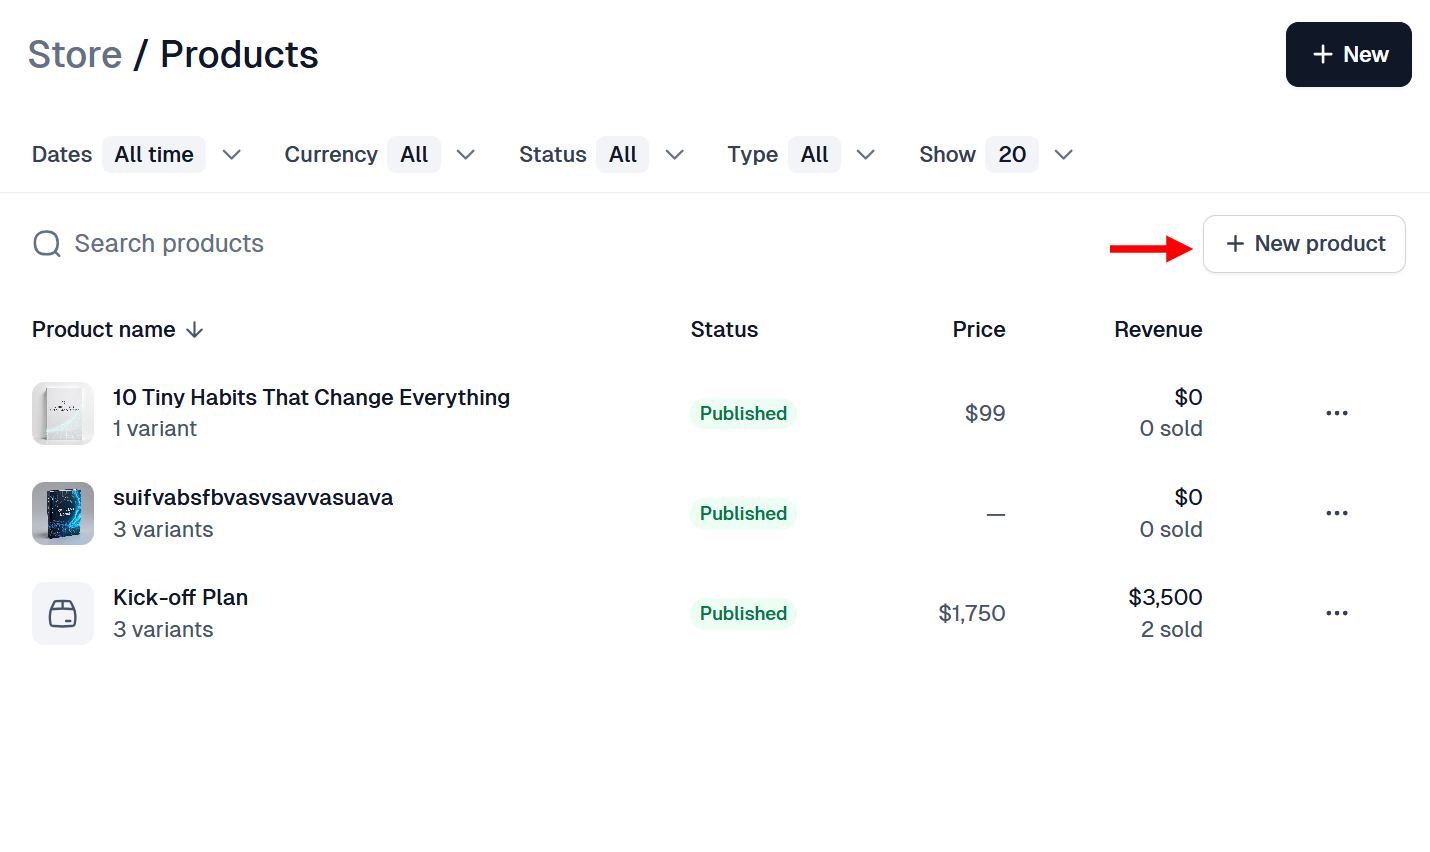
The products section holds existing products, which you can manage and edit. We want to create a new product, so click "New product".
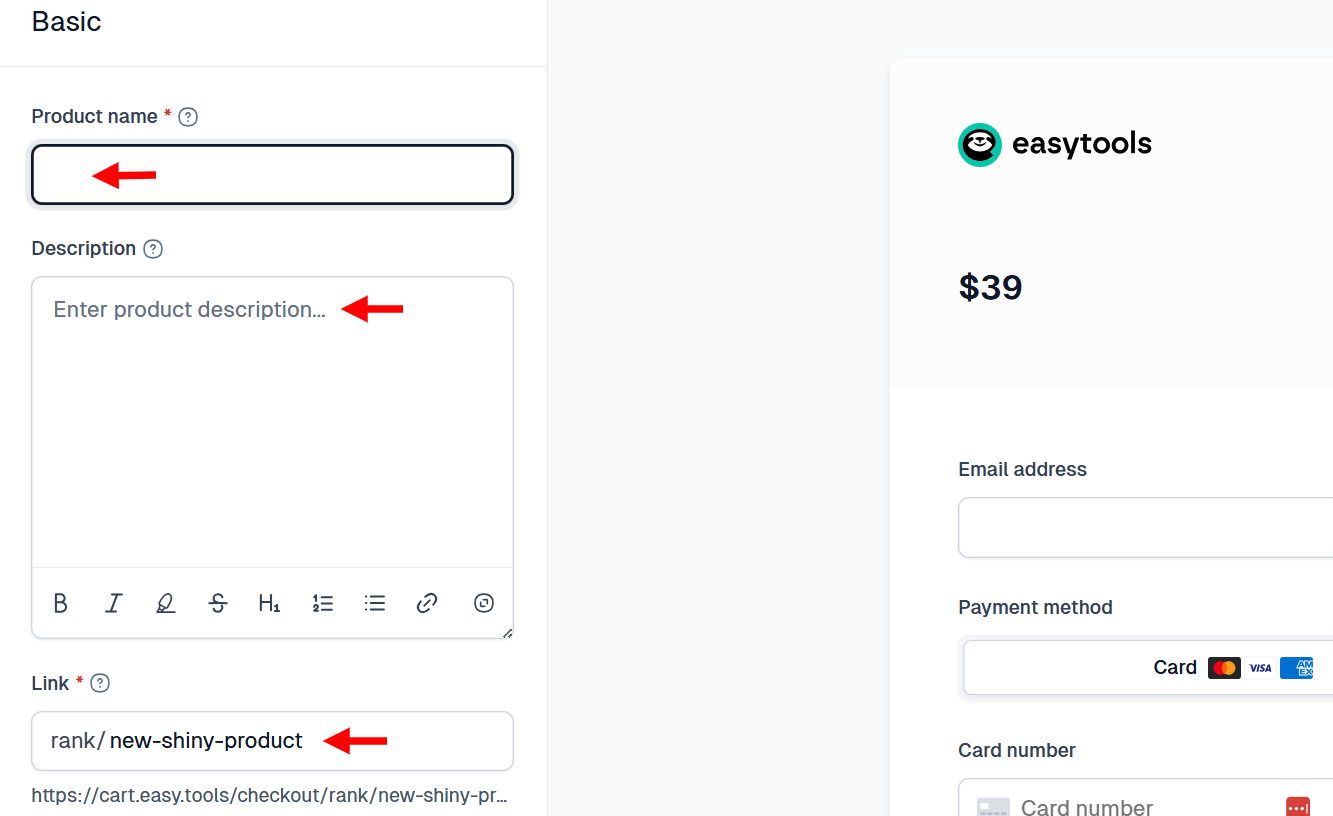
This opens the product creation page. You first define the e-book product by providing a description for the storefront and adding its link, then assign a name to it.
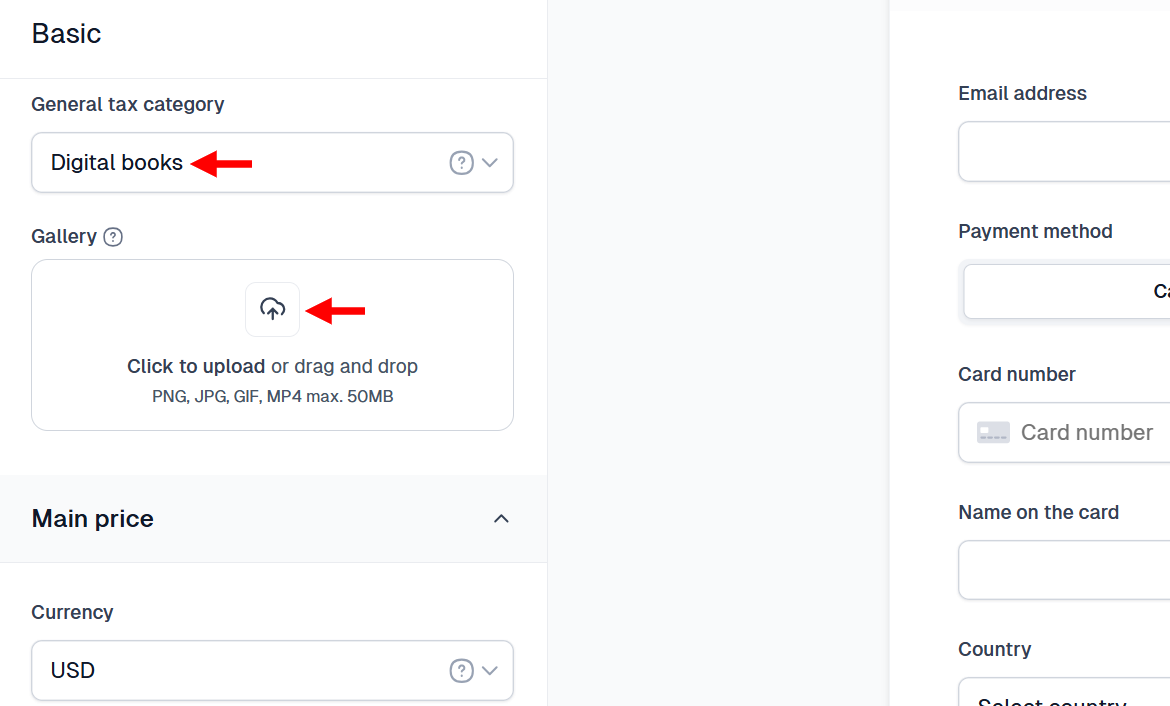
Moving on, select the product category and upload its images for the storefront gallery. We are creating an e-book product, hence, select 'Digital Books' as its category.
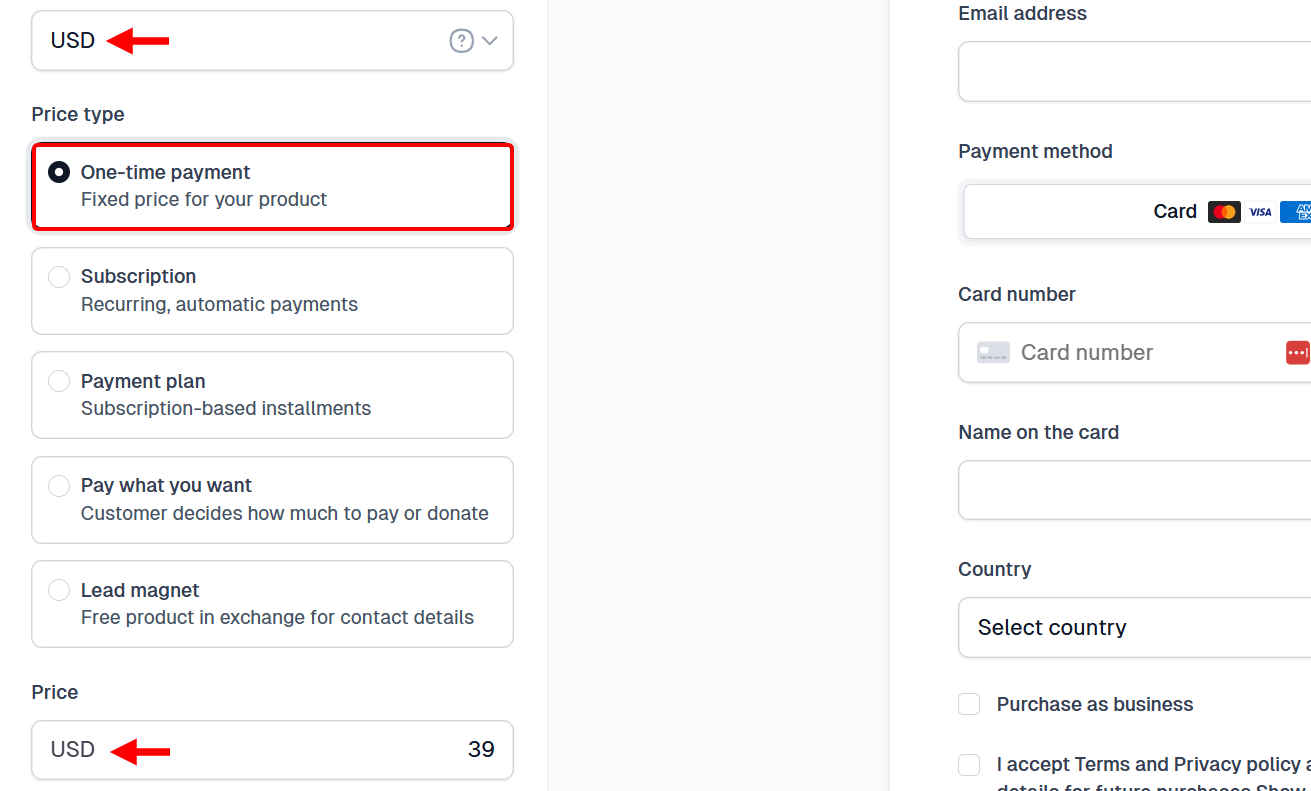
Next, scroll to the pricing section, where you enter the e-book's price and its corresponding currency. You also select its pricing type, such as a payment plan.
Since it's a one-time purchase product, select the one-time payment type.
You can also include or exclude tax on the ebook and add benefits like cross-sell and upsell.
Easy provides an option to let customers buy multiple items, revoke their access to the ebook, and limit its availability.

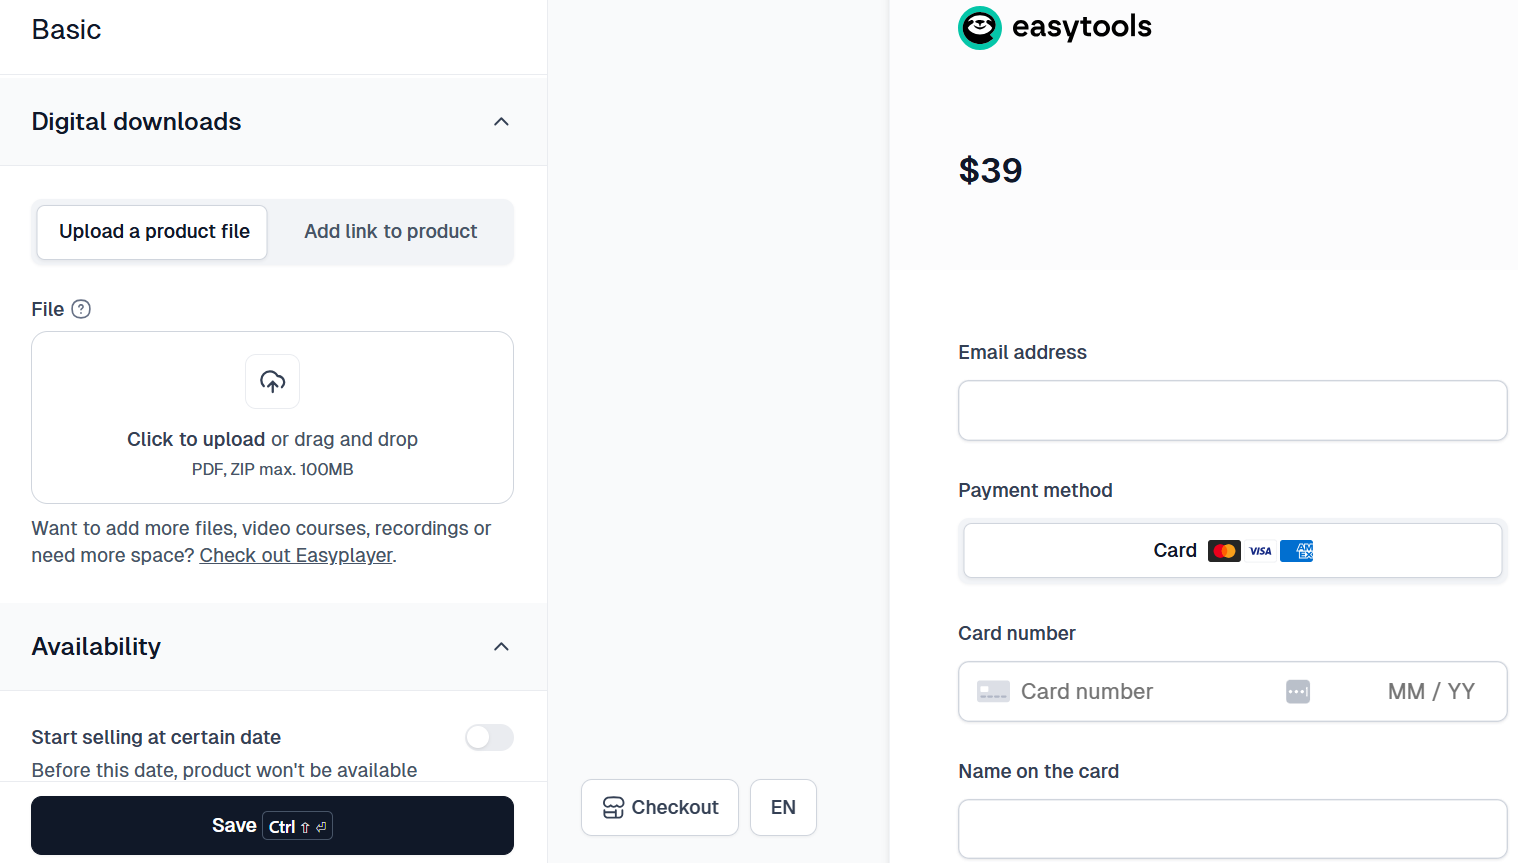
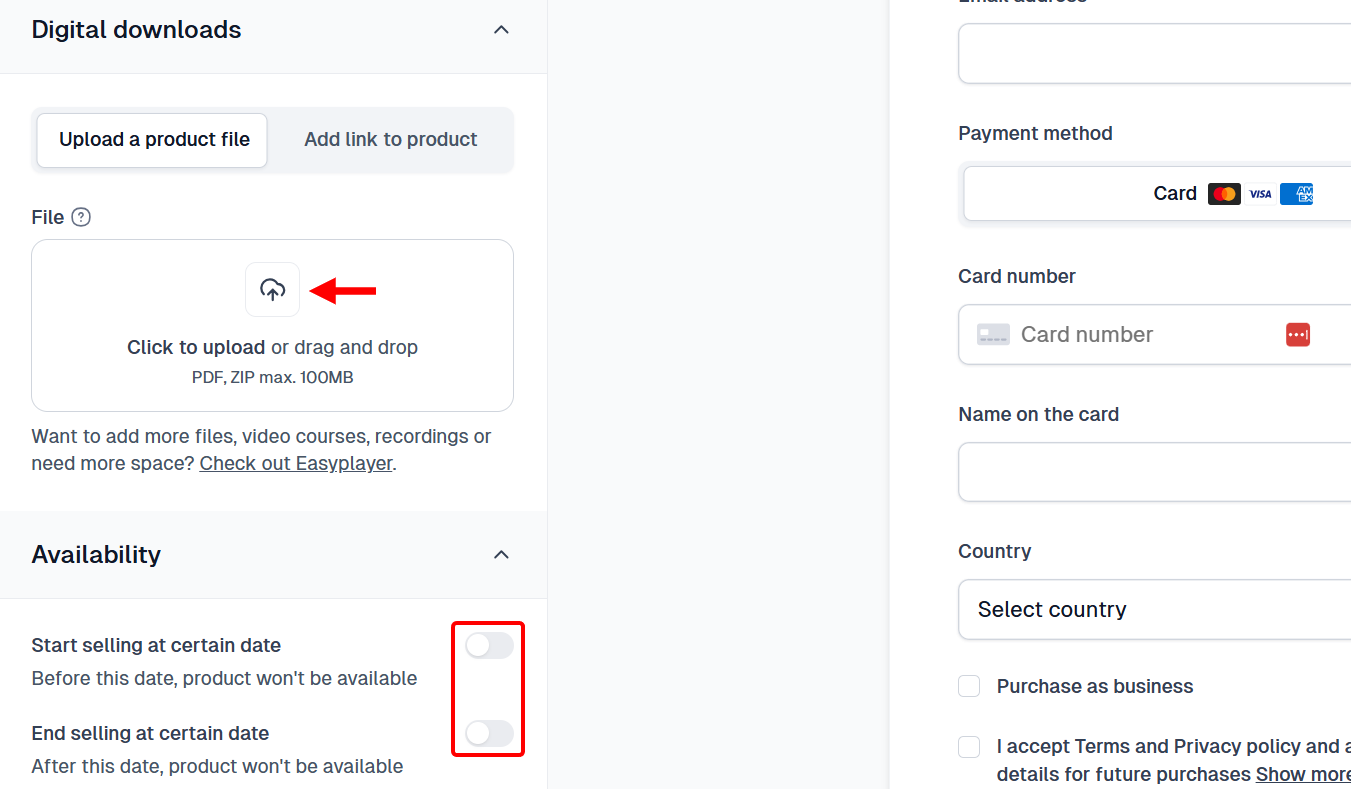
Now, scroll to the 'Digital Download and Availability' section. Here, you upload your product file, such as an ebook, or add its link, and schedule the product to go on sale in a specific period before you publish it.
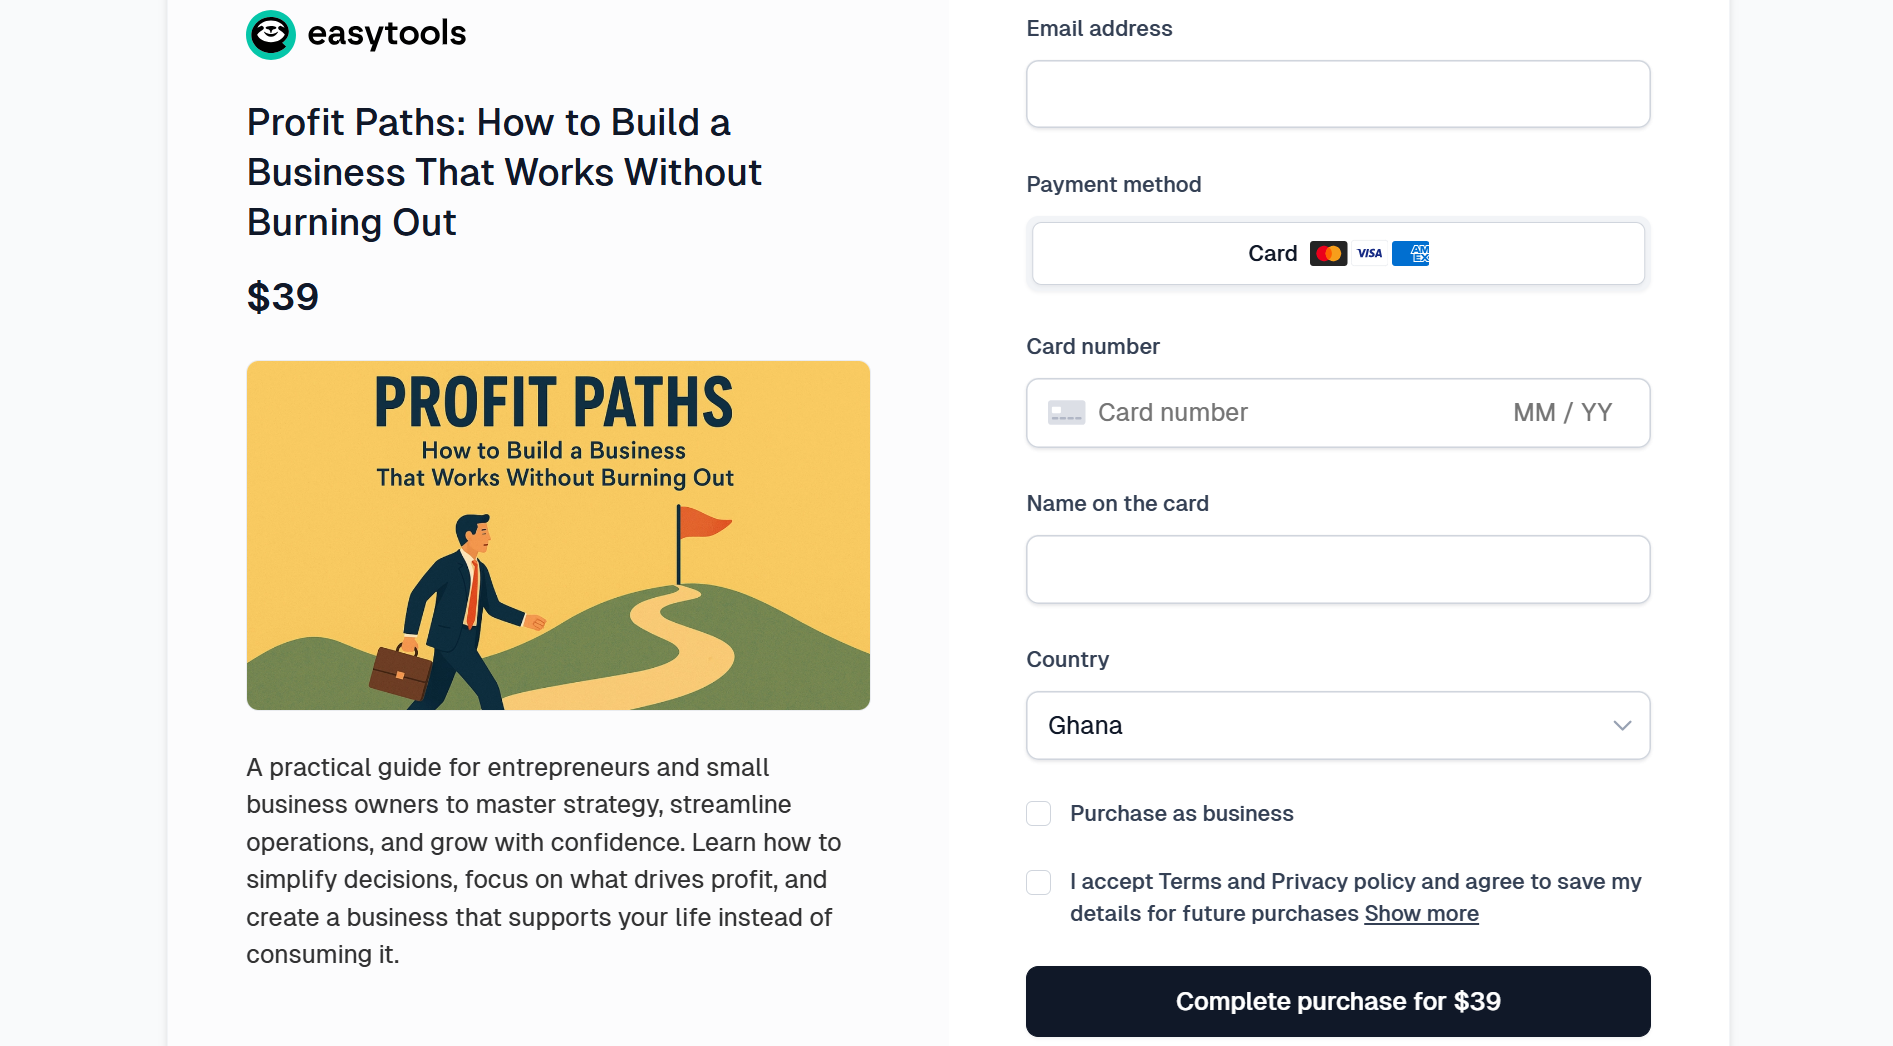
Your ebook product storefront should look like this when published. Your buyers can view details and prices before making a purchase.
Key Features
1. Courses
Easytools is not limited to creating digital products; you can use the course feature to create and sell structured online learning programs.
It allows you to upload lessons, add videos or files, and organise content into modules for your students. You can use it to deliver training, guide clients step by step, and provide your clients with a clear path to progress
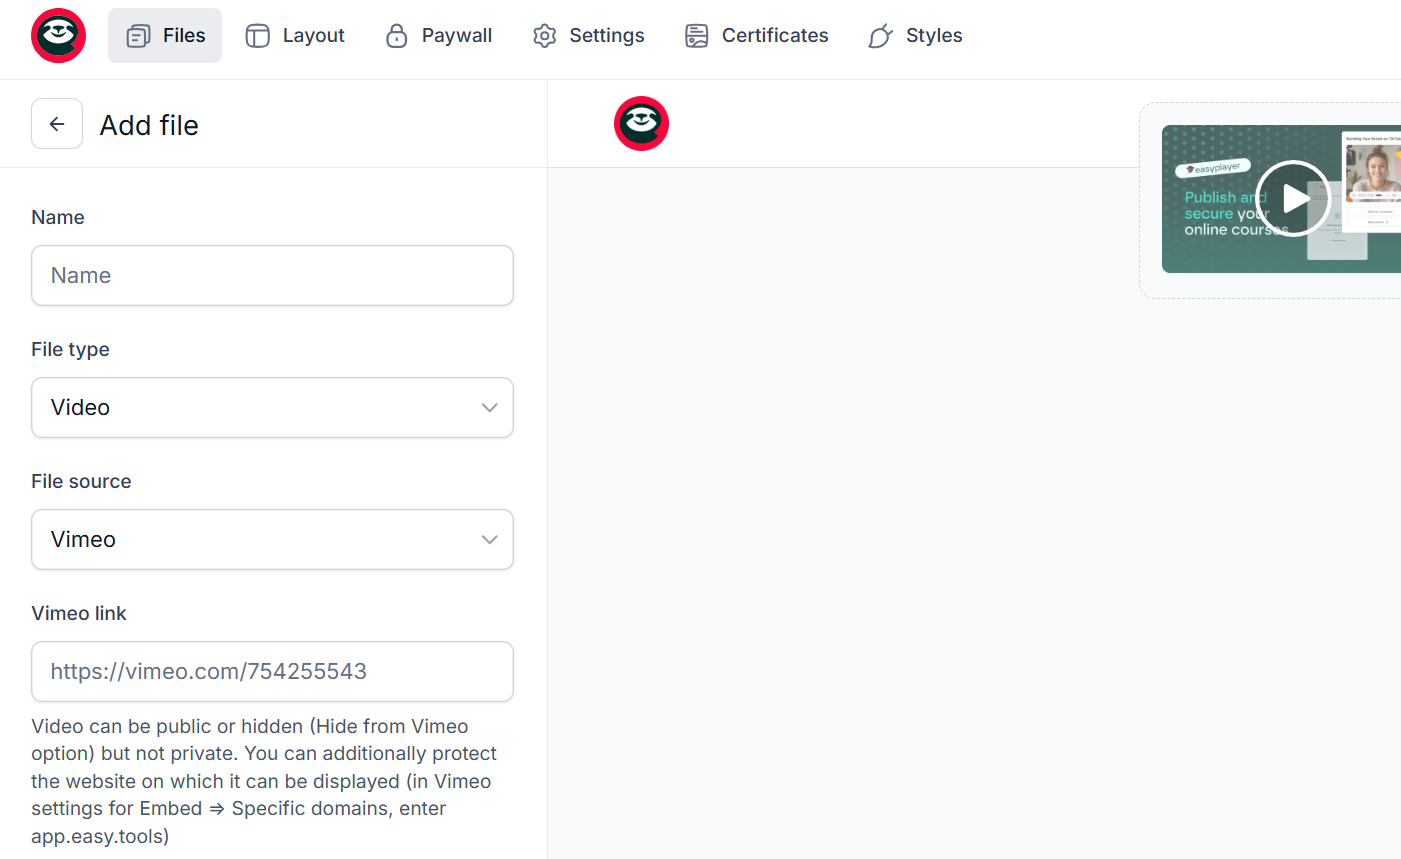
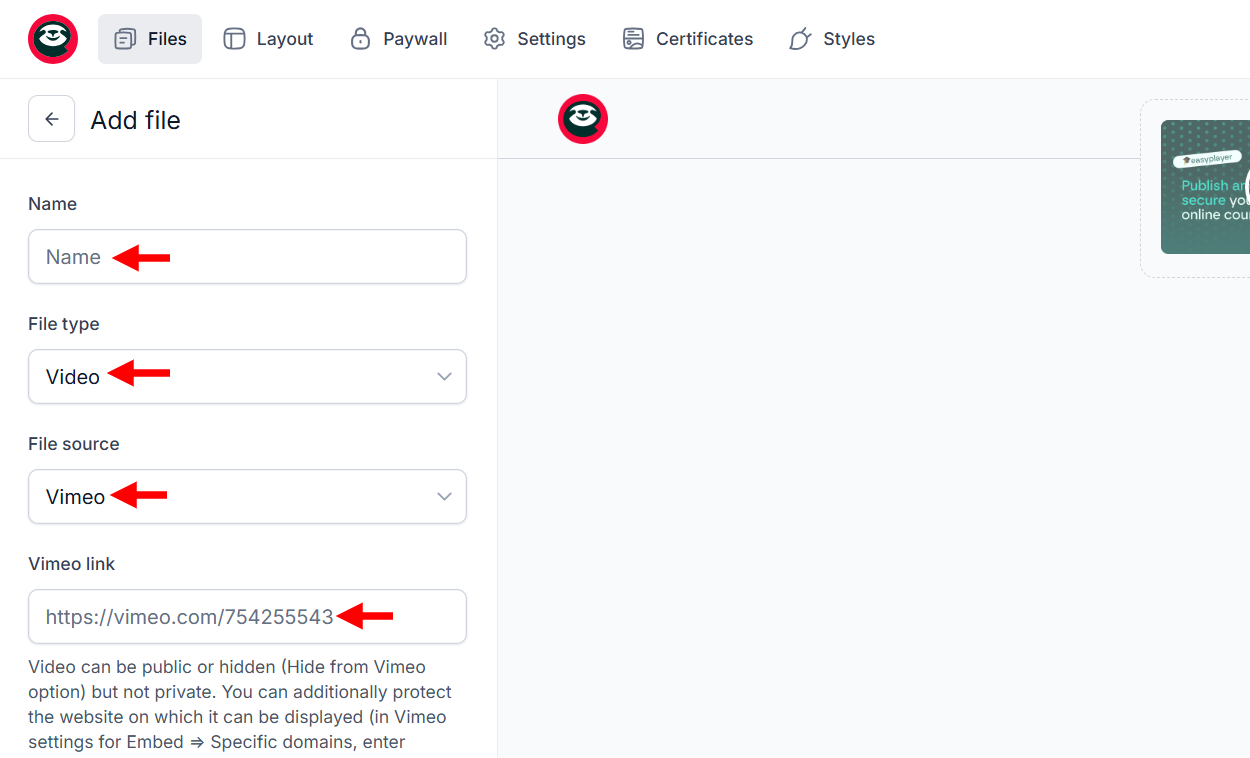
To set up your course, you have to add the course's files or resources. You must indicate the type of file, its source, and link before naming it as a resource.
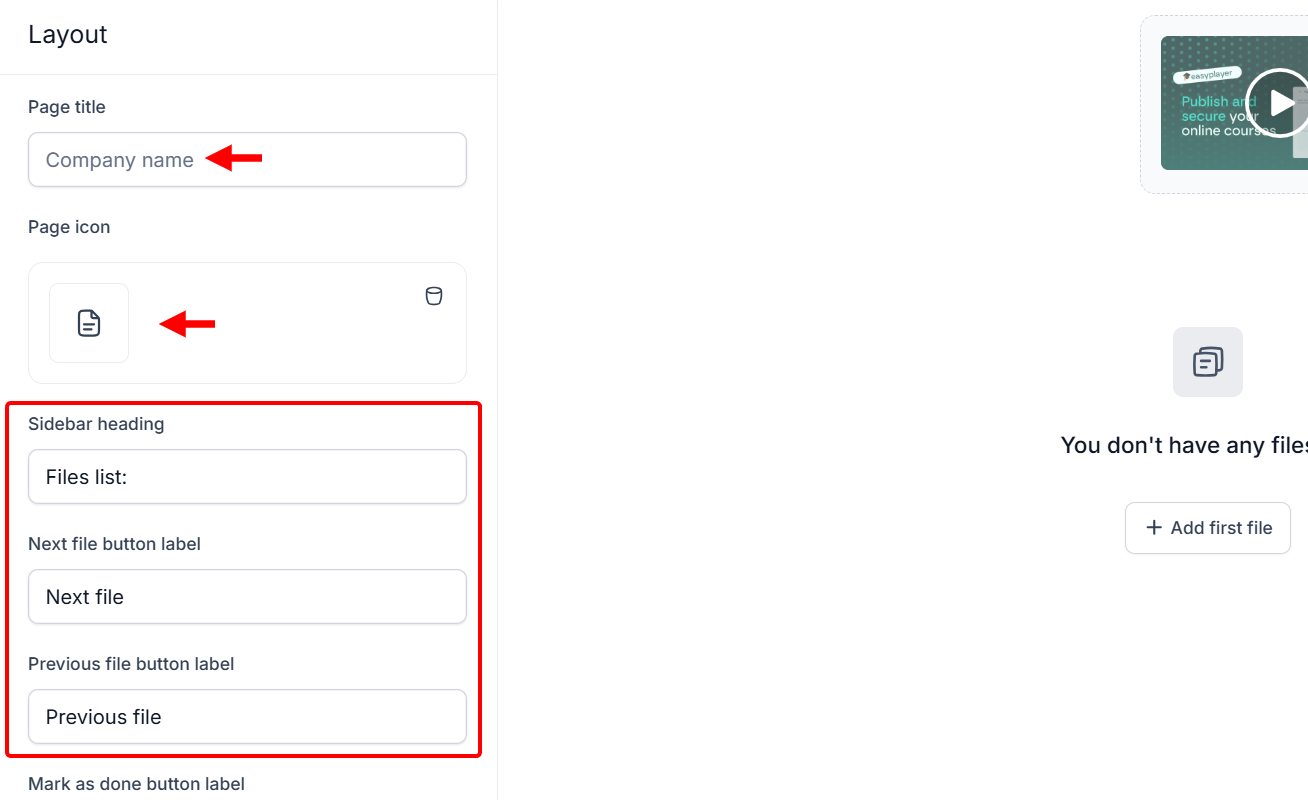
Again, you can set up the course's layout by naming it and uploading an icon. There are also options to adjust the sidebar heading, as well as the previous and next buttons on the course's page.
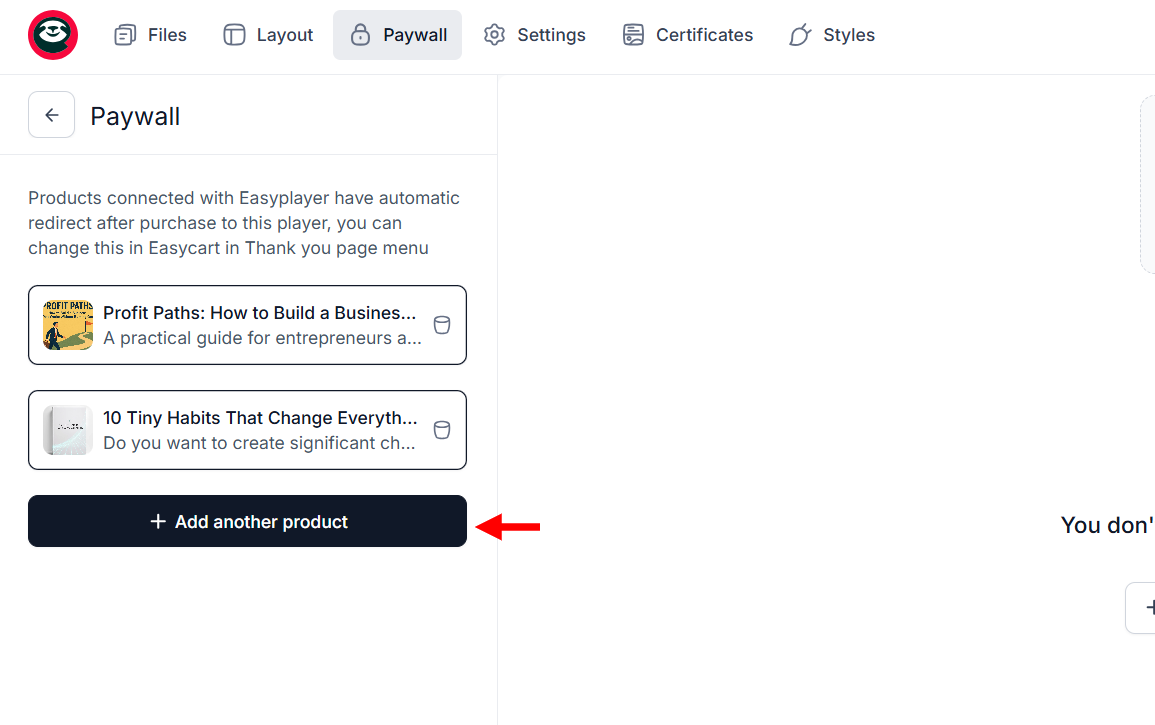
Easytools allows you to add products to the course in its paywall tab.
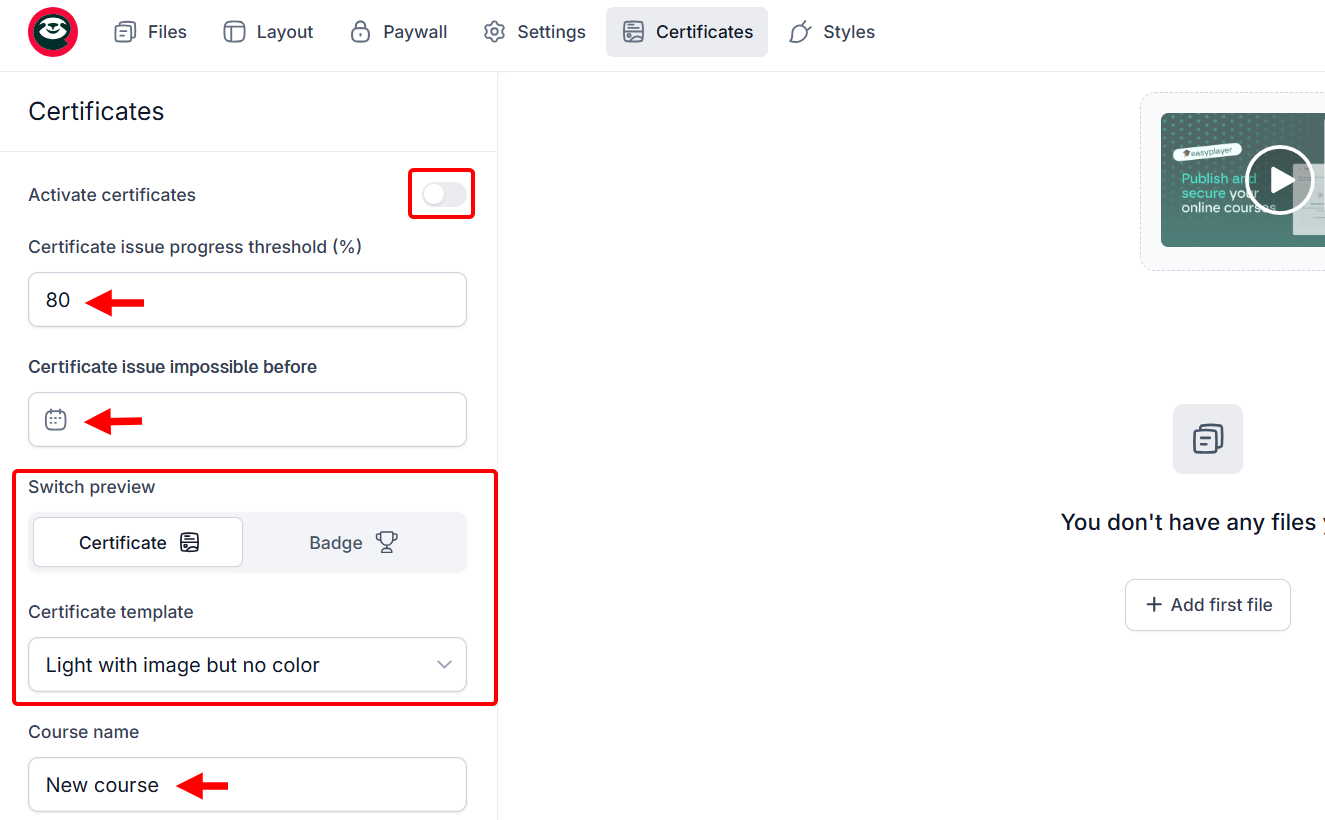
Moreover, you can add a certificate to the course. You add the certificate's threshold, expiry date, customise the appearance, give it a name, and activate it.
2. Orders
The Orders feature is where you track and manage every purchase your customers make.
It provides analytics and allows you to view details of orders, including buyer information, payment status, and product type, all in one place.
You can use this to organize your courses, ebooks, and other coaching products, follow up with clients, and ensure the good delivery of digital products or sessions.
On the orders' analytics dashboard, you can apply filters such as product type and select a date period, which returns key metrics of your orders, including the number of sales, revenue, and conversion rate.

When you scroll down, you can view the list of others, including order number, status, customer name and email address, product, and revenue.

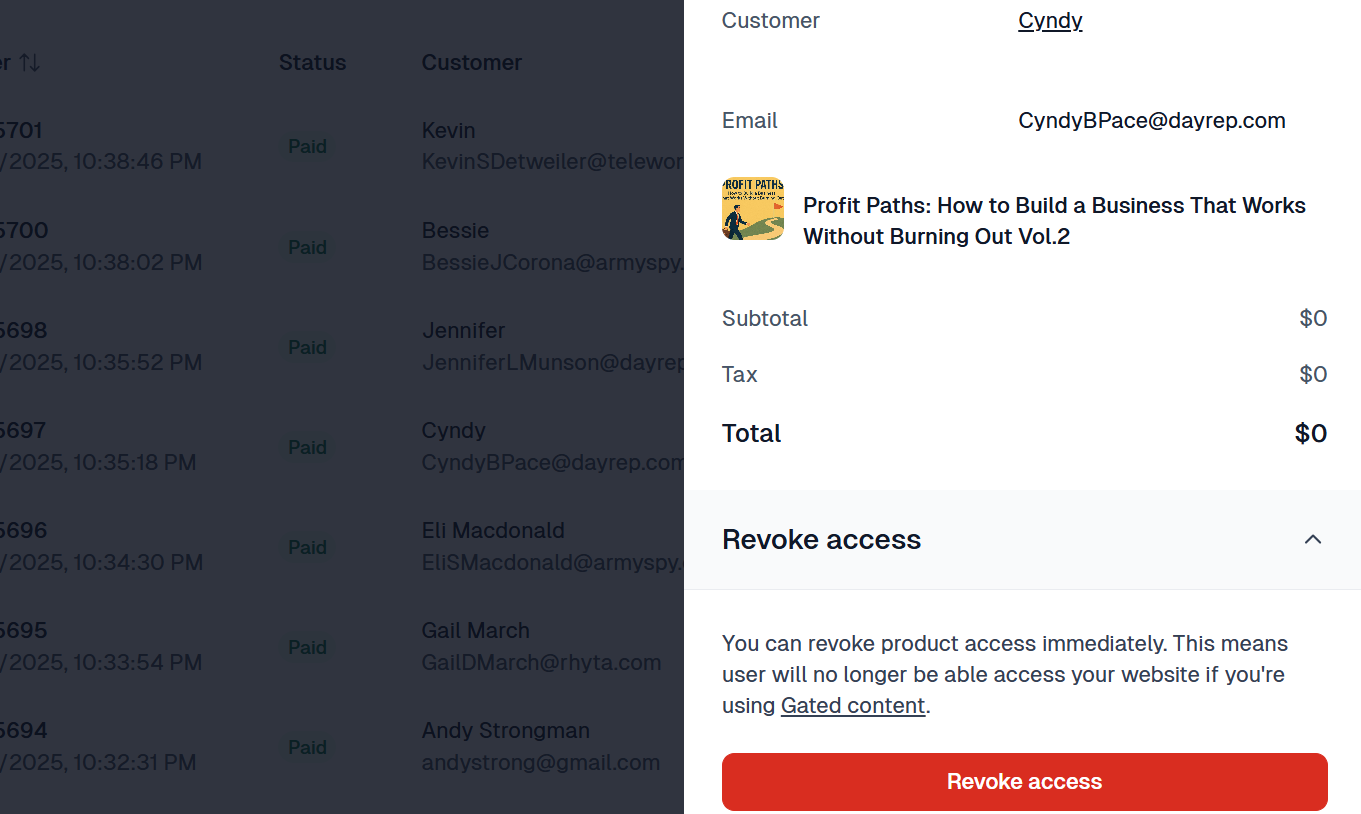
When you select an order from the list, it opens the details section, where you can view the order's tax and total price. Also, you can revoke the product from the buyer from this section.
Best For
Coaches and creators who seek to sell digital coaching resources via one-page branded checkouts.
Pricing
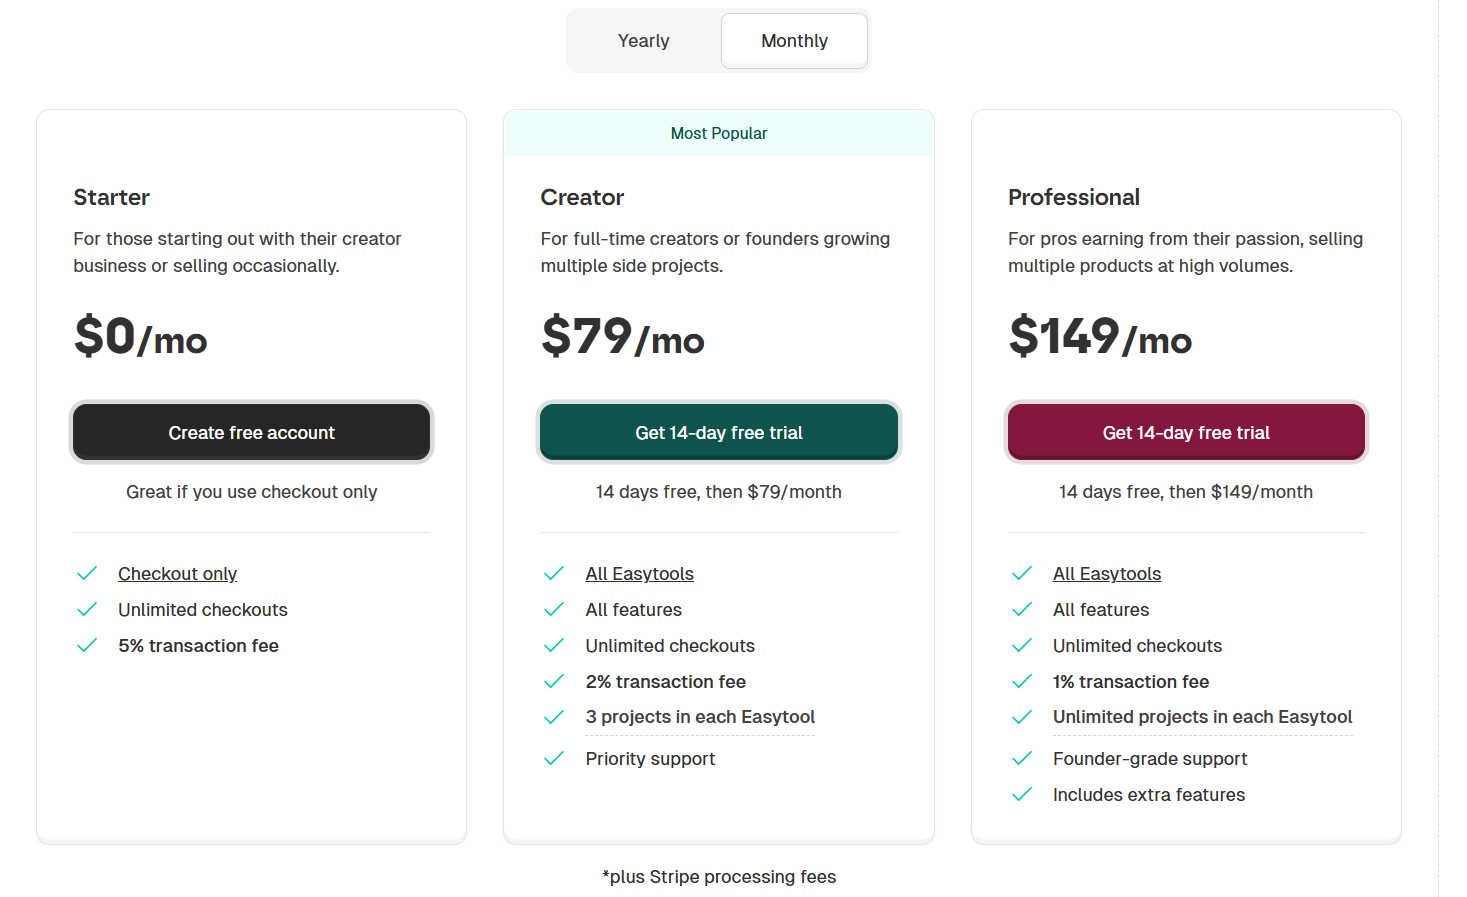
- Starter - Free/ monthly package [5% transactional fees]
- Creator - $79/ monthly package [2% transactional fees]
- Professional - $149/ monthly package [1% transactional fees]
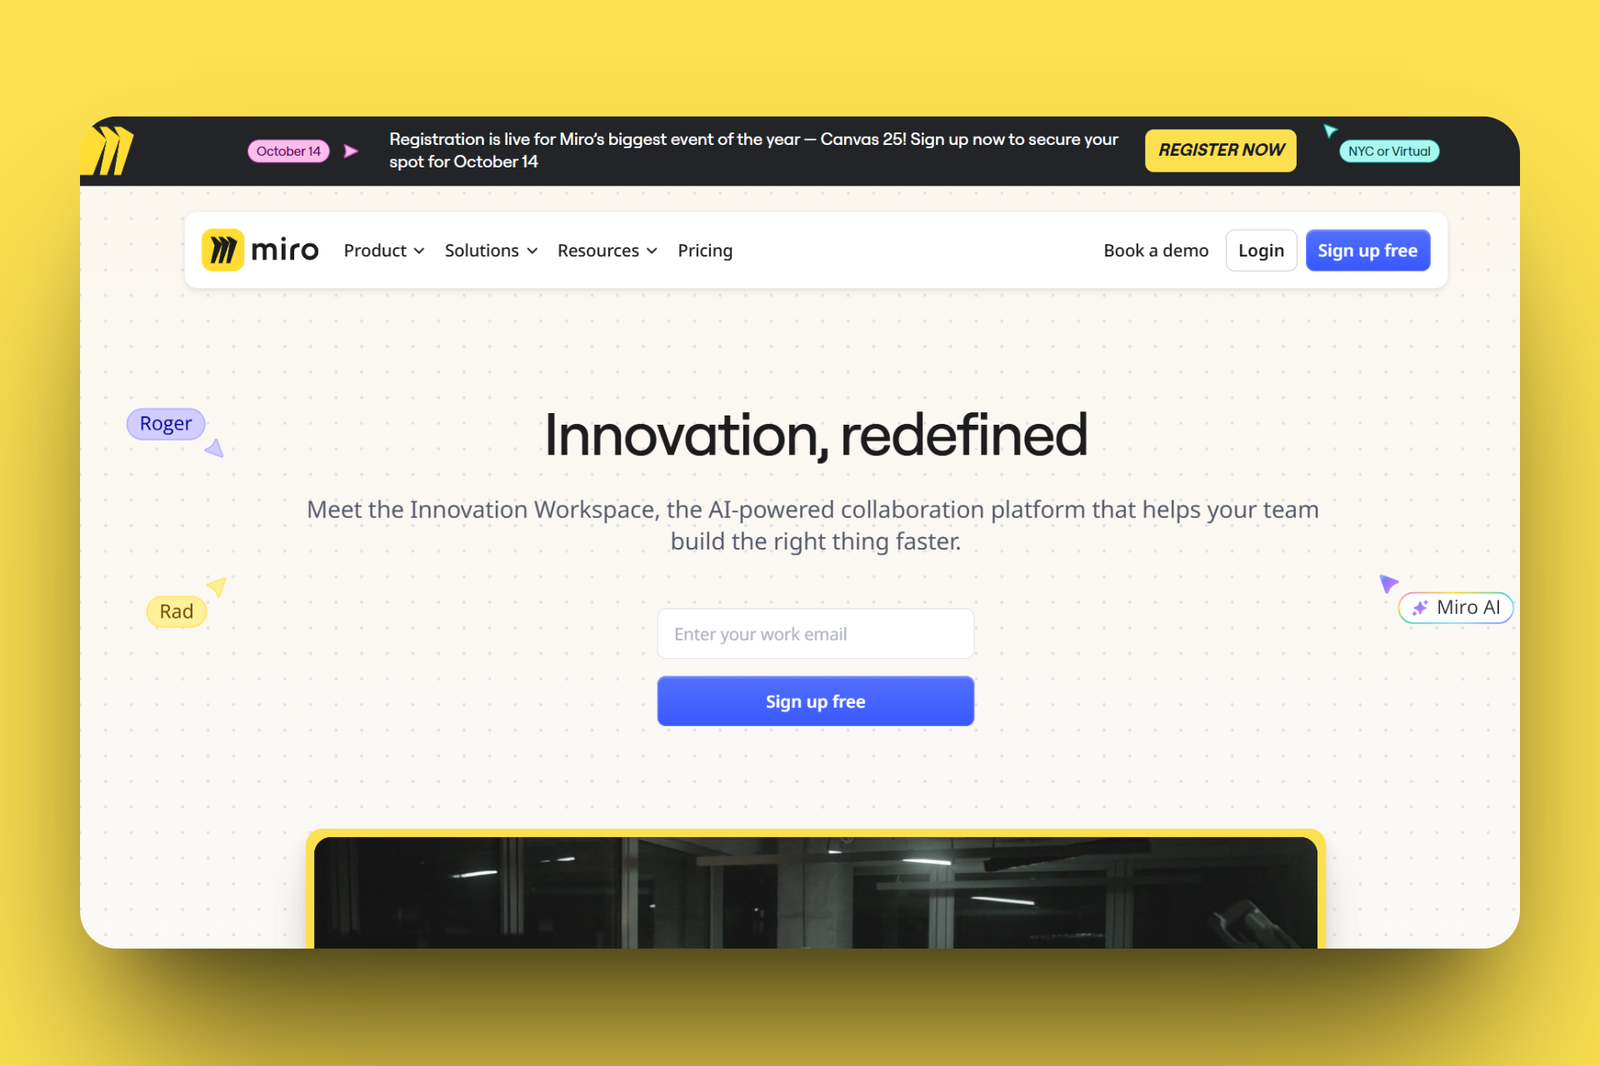
6. Miro
Another tool on this list of online coaching platforms is Miro, a collaborative visual workspace that allows you to map coaching ideas and workflows.
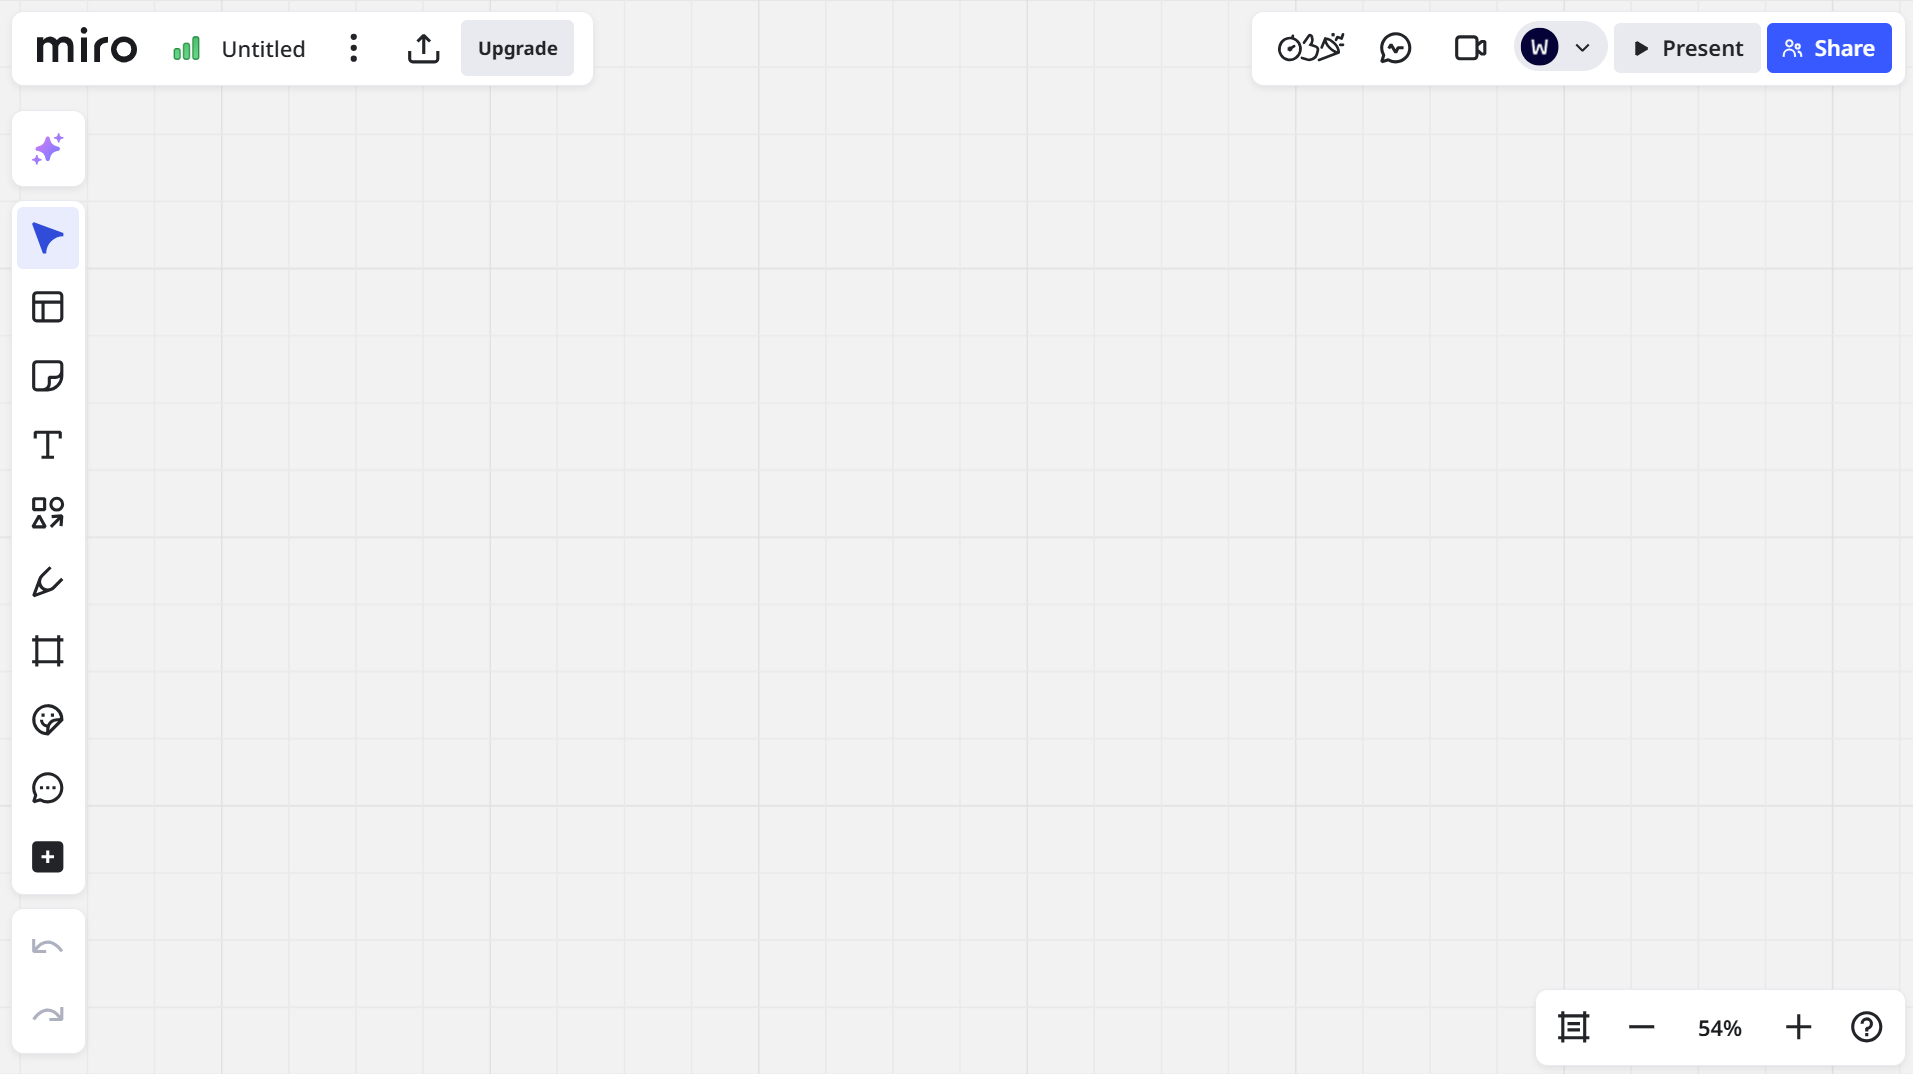
Miro primarily features a Boards tool, which is a virtual whiteboard that enables you to map out ideas, brainstorm, or create workflows with clients in real-time.
You can start with a template or blank board, drag in sticky notes, upload reference files, place shapes like arrows, add steps, adjust colours for clarity, and share with clients.
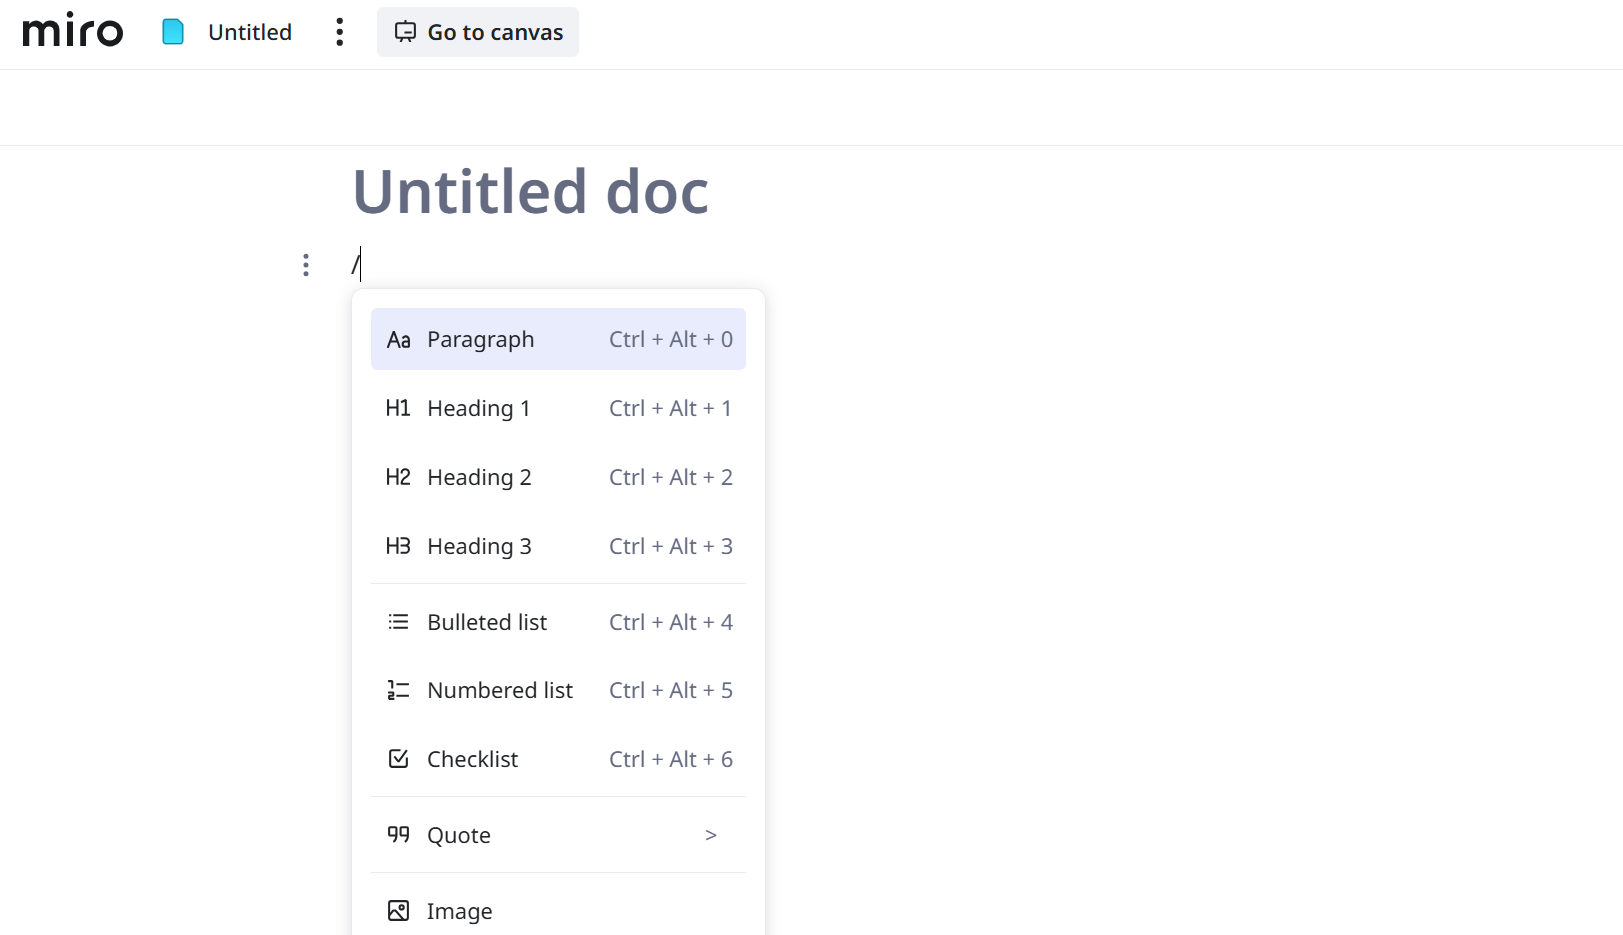
It has documents that you can use to draft plans and contents by selecting a new document, writing or pasting text, and tagging contributors.
It does not end there. You can add elements like checklists or inline comments, set a section limit, and share the link with view or edit access.
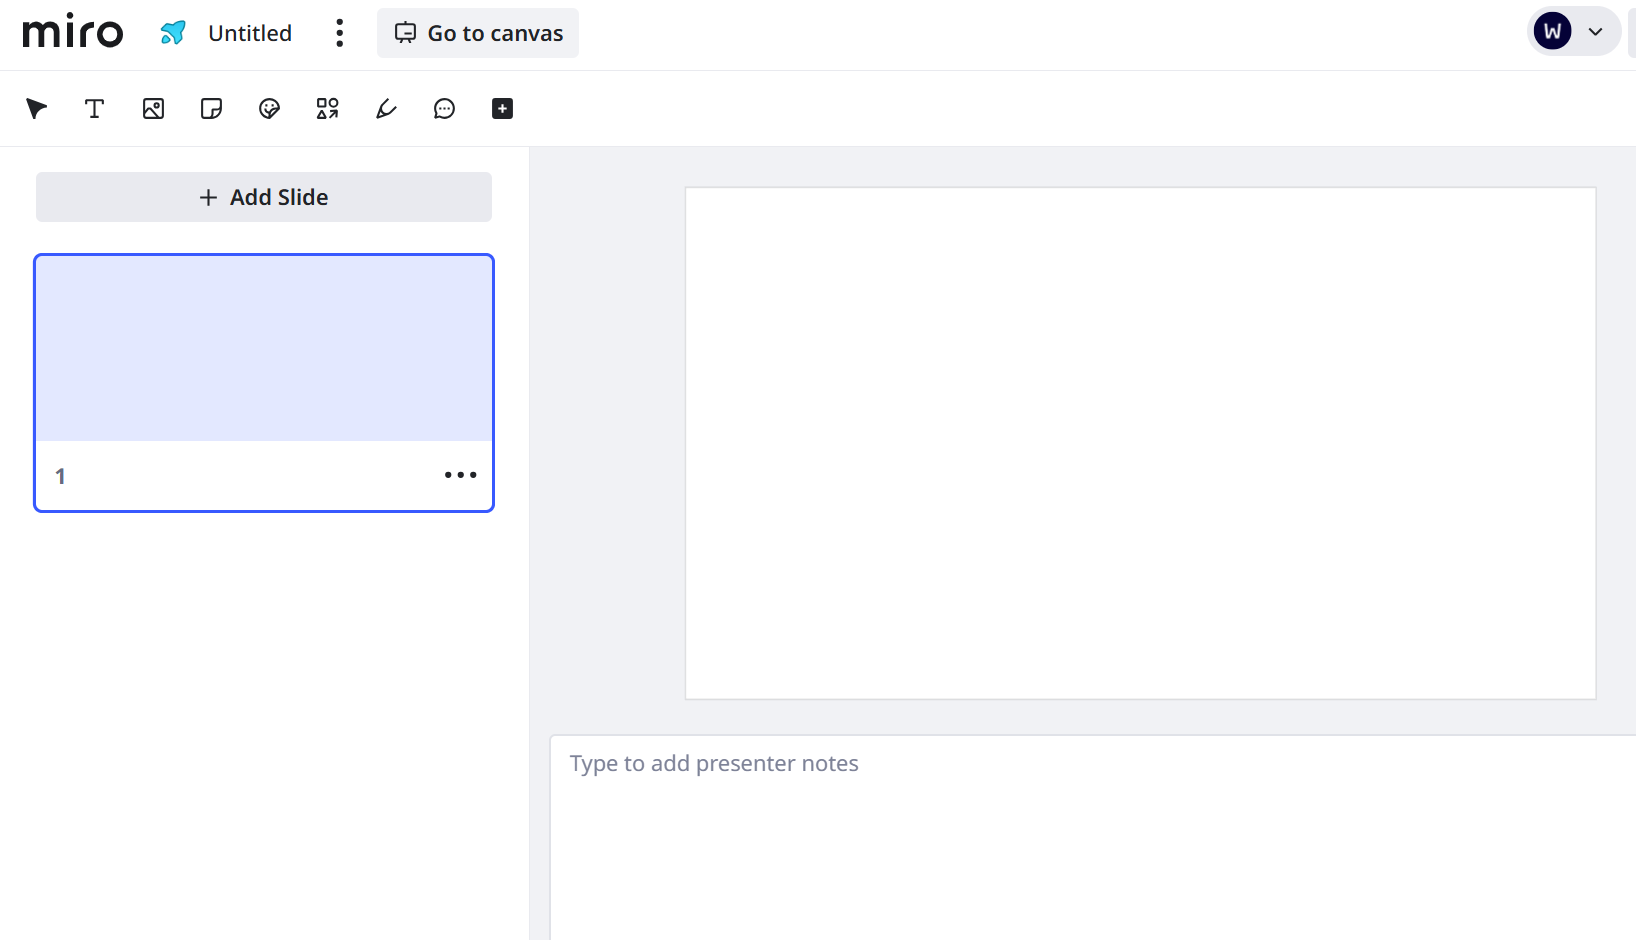
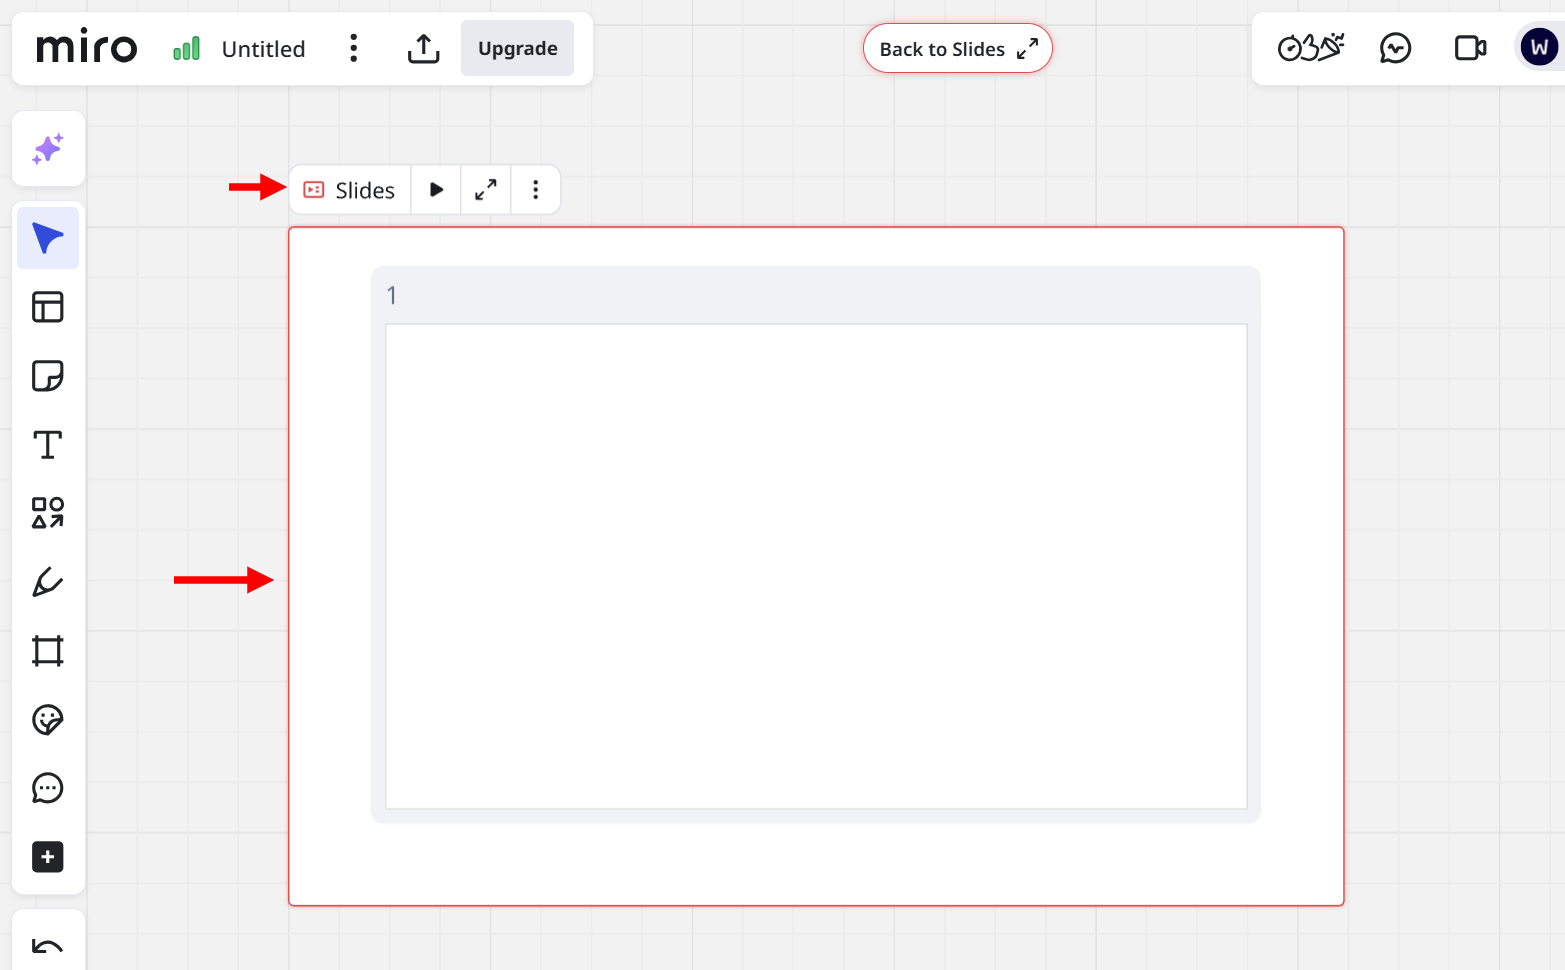
Some slides allow you to present whiteboards, where you can select frames from a board, enable the presentation, add and organize the slides, preview the flow, and start full-screen mode.
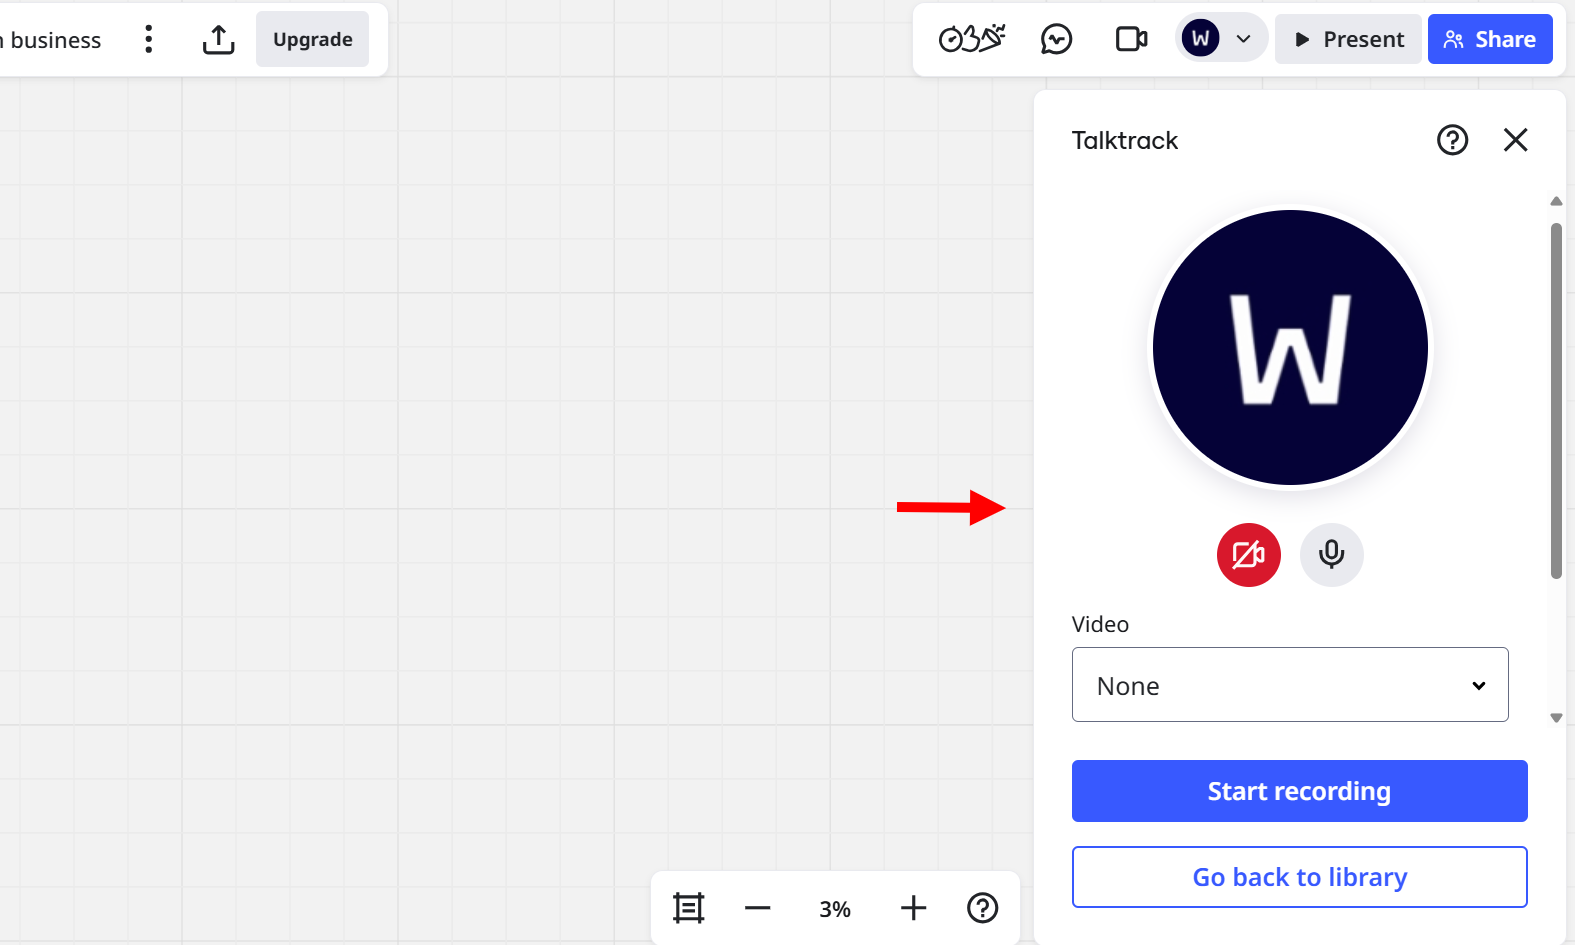
Miro also features TalkTrack, an in-built tool that allows you to record voice and video walkthroughs.
You simply access the talktrack, enable its mic and camera access, navigate the board frame by frame, speak through the content, save the recording, and share the playback link.
The board serves as the core feature for your coaching. This digital board is where you can brainstorm, plan, and collaborate visually in real time with clients.
The board provides a toolbar that contains sticky notes, diagrams, templates, and documents, which you or your clients can add collaboratively to the board during coaching sessions.
Let's dive into this feature as I also teach you how you can prompt Miro's AI to draft a business coaching flowchart diagram right on the board.
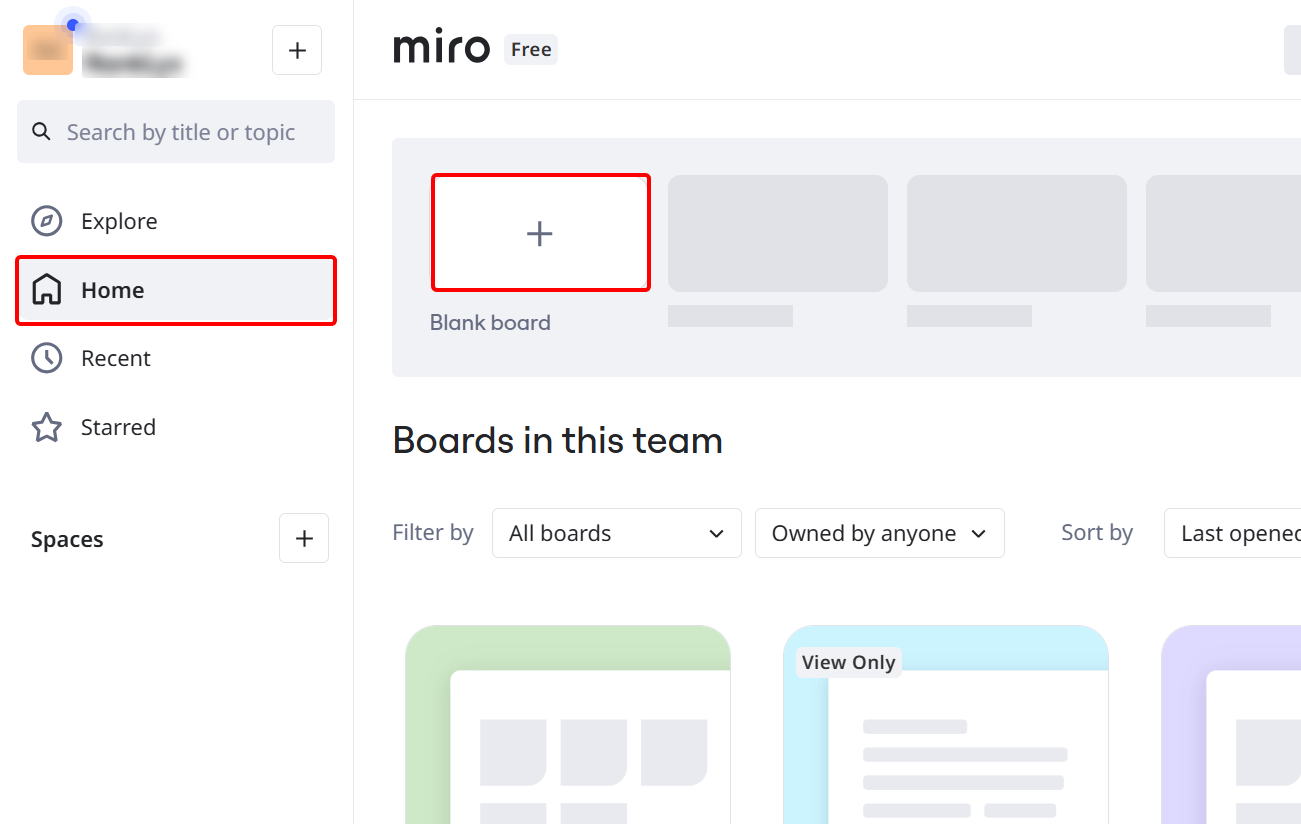
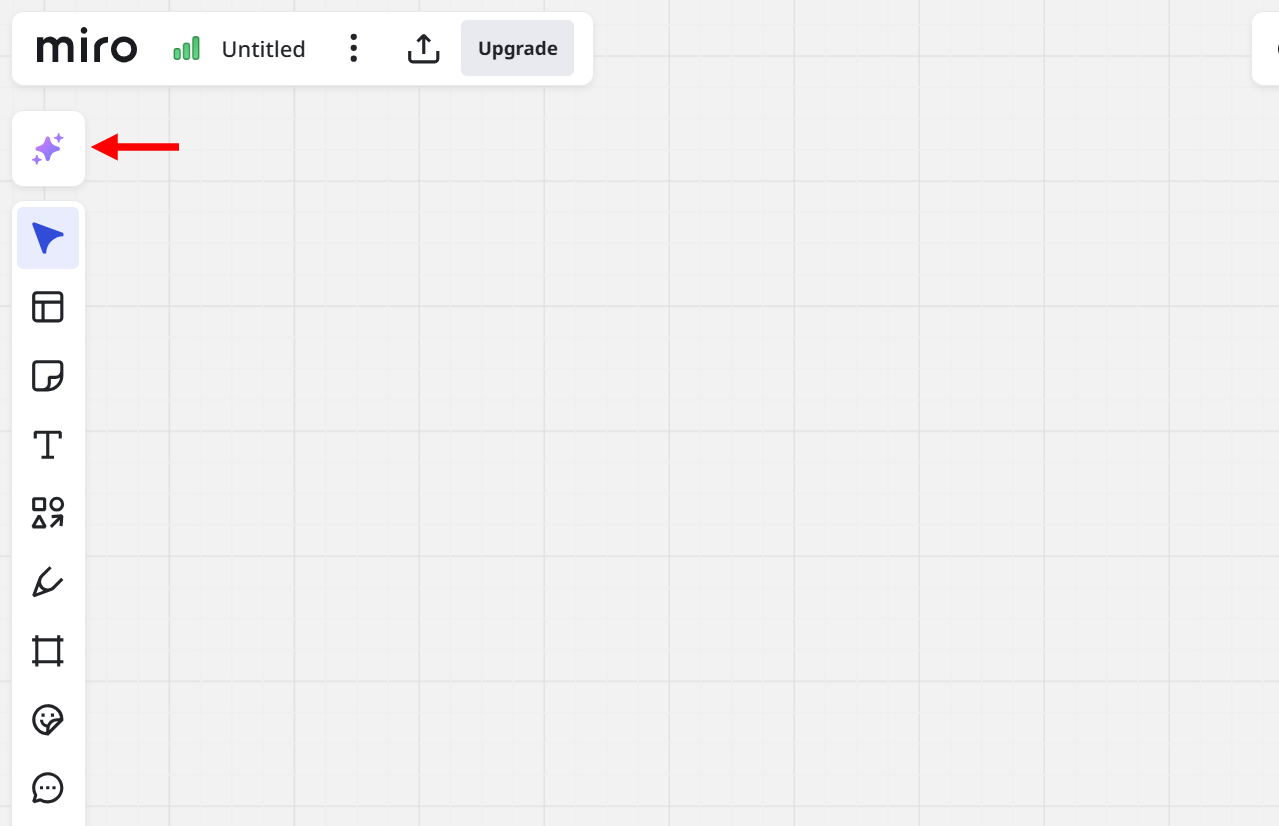
To create a new flowchart, you have to start on a blank board. Access the home dashboard and select the blankboard.
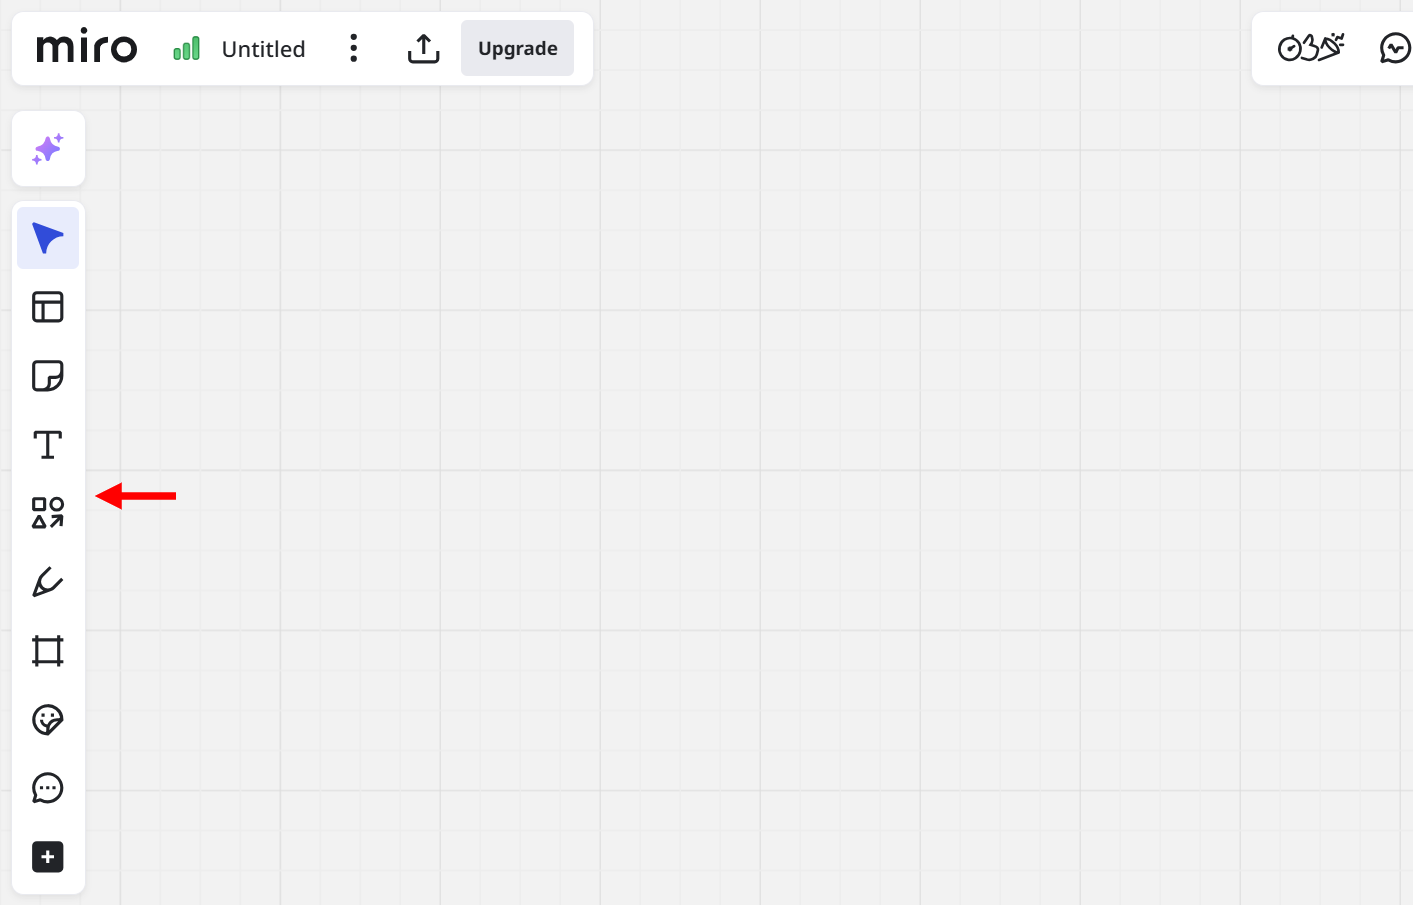
This opens the blank whiteboard, which you can start building your flow with the elements on the toolbar. These elements include sticky notes, text, shapes, stickers, comments, and frames.
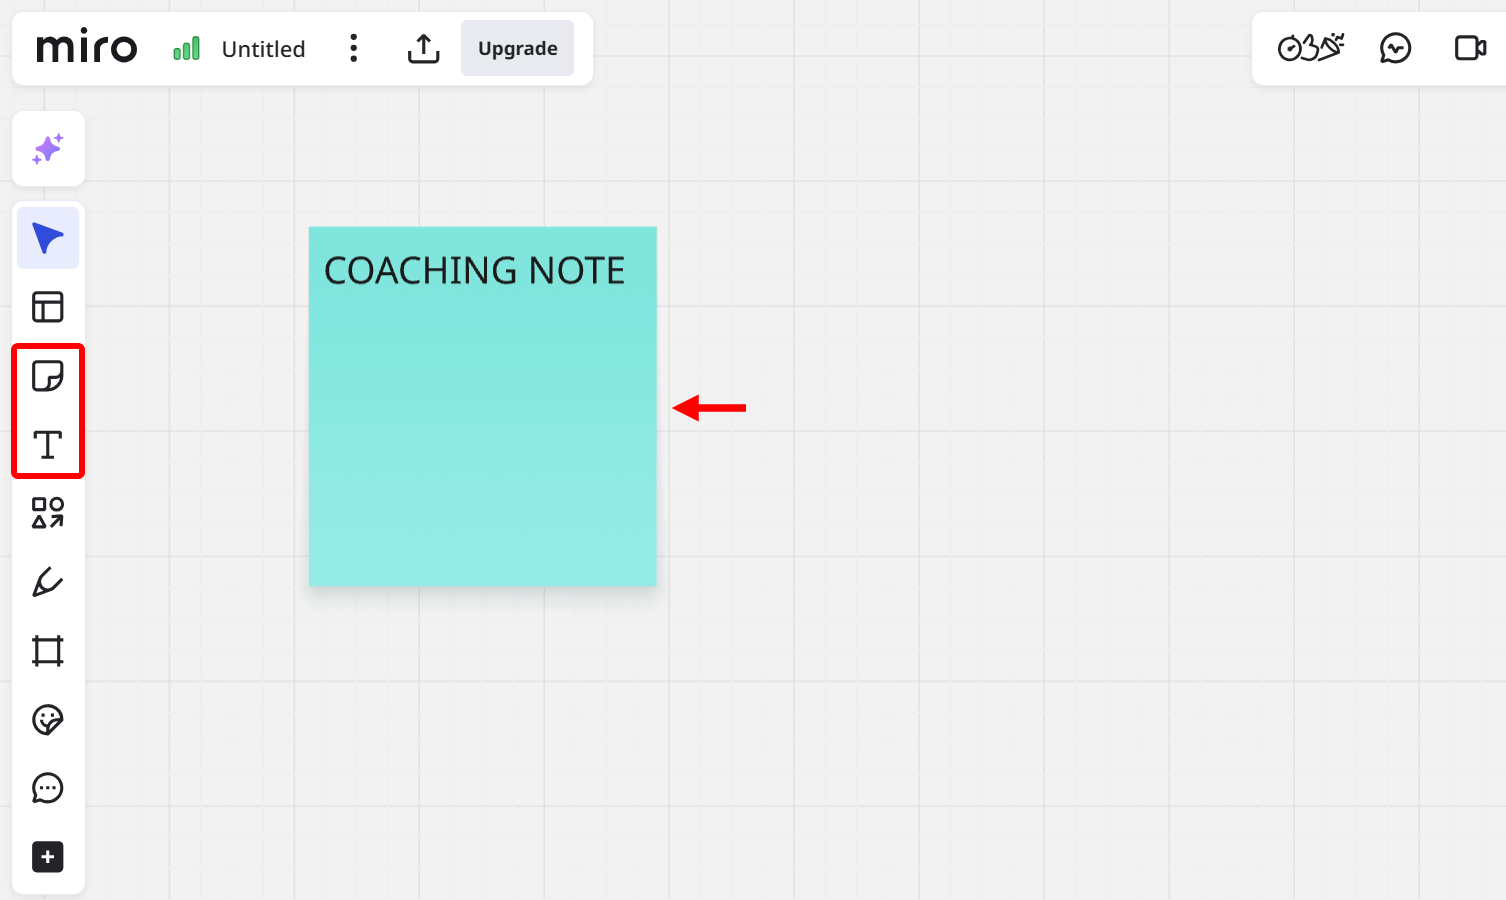
For instance, you can select the sticky note, choose its color, add it to the board, and then add a text element to it, as demonstrated.
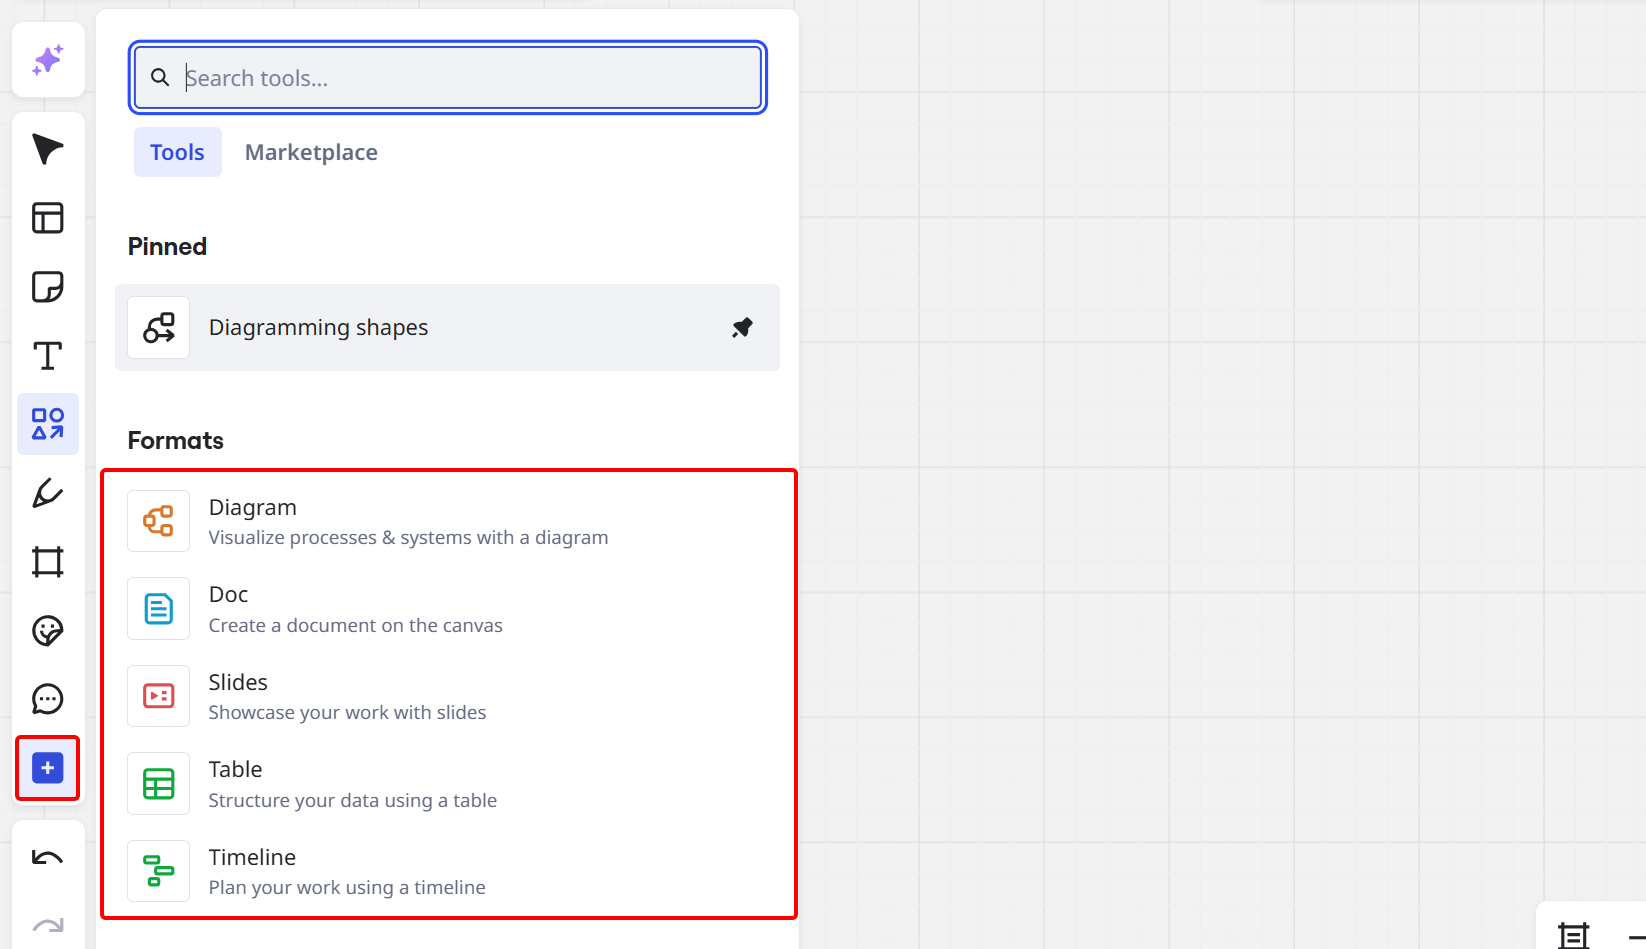
There is also a more expandable tools section which contains diagrams, documents, tables, and a timeline you can add to the whiteboard content.
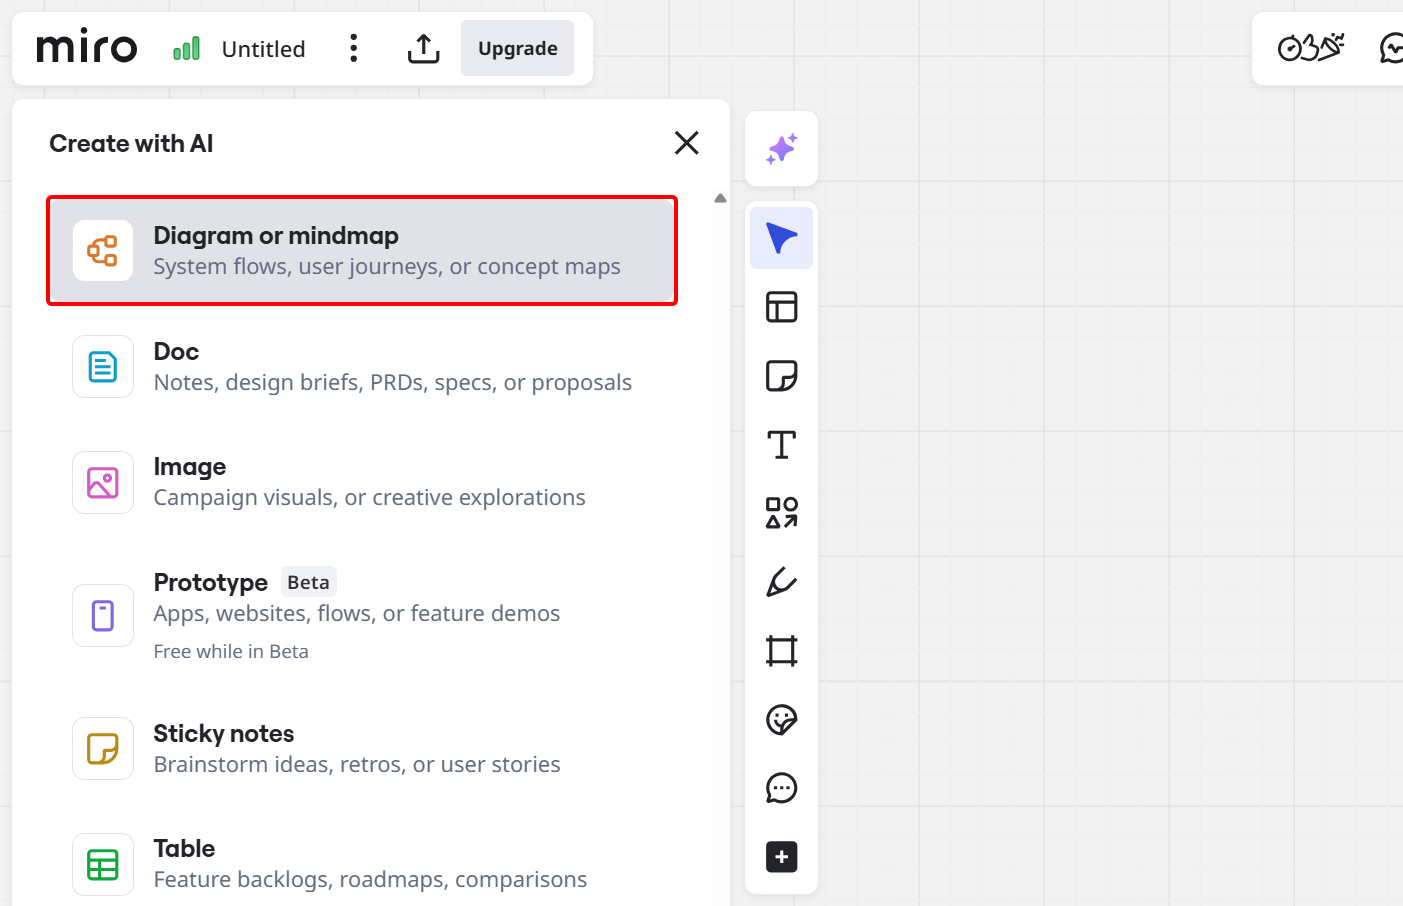
Alternatively, you can select Miro's AI to prompt it to create your coaching content on the board.
Let us prompt it to create a flowchart diagram.
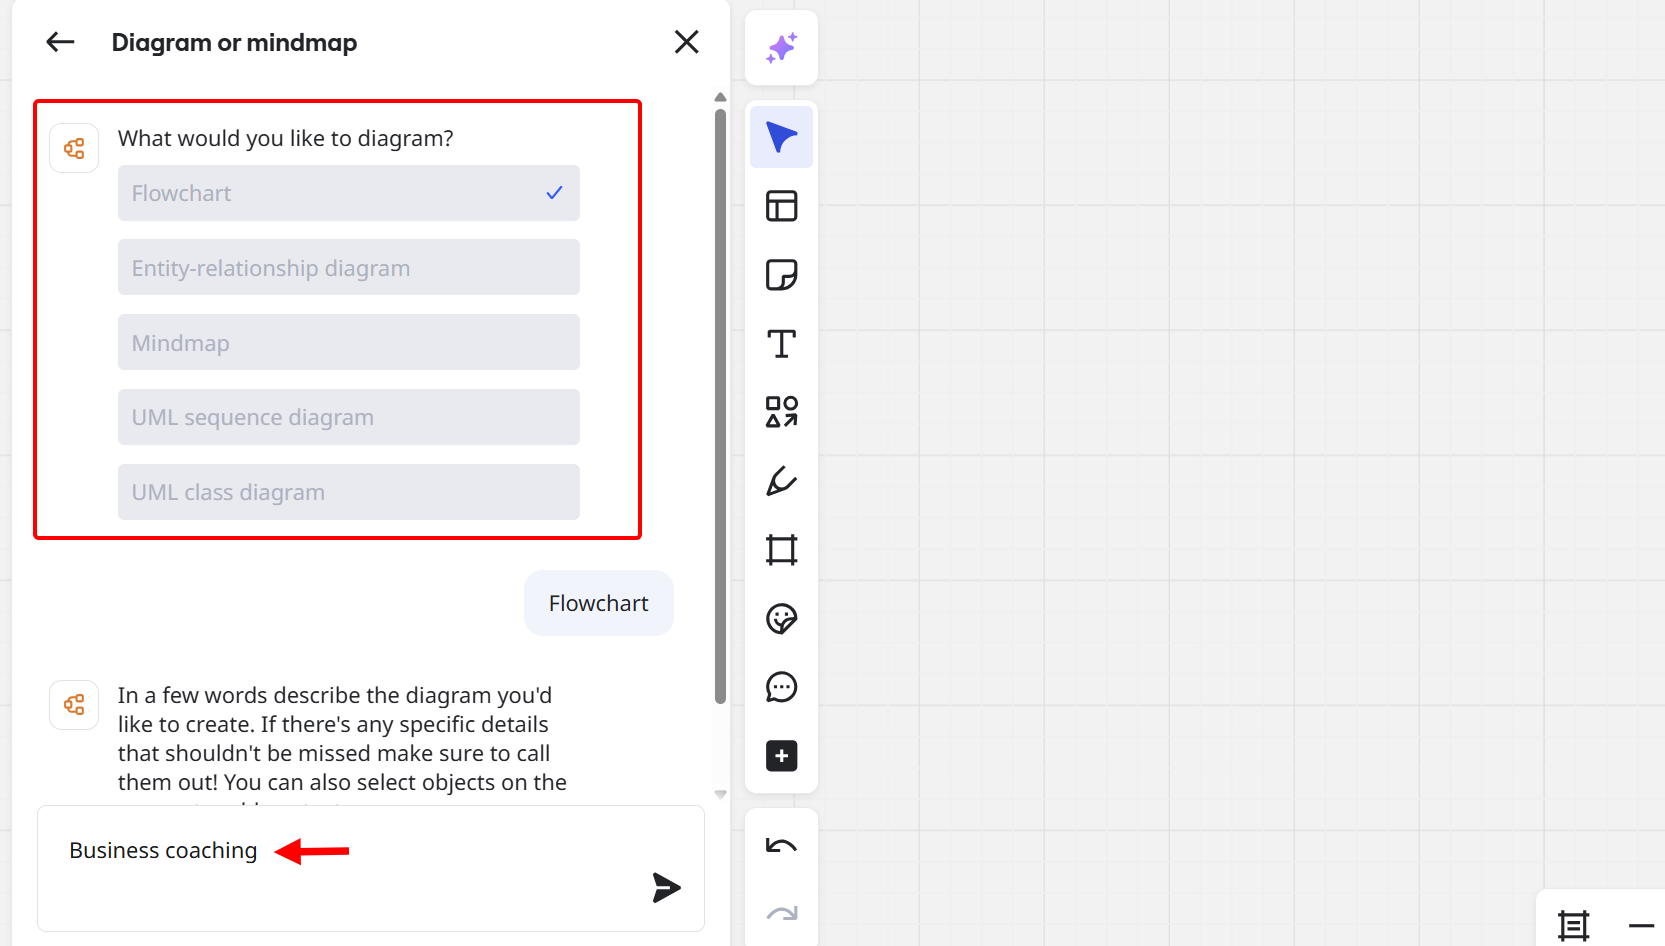
On the AI prompt options, you can let it create a document, image, table, and many more. Here, you should select the diagram type.
In the diagram options, you select the flowchart type, prompt it, and add your prompt for the AI to generate.
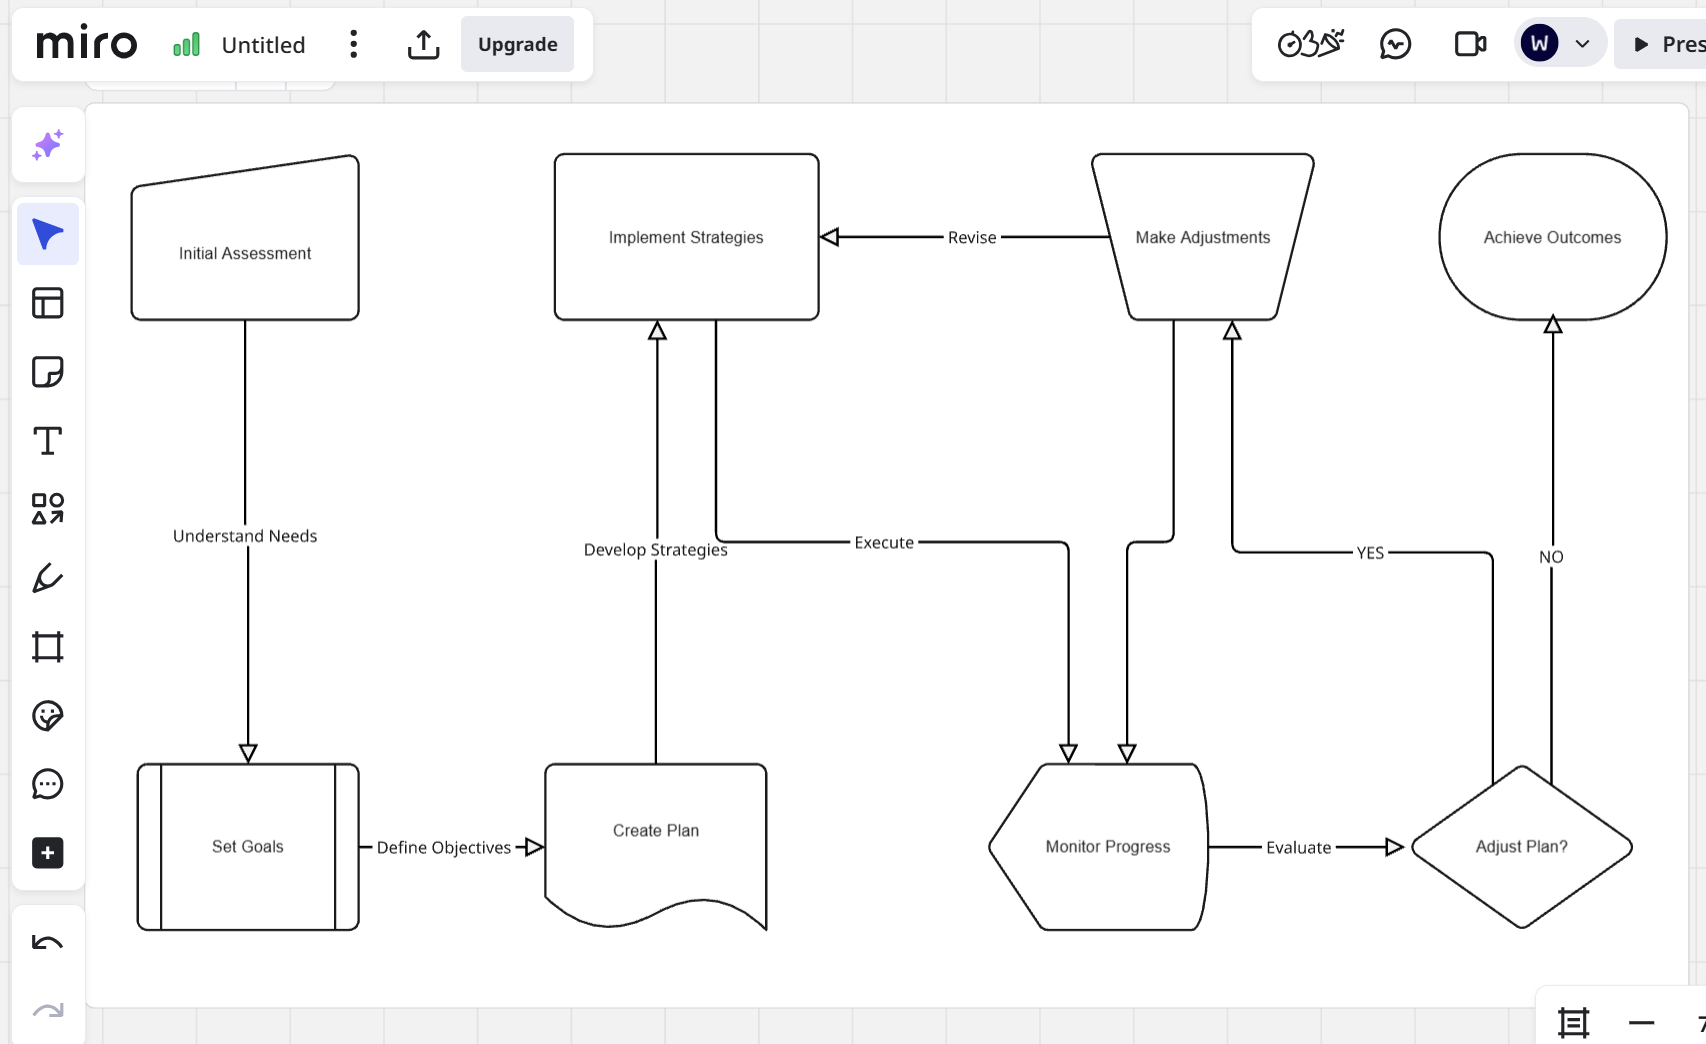
In this section, let's prompt to create a flowchart for business coaching and see what happens.
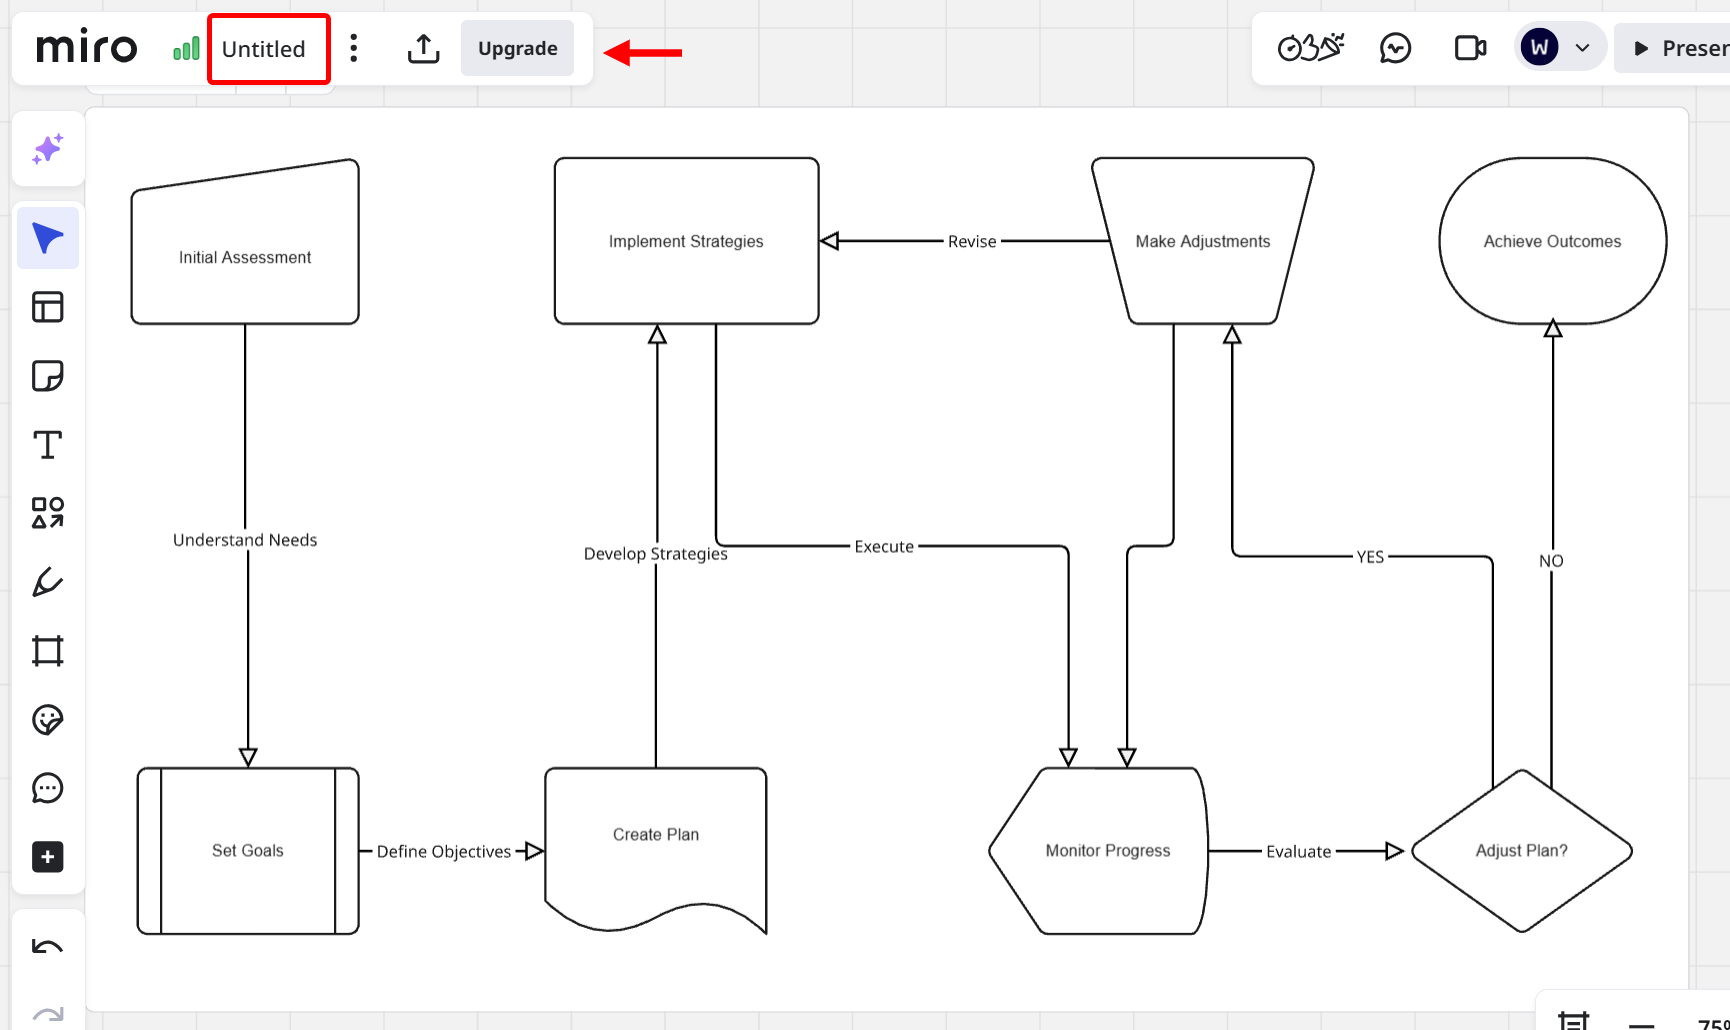
As demonstrated, the AI creates your workflow based on your prompt, like this business coaching workflow.
You can modify the workflow or enhance it, saving you time and effort.
To wrap it up, select the title on the titlebar to rename your workflow.
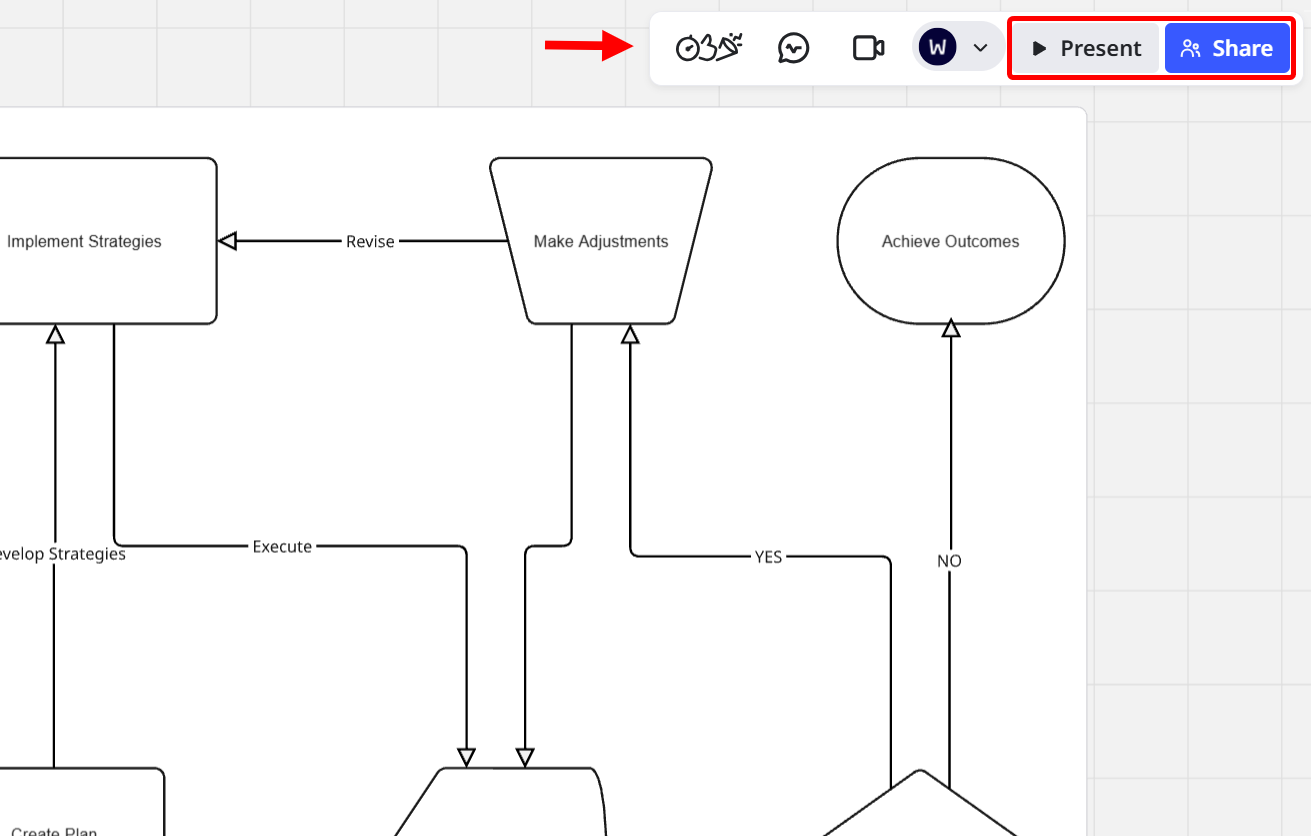
Next, select the share button to make the board available to your clients in real-time or to present it.
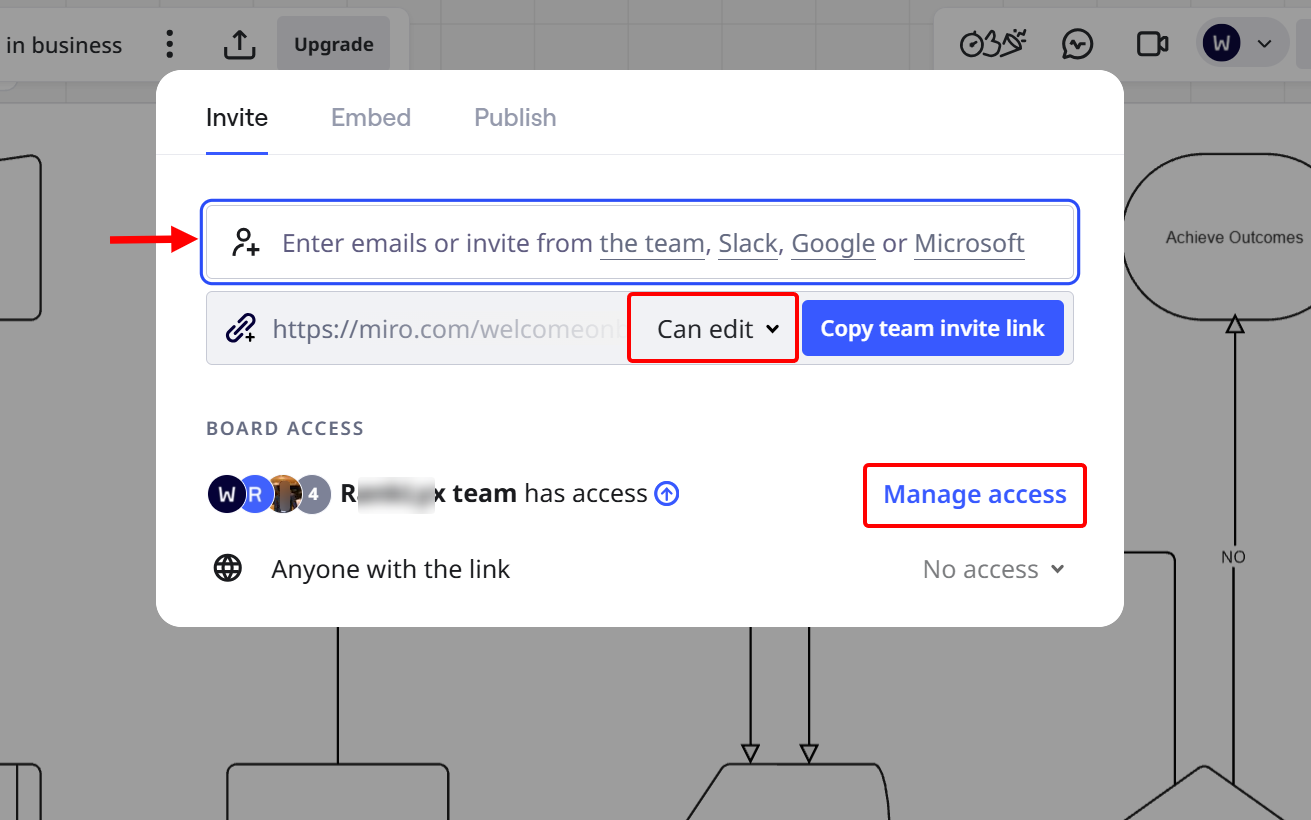
This brings up the share option, where you make the board available to clients by entering their email addresses, setting their level of access, and choosing who can access it.
Key Features
1. Document
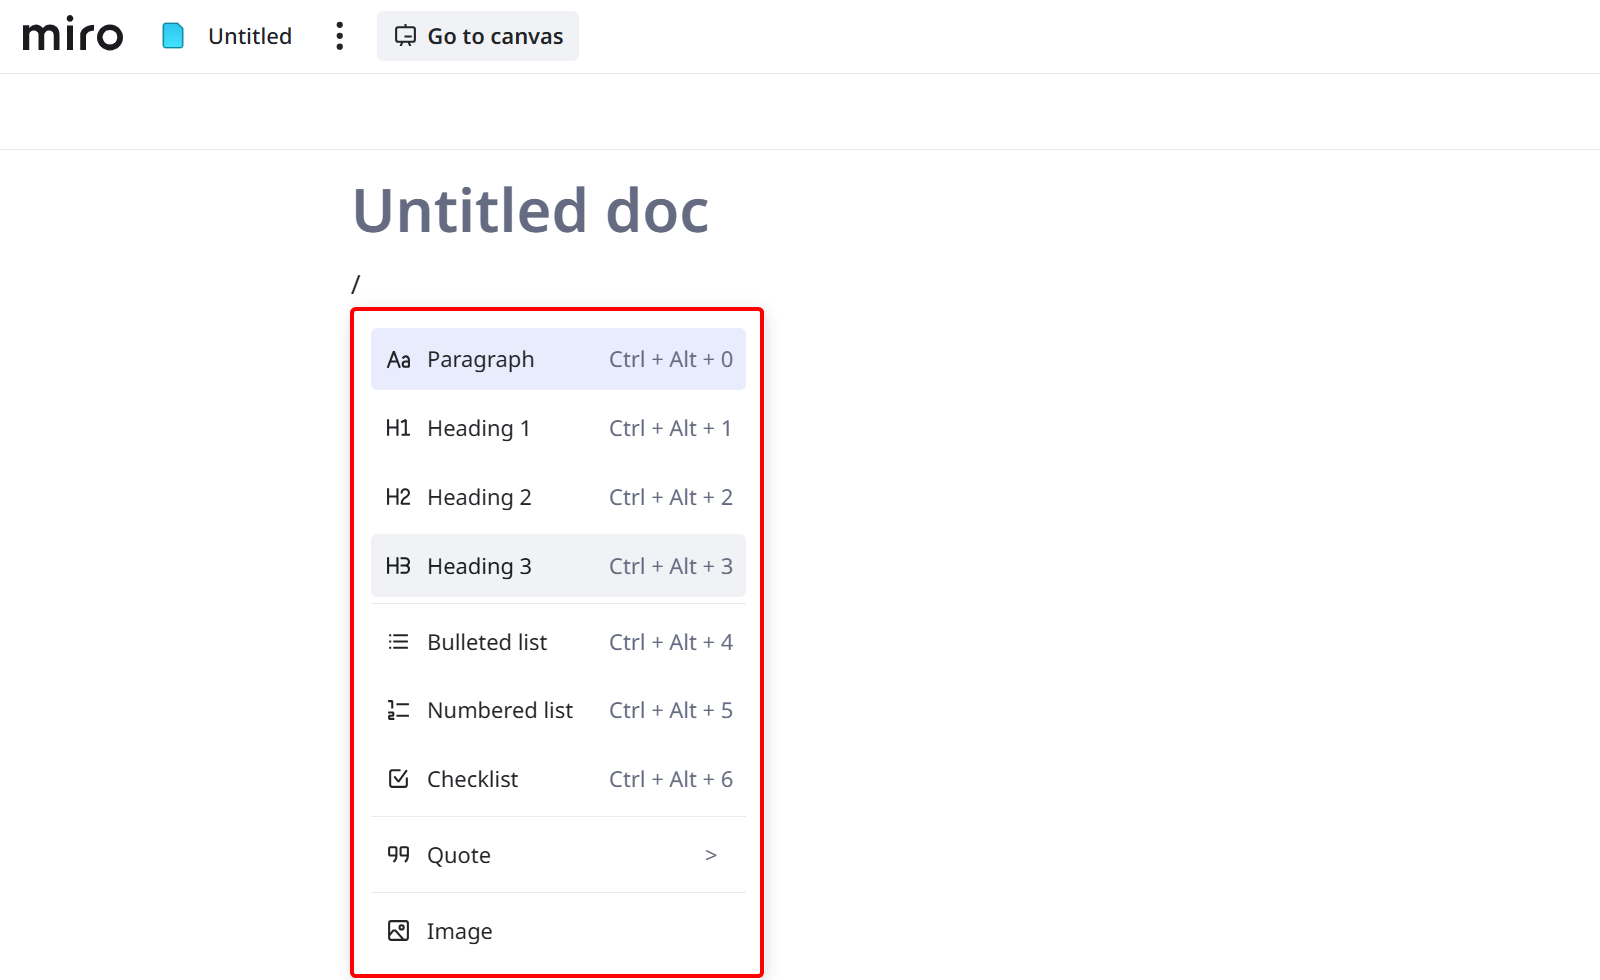
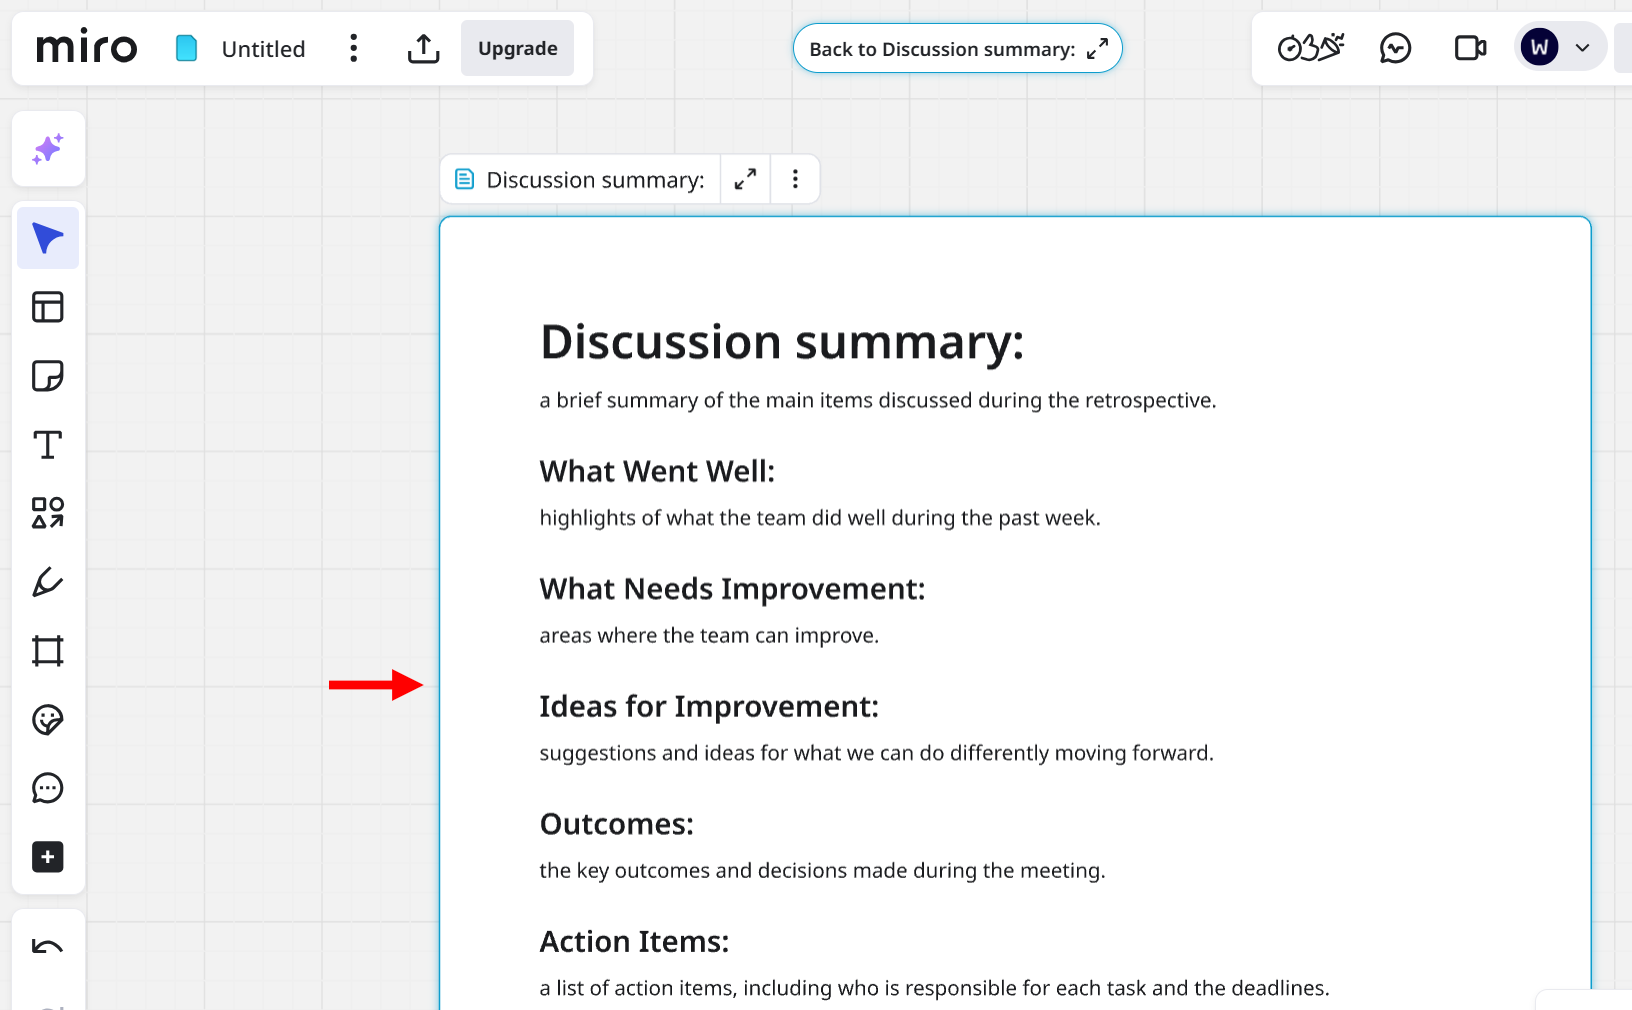
The document feature allows you to create and share text-based documents with clients directly within your workspace.
It combines writing, note-taking, and collaboration. This allows you to draft session outlines, record client insights, or document action plans.
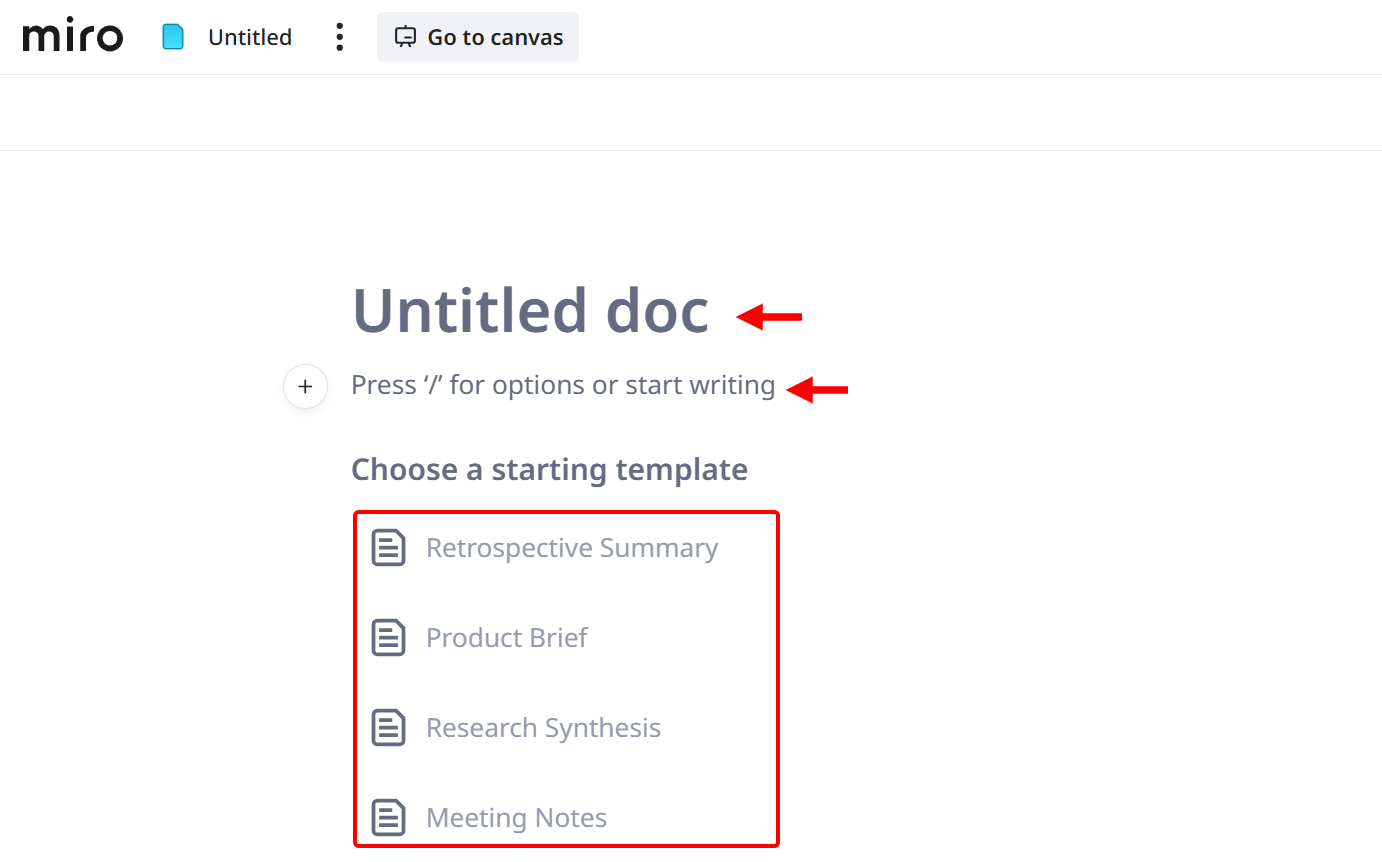
When creating a document, provide a title and draft its content. The document also provides templates, such as a product briefing, meeting notes, and research synthesis, to get started.
In the documents, you can add supplementary elements, such as headers, checklists, images, lists, and quotes, to your content.
After creating the document and its content, you can also add it to your board to keep visuals and written content connected.
2. Slides
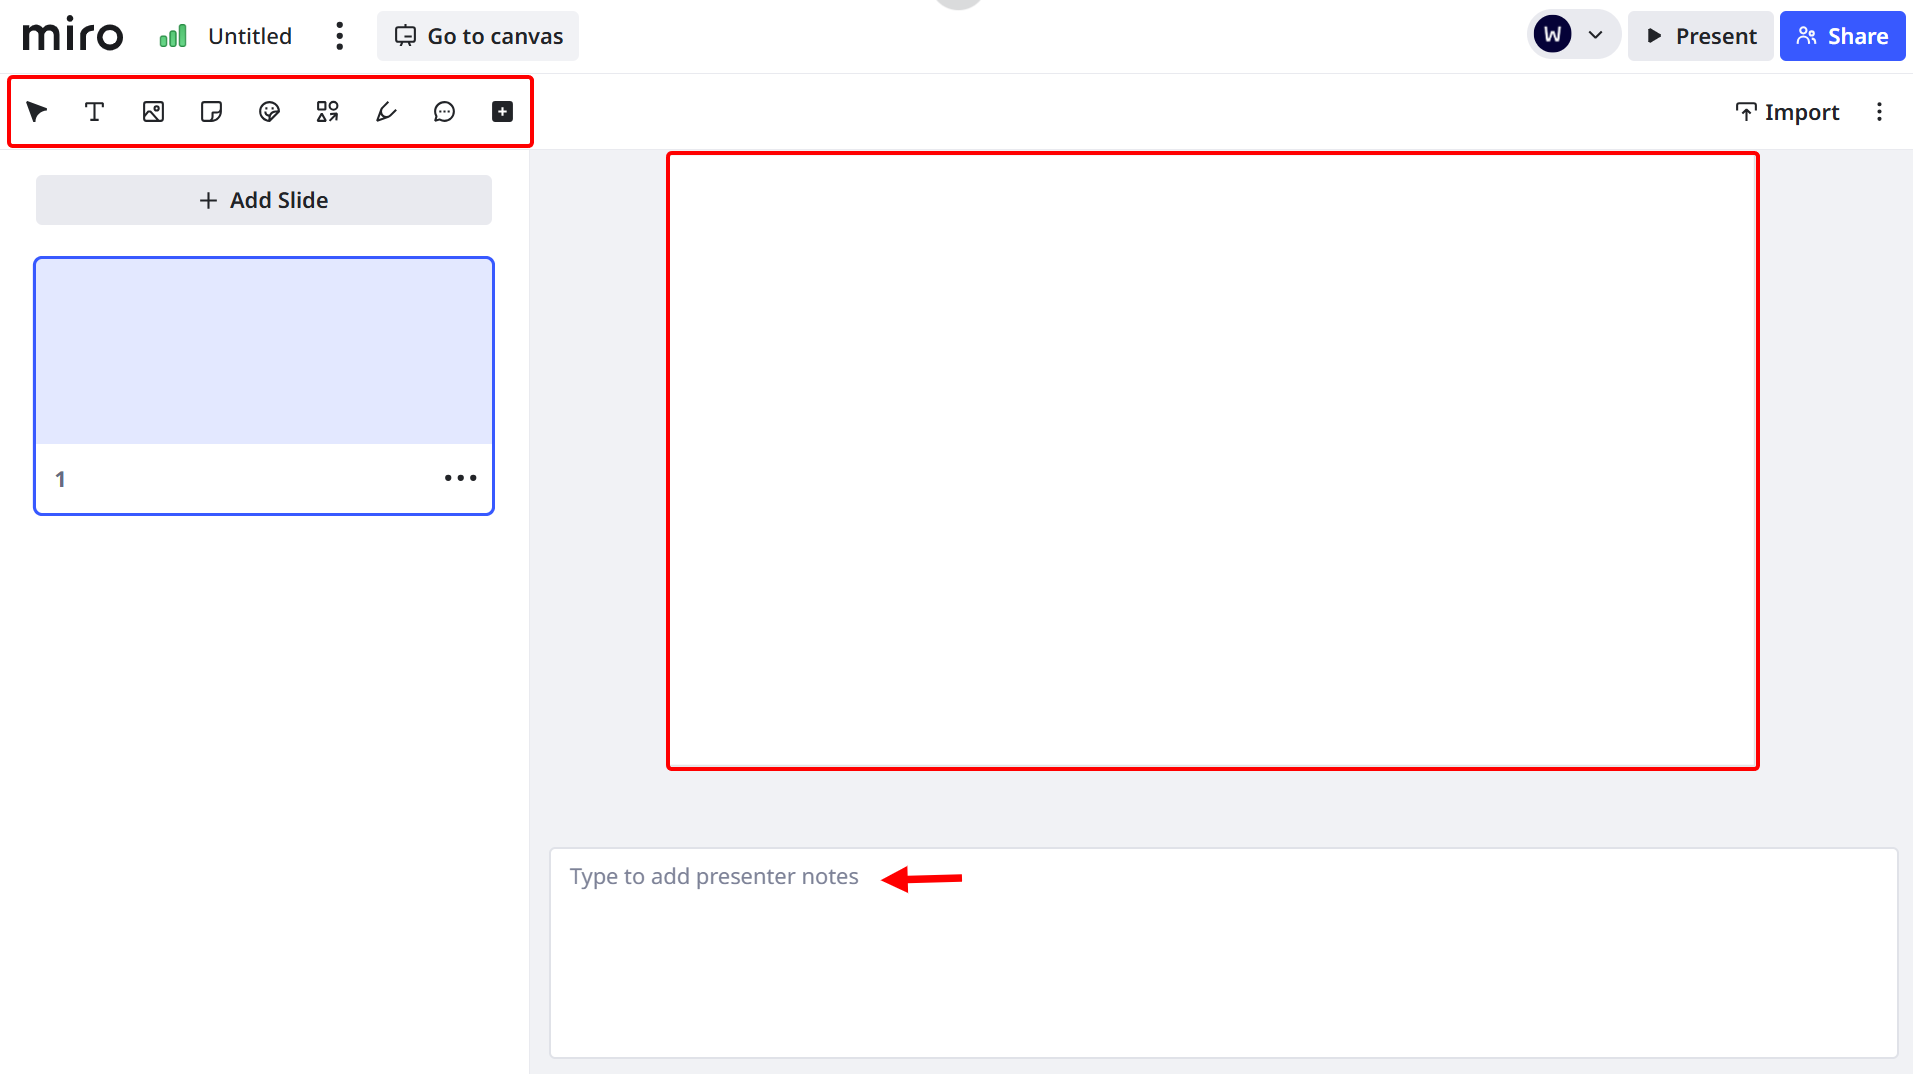
The slides feature lets you turn your board into structured presentations without leaving the platform.
You can choose the slides' frame and organise them into a precise flow to present strategies, client progress, or program roadmaps directly to their clients.
When setting it up, you add elements like text, images, sticky notes, and shapes to each slide to create content. There's the option to add more slides. The text area below lets you add presentation notes to each slide.
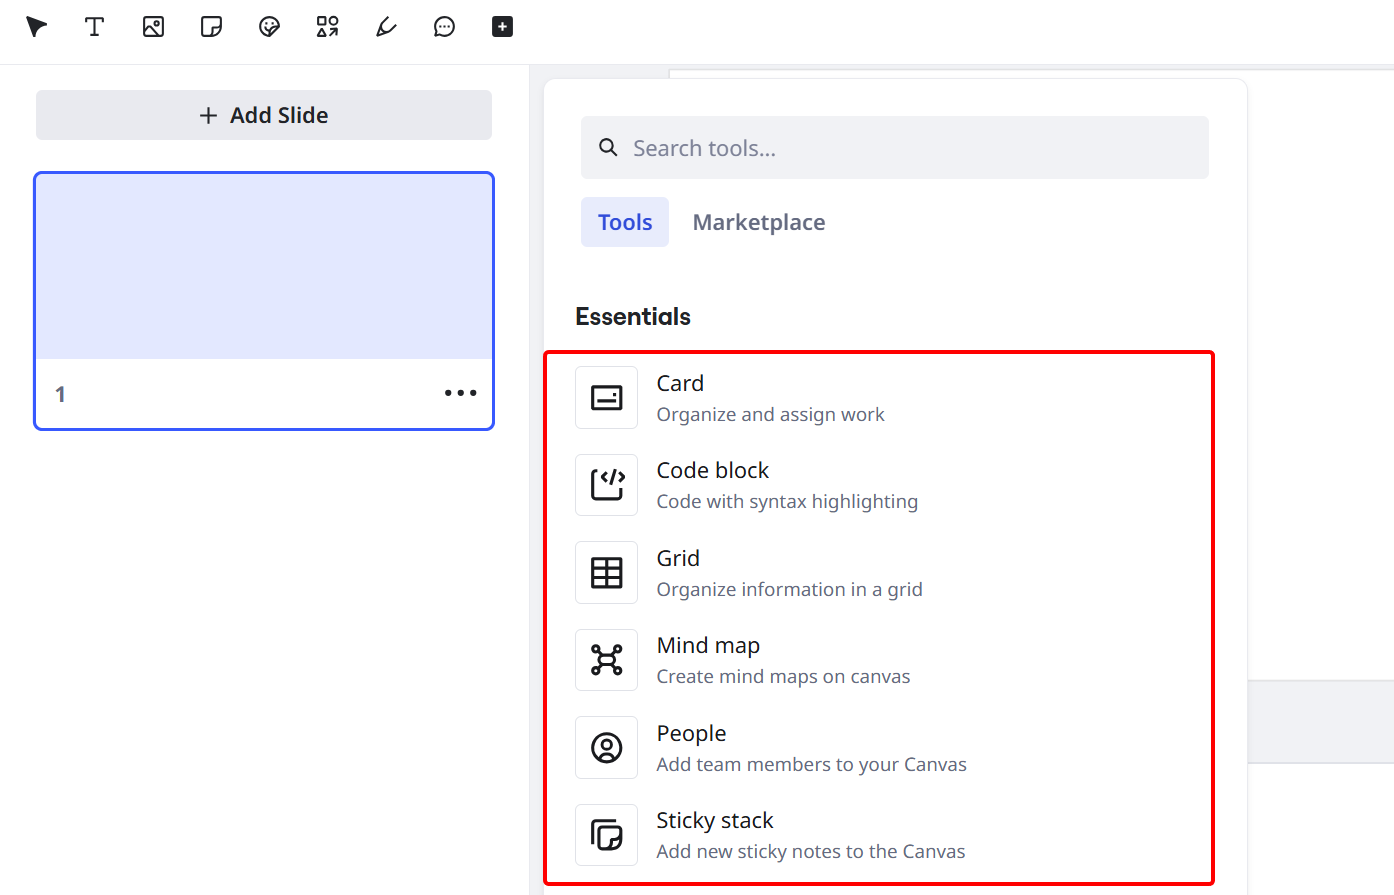
You are not limited to just elements; Miro provides tools like cards, code blocks, a grid, and a mind map to add to each slide for enhanced content.
Similar to the document feature, you can add the slides you created to your board to keep visuals and presentation content connected.
Best For
Business coaches who seek to visualize client goals and session structures on a collaborative whiteboard.
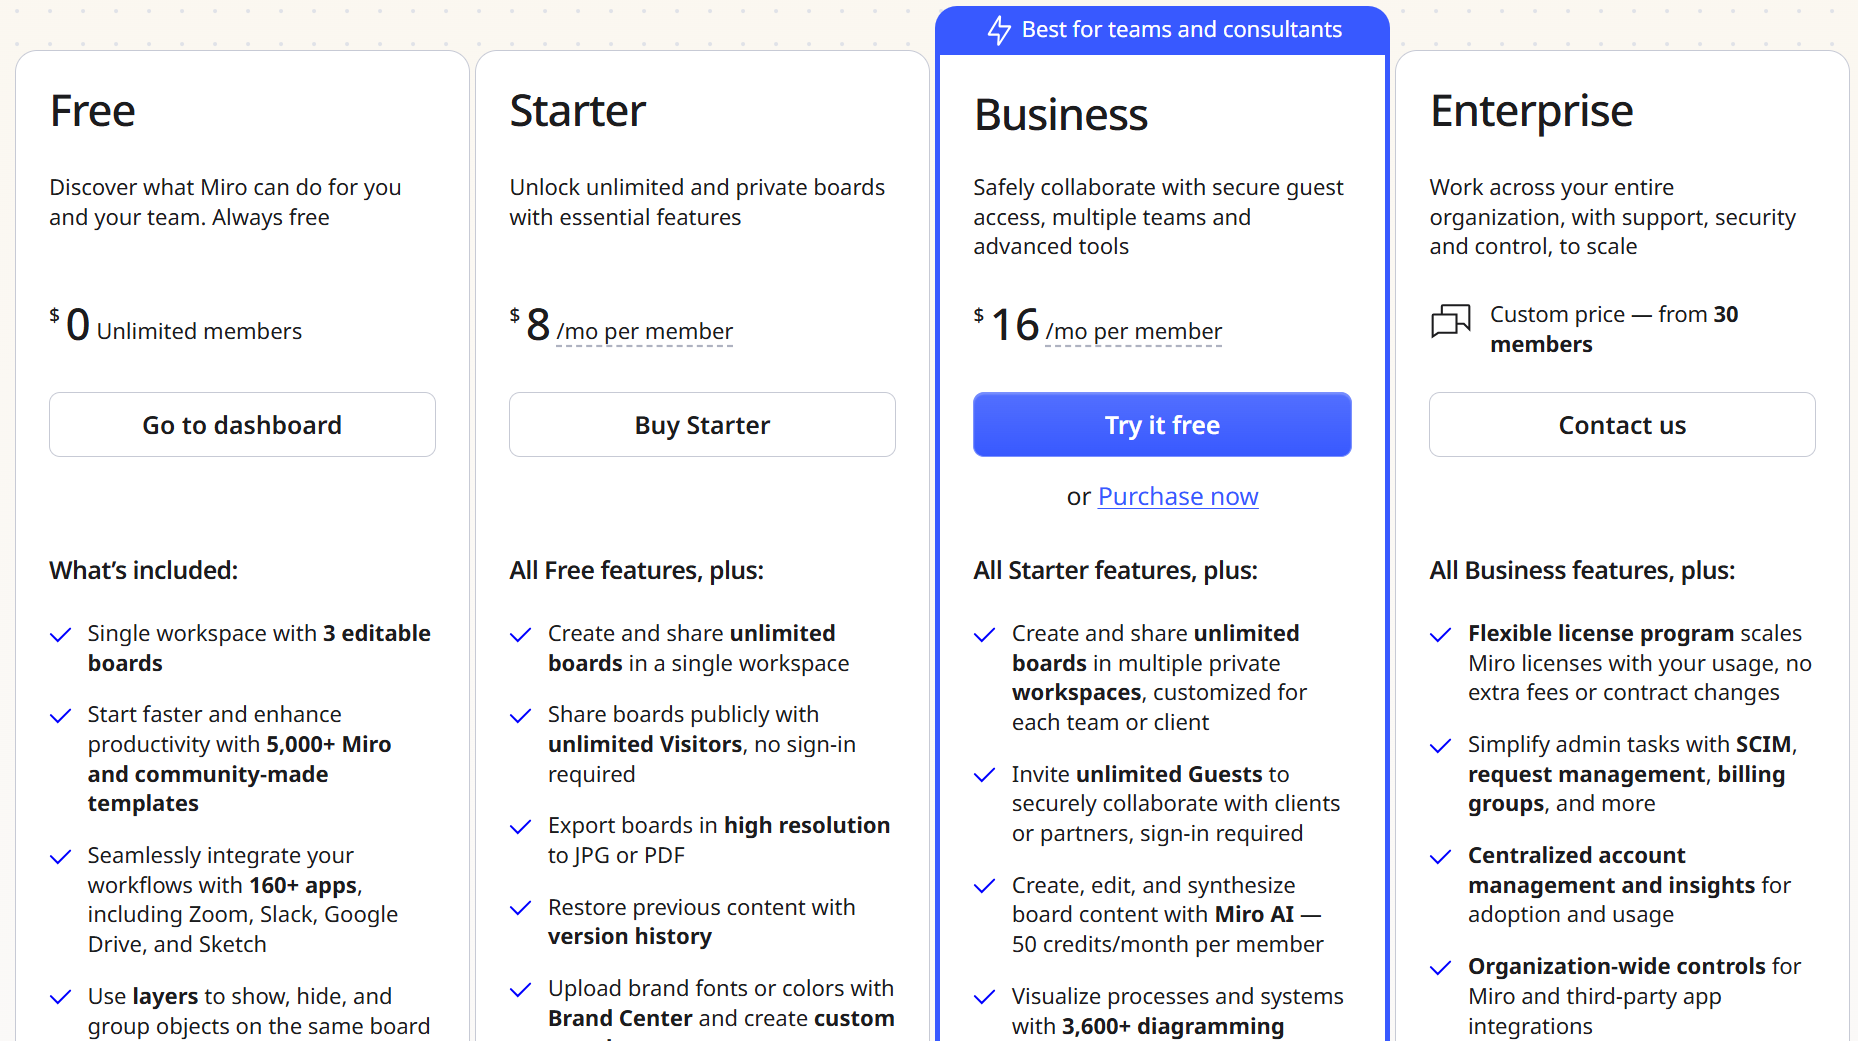
Pricing
- Free plan - Free/ monthly package [per user]
- Starter - $8/ monthly package [per user]
- Business - $16/ monthly package [per user]
- Enterprise - Custom pricing
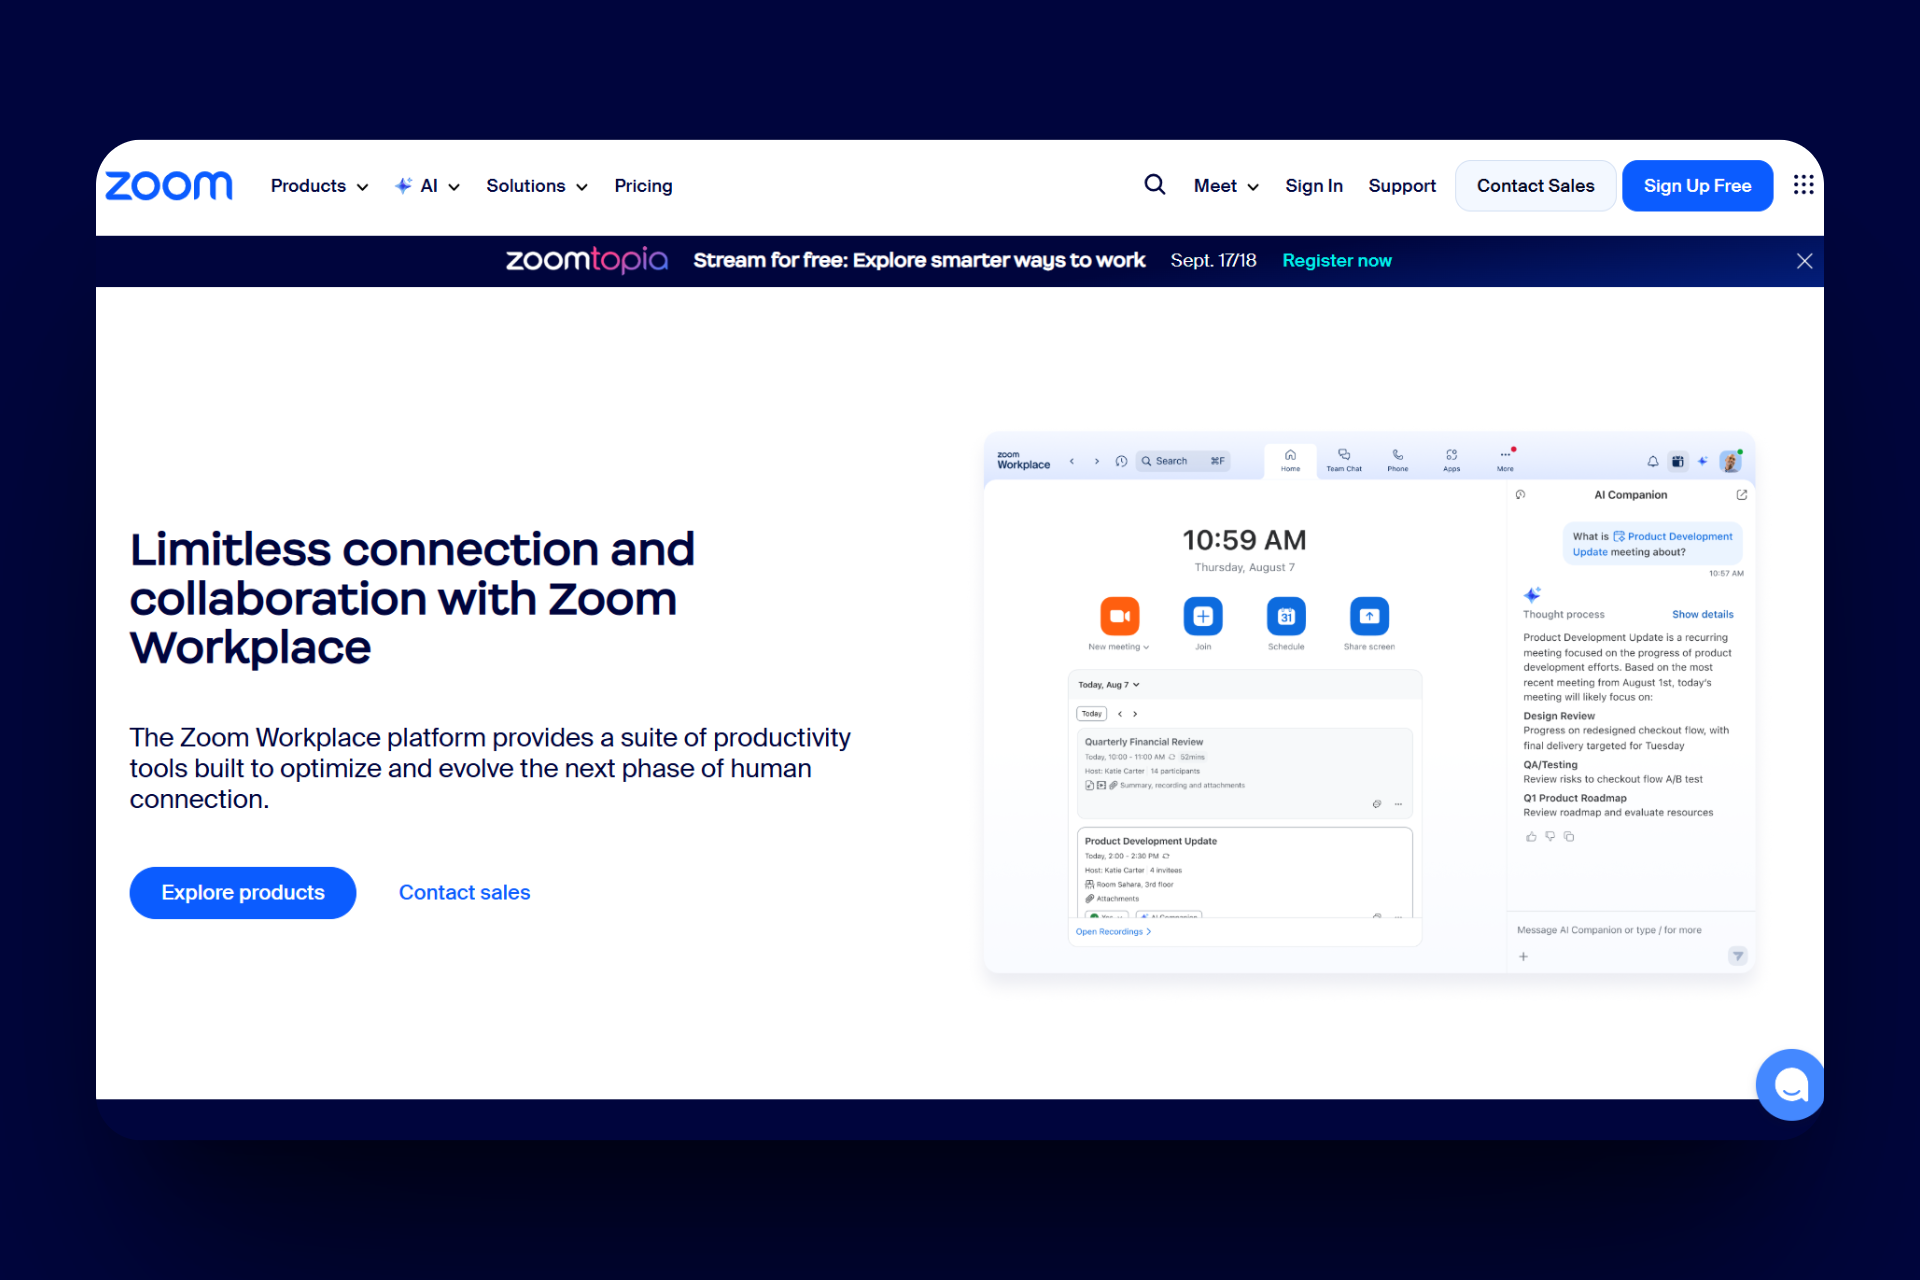
7. Zoom
Last on the list of online coaching platforms is Zoom, a video communication platform you can use to run live coaching sessions.
Zoom's Meetings enable you to create and run live sessions.
To do this, select a schedule, enter the title and description, set the time and duration, make it private or general, add invitees, and enable whiteboards if you please.
You can then copy the invite link before launching the meeting from the dashboard.
This tool also features Hubs, a space where you organise past recordings and sessions. Here, choose a workspace, name the folder, describe it, upload or assign recordings from past meetings, and set access levels for clients or team members.
Zoom also provides a whiteboard feature you can use to create diagrams, brainstorm, or create coaching ideas.
You start a new whiteboard, choose a blank or template layout, draw shapes, add text or sticky notes, invite collaborators, and save it inside the workspace.
And finally, there is a tasks feature that allows you to create to-do lists and assign follow-ups.
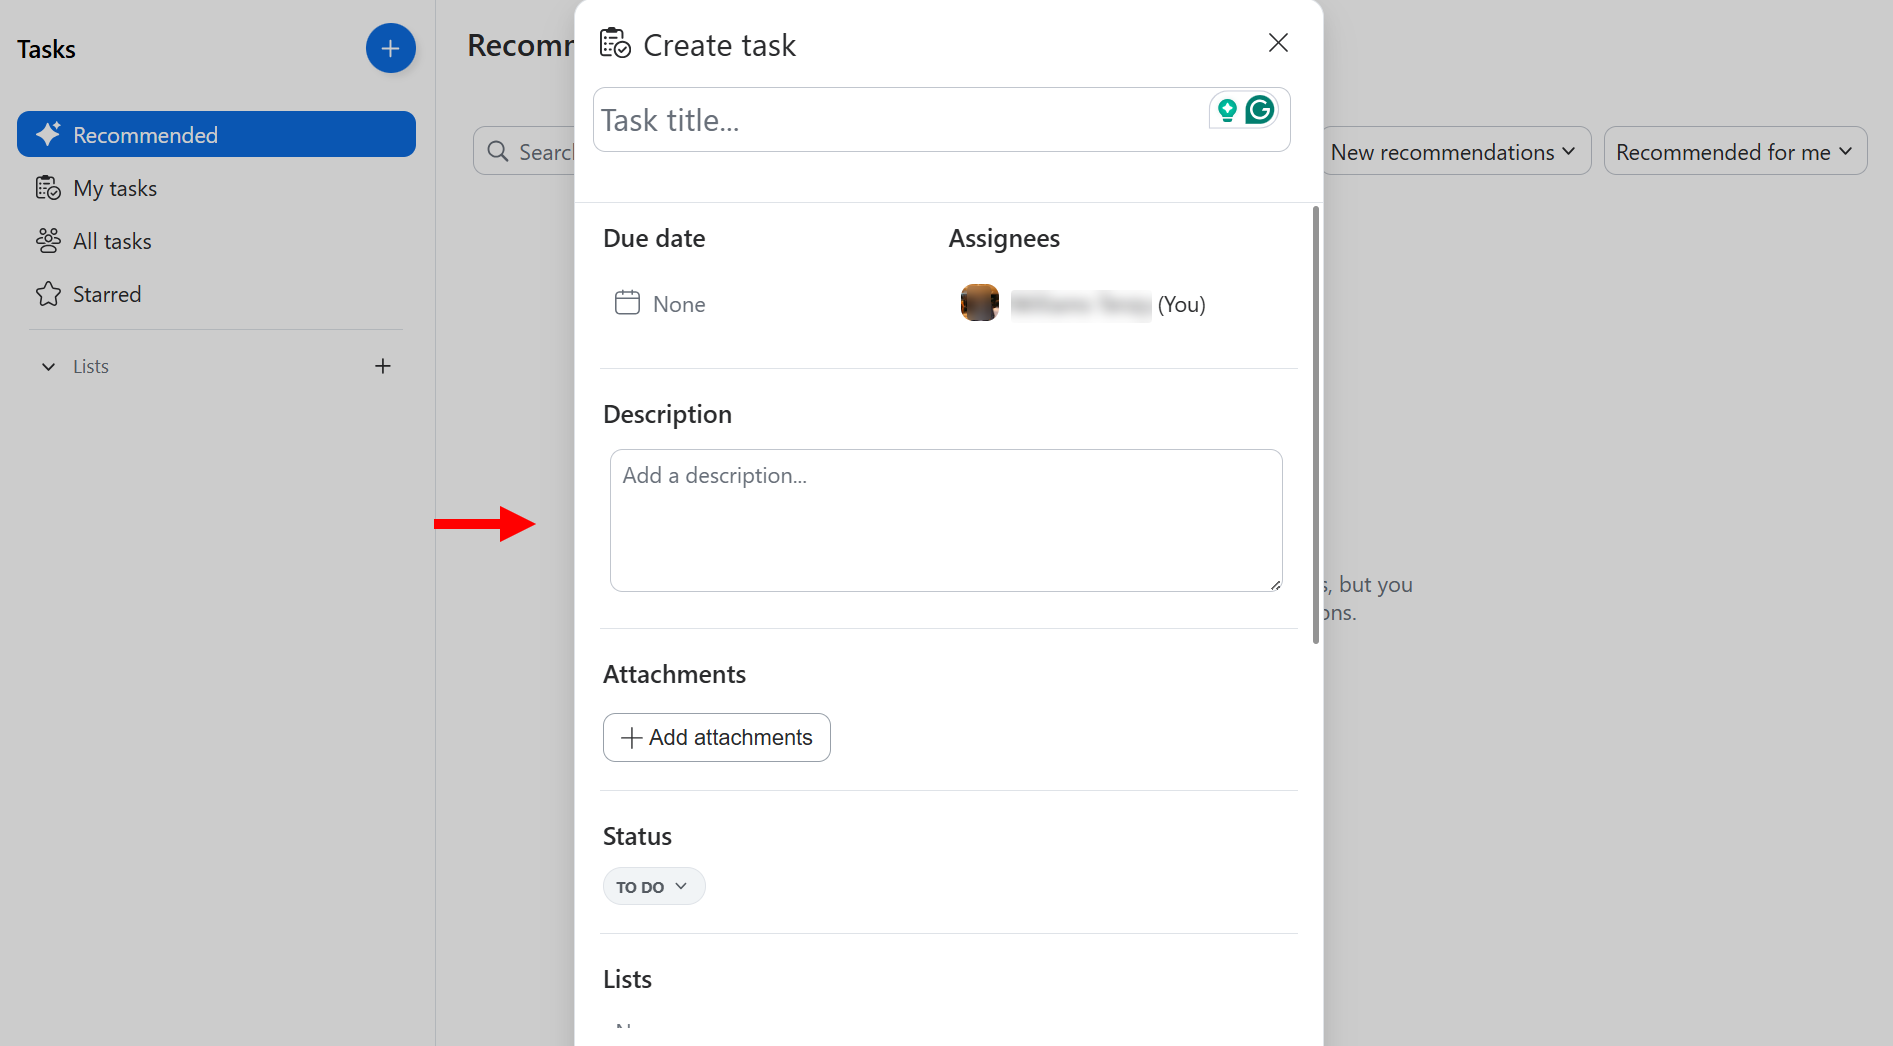
To do this, you access the tasks tab, add a new task with a title and due date, set the status, attach files, assign it to team members, link it to a meeting, and add sub-steps.
Zoom is designed for live conferences, which makes the meetings feature the best for your coaching. This allows you to host real-time sessions with individual clients or groups.
You can use it to start interactive coaching calls, share screens, change backgrounds, use breakout rooms, and engage clients with chat and recording options.
Let me show you how to set up a meeting with this feature.
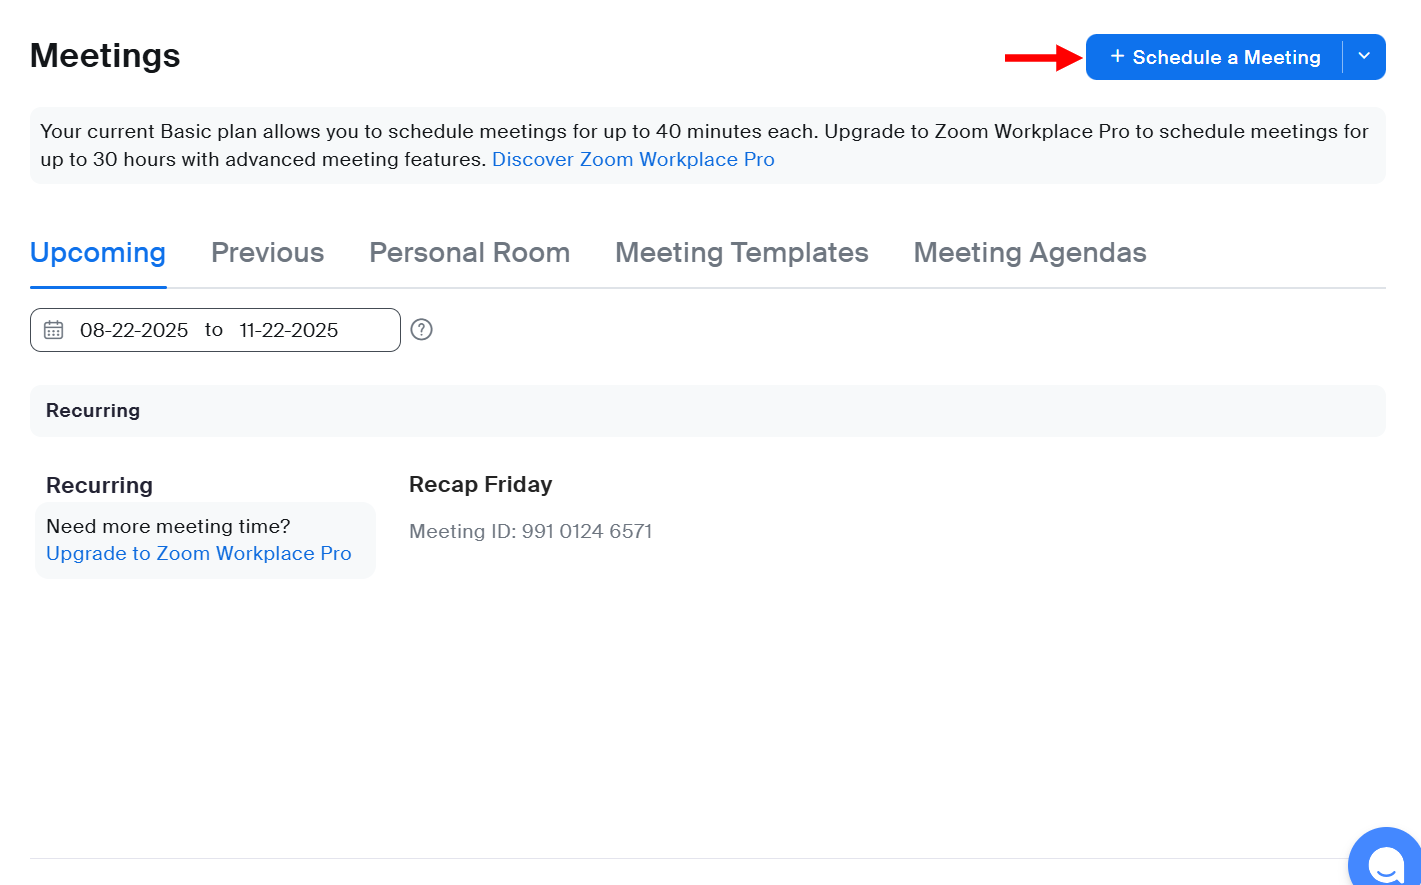
First, select the Meetings feature to access its section.
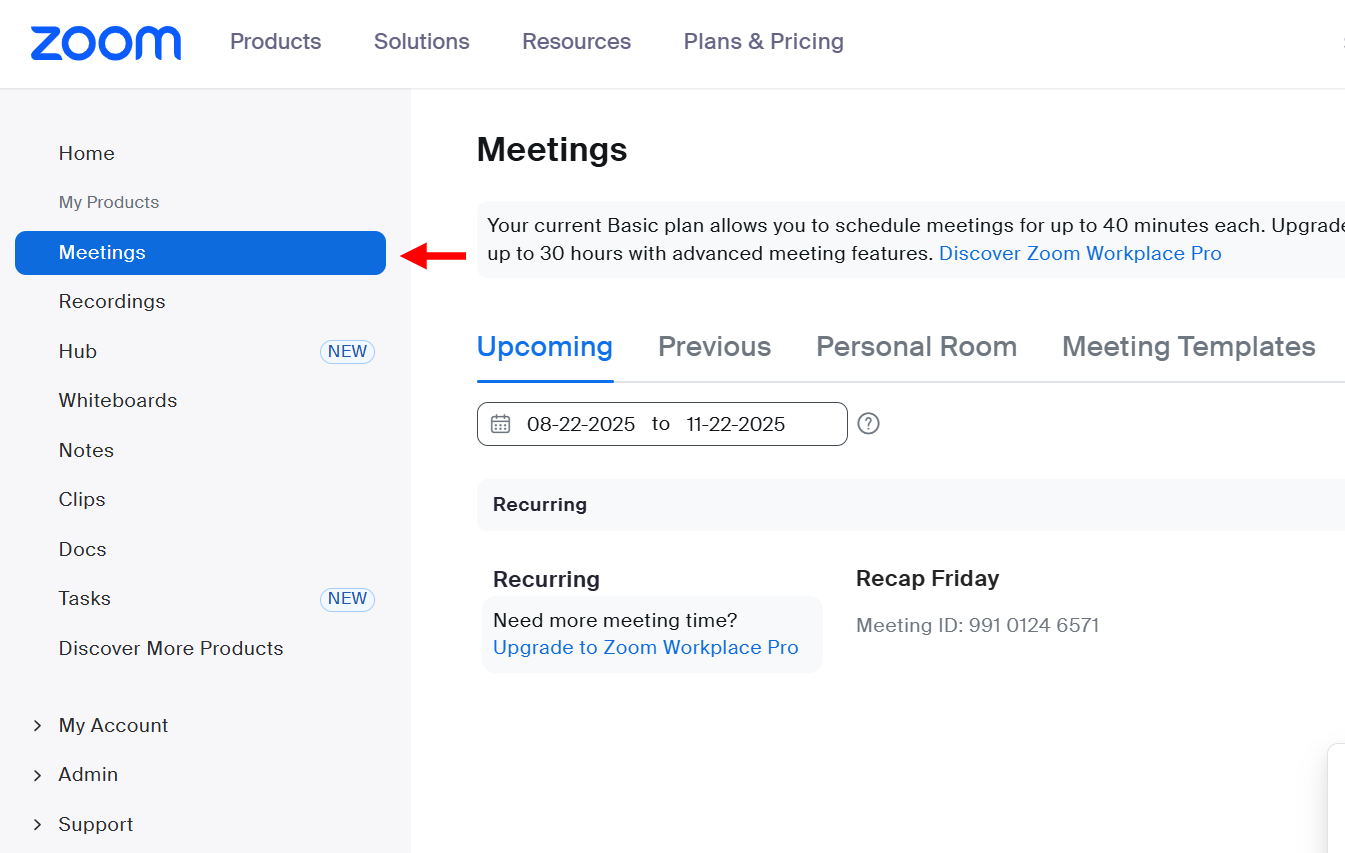
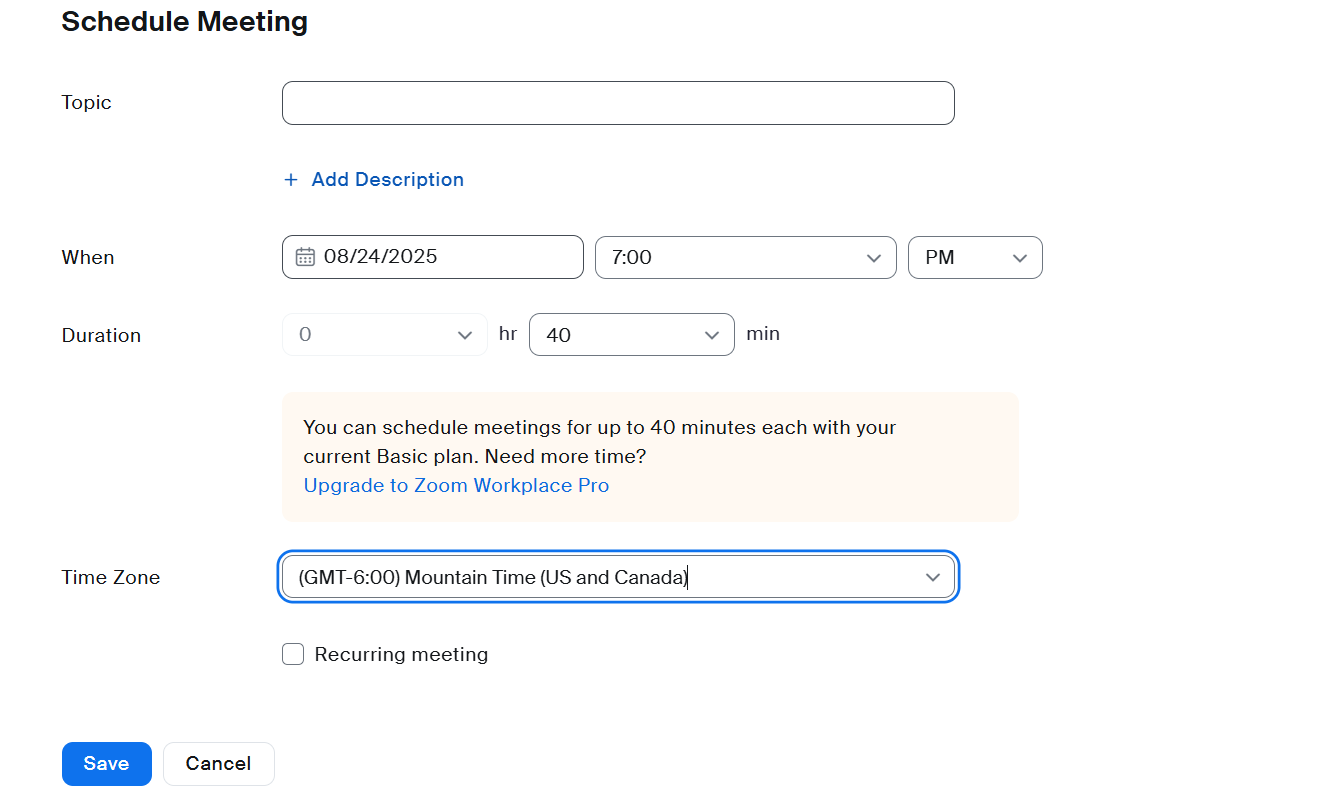
In the meetings section, you can track and manage upcoming meetings. But we want to create a new meeting, so click "Schedule a meeting".
Next, set up the meeting. Zoom will require you to specify a time zone for the meeting, set the meeting's date, and duration. After that, you can set the meeting as recurring or not, and then add a description before assigning a name.

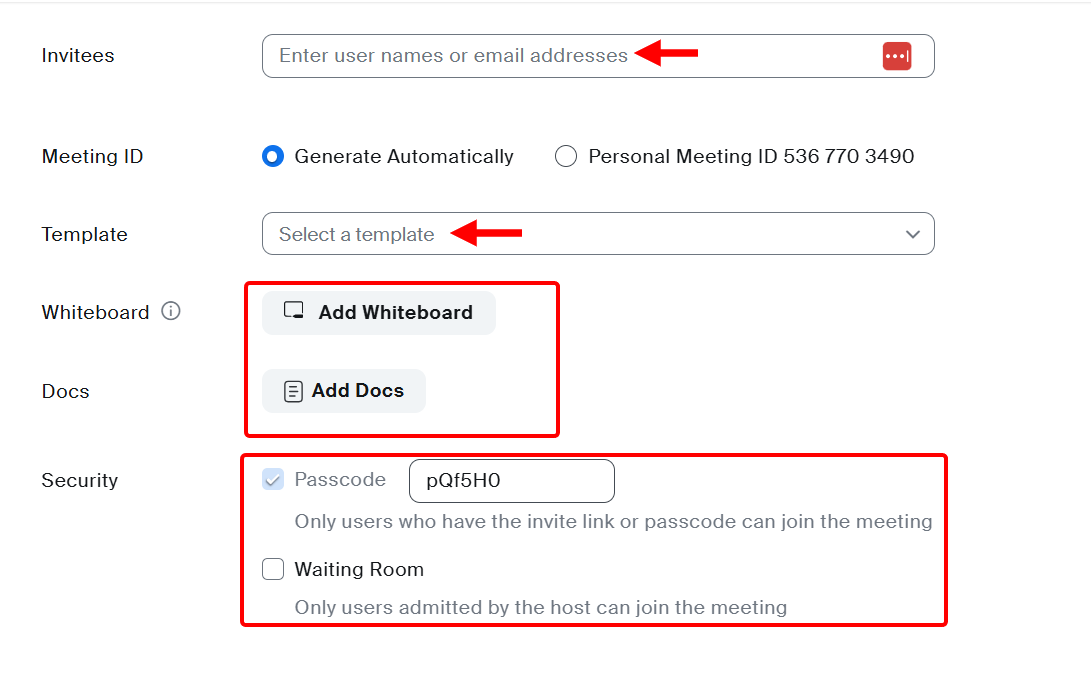
Next, select the meeting's template, make it private or general, and add the participants. Also, you can enable the meeting's whiteboard, add a document to the meeting, and enable its waiting room.
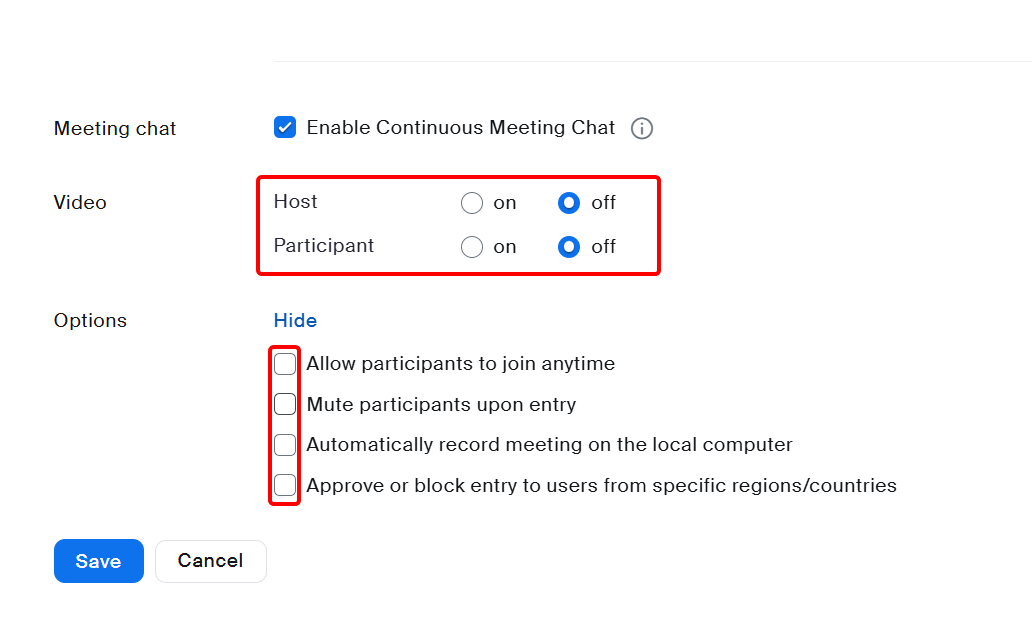
Finally, you can add a live chat feature and allow the host or participants to make video calls during the meeting.
There is also a control option that allows you to set preferences, such as enabling participants to join the meeting at any time, muting them when they enter, and more, before saving the meeting.
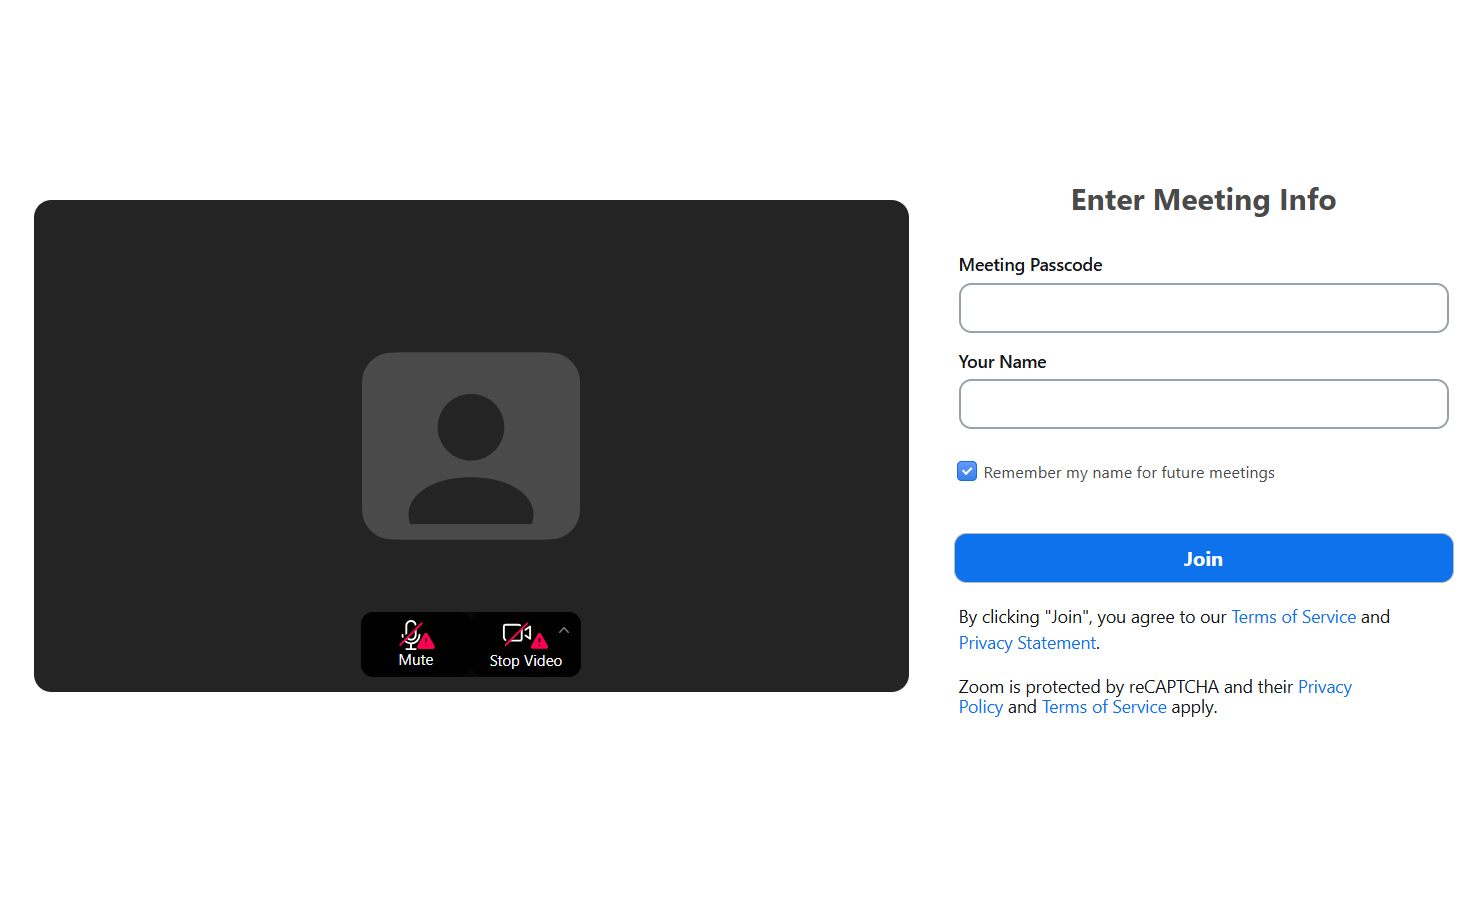
When the meeting is activated, your clients can visit the meeting login page, where they are required to enter their passcode or join instantly, depending on the settings.
Key Features
1. Hub
The Hub feature provides a space to organize, share, and promote all your meetings, webinars, and recordings. You can create a branded hub with upcoming events, past session replays, and resources.
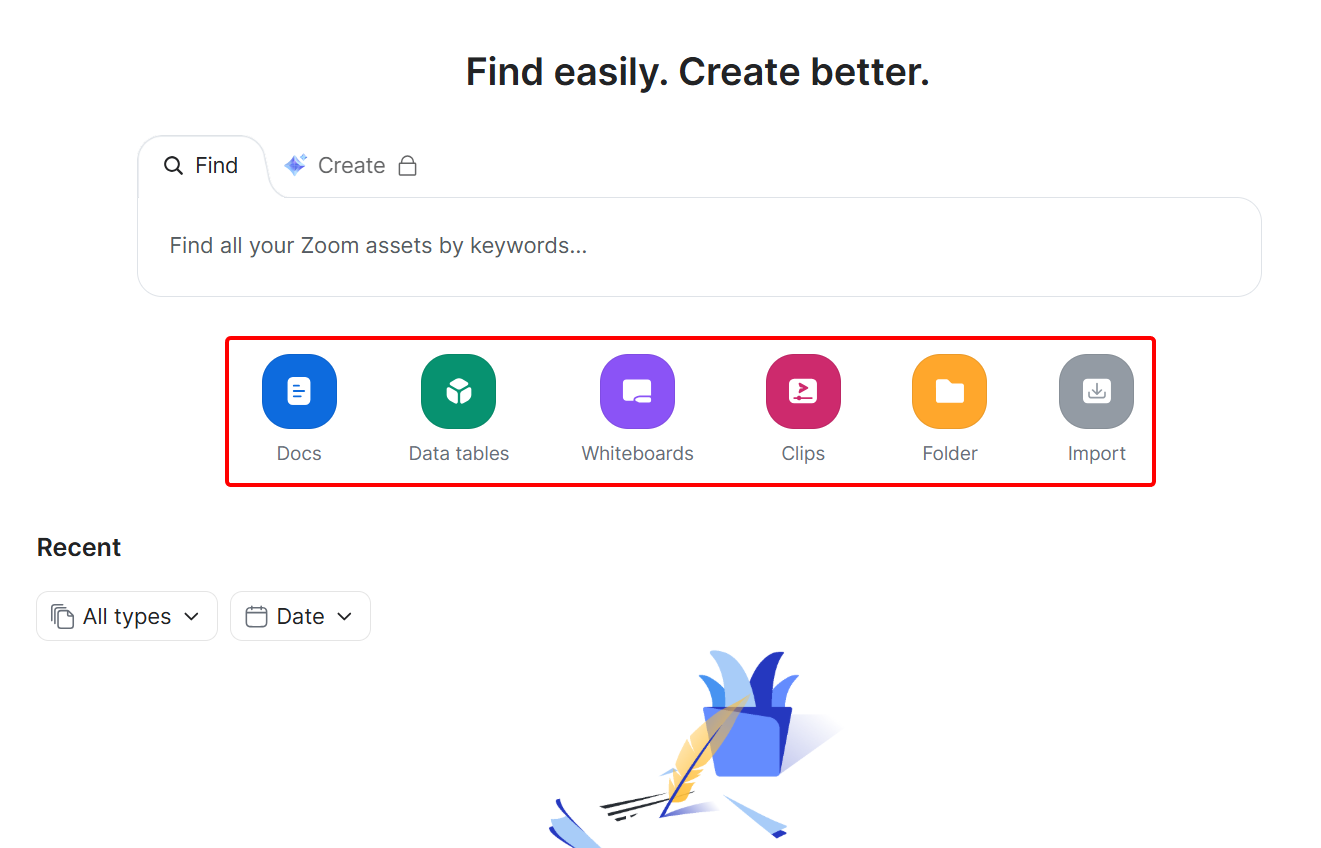
On the hub's dashboard, you can add or create documents, data tables, folders, clips, import local files and Notion, and query assets.
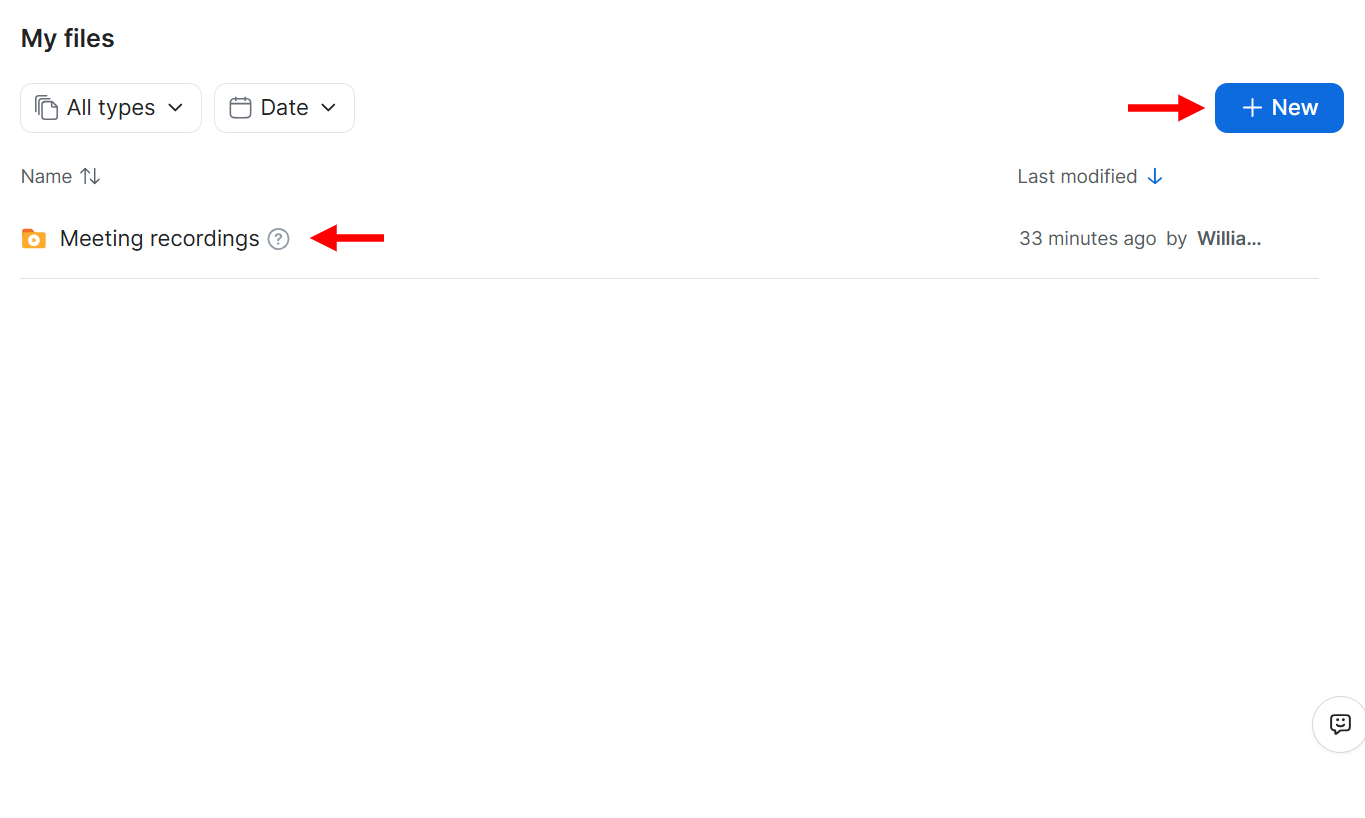
There is also a files section, which holds all existing files available in the hub, allowing you to manage, set access, edit, and delete them.
Also, you can create or add files here.
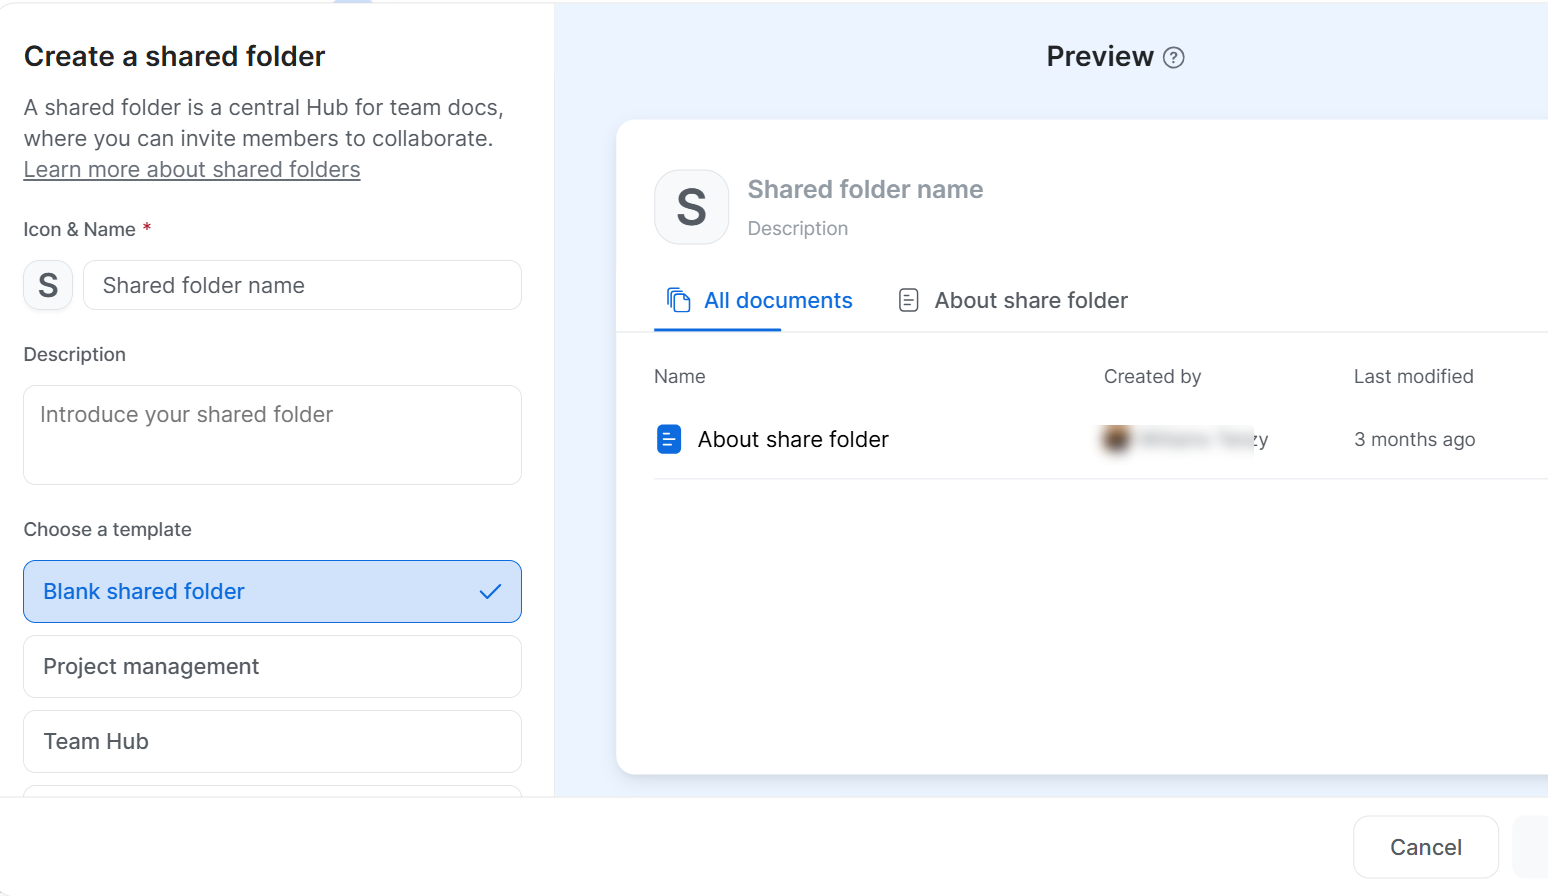
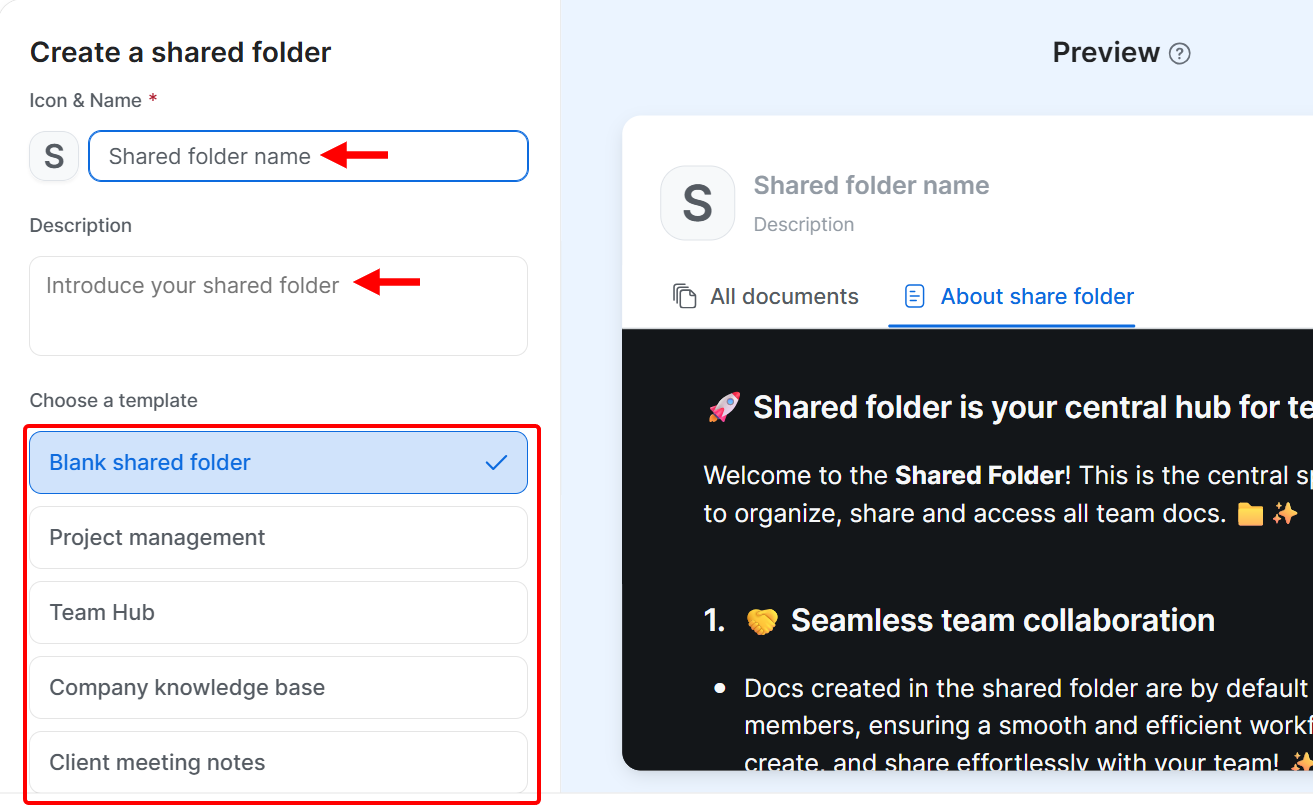
This feature also includes a section to share files, create a shared folder, and set access.
2. Whiteboard
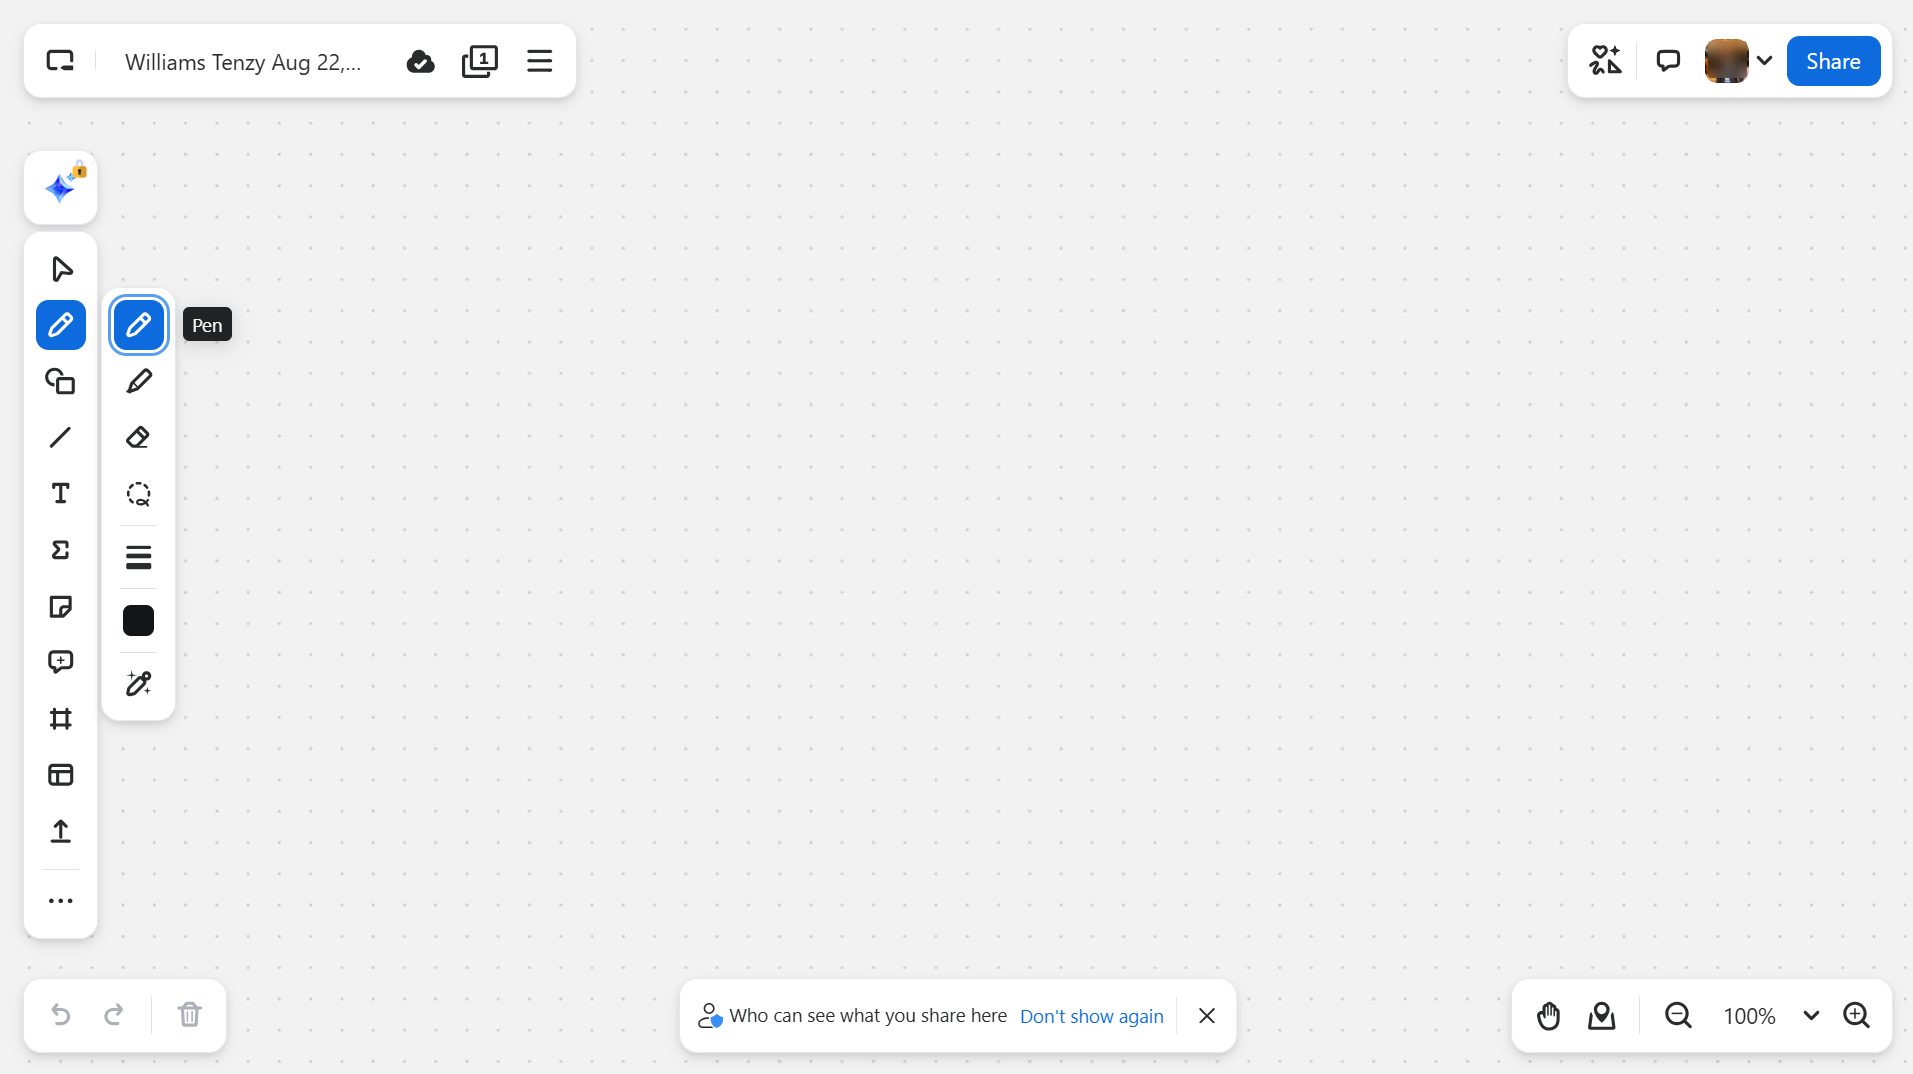
The whiteboard feature provides a real-time digital canvas where you and the clients can brainstorm, plan, and collaborate visually.
Similar to the Miro whiteboard we explored previously, you can use it to add text, sticky notes, shapes, and drawings during or outside of a meeting, making it easier to map out ideas.
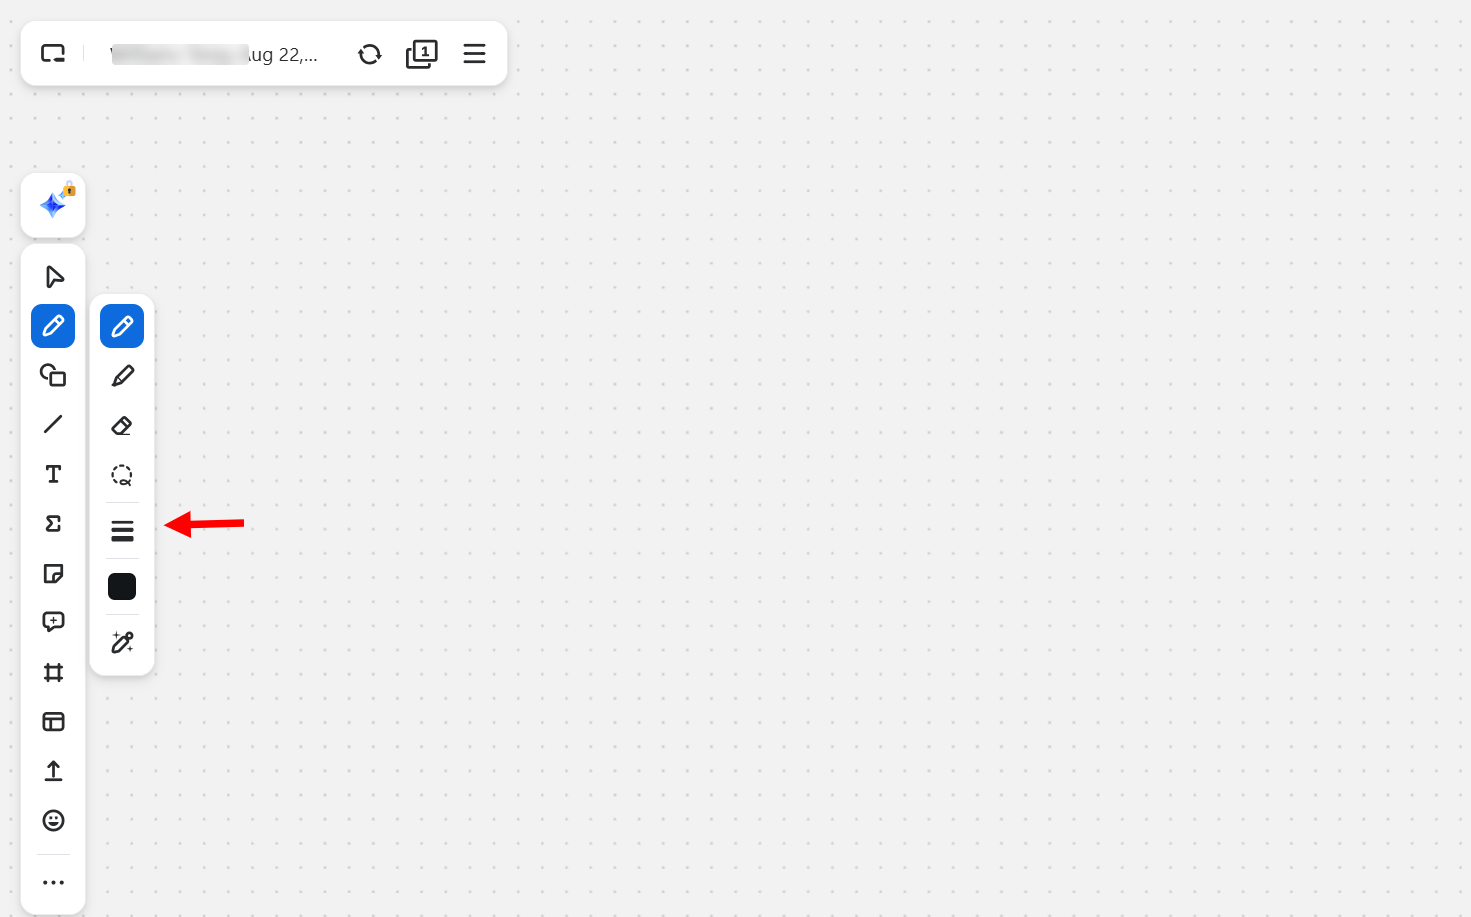
The whiteboard's toolbar contains elements such as shapes, text, sticky notes, and stickers, which you can use on the dashboard to communicate or brainstorm in real-time.
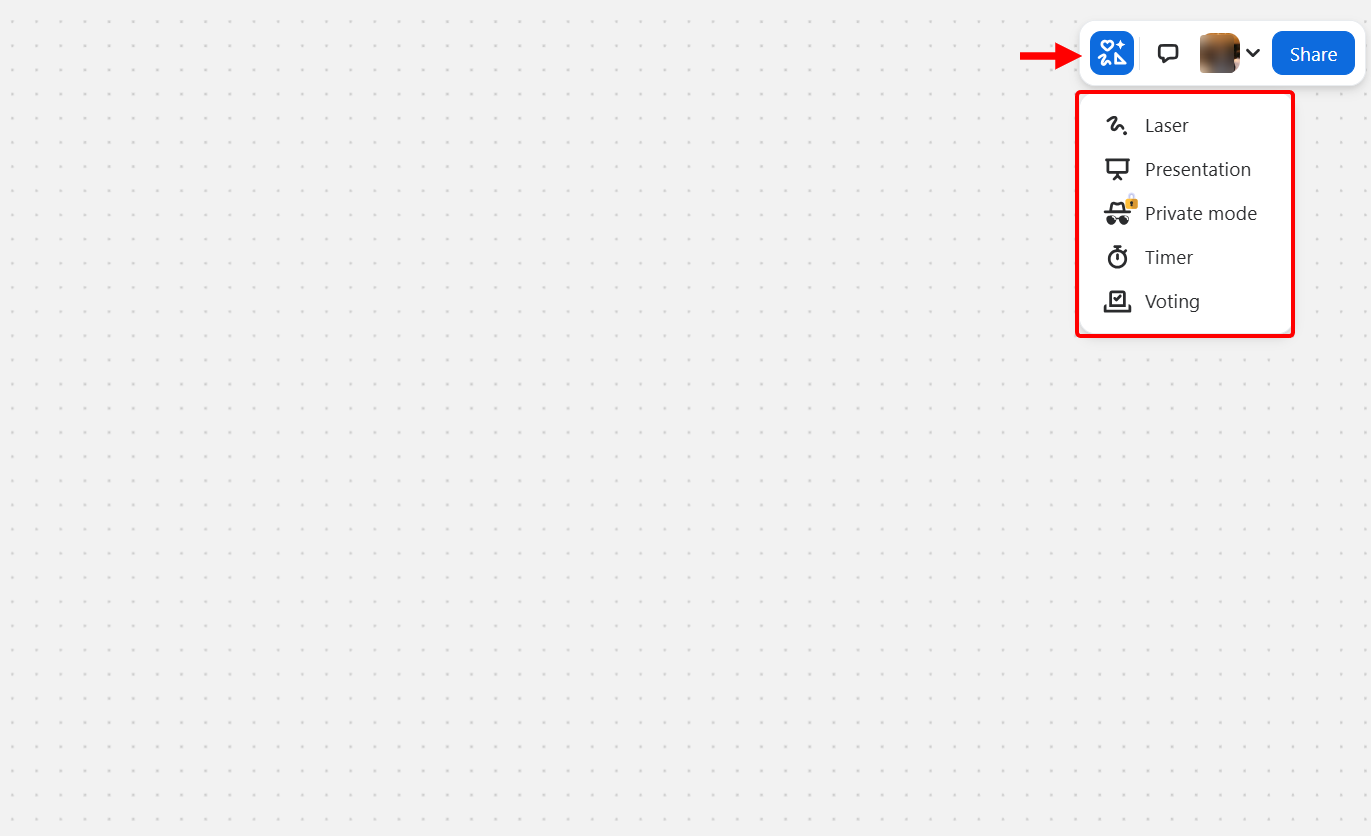
Zoom's whiteboard also features additional tools, including a timer and voting, which you can utilize to enhance interactions and the overall experience with clients. Also, it has a private and presentation mode that you can switch between.
In addition, you can share the whiteboard with clients for real-time collaboration or presentations. You only need to add the client's email and set their access level.

Best For
Fitness coaches who seek to conduct live virtual training sessions by scheduling and hosting video meetings with clients.
Pricing
- Free plan - Free/ monthly package [per user]
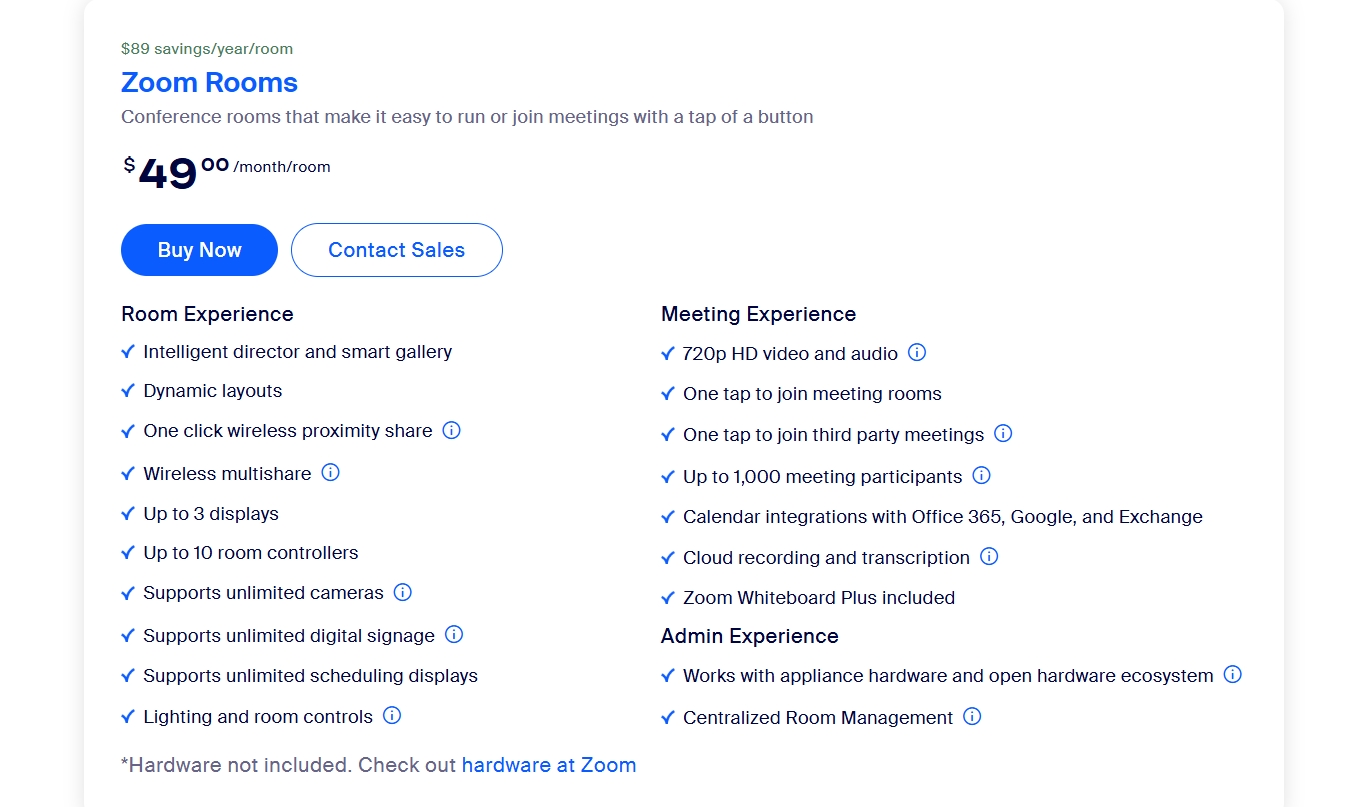
- Zoom Rooms - $49/ monthly package [per user]
Start your 14-day free trial and automate your scheduling today.
How to Choose the Right Online Coaching Platforms
Choosing a coaching platform should not just be about its features; it should also consider its benefits. You need to identify which one matches your coaching style.
Every platform may have its strengths, but the right choice should align well with your style, whether you run one-on-one sessions, group coaching, or a mix of both.
Now, let me guide you on how to choose the right platform for your coaching.
1. Match the Coaching Platform to Your Coaching Style.
As a coach, your style plays a big role in selecting the right platform.
If you run sessions that are focused on a personal client, such as one-on-one sessions, platforms like Zoom allow you to set up private video or audio sessions where you can share screens and record.
Suppose you are a coach who engages and collaborates with a group of clients during sessions. In that case, collaborative platforms like Miro enable you to use their whiteboard to interact with clients in real-time.
And if your focus is building a community-style space, a platform like Slack matches well, because it keeps clients connected through channels, huddles, and discussions.
These platforms may handle specific styles, but Zencal brings the majority of these features together in one place.
In Zencal, you can set up structured meeting topics for private coaching with a client, schedule group sessions with clear time slots, and combine both styles professionally without any difficulties.
Beyond that, Zencal allows you to connect your calendar, track client details, and provide summaries after meetings.
This means you can focus on your coaching style without having to switch tools. Your tool should be able to adapt to your approach and maintain a well-organized system.
2. Check Scheduling and Calendar Integration
Managing your time is just as crucial as running the coaching sessions themselves.
The right platform should make your scheduling smooth and also sync well with your calendar, so you won't spend your time juggling other apps.
Let's take a look at some platforms. Practice.do, for instance, has a built-in scheduler that lets you set up availability and appointments. It has a form feature for collecting details from your clients before or after coaching sessions.
On the other hand, Zoom can also generate meeting links instantly, but you'll often need another tool to manage recurring sessions or group availability.
You can build a custom calendar and track your coaching work in Notion, which requires extra setup. These platforms may help your coaching in their own way, but they usually handle only part of the process.
However, with Zencal, you can handle everything in one flow. You can connect directly with your calendar and structure your meetings and availability to prevent double-booking.
Your clients can book based on the times you set, and you can automate notifications to avoid no-shows.
You can organize events by topic, automate sending invites to clients, and even keep their history tied to your schedule.
A good platform for your coaching should be able to manage your coaching calendar effectively.
3. Assess Pricing and Scalability
Pricing is also a significant factor when selecting the right coaching platform. Managing your platform can become expensive as your client base grows. Some platforms may work well when you first start using them, but may limit you later on.
Take Slack, for instance, it is a good start for small communities, but it adds costs when you need advanced features or more message history.
Miro comes with free collaboration for smaller teams or clients, but you will incur additional costs for higher upgrades and workshops as your team or client base grows.
Zoom also offers a free plan, but it limits the duration of your group meetings, which will require you to upgrade.
These are basic features that are fine for your coaching needs, but they often scale by locking features behind higher plans.
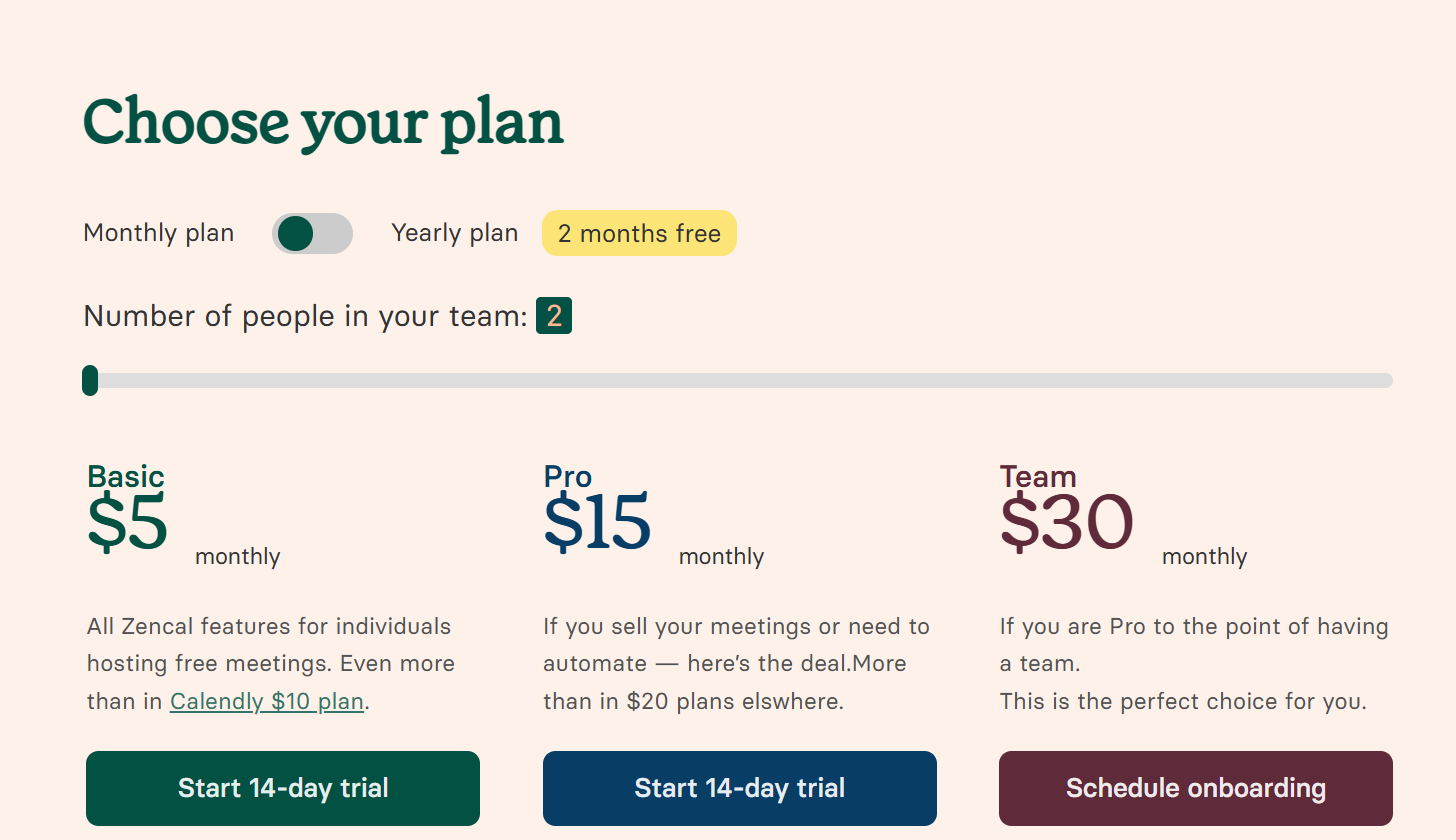
Zencal takes a more balanced approach. It offers a free plan, which comes with perks like unlimited meetings, unlimited meeting topics, calendar integrations, a hosted profile page, and notifications.
If you want to upgrade, you can move to the Pro plan, which costs $15 per month. This perk adds paid meetings, team scheduling, automations, and client management.
Zencal offers you space to start simple and expand without constant roadblocks.
You don't just choose a platform based on price alone; you select one that can adapt as your coaching business expands, making it easier to scale smoothly and keep costs predictable.
4. Check Integrations With Other Tools
Coaching is not only about meeting clients because there are more actions involved. You may also need to take notes, share files, collect payments, manage tasks, and much more. Which is why checking integrations is key.
For example, a platform like Notion allows you to connect databases and content calendars, but often needs third-party add-ons for automation.
Zoom integrates with a number of apps, but you must set them up separately for scheduling, payments, or CRM systems.
EasyTools offers products and courses, making it useful for selling digital materials, but it's focused more on the business side than the coaching workflow.
Zencal brings together these options on its platform. You can connect and sync the calendar to prevent conflicts, manage events, and client details in the same space.
It provides summaries after sessions and prepares analytics reports on the same platform.
This lets you avoid switching between platforms and have fewer moving parts to manage.
However, Zencal also gives you the freedom to integrate third-party apps or plugins like MailerLite at your convenience.
If your coaching workflow uses other tools, ensure the platform you select still keeps your central scheduling and coaching workflow easily accessible.
Choose the Best Online Coaching Platform
In conclusion, before selecting the right online coaching platform, consider your coaching style, the platform's scheduling and calendar management capabilities, as well as its pricing and growth potential.
You also need to ensure the available integrations match your workflow.
When you consider all these factors, you will be able to choose a platform that feels more natural and aligns with your coaching style in the long run.
There may be other decent options you can explore.
Still, Zencal stands out as the perfect platform for coaching because it allows you to offer one-on-one, group, and hybrid coaching sessions, syncs your calendar and keeps it organized, scales with your business, and connects smoothly with your workflow.
Zencal works for every type of coaching, whether it's career, business, or even psychology, where you can use it to run therapy sessions.
Ultimately, the best platform should be the one that meets your business needs, which is a decision you will have to make.